FO-DC635U
1 – 10
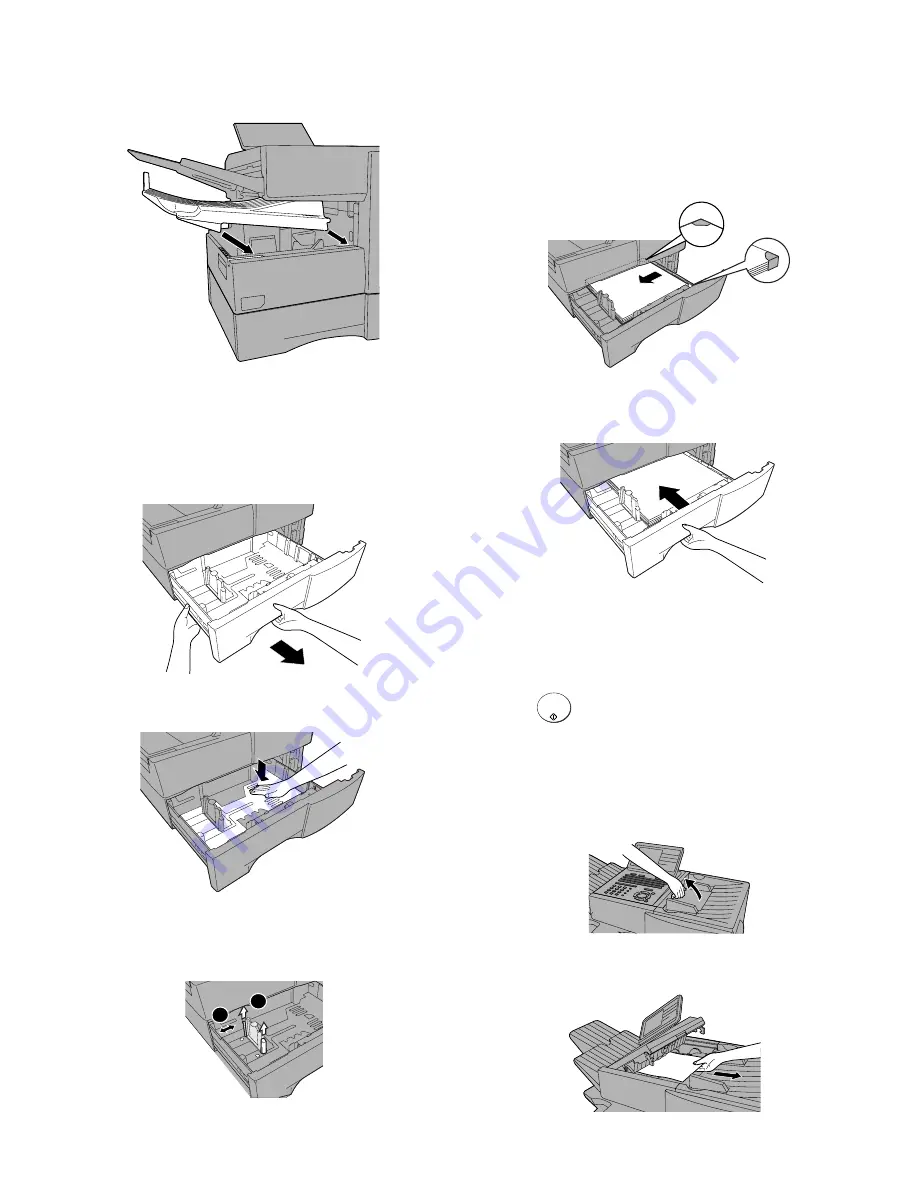
4) Replace the received document tray.
• The received document tray must be attached for the machine
to operate properly.
5. Loading paper in the paper cassette
Note:
To use A4 paper in the paper cassette, you must have a service
technician adjust the cassette.
1) Grasp the hand-hold on the cassette and pull the cassette out until
it stops.
2) Push the pressure plate down until it locks into position.
3) Squeeze the paper guide and pull up to move it to the appropriate
holes for the length of the paper. Push the guide down into the
holes.
4) Place a stack of paper in the cassette, print side up.
• Make sure the stack of paper is not higher than the two tabs on
the paper guide and the two metal tabs. If it is, remove some of
the paper.
• If you find it difficult to load the paper, remove the cassette from
the machine. (Pull the cassette out as far as it will go, grasp the
left side of the cassette with your left hand, and then lift it up and
out with both hands.)
5) Push the cassette back into the machine, making sure it clicks into
place.
6. Clearing paper jams
Clearing a jammed document
If the original document doesn’t feed properly during transmission or
copying, or REMOVE ORIGINAL(S) appears in the display, fist try
pressing
. If the document doesn’t feed out, open the opera-
tion panel and remove it.
Important:
Do not try to remove a document without opening the oper-
ation panel. This may damage the feeder mechanism.
1) Open the operation panel.
• Squeeze the release marked
PANEL RELEASE
and pull up.
2) Remove the document.
1
2
START/
ENTER
Summary of Contents for FO-DC635U
Page 3: ... ii MEMO FO DC635U ...
Page 87: ...FO DC635U 5 21 MEMO ...
Page 110: ...FO DC635U 6 23 3 Printer PWB parts layout Top side ...
Page 111: ...FO DC635U 6 24 4 Printer PWB parts layout Bottom side ...
Page 124: ...FO DC635U 8 2 MEMO ...
Page 165: ...FO DC635U 41 ...


