background image

3-25

User Pr

ogram and

Inde

x

USING CONVENIENT

FUNCTIONS 1

PROGRAMS

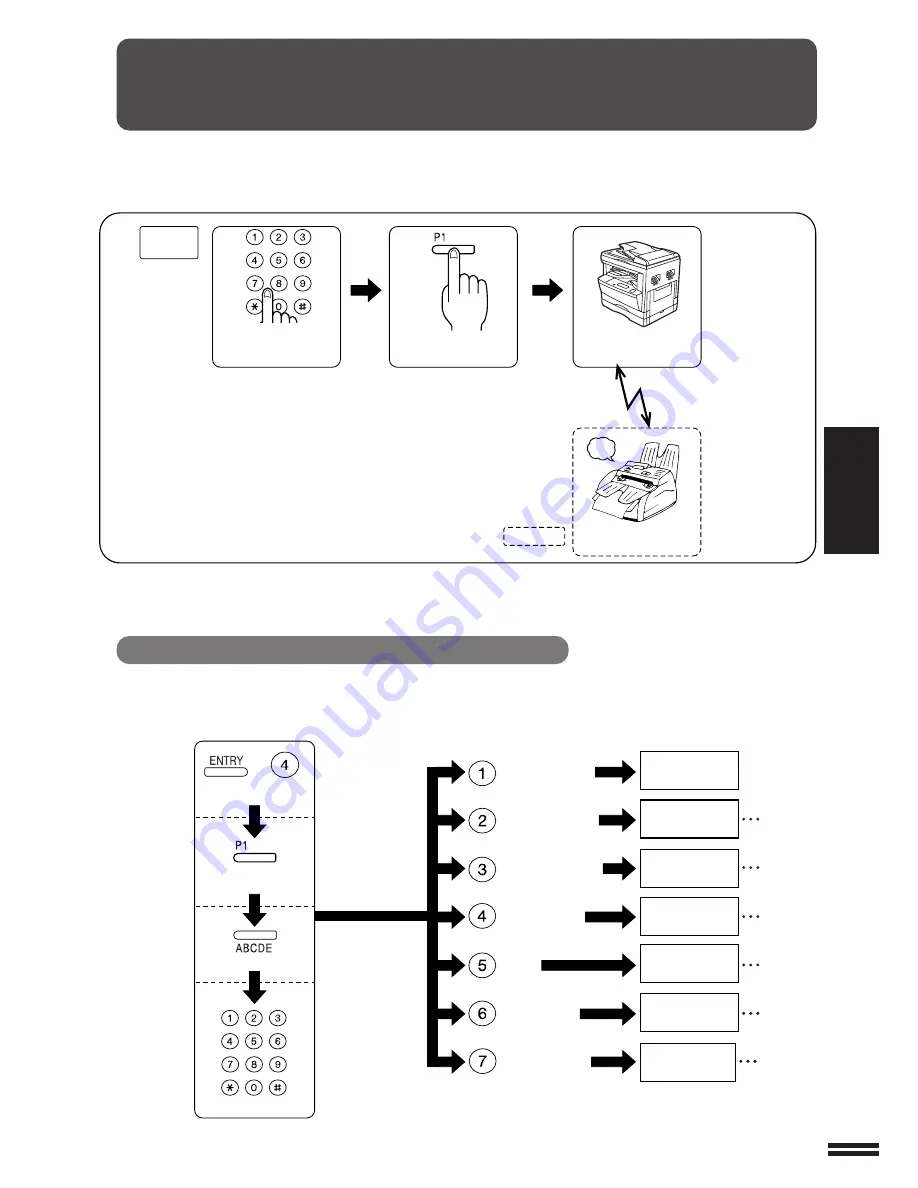
By first entering the operation steps, you can perform a fax operation by pressing only one button. You can also set the day and
time in a manner similar to a timer operation. This function is useful for example, if you frequently send daily reports to the
same person.

You can set the following types of program operations.

 Normal sending (See page 3-29)

 Broadcast sending (See page 3-32)

 Confidential sending (See page 3-33)

 Relay request (See page 3-34)

 Polling (See page 3-35)

 Serial polling (See page 3-36)

 Memory polling (See page 3-37)

Your fax 
machine

beep

Initiate the program

Operation begins

Transmission/reception 

occurs

Recipient

Enter the recipient fax number 

and method (you can also 

perform a timer operation)

[Program entry]

[Program initiation]

You can enter up to 5 program operations (Program keys P1 to P5).

After you set a program operation, it is saved. Therefore, you can perform the same operation any number of times.

When performing a relay request, you must first enter a relay group. (See page 3-12)

Entering Program Operations

The method for entering program operations depends on the operation type.

Normal sending
(See page 3-29)

Broadcast sending
(See page 3-32)

Confidential sending
(See page 3-33)

Relay request
(See page 3-34)

Polling
(See page 3-35)

Serial polling
(See page 3-36)

Memory polling
(See page 3-37)

dial the fax 
number

Each operation 

(Select the 

operation type)

Enter the program name

Press the appropriate 
program key

Common operation

(See the next page)

Set the time-day

Select program entry

enter the confidential 
box number

dial the fax 
number

enter the relay 
group number

dial the fax 
number

dial the fax 
number

set memory
polling

Programs

Summary of Contents for AR-FX2

Page 1: ...NG BASIC OPERATIONS USING CONVENIENT FUNCTIONS 1 USING CONVENIENT FUNCTIONS 2 PRINTING LISTS GENERAL INFORMATION APPENDIX 1 1 2 1 3 1 4 1 5 1 6 1 Appendix 1 FACSIMILE EXPANSION KIT OPERATION MANUAL Page MODEL AR FX2 ...

Page 2: ...ias de las Directivas 98 13 CE y 89 336 CEE 73 23 CEE modificadas ambas por medio de la 93 68 CEE Quest apparecchio è conforme ai requisiti delle direttive 98 13 CE e 89 336 EEC 73 23 EEC entrambe emendate dalla 93 68 EEC Dit apparaat voldoet aan de eisen van de richtlijnen 98 13 EG en 89 336 EEG 73 23 EEG beide gewijzigd door 93 68 EEG Este equipamento obedece às exigências das directivas 98 13 C...

Page 3: ...an de Raad voor de pan Europese aansluiting van enkelvoudige eindapparatuur op het openbare geschakelde telefoonnetwerk PSTN Gezien de verschillen tussen de individuele PSTN s in de verschillende landen biedt deze goedkeuring op zichzelf geen onvoorwaardelijke garantie voor een succesvolle werking op elk PSTN netwerkaansluitpunt Neem bij problemen in eerste instantie contact op met de leverancier ...

Page 4: ......

Page 5: ... in wet locations unless the socket is specifically designed for wet locations Never touch uninsulated telephone wires or terminals unless the telephone line has been disconnected at the network interface Use caution when installing or modifying telephone lines Avoid using a telephone other than a cordless type during an electrical storm There may be a remote risk of electric shock from lightning ...

Page 6: ...ut Poorly ventilated areas When copying printing this machine emits ozone The amount of ozone emitted is not harmful however if performing large copying printing jobs and the smell of ozone becomes objectionable open a window or use a fan to ventilate the area If you place the machine near a window make sure it is not exposed to direct sunlight Areas in direct sunlight Direct sunlight can distort ...

Page 7: ...ration Excessive vibration can harm the machine INSTALLATION Note Sometimes if the machine is plugged into an outlet that is shared with lighting such as a lamp the lights will dim or flicker slightly Plug the machine into an outlet that is not shared with lighting When moving the machine always use two people lifting with the recessed handholds on the sides of the cabinet ...

Page 8: ... times when the power is switched off The battery is used even if you have not made settings When the power is switched on there is little appreciable drain on the battery If the battery level becomes low you can lose settings you have made so keep a record of the settings by printing them out See page 5 1 The life of the lithium battery is about 5 years if the power were always switched off If th...

Page 9: ...e 3 17 Memory Polling You can allow other fax machines to poll your fax machine and send them an original stored in memory See page 3 20 Confidential Faxing You can transmit and receive confidential originals See page 3 7 Broadcasting You can send an original to several fax machines with one operation See page 3 1 Relay Request You can have your fax machine serve as a relay machine so it receives ...

Page 10: ...information you can dial numbers without using numeric keys by simply pressing a rapid key Together with group dial numbers you can enter up to 35 numbers About the START key and ENTER key Depending on the display you are instructed to press the START key or the ENTER key However instead of pressing the ENTER key where instructed to do so you canalsopresstheSTARTkeyandperformtheoperation correctly...

Page 11: ...achine is set as delivered from the factory If you change the settings the procedures and steps described within may differ slightly and you may not be able to perform some operations CHAPTER 3 USING CONVENIENT FUNCTIONS 1 ABOUT SPECIAL TRANSMISSION OPERATIONS Explains how to use convenient functions Read the appropriate sections CHAPTER 4 CONVENIENT FUNCTIONS 2 ABOUT MAKING USE OF CONVENIENT FUNC...

Page 12: ...ed Dialling Information Corrections Erasing 2 25 Entering Group Dialling Information Additions Erasing 2 31 HOW TO ENTER CHARACTERS 2 37 CONTENTS CHAPTER 3 USING CONVENIENT FUNCTIONS 1 ABOUT SPECIALTRANSMISSION OPERATIONS Page BROADCASTING 3 1 How to Use Broadcasting 3 2 TIMER OPERATIONS 3 3 Setting Timer Operations 3 3 CONFIDENTIAL FAXING 3 7 How to Use Confidential Faxing 3 8 RELAY REQUEST 3 11 ...

Page 13: ...eration manual Open to clear a misfeed Paper trays See the copier operation manual Holds paper used for receiving faxes and making copies The paper trays hold 250 sheets each Part Names and Functions Models with platen cover installed Models with only one paper tray Overall Layout The following illustration shows the overall layout of the AR 200 model with optional single pass feeder SPF AR SP2 jo...

Page 14: ...SPEAKER key Before you dial press this key and the machine waits for you to dial a number on hook dialling REDIAL PAUSE key Press this key to automatically redial the last number dialed You can also use this key to enter a pause while dialling a fax number SEARCH DIAL key Press this key to search by name for a number stored for automatic dialling Resolution key and indicators See page 1 14 Press t...

Page 15: ...t keys and indicators used with the copy function refer to the Operation panel section of the copier operation manual REPORT key Press this key to print out a report of a fax transaction and also when receiving a confidential fax ENTRY key Used when entering various information Rapid keys 01 to 10 Press one of these keys to automatically dial a number Light and dark keys and indicators Press these...

Page 16: ...efore power was turned off For example if the machine is in copier mode and the power is turned off it will enter copier mode when the power is turned on again Likewise if the machine is in fax mode and the power is turned off it will enter fax mode when the power is turned on again The machine is set up from the factory to enter a power save mode from the copier or fax modes if it is turned on an...

Page 17: ...chine is idle make sure one of the following conditions exists Copier mode The START key indicator is lit Initial state The POWER SAVE indicator is lit In preheat mode and auto power shut off mode For more information see the POWER SAVE MODES section of the copier operation manual Fax mode The display panel shows the following message initial state Example 12 NOV FRI 08 30 STAND BY 100 The LINE ST...

Page 18: ...o manually receive a fax or if you want to quickly enter fax mode press the CLEAR key to cancel copying and press the COPY FAX key After sending or receiving faxes the machine returns to the fax mode initial state but does not return to the copier mode Fax Mode Initial State In the fax mode initial state the messages similar to the following are shown on the display Depending on user program setti...

Page 19: ...me with a user program See page Appendix 19 You can print out your phone number and ID code See page 5 5 Setting the Date and Time There is an internal clock built into this machine Please enter the current date and time Enter the date and time with a user program See page Appendix 25 The date and time is displayed on the display panel when the fax machine is in the initial state The date and time...

Page 20: ...ccount number using the numeric keys When you enter the digits of your account number the characters on the display change to characters If you make a mistake entering your code press the CLEAR key and enter your account number again When the account number is entered correctly the following message is displayed 12 NOV FRI 09 00 STAND BY 100 2 When you are finished using the fax function press the...

Page 21: ...iginal Size Smallest Original Size Largest Original Size Using the SPF 297mm 1000mm A5 210mm 148mm You can set long originals Using the original table A3 297mm 420mm You can send originals other than the standard sizes A3 B4 A4 A4R A5 About long originals The length of originals is limited by the maximum amount of memory for scanning which in turn depends on the scanning resolution and original si...

Page 22: ...g originals Ensure that any glue ink or correction fluid is thoroughly dry otherwise these substances can dirty the original table If placing originals with punch holes 2 hole or 3 hole feed the edge with the punch holes into the SPF first or align the holes with the original guides Unusable Originals You cannot use the following types of originals Doing so will cause misfeeds or dirty internal me...

Page 23: ...ly close the document feeder cover 2 Adjust the original guides to the width of your originals 3 Stack the pages of the original and place them face up in the document feeder area Make sure to push the original as far into the feeder as it will go Do not set more pages in the feeder than is indicated by the line 30 sheets maximum If rotation function is set with a user program A4 size originals wi...

Page 24: ... table do not set originals in the SPF When using the AR 200 AR 205 3 Confirm the original size If your originals are of a non standard size press the ORIGINAL SIZE ENTER key to select the sending size you want The indicator for the size you chose lights up and the machine scans the original 1 What is standard size A3 B4 A4 A4R and A5 are standard sizes If the original is one of these sizes the si...

Page 25: ...canned If the original size that you have selected is smaller than the size of your original part of the original is cut off If rotation function is set with a user program A4 size originals will be rotated to A4R size and faxed See page Appendix 18 Cancelling To cancel the selected original size Press the CLEAR ALL key to return to the initial state Setting Originals SETTING ORIGINALS ...

Page 26: ... Compared with other settings transmitting with this resolution takes longer HALF TONE Select for photographs and originals with marked colour contrasts for example colour originals Selecting HALF TONE allows these types of originals to be sent with greater clarity Compared with other settings where HALF TONE is not used transmitting with this resolution takes longer Select for photographs and ori...

Page 27: ...nals with dark characters 3 Select for originals with normal characters 4 5 Select for originals with faintly written characters SELECTING FAX RESOLUTION EXPOSURE CONTROL Note You cannot change the exposure while the original is being read into memory If scanning from the original table you can change the exposure when you place the next page of the original Returning the exposure setting to auto ...

Page 28: ...dial To perform search dialing use the following procedure 1 Press the SEARCH DIAL key 2 Enter the first few characters of the recipients name you can skip this step 3 Press the ENTER key 4 Select the recipient s phone number using the left arrow key or right arrow key 5 Press the START key Group Dialling maximum 35 keys Rapid keys and speed dial numbers can be entered into one group dial key This...

Page 29: ...u to dial a number If the extension phone is not installed you cannot converse When using on hook dialling you cannot use memory sending mode You can send faxes however using the automatic direct sending mode See page 2 6 On hook Dialling ABOUT CONVENIENT DIALLING dial tone About Convenient Dialling In this manual depending on the display you are instructed to press the START key or the ENTER key ...

Page 30: ......

Page 31: ...9 30 SEND READY 100 2 Confirm the original size See page 1 11 If the original is of a standard size the appropriate indicator lights up If your originals are of a non standard size press the ORIGINAL SIZE ENTER key to select the closest size 3 Select the resolution and exposure See page 1 14 Initially the resolution is set to STANDARD the exposure indicator is not lit and the fax machine is in the...

Page 32: ...iginal is deposited on the exit area TOTAL PAGE 02 When the transmission is completed a beep sounds and the following message is displayed 12 NOV FRI 09 40 STAND BY 60 The recipient is dialed then the fax is sent Cancelling To cancel a fax Press the CLEAR key and sending is cancelled See page 2 12 7 The send operation is finished If you turn the power off or if there is a power outage while scanni...

Page 33: ... You pick up the extension telephone and converse When receiving a fax press the 5 keys on the extension telephone see pageAppendix 8 After pressing the keys on the extension telephone replace the handset When sending a fax picking up the extension telephone cancels the sending operation Press the CLEAR ALL key to cancel the sending operation then press the SPEAKER key and remove the originals and...

Page 34: ...ur originals are of a non standard size press the ORIGINAL SIZE ENTER key to select the closest size 3 Select the proper resolution and exposure See page 1 14 Initially the resolution is set to STANDARD the exposure indicator is not lit and the fax machine is in the AUTO exposure mode 4 Check the MEMORY indicator If the MEMORY indicator is lit the fax machine is in memory mode See page 2 6 5 Dial ...

Page 35: ...the order in which they were scanned Example TOTAL PAGE 02 Remove originals from the original table by opening the document feeder cover If you leave the last original on original table for about one minute without pressing the key the fax machine makes a beeping sound and sends the fax When the transmission is completed a beep sounds You can remove the original and the following message is displa...

Page 36: ...s in the SPF while scanning a page into memory refer to the MISFEED REMOVAL section of the copier operation manual follow the displayed messages and retry the scan operation The number of originals that can accumulate in memory depends on the sending conditions and on how much memory is installed in your machine See page 2 17 A fax will not transmit from memory if you are sending in manual mode or...

Page 37: ...ge 1 11 You can set up to 30 sheets If necessary select the original size resolution and exposure See pages 1 11 1 14 1 15 12 NOV FRI 10 30 SEND READY 100 2 Perform one of the following operations Using Rapid Group Dialling Press a rapid key 01 to 35 Example SHARP 987 654 3210 Using Speed Dialling Press the SPEED DIAL key and using the numeric keys input a 3 digit number 000 to 149 Press the START...

Page 38: ...A Press the ENTER key PRESS START TO READ Press the START key 3 The transmission operation finishes When the reservation is completed a beep sounds and the following message is displayed 12 NOV FRI 10 35 STAND BY 100 The recipient is dialed then the fax is sent Cancelling To cancel a fax Press the CLEAR key and sending is cancelled See page 2 12 In memory mode the original is scanned the number is...

Page 39: ...ample SHARP 987 654 3210 Using Speed Dialling Press the SPEED DIAL key and using the numeric keys input a 3 digit number 000 to 149 Press the START key Example SHARP 987 654 3210 Using the Search Dialling Press the SEARCH DIAL key SEARCH DIAL ENTER 3 DIGITS Open the rapid key overlay enter the first three characters of the name you are searching for and press the ENTER key See page 2 37 You can al...

Page 40: ...ax machine automatically dials the number and sending begins Originals are sent in the order in which they were scanned Example TOTAL PAGE 02 When the reservation is completed a beep sounds You can remove the original and the following message is displayed 12 NOV FRI 10 45 STAND BY 100 The recipient is dialed and the fax is sent Cancelling To cancel a fax Press the CLEAR key and sending is cancell...

Page 41: ...repeat as necessary After the last original has been scanned press the key See page 2 5 After scanning is finished you return to the initial state display See page 1 6 4 As soon as the previously set faxes are sent or received the fax transmission that you have set begins Cancelling To cancel a fax in memory Press the CLEAR key and sending is cancelled See next page You can print a list of jobs wa...

Page 42: ... To elect not to cancel a fax Press the 2 key 3 Press the START key COMM CLEARED Fax sending or receiving is cancelled and the fax machine returns the initial state Use the following procedure to cancel a fax transmission or reception You can also erase scanned originals from memory This applies to fax transmission operations the original has been scanned into memory and is being sent fax receptio...

Page 43: ... key FUNCTION MODE 4 MEMORY STATUS If there is no job waiting the message NOT STORED is displayed and the fax machine returns the initial state 3 Press the right arrow key to select the job to cancel Example FILE 002 10 50 SHARP RECALL03 4 Press the CLEAR key Example PRESS START TO CLEAR SHARP RECALL03 Cancelling To elect not to cancel a fax Press the CLEAR key again and proceed with step 3 5 Pres...

Page 44: ...hen this happens match the paper size in the tray with the size set in the fax machine You cannot print received faxes using paper set in the bypass tray When receiving a fax with ULTRA FINE resolution you need one of the optional memory upgrades See page 6 1 About the Receiving Method RECEIVING FAXES Procedure Fax only mode See page 2 16 Automatic receiving Faxes are automatically received This m...

Page 45: ...ower How to set 1 From the fax mode initial state press the FUNCTION key FUNCTION MODE PRESS 1 4 2 Press the 1 key FUNCTION MODE 1 RECEIVE MODE Instead of pressing the 1 key you can also press the left arrow key or right arrow key until the following message appears and then press the ENTER key 3 Press the START key RECEIVE MODE PRESS 1 2 The above message displays the currently set receiving mode...

Page 46: ...0 to 9 with a user program See page Appendix 12 2 Receiving finishes When the fax has been received a beep sounds The output is deposited on the job separator tray The illustration above shows a model with the job separator tray installed After about 100 sheets of received faxes accumulate on the job separator tray the output tray full indicator lights up and the printing of received data stops Re...

Page 47: ...The number of originals that can be stored with the substitute reception function depends on the amount of memory installed If the amount of remaining memory is less than that listed in the table substitute reception becomes impossible You can use dual access even while substitute reception is being performed See page 2 11 Using the Fax Data Transfer Mode you can choose to have received faxes read...

Page 48: ...ART key When there are originals in the SPF or on the original table the machine senses the presence of the originals and displays the following message MANUAL MODE 1 SEND 2 RECEIVE 3 Press 1 to send Press 2 to receive In Copy Mode 1 Press the CLEAR key to finish the copier operation 2 Press the COPY FAX key to enter fax mode 3 Pick up the handset or use the SPEAKER key and press the START key Whe...

Page 49: ...ormation Corrections Erasing By entering rapid dialling information you can dial numbers without using numeric keys by simply pressing a rapid key Together with group dial numbers you can enter up to 35 numbers About the START key and ENTER key Depending on the display you are instructed to press the START key or the ENTER key However instead of pressing the ENTER key where instructed to do so you...

Page 50: ...y digits of the number press the REDIAL PAUSE key A pause that you enter is displayed as a hyphen character The pause time is set with a user program See page Appendix 6 If you make a mistake entering the number pressing the CLEAR key repeatedly erases characters one at a time and you can re enter the characters 6 Press the START key The entered number is now set proceed with entering the name ENT...

Page 51: ...d normally After selecting the speed the following message is displayed INT NATIO TX 1 NO 10Select the international transmission mode using keys 1 through 4 1 NO 2 MODE 1 3 MODE 2 4 MODE 3 Instead of choosing a number you can use the left arrow key or right arrow key and press the ENTER key to select the international transmission mode Sometimes when faxing internationally line noise can cause th...

Page 52: ...displayed as a hyphen character The pause time is set with a user program See page Appendix 6 If you make a mistake entering the number pressing the CLEAR key repeatedly erases characters one at a time and you can re enter the characters 5 Press the START key After changing the fax number stored in the rapid key number you can change the recipient s name The display panel shows the recipient s nam...

Page 53: ...on 1 From the fax mode press the ENTRY key 2 Press the 1 key RAPID KEY 1 SET 2 CLEAR Instead of pressing the 1 key you can also press the left arrow key or right arrow key and press the ENTER key to display this message 3 Press the 2 key Select to clear rapid key information RAPID KEY CLEAR ENTER RAPID KEY 4 Press the rapid key number 01 to 35 that you want to erase Example Erasing the 01 key RAPI...

Page 54: ...nformation repeat steps 3 through 5 6 After you have erased all the rapid dialling information you want to press the CLEAR ALL key Whenyoucannoteraserapiddiallinginformation Confirm that the number is not used in the following ways Currently being used for dual access Included in group dialling Included in a relay group Included in a program Entering Auto Dialling Information ...

Page 55: ...left arrow key or right arrow key and press the ENTER key to display this message 3 Press the 1 key Select to set speed dial key information SPEED SPEED 000 149 4 Press a 3 digit number using the numeric keys 000 to 149 for which you want to enter information Example PRESS START KEY SPEED 000 149 123 5 Press the START key Example S123 ENTER FAX Ifaspeeddialnumber 3 digitnumber alreadyhasinformatio...

Page 56: ...TO ENTER CHARACTERS See page 2 37 CHAIN DIAL 1 SET 2 CANCEL You can choose not to enter a name by simply pressing the ENTER key without entering any characters 9 Press the number 1 or 2 key to set chain dialling If you press the 1 key and select 1 SET chain dial entry begins and you return to step 3 For more information about chain dialling see page 3 42 DEFALT TX SPEED 1 33600bps For normal name ...

Page 57: ...onal transmission mode About selecting the international transmission mode This operation is the same as that described in the section Entering Rapid Dialling Information For more information see page 2 21 After you have finished entering the speed dialling information you return to step 3 To enter more speed dial information continue with steps 4 through 11 12After you have entered all your speed...

Page 58: ...ter is displayed as a hyphen character The pause time is set with a user program See page Appendix 6 If you make a mistake entering the number pressing the CLEAR key repeatedly erases characters one at a time and you can re enter the characters 5 Press the START key After changing the fax number stored in the rapid key number you can change the recipient s name The display panel shows the recipien...

Page 59: ...t you do not want to change Erasing Speed Dialling Information 1 From the fax mode press the ENTRY key 2 Press the 2 key SPEED 1 SET 2 CLEAR Instead of pressing the 2 key you can also press the left arrow key or right arrow key until this message appears and then press the ENTER key 3 Press the 2 key Select to clear speed dial information SPEED CLEAR SPEED 000 149 4 Using the numeric keys press th...

Page 60: ...lling number you return to step 3 If you want to erase more speed dial numbers repeat steps 3 through 6 7 After you have erased all the speed dialling numbers you want to press the CLEAR ALL key When you cannot erase speed dialling numbers Confirm that the number is not used in the following ways Currently being used for dual access Included in group dialling Included in a relay group Included in ...

Page 61: ...he 3 key GROUP KEY 1 SET 2 CLEAR Instead of pressing the 3 key you can also press the left arrow key or right arrow key until this message appears and then press the ENTER key 3 Press the 1 key Select to set group key information GROUP KEY PRESS GROUP KEY 4 Press a rapid key 01 to 35 for which you want to enter the group information Example G06 ENTER FAX If you have already entered rapid dialling ...

Page 62: ...ial key you cannot enter rapid keys or speed dial numbers that have no information stored in them When you are entering group dialling information you cannot enter information for another group dial key at the same time 6 When you are finished entering the group information press the START key ENTER GROUP NAME 7 Use the alphabetic entry keys to enter the group name and press the ENTER key You can ...

Page 63: ...one or more rapid keys Press the START key Using speed dialling Press the SPEED DIAL key Enter a speed dial number 000 to 149 Press the START key Using the numeric keys Enter the recipient s fax number Press the START key For rapid keys and speed dialling if the recipient s name is not set the fax number appears on the display When entering numbers for a group dial key you cannot enter the same ra...

Page 64: ... enter a maximum of 20 characters For information about entering alphabetic characters refer to the section HOW TO ENTER CHARACTERS See page 2 37 You have finished adding to the group dialling information You can choose not to change a group name by simply pressingtheENTERkeywithoutenteringanycharacters 7 After you have added all the group dialling information you want to press the CLEAR ALL key E...

Page 65: ...up dialling information GROUP CLEAR PRESS GROUP KEY 4 Press the rapid key 01 to 35 that contains the group dialling information that you want to erase Example G08 CLEAR SELECT 1 FAX 2 GROUP When you cannot erase group dialling keys Confirm that the number is not used in the following ways Included in a program 5 Press the number 1 or 2 key When selecting 1 The recipient s fax number is erased from...

Page 66: ... FAX CLEAR 1 CONTINUE 2 END 8 Press the number 1 or 2 key When selecting 1 If you want to erase more group information continue with steps 6 through 8 When selecting 2 Erasing is finished and you return to step 2 9 After you have erased all the group dialling information you want to press the CLEAR ALL key Entering Auto Dialling Information ENTERING AUTO DIALLING INFORMATION ...

Page 67: ...e following functions Note When entering the recipient s name 1 Confirm that you are ready to enter characters and open the second rapid key overlay Example Entering a recipient s name ENTER NAME _ 2 Press the key that contains the character you want to enter The first character contained in that key is displayed To enter lower case characters press the SHIFT key and then the character entry key P...

Page 68: ... will be entering more characters from another key you can press that key instead of pressing the right arrow key PRESS START KEY LAST S_ 5 Entering more characters If you pressed the SHIFT key to enter lower case characters you can press the SHIFT key again to switch back to upper case characters To enter spaces press the SPACE key PRESS START KEY LAST SHARP 6 If you are finished entering charact...

Page 69: ... The character above the cursor is erased and the cursor shifts left one character PRESS START KEY LAST SHAARP_ Press the left arrow key or right arrow key to position the cursor PRESS START KEY LAST SH_ AARP Press the CLEAR key PRESS START KEY LAST SH_ ARP If you want to change only one character that you have already entered press the left arrow key or right arrow key to position the cursor belo...

Page 70: ......

Page 71: ...ial key Group dialling is of way of storing rapid dialling information speed dialling information and numbers from the numeric keys in one rapid key For more information about how to enter group dialling information see page 2 31 You can use broadcasting only in memory send mode If the fax machine is set to direct send mode it automatically changes to memory send mode See page 2 6 When you use gro...

Page 72: ...ancelling When you make a mistake entering a fax number Press the CLEAR key and enter the number again You cannot use program dialling or search dialling 3 Press the START key PRESS START LAST DIAL 4 Repeat steps 2 and 3 to enter up to 200 recipient fax numbers If you enter 50 fax numbers in one group dial key and 50 fax numbers in another group dial key together they count as 100 locations 5 When...

Page 73: ...pient See page 3 25 To perform a timer operation you must first scan the original into memory The fax machine cannot send the original at the reserved time if you simply place the original in the SPF or on the original table If you do not specify the day for a timer operation the operation is performed at the time you specify regardless of the day that time falls upon When you perform a relay requ...

Page 74: ...of pressing the 1 key you can also press the left arrow key or right arrow key until this message appears and press the ENTER key 3 Press the 1 key ENTER TIME 00 23 4 Enter the hour in 24 hour time using the numeric keys 00 to 23 Enter hours from 0 to 9 o clock as two digits for example 00 09 Example ENTER TIME 00 59 08 5 Enter the minutes using the numeric keys 00 to 59 Enter minutes from 0 to 9 ...

Page 75: ...ing the numeric keys 1 Normal sending 2 Broadcast sending 3 Confidential sending 4 Relay request 5 Polling 6 Serial polling Instead of pressing the keys from 1 to 6 you can use the left arrow key or right arrow key to select the operation type and press the ENTER key The procedures for the following operations are different Please refer to the pages listed Normal sending See page 2 1 Broadcast sen...

Page 76: ...ration number See page 5 3 1 Perform steps 1 and 2 in the When setting timer operations section See page 3 4 2 Press the 2 key TIMER COMM CLEAR 01 50 3 Enter the timer operation number 01 to 50 of the operation you want to cancel using the numeric keys Example START TO CLEAR 01 50 12 4 Press the START key You can also cancel a timer operation using the FUNCTION key See page 2 13 Timer Operations T...

Page 77: ...e a SHARP fax machine that has the confidential fax function On this model you can use up to 10 confidential boxes For more information see the manual for the recipient s fax machine When using this function the sender and recipient must have their own telephone number entered into the fax machine About confidential boxes and Passcodes Confidential boxes and passcodes are used for receiving confid...

Page 78: ...ow key until this message appears and press the ENTER key CONF TX MODE ENTER BOX After three seconds the following messege is displayed ENTER BOX BOX 00 99 3 Enter the recipient s 2 digit confidential box number using the numeric keys 4 Press the START key Example PRESS START KEY BOX 00 99 12 5 Set the original select the appropriate original size resolution and exposure then perform the sending o...

Page 79: ...fax mode press the REPORT key PRINT SELECTION 1 LIST 2 CONF DATA 2 Press the 2 key CONF DATA PRINT BOX 00 99 3 Enter the 2 digit confidential box number using the numeric keys Example PRESS START KEY BOX 00 99 55 4 Press the START key When the confidential box whose number you entered contains received data the following message is displayed CONF DATA PRINT PASSCODE When the confidential box whose...

Page 80: ... key however you cannot converse using this method You can receive a fax while another job is printing by pressing the START key to peform substitute reception After printing is finished the received fax is printed Note You cannot use the Fax Data Transfer Mode with confidential fax reception See page 2 17 5 Enter the 4 digit passcode using the numeric keys As you enter the passcode the hyphens in...

Page 81: ...equest Fax prints out Fax prints out Fax prints out Originals are sent in order Beep Enter the relay group Original is sent Stored into memory Memory before transmitting Relay station Beep Your fax machine Recipient A Recipient B Recipient C The following models of Sharp s fax machines have the relay request function FO 4500 FO 5600 You can only use this function if the fax machine that is the rel...

Page 82: ...until this message appears and press the ENTER key 3 Press the 1 key RELAY GROUP GROUP 01 10 Relay Request RELAY REQUEST Note Information You Must Enter for Relay Requests Preparation Enter the relay passcode with a user program See page Appendix 17 The relay station can use automatic dialling to broadcast to other fax machines This is convenient if the relay station already has the recipient s fa...

Page 83: ... number using rapid dial or speed dial information You cannot enter group dial or program dial information Cancelling When you make a mistake entering Press the CLEAR key and enter the number again Example PRESS START TO ENTER 22222 7 Press the START key RX STATION SELECT PRESS 1 4 8 Enter the dialling method 1 to 4 using the numeric keys Instead of pressing a key from 1 to 4 you can also press th...

Page 84: ... the fax number Enter the recipient s fax number up to 30 digits Press the START key When selecting group dialling Enter the number 01 to 99 using the numeric keys Press the START key 10Press the number 1 or 2 key If you select 1 you return to step 7 In the same manner you can enter more recipient s fax numbers as described in steps 8 to 10 If you select 2 you return to step 3 You can enter anothe...

Page 85: ...the relay group number 01 to 10 of the relay group you want to erase Example PRESS START KEY GROUP 01 10 01 4 Press the START key Example RELAY G01 PRESS START TO CLEAR If the relay group number you want to erase does not exist or if the relay group is currently in use you return tostep2 Enterthecorrectrelaygroupnumber orerase the group after the current operation is finished 5 Press the START key...

Page 86: ... the 3 key you can also press the left arrow key or right arrow key until this message appears and press the ENTER key RELAY TX MODE ENTER GROUP After three seconds the following message is displayed ENTER GROUP GROUP 01 10 3 Enter the relay group number using the numeric keys Example PRESS START KEY GROUP 01 10 01 4 Press the START key 5 Set the original select the appropriate original size resol...

Page 87: ...ax machine send you the original that is set in that fax machine You can perform a polling operation at a scheduled time Timer operations See page 3 3 memory Serial polling You can poll several fax machines one at a time with a single serial polling operation Polling fax Other fax A memory Other fax B memory polling Original is set Original is set sending Repeated for the next fax machine Select s...

Page 88: ...ax number of the fax machine you want to poll using the numeric keys You use rapid dialling speed dialling or redial to enter the number Example PRESS START KEY 12345 Cancelling When you make a mistake entering Press the CLEAR key and enter the number again If you use group dialling the polling method automatically changes to serial polling See the next page You cannot use program dialling with po...

Page 89: ...ou use rapid dialling speed dialling group dialling or redial to enter the number you can redial the first number entered in serial polling only Cancelling When you make a mistake entering Press the CLEAR key and enter the number again You cannot use program or search dialling with serial polling 4 Press the START key PRESS START TO ENTER DIAL 123 5 Repeat steps 3 and 4 to enter more fax numbers f...

Page 90: ...chine and receive the same original Reading an original into memory for memory polling Adding to an original that has already been scanned into memory for memory polling Set the original and adjust the original size resolution and exposure if necessary then perform the following procedure Your fax machine polling beep Original is sent from memory The original is read into memory Original is receiv...

Page 91: ... is preserved in memory and can be used for multiple polling operations Example MEMORY POLL 1TIME PRESS START KEY 5 Press the START key Scanning begins When scanning from the original table if there are several pages set the next page and press the START key again as needed When the last page has been scanned press the key READING 6 Confirm that the fax machine has entered automatic reception mode...

Page 92: ...ntil this message appears and press the ENTER key 3 Press the 2 key MEMORY POLL CLEAR PRESS START TO CLEAR Cancelling When cancelling a memory polling operation Press the CLEAR ALL key 4 Press the START key The original for memory polling is erased from memory If the original in memory is being used for a memory polling operation it cannot be erased from memory You can also erase the original from...

Page 93: ... polling Fax is received Polling fax Fax being polled beep These two numbers are compared polling allowed Entered fax number Permitted fax number Enter the fax number for your fax machine When polling Preparation numbers match Preparation 0 TONE 1 2 3 4 5 6 7 8 9 Enter the fax number of fax machines you want to allow to poll your fax machine or key polling sending Polling security using the system...

Page 94: ...ID Numbers This number is used for polling security You can use this number only with other SHARP fax machines certain models only You enter the ID number and it is compared with the system number of fax machines that want to allow to poll your fax machine You can enter up to ten 4 digit ID numbers ID numbers are set with a user program See page Appendix 14 First confirm the system number of the o...

Page 95: ... a timer operation Program entry Program initiation You can enter up to 5 program operations Program keys P1 to P5 After you set a program operation it is saved Therefore you can perform the same operation any number of times When performing a relay request you must first enter a relay group See page 3 12 Entering Program Operations The method for entering program operations depends on the operati...

Page 96: ...row key until this message appears and press the ENTER key 3 Press the 1 key PROGRAM KEY PRESS PROGRAM KEY 4 Open the second rapid key overlay 5 Press a program key P1 to P5 Example PROGRAM 03 ENTER PROGRAM NAME If the program number that has already been entered you return to step 3 Enter a program number that has not already been entered or erase the information for the number you want to use Se...

Page 97: ...y ENTER TIME 00 23 8 Enter the hour in 24 hour format using the numeric keys 00 to 23 Enter hours from 0 to 9 o clock as two digits for example 00 09 Example ENTER TIME 00 59 08 If you do not need to enter the time continue with step 12 Ifyoudonotenterthedayandtimeasdescribedinsteps 8 to 11 you cannot use memory polling 9 Enter the minutes using the numeric keys 00 to 59 Enter minutes from 0 to 9 ...

Page 98: ...y are set correctly and press the START key The procedures for the following operations are different Please refer to the pages listed Normal sending See the next page Broadcast sending See page 3 32 Confidential sending See page 3 33 Relay request See page 3 34 Polling See page 3 35 Serial polling See page 3 36 Memory polling See page 3 37 After setting a program operation you can perform other o...

Page 99: ...r the recipient s fax number You can also use automatic dialling and redial 15Press the START key RESOLUTION 1 SKIP 2 SET 16Press the number 1 or 2 key to select the resolution setting When selecting 1 Resolution setting is skipped and you proceed with step 19 When selecting 2 You can set the resolution PRESS RESOLUTION KEY PRESS START LAST 17Set the resolution using the Resolution key For more in...

Page 100: ...hen selecting 2 You can set the exposure PRESS CONTRAST KEY PRESS START LAST 20Set the exposure using the light and dark keys For more information about setting the exposure see page 1 15 21Press the START key COVER SHEET SET 1 OFF 2 ON 22Press the number 1 or 2 key to select a COVER SHEET See page 4 2 When selecting 1 The COVER SHEET is not sent When selecting 2 You can send a COVER SHEET TX MESS...

Page 101: ...om 1 to 6 to select a transmisson message See page 4 3 1 CONFIDENTIAL 2 PLS DISTRIBUTE 3 URGENT 4 PLS CALL BACK 5 IMPORTANT 6 NO MESSAGE After selecting a message you return to step 5 You can enter other programs 24When you are finished entering programs press the CLEAR ALL key PROGRAMS ...

Page 102: ...y or right arrow key until this message appears and press the ENTER key 14Enter the recipient s fax number You can also use automatic dialling and redial you can redial the first number entered in broadcast sending only 15Press the START key PRESS START LAST DIAL 16Repeat steps 14 and 15 to enter up to 200 recipient fax numbers 17When you are finished entering numbers press the START key RESOLUTIO...

Page 103: ...ars and press the ENTER key 14Enter the recipient s 2 digit confidential box number using the numeric keys 15Press the START key 16Enter the recipient s fax number You can also use rapid dialling speed dialling and redial 17When you are finished entering press the START key RESOLUTION 1 SKIP 2 SET 18Continue with steps from 16 to 24 in the section Normal Sending See page 3 29 Note You cannot use p...

Page 104: ...ELAY TX MODE GROUP 01 10 Instead of pressing the 4 key you can also press the left arrow key or right arrow key until this message appears and press the ENTER key 14Enter the relay group number 01 to 10 using the numeric keys 15Press the START key RESOLUTION 1 SKIP 2 SET 16Continue with steps from 16 to 24 in the section Normal Sending See page 3 29 PROGRAMS ...

Page 105: ...ess the left arrow key or right arrow key until this message appears and press the ENTER key 14Enter the recipient s fax number You can also use rapid dialling speed dialling and redial 15Press the START key When entering is finished you return to step 5 You can enter other programs 16When you are finished entering programs press the CLEAR ALL key PROGRAMS ...

Page 106: ... you can redial the first number entered in serial polling only 15Press the START key PRESS START LAST ENTER STATION 16Repeat steps 14 and 15 for each recipient fax number you want to add up to 200 numbers 17When you are finished entering numbers press the START key When entering is finished you return to step 5 You can enter other programs 18When you are finished entering programs press the CLEAR...

Page 107: ... key 14Press the number 1 or 2 key If you press the 1 key the original in memory is used for polling once and then automatically erased If you press the 2 key the original is preserved in memory and can be used for multiple polling operations 15Press the START key RESOLUTION 1 SKIP 2 SET 16Continue with steps from 16 to 24 in the section Normal Sending See page 3 29 Note Ifyoudonotenterthedayandti...

Page 108: ...ss the 2 key PROGRAM CLEAR PRESS PROGRAM KEY 3 Open the second rapid key overlay 4 Press the program key P1 to P5 that you want to erase Example PROGRAM 03 PRESS START TO CLEAR Cancelling When cancelling the erasing of a program Before pressing the START key in step 5 press the CLEAR ALL key 5 Press the START key The program is erased and you return to step 2 You can erase other programs 6 When yo...

Page 109: ...inal See page 1 11 1 12 If you are using a program that performs polling or serial polling do not set the original 2 Press the program key The operation stored in that program is performed Example PROGRAM 2015298200 Cancelling When cancelling sending If the original is being scanned into memory press the CLEAR key See page 2 12 Note Ifapollingorserialpollingoperationisalreadysetonthe fax machine y...

Page 110: ...Memory sending See page 2 6 Fax reception See page 2 14 You cannot use this function during a copy operation or a direct sending operation The prepared job begins Current job is executing Select dual access After the current job is finished Your fax machine Recipient fax machine memory You can perform the following types of dual access operations Normal sending See page 2 1 Broadcast sending See p...

Page 111: ...u must enter a relay group See page 3 12 Before performing a program sending operation you must enter a program See page 3 25 If the recipient s phone is busy the next dual access job is sent while the first job is waiting to make another redial attempt The sending order for dual access job is as follows Jobs that have been waiting to make another redial attempt have priority when it is time to ma...

Page 112: ...pid dialling speed dialling however when using rapid dialling and speed dialling you must first enter the chain dialling information See pages 2 21 and 2 26 Your fax machine REDIAL PAUSE key to chain Fax is transmitted Example 201 5298200 2015298200 is dialed pause Dial the prefix using the numeric keys rapid dialling or speed dialling Enter the recipient s phone number using the numeric keys rapi...

Page 113: ...ta For more information about entering the fax number of the fax you want to transfer data to see page Appendix 9 When the fax machine enters the data transfer mode it displays the following message FW RX DATA 1 NO 2 YES How to Use the Fax Data Transfer Mode 1 In fax mode press the SENDING OPTIONS key FW RX DATA 1 NO 2 YES 2 Press the 2 key FW RX DATA SENDING Cancelling To cancel the transfer Pres...

Page 114: ......

Page 115: ...ted sheets printed on the cover sheet includes the cover sheet You cannot use this function with relay request See page 3 11 You can set whether a cover sheet is sent by default with each fax transmission using the user program P154 AUTO COVER SHEET beep Fax is received Fax is sent Cover sheet is automatically printed DATE T O FAX FROM FAX PAGES 12 NOV 1999 FRI 10 00 SERVICE CENTRE 0333829161 SHAR...

Page 116: ...transmission Cancelling the Cover Sheet 1 Press the FUNCTION key then press the 2 key COVER SHEET SET 1 OFF 2 ON Instead of pressing the 2 key you can also press the left arrow key or right arrow key until this message appears and press the ENTER key 2 Press the 1 key Even if the cover sheet function is set it is cancelled by the following oerations Pressing the CLEAR ALL key Entering copy mode Us...

Page 117: ...2 3 4 5 Transmission CONFIDENTIAL PLS DISTRIBUTE URGENT PLS CALL BACK IMPORTANT message If you select 6 no message is displayed beep Fax is received Fax is sent Example Cover sheet is automatically printed DATE T O FAX FROM FAX PAGES 12 NOV 1999 FRI 10 20 SERVICE CENTRE 0333829161 SHARP 0666211221 02PAGES WERE SENT INCLUDING THIS PAGE IMPORTANT AUTOMATIC COVER SHEET Your fax machine Recipient Sele...

Page 118: ...sion message 1 CONFIDENTIAL 2 PLS DISTRIBUTE 3 URGENT 4 PLS CALL BACK 5 IMPORTANT 6 NO MESSAGE Instead of using the numeric keys you can also press the left arrow key or right arrow key until this message appears and press the ENTER key 3 Perform the sending operation The transmission message function is automatically cleared after the fax transmission Even if the transmission message function is ...

Page 119: ...x mark setting with a user program See page Appendix 24 Preparation Sender Black index mark is printed This function must be set with a user program prior to fax reception This function takes effect until it is cleared See page Appendix 24 Using this function increases the print time for received faxes decreases the printable area on the fax paper slightly and also causes jobs to be printed on sep...

Page 120: ...ce other than a telephone to the fax machine ring ring ring ring Pick up the extension telephone Number is dialed Connected to TEL socket Conversing Phone rings Converse on the extension telephone Caller You Receiving a Phone Call Receiving a fax ring ring Number is dialed Fax is sent Fax tone sounds Fax is received Sender You Phone rings r in g r in g Press If the fax machine is set to automatic ...

Page 121: ...ON TELEPHONE INSTALLATION Extension Telephone Installation Note How to Use an Extension Telephone When conversing You can make calls and receive calls as you would on any telephone If the fax function is set to auto reception pick up the telephone before fax transmission begins The number of rings before fax reception begins is initially set to two You can change the number of rings 0 to 9 rings w...

Page 122: ...rate digital tone signals 1 Press 5 on the extension phone The machine enters the fax reception mode 2 Replace the handset When a fax call comes and you pick up the handset the number you enter to receive the fax 5 is called the remote number You can change the remote number 0 to 9 with a user program See page Appendix 8 ...

Page 123: ...e activity list at a certain time 2 times maximum See page Appendix 23 Example 10 DEC 1999 FRI 14 00 ACTIVITY REPORT SEND P 01 COM TIME XX 10 DEC XX XX XX X XX XX X XX XX X XX XX XX XX XX XXXXXXX XXXXX XXX TOTAL GRAND TOTAL RECEIVER STARTTIME PAGES TYPE NOTE DEPT FILE DATE ACTIVITY REPORT RECEIVE P 02 COM TIME XX 10 DEC XX XX XX X XX XX X XX XX X XX XX XX XX XX TOTAL GRAND TOTAL SENDER STARTTIME P...

Page 124: ...ct sending with the SPF there is an original misfeed ERRORxx xxxx Because of poor line conditions a telephone line error prevented the transmission COM ERROR number first 2 digits The displayed error code is from 00 to 31 COM ERROR number last 4 digits Used by service personnel Reception Result Explanation OK The reception completed successfully P FAIL There was a power failure during transmssion ...

Page 125: ...XX XXX XXX XXX XXX XXX XXX XXX XXX XXX XXX XX XX XX XXX XXX 1 XXXXXX XXXXXX XXX XXX X XX X X X X XX XX XXXX XXXX X X XXXX TIMES TIMER MODE MEMORY TX REMOTE TX FILE FILE 10 DEC 1999 FRI 14 30 Telephone Number List You can print out a list of number stored in rapid dialling and speed dialling Example The automatic dialling numbers are printed out in the following way Rapid dial R01 R02 Speed dial S0...

Page 126: ...XXXXXX XXXXXX SPEED XXX XXX RECEIVER GROUP NAME GXX GXX GXX XXXX XXXX XXXX 10 DEC 1999 FRI 14 54 Program List You can print a list of entered programs Example PROGRAM LIST P 01 TYPE 1 XXXXXXXX XXXX PROGRAM XXXXXXXXXXXX FAX XXXXXXXXXXXXXX RAPID XX XX XX XX GROUP XX XX XX SPEED XXX XXX MSG BOX PROGRAM NAME RECEIVER CON RES CVR 10 DEC 1999 FRI 15 10 PRINTING Printing ...

Page 127: ...T POLL SECURITY SYSTEM ID PASSCODE RELAY ID SENDER S NAME SENDER S FW STA NAME FW STATION XXXXXXXXXXXXXXXXXX XXXXXXXXXXXXXXXX XXXXXXXXXXXXXXXXXXXX XXXXXXXXXXXXXXXX XXXX 01 02 03 04 05 06 07 08 09 10 01 02 03 04 05 06 07 08 09 10 01 02 03 04 05 06 07 08 09 10 XXXX XXXX XXXXXXXXXX XXXXXXXXXX XXXXXXXXXXXX XXXX 10 DEC 1999 FRI 15 35 Printing PRINTING ...

Page 128: ...es received for each confidential box Example CONFIDENTIAL RECEPTION LIST XX XX XX BOX NAME TOTAL PAGE XXXX XXXX XXXX XXX XXX XXX 10 DEC 1999 FRI 17 38 Department Usage List You can only print out this list if auditing is turned on with a user program Each time you print out the list the data is erased For more information about setting auditing see page 1 8 Example DEPARTMENT USAGE LIST 01 02 03 ...

Page 129: ...tion Print a transaction report only after failed broadcast operations Do not print a transaction report When Printing Reports for Receptions Print a transaction report after every reception operation Print a transaction report only after errors Do not print a transaction report When Printing Reports for Confidential Receptions Print a transaction report after every confidential reception operatio...

Page 130: ...right arrow key and press the ENTER key to choose the list type 4 Press the START key Example 1 TIMER LIST PRESS START KEY The lower line of the display shows the type of list or report you are printing The fax machine compiles the list you requested and automatically prints it Printing Options 1 Timer List 6 Passcode List 2 Activity Report 7 Relay Group List 3 Telephone Number List 8 Confidential...

Page 131: ...eparator tray error Reset the sheets of the original in the SPF 1 11 Remove the output confirm that the copier is in the initial state and press the CLEAR ALL key Press the CLEAR ALL key Misfeed indicator There is a misfeed Clear the misfeed See the section Misfeed Removal section of the copier operation manual See the section Misfeed Removal section of the copier operation manual There is no tone...

Page 132: ...c self diagnostic fucntion is in effect contact your dealer for assistance Continous tone 3 seconds Message display Audible signal Meaning Direct sending is finished XX is the number of sheets transmitted Manual reception is finished XX is the number of sheets received Original is being read into memory when using memory sending A fax is being manually received You pressed the SPEAKER key Idle sta...

Page 133: ...etailed information see the Supplies section of the copier operation manual Options You can expand the capabilities of the fax function with the following options Fax memory upgrades AR MM5 2MB fax memory module AR MM6 4MB fax memory module AR MM7 8MB fax memory module Job separator tray kit AR TR2 You can order optional equipment from your authorized SHARP dealer Optional equipment can be install...

Page 134: ...ax machine is not out of paper Add paper The paper does not output The sender set the paper incorrectly Check with the sender Received fax comes out blank See the Supplies section of the copier operation manual Make sure you are using paper of the proper specification The received original is faint Received images are distorted The phone line condition is poor due to lightning or an electrical sto...

Page 135: ... up to 35 speed dialling up to 150 search dialling and redial automatic resending Timer operation Yes 50 Program function Yes 5 Automatic feeding capacity Up to 30 sheets with the SPF Memory capacity Sending approx 120 letter sheets Receiving approx 80 letter sheets optional memory not installed SHARP NORMAL resolution The capacity depends on the amount of optional memory installed Automatic error...

Page 136: ......

Page 137: ...E ERROR Set to change the number of retries when there is a SETTING transmission error P115 INTERRUPT TX AT RECALL Set to control whether faxes waiting in memory will MODE SETTING be sent when the current job cannot be sent for example because of a busy signal P116 OF RINGS AUTO TX SETTING Set to change the time that elapses before an automatic transmission stops when there is no answer from the r...

Page 138: ... printed at a certain time P140 PRINT STATION IN RCVD Set to choose where to print the date your name DATA SETTING and your fax number on faxes you send P141 PAGE COUNTER PRINT SETTING Set to print page numbers on faxes you send P142 INDEX PRINT Set to print an index mark on the top of received faxes P143 DATE AND TIME SETTING Use to set the date and time of the internal clock P144 DAYLIGHT SAVING...

Page 139: ...gram number 3 digit using the numeric keys then press the START key The user program numbers are listed on page Appendix 1 Confirm the user program numbers by printing a list of them with the user program P161 OPTIONAL SETTING LIST PRINT The user program number and name are displayed Instead of entering the user program number you can also press the left arrow key or right arrow key to select the ...

Page 140: ...hat start on the next page for specific information about setting user programs When setting user programs the current settings and options are shown on the display panel When you want to exit from the middle of a user program press the light key For more information about entering characters see section HOW TO ENTER CHARACTERS See page 2 37 When changing between screens use the arrow keys as foll...

Page 141: ... account numbers are entered You cannot use account number 000 When you enter P101 the following message is displayed P101 DEPT CODE MODE 1 Press the START key DEPT CODE MODE 1 SET 2 CLEAR When selecting 1 to enable auditing 1 Press the 1 key DEPT CODE SET 1 SET 2 CLEAR 2 Press the 1 key ENTER DEPT CODE 3 Enter the 3 digit account number using the numeric keys The hyphens in the display change to ...

Page 142: ...an account number that does not exist the display returns to step 1 Enter the correct number P103 PAUSE TIME SETTING Use program 103 to change the duration of pauses inserted in a recipient s fax number pause time When you are entering the recipient s phone number pressing the REDIAL PAUSE key inserts a pause of the duration specified in this setting Initially the pause time is set to 2 seconds Wh...

Page 143: ...r right arrow keys to change the display messages BEEPER VOLUME 1 4 1 OFF 2 LOW BEEPER VOLUME 1 4 3 MIDDLE 4 HIGH 2 Press one of the following keys 1 key OFF 2 key LOW 3 key MIDDLE 4 key HIGH After setting the speaker volume you can set the ringer volume Use the left or right arrow keys to change the display messages SPEAKER RINGER 1 4 1 OFF 2 LOW SPEAKER RINGER 1 4 3 MIDDLE 4 HIGH 3 Press one of ...

Page 144: ...e following keys 1 key ON 2 key OFF If you have not installed an extension telephone do set this user program to OFF P108 REMOTE RECEPTION SETTING Use P108 to enter the 1 digit number for the remote reception of fax on an extension telephone Initially the number set in this program is 5 When you enter P108 the following message is displayed P108 REMOTE RECEPTION 1 Press the START key ENTER REMOTE ...

Page 145: ... is displayed P109 FW RX DATA 1 Press the START key FW RX DATA 1 ON 2 OFF When selecting the Data Transfer function 1 Press the 1 key ENTER STATION DIAL 2 Enter the transferring fax number using the numeric keys and press the START key You can only set the Data Transfer function to one location The number can be up to 40 digits To insert a pause in the number press the REDIAL PAUSE key Pauses are ...

Page 146: ... busy Initially the number of retries is set to 2 When you enter P112 the following message is displayed P112 RECALL TIMES BUSY 1 Press the START key ENTER RECALL TIMES 00 14 02 2 Enter the number of retries 00 to 14 using the numeric keys 3 Press the START key P113 RECALL INTERVAL LINE ERROR SETTING Use program P113 to change the interval for dial retries when there is a transmission error Initia...

Page 147: ...his program is set to ON When you enter P115 the following message is displayed P115 INTERRUPT TX AT RECALL MODE 1 Press the START key INTERRUPT TX 1 ON 2 OFF 2 Press one of the following keys 1 key ON 2 key OFF P116 OF RINGS AUTO TX SETTING Use program P116 to set the time that elapses before an automatic transmission stops when there is no answer from the recipient s fax When there is no answer ...

Page 148: ... Iftheexternaltelephoneisconnected theexternaltelephoneringsoncewhenthenumberofrings is set to 0 P118 POLLING SECURITY SETTING Use program P118 to set polling security so that only designated people can poll your fax machine or so that anyone can poll your fax machine Initially this program is set to ON When you enter P118 the following message is displayed P118 SECURITY SELECTION 1 Press the STAR...

Page 149: ...displayed Example PASSCODE 08 FAX If you enter a previously entered passcode you return to step 1 4 Enter the phone number using the numeric keys The phone number can be up to 20 digits long To input a plus symbol press the key and to input a space press the key If you make a mistake entering the number pressing the CLEAR key erases characters one at a time Enter the correct number from the last c...

Page 150: ... Numbers 1 Press the 1 key ENTER ID CODE ID 01 10 2 Enter the ID number 01 to 10 using the numeric keys 3 Press the START key The following message is displayed STATION SYSTEM 0000 9999 If you enter a previously entered ID number you return to step 1 4 Enter the 4 digit system number of the polling fax machine using the numeric keys 5 Press the START key If you enter a system number used by anothe...

Page 151: ... the START key How to Erase System Numbers 1 Press the 2 key If you entered a system number that was not previously entered you return to the user program display 2 Press the START key P122 CONF BOX SETTING Use program P122 to enter the confidential box number and passcode for confidential fax reception You can create up to 10 confidential boxes and enter 4 digit passcode numbers 0000 to 9999 You ...

Page 152: ... the passcodes the fax prints out the list for your records How to Erase Confidential box Numbers 1 Press the 2 key ENTER BOX BOX 00 99 2 Enter the 2 digit confidential box number you want to erase 3 Press the START key The following message is displayed ENTER CONF CODE PASSCODE If you enter a confidential box number that has not been previously entered you return to the user program display Note ...

Page 153: ...ART key The following message is displayed Example RELAY ID 08 FAX If you enter a previously entered relay passcode number you return to step 1 4 Enter the sender s fax number using the numeric keys The phone number can be up to 20 digits long To input a plus symbol press the key and to input a space press the key If you make a mistake entering the number pressing the CLEAR key erases characters o...

Page 154: ...Enter one of the following keys 1 key REDUCE 2 key 1 1 P125 ROTATE TX SETTING Use program P125 to control whether the image of the original is rotated before transmission You can set this program to rotate the image of a landscape original to portrait orientation before transmission and vice versa The rotation direction is counter clockwise Initially original rotation is set to ON Original orienta...

Page 155: ...up to 20 digits long To input a plus symbol press the key and to input a space press the key If you make a mistake entering the number pressing the CLEAR key erases characters one at a time Enter the correct number from the last character erased 3 Press the START key The following message is displayed ENTER NAME If you previously entered a name the new name that you enter becomes effective and the...

Page 156: ...r is printed on several pages or automatically reduced Initially this program is set to ABD automatically reducing faxes that are too large When you enter P133 the following message is displayed P133 PRINT COND 1 Press the START key Press the left or right arrow keys to change the display SELECT COND 1 ABC SELECT COND 2 ABD 2 Press one of the following keys 1 key If the received fax is too large f...

Page 157: ... 2 key The received fax is printed on the most appropriate size paper that is available in all of the trays P137 TRANSACTION REPORT PRINT SELECT SETTING Use program P137 to control when to print a transaction report The fax machine stores only one transaction report at a time If you send or receive a fax the previous transaction report is erased Initially this program is set to print a transaction...

Page 158: ...ONLY RECEPTION 3 NEVER PRINTS 5 Press one of the following keys Select the printing condition for confidential fax operations 1 key ALWAYS PRINT 2 key NEVER PRINT Press the left or right arrow keys to change between screens CONF RECEPTION 1 ALWAYS PRINTS CONF RECEPTION 2 NEVER PRINTS P138 IMAGE MEM PRINT LINE ERROR SETTING Use program P138 to control whether to print the first part of the original...

Page 159: ...t PRINT TIME 00 00 ENTER TIME 09 3 Enter the minutes 00 to 59 using the numeric keys 4 Press the START key The following message is displayed 2nd PRINT TIME 1 ON 2 OFF 5 To enter a second printing time press the 1 key If you do not want to enter a second printing time press the 2 key The following message is displayed to enter a second time 2nd PRINT TIME 00 00 ENTER TIME If you don t want to ente...

Page 160: ...TION 1 OUT 2 IN DATA 2 Press one of the following keys 1 key OUT 2 key IN DATA P141 PAGE COUNTER PRINT SETTING Use program P141 to print page numbers on the recipient s copy of faxes you send Initially this program is set to ON When you enter P141 the following message is displayed P141 PAGE COUNTER PRINT 1 Press the START key PAGE COUNTER PRINT 1 ON 2 OFF 2 Press one of the following keys 1 key O...

Page 161: ...1 using the numeric keys The following message is displayed Example PRESS START KEY 1999 11 07 If you press the START key during steps 2 through 4 the displayed date is set 5 Press the START key The following message is displayed Example ENTER TIME 00 23 1999 11 07 00 00 6 Enter the hour in 24 hour time 00 to 23 using the numeric keys The following message is displayed Example ENTER TIME 00 59 199...

Page 162: ...lution of transmitted faxes for example STANDARD FINE SUPER FINE ULTRA FINE Initially the resolution is set to STANDARD When you enter P151 the following message is displayed P151 RESO PRIORITY 1 Press the START key Use the left or right arrow keys to change the display messages RESO PRIORITY 1 STANDARD 2 FINE RESO PRIORITY 3 S FINE 4 U FINE 2 Press one of the following keys 1 key STANDARD 2 key F...

Page 163: ... Use program P154 to set whether a cover sheet is automatically sent with each fax transmission Initially this program is set to OFF When you enter P154 the following message is displayed P154 AUTO COVER SHEET 1 Press the START key AUTO COVER SHEET 1 ON 2 OFF 2 Enter one of the following keys 1 key Cover sheet is sent 2 key Cover sheet is not sent P161 OPTIONAL SETTING LIST PRINT Use program P161 ...

Page 164: ...mber 3 23 ID Number Sender s 5 5 Index 4 5 Initial State 1 6 International Transmission Mode 2 21 2 27 J Job separator tray 1 1 2 16 INDEX L LINE Socket 1 1 1 7 Lithium Battery iv M Manual Reception 2 14 Manual Sending 2 3 Memory Polling 3 20 Memory Sending 2 6 Memory Upgrades 2 17 6 1 N Name Entering Own 1 7 O On hook Dialling 1 17 Operation Panel 1 2 Options 6 1 Original guides 1 11 Original tab...

Page 165: ...er 1 1 Specifications 6 3 Speed Dialling 1 16 2 19 2 25 SPF 1 10 Substitute Reception 2 17 Supplies 6 1 System Number 3 24 T Telephone Line 1 7 Telephone Line Wall Socket 1 7 Telephone Number Entering Own 1 7 Telephone Number List 5 3 TEL Socket 1 1 4 7 Timer List 5 3 Timer Operations 3 3 Transaction Report 5 7 U User Programs Appendix 1 Index INDEX ...

Page 166: ...99K DSC1 CINSE0143QS51 ...

Page 167: ......

Page 168: ...AR FX2 SHARP CORPORATION SHARP ELECTRONICS U K LTD Sharp House Thorp Road Newton Heath Manchester M40 5BE PRINTED IN JAPAN 99K DSC1 CINSE0143QS51 ...

Reviews: