background image

ServerLink Dual Rail LCD Console


16


Replaceable Touch Pad 

 
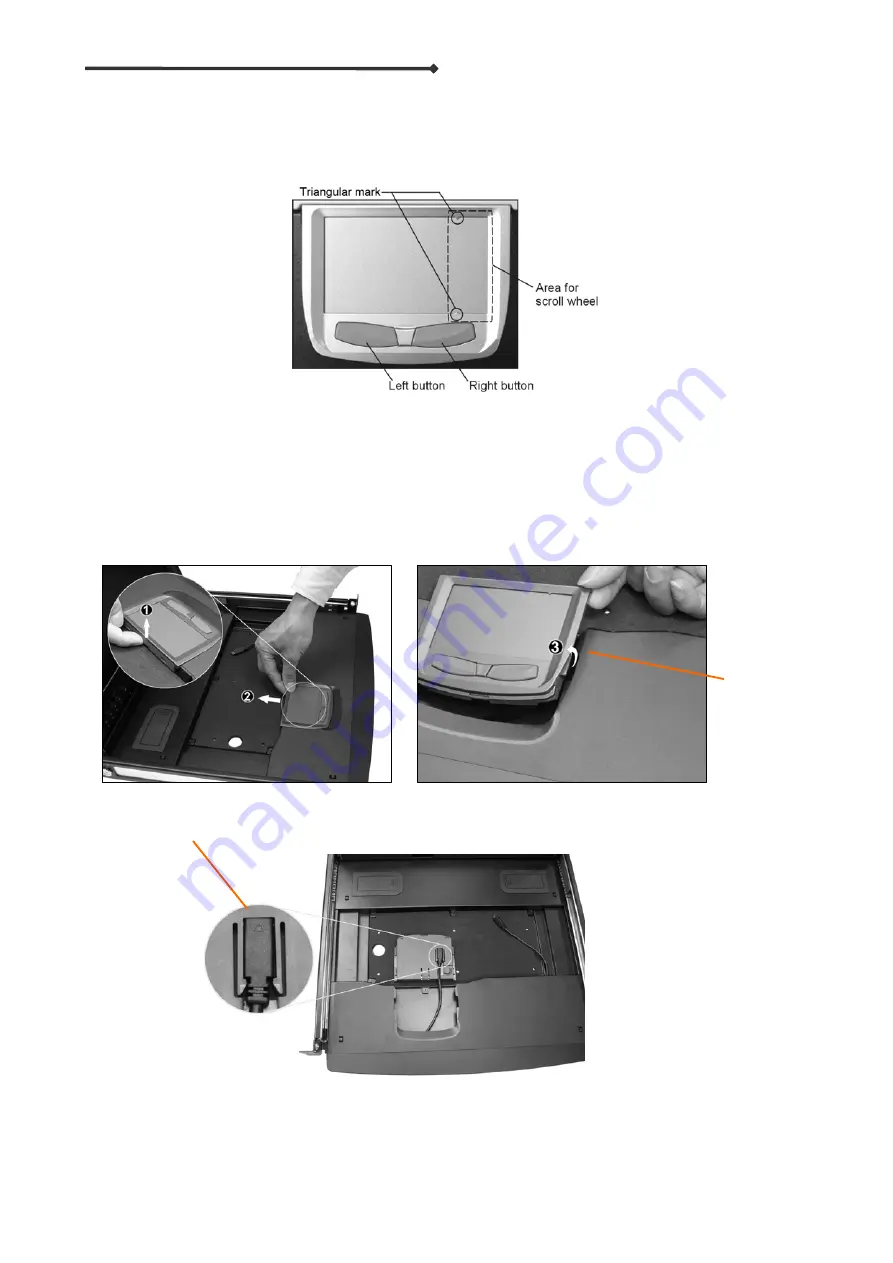
1. Touch Pad and Its “Wheel” 

The Touch Pad simulates a “wheel mouse”.    This area is located at the right side of Touch Pad.    When 
touching this area you will see two small 

triangular marks

 which is the simulated “wheel” as shown below. 


2. Touch Pad Replacement 
 
To remove the Touch Pad, press the tab (as shown in the following diagram, the finger point with labeled 
1)underneath it upward to release the latch, and then slide it outwards till the Touch Pad fully lifted up away 
from the notch, as shown in the figure on the right. The Touch Pad is attached by a piece of mini-USB cable. 
To install the Touch Pad, adjust the length of mini-USB cable and slide the Touch Pad all the way in till a click 
sound is generated, which means it is locked into position. 


Note 

: The triangular mark on the mini-USB connector must face outwards. 


Triangular mark 

Fully lifted up away 

from the notch 

Summary of Contents for LKS-1601CM

Page 1: ...VM Module 4 Assembly 5 Installation 8 Front Panel 9 Control Selection 10 Open and Close Console 11 Replaceable Keyboard and Touch Pad 14 LCD Specification 17 Please read this manual thoroughly and fol...

Page 2: ...design allows the keyboard and LCD display to slide in and out the rack independently of each other which allows the keyboard to be conveniently stowed away while the monitor is still displayed All KV...

Page 3: ...touch pad and LCD monitor in 1RU height Front panel On Screen Display OSD control and LED indicator for easy adjustment of display image LED lighting bar indicating power status Flip open 17 Full HD...

Page 4: ...depth of your cabinet Note the following length is measured between front pole and rear pole inside a rack cabinet not the outside depth of a rack cabinet enclosure RW 2 RW 1 Rear Bracket Pairs of Di...

Page 5: ...01CM LKS 801CRM LKS 1601CRM For computer PS 2 USB USB Sun USB Mac PS 2 PC USB PC USB Sun USB Mac No of console ports N A 1 1 1 1 No of computer ports 1 8 16 8 16 OSD menu N A Yes Yes Built in IP No Ye...

Page 6: ...f the KVM switch module Please note the length of the extensions in advance and then mount them in the following way For a 2U module the extensions are mounted to the lower half of the module Extensio...

Page 7: ...ease make sure those two wheels with screws are INSIDE the track of bracket while sliding in Please follow the direction as the white arrows shown Step 4 Push the KVM switch module evenly towards the...

Page 8: ...er from sliding out when in transit After the safety stoppers are removed the drawer may slide out when be tilted and can cause serious injury Step 8 Connect the power supply to the power jack on the...

Page 9: ...sole and a one port module LKS 101CM or LKS 101CRM can be considered as a set of PS 2 keyboard mouse and monitor as shown below ServerLink LCD Console connects to a computer Or the ServerLink LCD Cons...

Page 10: ...lights up with steady red When any of the A H port of computer is selected the corresponding indicator lights up with flashing red 3 LCD Power Button Press this button to turn on the monitor the corr...

Page 11: ...on demand solution is tailored to fit the user s needs while using the wireless mouse or wireless keyboard and mouse combo users can disable the Touch Pad function to prevent the mouse cursor from bei...

Page 12: ...h pad together to a position that best supports ergonomic comfort and lift the LCD panel to the degree for screen display 2 Opening LCD Monitor Only Hold the handler of LCD monitor part Pull it upward...

Page 13: ...tes are moved inside the unit completely Make sure to push safely and protect your fingers from hurt Special Note Open Keyboard Touch Pad Part LCD Monitor Part Individually In case you still want to p...

Page 14: ...se personal injury or property damage Do not put your fingers hand and anything on the rear cabinet Do not touch any part behind the rear cabinet Keep the area behind the drawer clear Do not apply for...

Page 15: ...rneath the keyboard Gently unplug it and take it out Put the keyboard in While installing a keyboard make sure that you extend proper length of the cable to flat it inside the tray Hold the keyboard w...

Page 16: ...triangular mark on the mini USB connector must be faced outwards Alternative Way for Keyboard Fastening Recommended Pull the keyboard part outwards as figures shown below and fasten these 6 screws to...

Page 17: ...following diagram the finger point with labeled 1 underneath it upward to release the latch and then slide it outwards till the Touch Pad fully lifted up away from the notch as shown in the figure on...

Page 18: ...SA DDC 2B Power Consumption Max 13 2W normal operation Typical Viewing Angle Typical 70 70 H 60 60 V Backlight Unit LED Operating Temperature 0 to 50 C 20 to 60 C Storage Shipping Temperature Operatin...

Page 19: ...ressed or implied with respect to the contents or use of this documentation and especially disclaims its quality performance merchantability or fitness for any particular purpose The direct vendor als...

Reviews: