background image

Advanced Features 

59 

Virtual Servers Screen 

The 

Virtual Servers

 screen is reached by the 

Virtual Servers

 link on the 

Advanced

 screen. An 

example screen is shown below.  


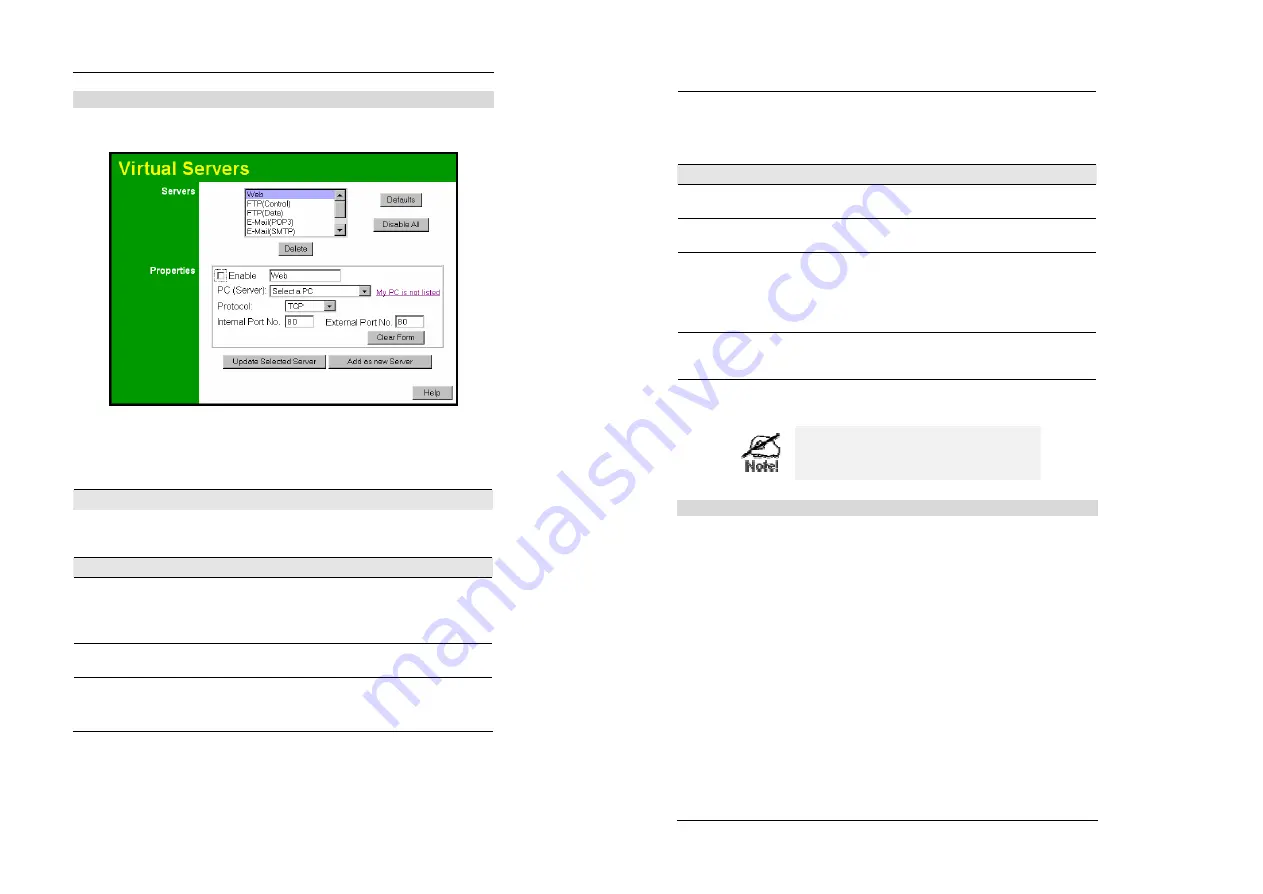
Figure 39: Virtual Servers Screen  

This screen lists a number of pre -defined Servers, and allows you to define your own Servers. 
Details of the selected Server are shown in the "Properties" area. 

Data - Virtual Servers Screen 

Servers 

Servers


This lists a number of pre -defined Servers, plus any Servers   y o u  
have defined. Details of the selected Server are shown in the "Prop-
erties" area. 

Properties 

Enable


Use this to Enable or Disable support for this Server, as required.  


If Enabled, any incoming connections will be forwarded to the 
selected PC. 


If Dis abled, any incoming connection attempts will be blocked. 

PC (Server)  

Select the PC for this Server. The PC must be running the appropri-
ate Server software.  

Protocol 

Select the protocol (TCP or UDP) used by the Server.  

Internal Port No. 

Enter the port number which the Server software is configured to 
use. 

Wireless Router User Guide  

60 

External Port No.  

The port number used by Internet users when connecting to the 
Server. This is normally the same as the Internal Port Number. If it is 
different, this device will perform a "mapping" or "translation" 
function, allowing the server to use one port address, while clients 
use a different port address. 

Buttons 

Defaults


This will delete any Servers you have defined, and set the pre -
defined Servers to use their default port numbers. 

Disable All  

This will cause the "Enable" setting of all Virtual Servers to be set 
OFF. 

Update Selected 
Server 

Update the current Virtual Server entry, using the data shown in the 
"Properties" area on screen. 

Add as new Server 

Add a new entry to the Virtual Serve r list, using the data shown in 
the "Properties" area on screen. The entry selected in the list is 
ignored, and has no effect. 

Delete  

Delete the current Virtual Server entry. Note that the pre -defined 
Servers can not be deleted. Only Servers you have defined yourself 
can be deleted. 

Clear Form 

Clear all data from the "Properties" area, ready for input of a new 
Virtual Server entry. 


For each entry, the PC must be running the 
appropriate Server software. 

Defining your own Virtual Servers 

If the type of Server you wish to use is not listed on the 

Virtual Servers

 screen, you can define 

and ma nage your own Servers: 

Create a new Server: 

1.


Click "Clear Form"  

2.


Enter the required data, as described above. 

3.


Click "Add". 

4.


The new Server will now appear in the list. 

Modify (Edit) a Server: 

1.


Select the desired Server from the list 

2.


Make any desired changes (for example, change the 
Enable/Disable setting).  

3.


Click "Update" to save changes to the selected Server. 

Delete a Server: 

1.


Select the entry from the list. 

2.


Click "Delete " . 

Note: 

 You can only delete Servers you have defined. Pre -

defined Server cannot be deleted. 


Summary of Contents for IP706ST

Page 1: ...Multi Function Wireless Router Wireless Access Point Broadband Internet Access 4 Port Switching Hub User s Guide...

Page 2: ...ils Fixed Dynamic IP Address 43 CHAPTER 6 ADVANCED FEATURES 45 Overview 45 Advanced Menu Screen 45 Advanced Internet Screen 46 Access Control 50 Remote Management 57 Virtual Servers 58 Dynamic DNS Dom...

Page 3: ...luded Special Internet Applications Applications which use non standard connections or port numbers are normally blocked by the Firewall The ability to define and allow such ap plications is pro vided...

Page 4: ...flood your Internet connection with invalid packets and connection requests using so much band width and so many resources that Internet accessbecomes unavailable The Wireless Router incorporates pro...

Page 5: ...ectors to connect your PCs to these ports Power port Connect the supplied power adapter here 6 Chapter 2 Installation This Chapter covers the physical installation of the Wireless Router Requirements...

Page 6: ...pter 3 Setup This Chapter provides Setup details of the Wireless Router Overview This chapter describes the setup procedure for Internet Access LAN configuration Wireless setup Assigning a Password to...

Page 7: ...od Double click the icon for the Wireless Router either on the Desktop or in My Network Places to start the configuration Refer to the following section Setup Wizardfor details of the initial configur...

Page 8: ...hys ical address Static Fixed IP Address Your ISP allocates a permanent IP Address to you IP Address allocated to you Some ISP s may also require you to use a particular Hostname Domain name or MAC ph...

Page 9: ...LAN is using a different IP address range In the latter case enter an unused IP Address from within the range used by your LAN Subnet Mask The default value 255 255 255 0 is standard for small class C...

Page 10: ...ocedure is required 1 Disable the DHCP Server feature in the Wireless Router This setting is on the LAN screen 2 Configure the DHCP Server to provide the Wireless Router s IP Address as the Default Ga...

Page 11: ...data you have entered since the last Save operation Wireless Router User Guide 18 WEP Screen This screen is accessed by clicking the Configure WEP button on the Wireless screen An example WEP screen i...

Page 12: ...rwise it will not be able to de crypt the data Key Enter the key value you wish to use Other stations must have the same key Wireless Router User Guide 20 Password Screen The password screen allows yo...

Page 13: ...a DHCP client If using a Fixed specified IP address the following changes are re quired The Gateway must be set to the IP address of the Wireless Router The DNS should be set to the address provided b...

Page 14: ...iguration tab ensure Enable DNS is selected If the DNS Server Search Orderlist is empty enter the DNS address provided by your ISP in the fields beside the Add button then click Add Figure 14 DNS Tab...

Page 15: ...with your network administrator before making the following changes 1 The Default Gateway must be set to the IP address of the Wireless Router To set this Click the Advanced button on the screen abov...

Page 16: ...ontrol Panel Network and Dial up Connection 2 Right click the Local Area Connection icon and select Properties You should see a screen like the following Figure 19 Network Configuration Win 2000 3 Sel...

Page 17: ...e following changes Enter the Wireless Router s IP address in the Default gatewayfield and click OK Your LAN administrator can advise you of the IP Address they assigned to the Wireless Router If the...

Page 18: ...a local area network LAN and click Next 4 Select I connect through a local area network LAN and click Next 5 Ensure all of the boxes on the following Local area network Internet Configuration screen...

Page 19: ...ur version of Linux and X windows shell 1 Start your X Windows client 2 Select Control Panel Network 3 Select the Interface entry for your Network card Normally this will be called eth0 4 Click theEdi...

Page 20: ...modem Internet Connection Current connection status Active Idle Unknown Failed If there is an error you can click the Connection Details button to find out more information Internet IP Address This IP...

Page 21: ...ier to read new messages Refresh Update the data on screen Connection Log Messages Message Description Connect on D emand Connection attempt has been triggered by the Connect automatically as required...

Page 22: ...g while the Refresh button will update the messages shown on screen Buttons Connect If not connected establish a connection to your ISP Wireless Router User Guide 40 Disconnect If connected to your IS...

Page 23: ...Provider Networ k Mask The Network Mask associated with the IP Address above Default Gateway The IP Address of the remote Gateway or Router associated with the IP Address above DNS IP Address The IP...

Page 24: ...ll show Enabled or Disabled depending on whether or not this device is functioning as a DHCP client If Enabled the Remaining lease time field indicates when the IP Address allocated by the DHCP Server...

Page 25: ...ow Figure 30 Internet Screen Communication Applications Most applications are supported transparently by the Wireless Router But sometimes it is not clear which PC should receive an incoming connectio...

Page 26: ...sh Enter the end of the range of port numbers used by the applic a tion server for data you receive Outgoing Ports Type Select the protocol TCP or UDP used when you send data to the remote system or s...

Page 27: ...www trash com or simply a string e g ads Any URL which contains ANY entry ANYWHERE in the URL will be blocked Wireless Router User Guide 50 Buttons Delete Delete All Use these buttons to delete the se...

Page 28: ...User Guide 52 Define Schedule Button Clicking this will open a sub window where you can define or modify the Schedule Services This lists all defined Services Select the Services you wish to block To...

Page 29: ...clicked This schedule can be optionally applied to any Access Control Group Blocking will be performed during the scheduled time between the Start and Finish times Two 2 separate sessions or periods...

Page 30: ...Start and Finish fields ICMP Type For ICMP Services enter the type number of the required service Buttons Delete Delete the selected service from the list Wireless Router User Guide 56 Save Add a new...

Page 31: ...the IP Address enter followed by the port number e g HTTP 123 123 123 123 8080 This example assumes the WAN IP Address is 123 123 123 123 and the port number is 8080 Wireless Router User Guide 58 Virt...

Page 32: ...ents use a different port address Buttons Defaults This will delete any Servers you have defined and set the pre defined Servers to use their default port numbers Disable All This will cause the Enabl...

Page 33: ...ess Router s DDNS screen 4 The Wireless Router will then automatically ensure that your current IP Address is re corded at http www dyndns org 5 From the Internet users will be able to connect to your...

Page 34: ...settings available via the Advanced configuration section of the Advanced menu Overview Normally it is not necessary to use these screens or change any settings These screens and settings are provide...

Page 35: ...Wireless Router User Guide 66 Data PC Database Screen Known PCs This lists all current entries Data displayed is name IP Address type The type indicates whether the PC is connected to the LAN Name If...

Page 36: ...Router s IP address Fixed IP Address Select this if the PC is using a Fixed Static IP address Enter the IP address allocated to the PC The PC must be configured to use this IP address MAC Address Sel...

Page 37: ...via UPnP If Disabled this device will not be visible via UPnP Allow Configura tion If checked then UPnP users can change the configuration If Disabled UPnP users can only view the configuration But cu...

Page 38: ...Threshold depends on many factors the most important factor is the available bandwidth of your Internet connection Select the setting to match the bandwidth of your Internet connec tion Wireless Rout...

Page 39: ...rvice attack is detected If enabled the E mail address informa tion must be provided Wireless Router User Guide 74 E mail Logs You can choose to have the logs E mailed to you by enabling either or bot...

Page 40: ...rview If you don t have other Routers or Gateways on your LAN you can ignore the Routing page completely If the Wireless Router is only acting as a Gateway for the local LAN segment ignore the Routing...

Page 41: ...the data shown in the Properties area on screen Delete Delete the current Static Routing Table entry Clear Form Clear all data from the Properties area ready for input of a new entry for the Static Ro...

Page 42: ...1 Can t connect to the Wireless Router to configure it Solution 1 Check the following The Wireless Router is properly installed LAN connections are OK and it is powered ON Ensure that your PC and the...

Page 43: ...tion or key for 128 Bit en cryption must match If the Wireless Router s Wireless screen is set to Allow LAN access to selected Wireless Stations only then each of your Wireless stations must have been...

Page 44: ...are available If using multiple Access Points it is better if adjacent Access Points use different Channels to reduce interference In Infrastructure mode Wireless Stations normally scan all Channels l...

Page 45: ...t occur in a particular installation If this equipment does cause harmful interference to radio or television reception which can be determined by turning the equipment off and on the user is encourag...

Reviews: