background image

21

16

17

Option: C4

VN cards (= barcoded time cards) without calculation
Printing line per day: Fixed, up to 4 punches (= 2 sets of IN/OUT punches) per day

IN

9:00
9:00
9:00
9:00

9:00

12:00
12:30
12:00
12:00

18:00

13:00
13:30
13:00

17:00
17:30
18:00

OUT

IN

OUT

2

3

4

61

2

3

4

61

2

31

2

31

Option: C5, C6, and C7

Time cards without calculation
Printing line per day: Fixed, up to 4 punches (= 2 sets of IN/OUT punches) per day

IN

9:00
9:00
9:00
9:00

9:00

12:00
12:30
12:00
12:00

13:00
13:30
13:00

17:00
17:30
18:00

18:00

OUT

IN

OUT

2

3

4

61

2

3

41

2

31

2

3

61

Please go to the next page for setting.

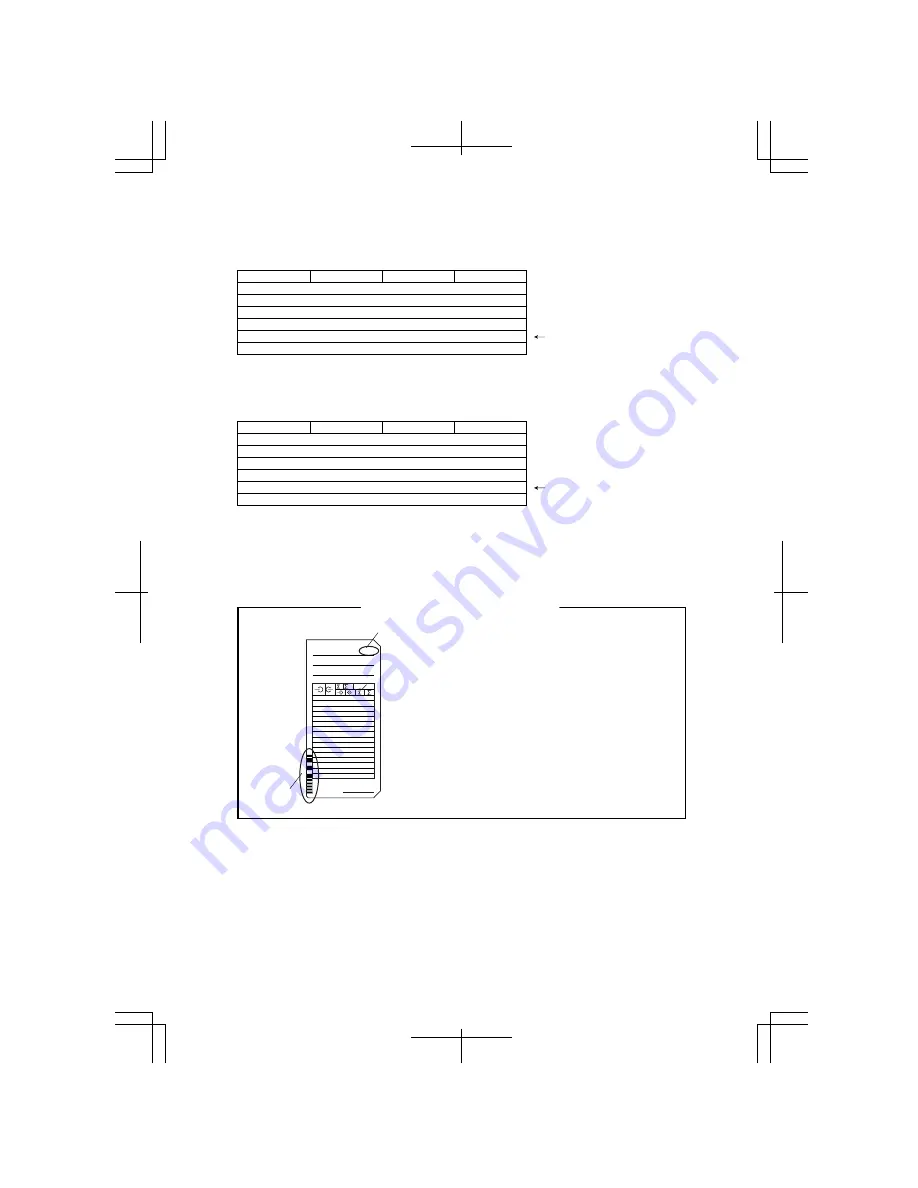
When you select "VN Card", the clock will 
remember the last imprint and automatically 
switch the "IN" and "OUT" columns by 
distinguishing each card with barcode.   (Up to 
100 cards can be used for one period.)

Card Number

Barcode

001

Signature

DEPT.

NO.              NAME

Only for VN Card Users 

     Line is skipped on a day off.

     Line is skipped on a day off.

Summary of Contents for QR-395

Page 1: ...QUARTZ TIME RECORDER USER S MANUAL 1 ...

Page 2: ...2 ...

Page 3: ... been prepared with the utmost care to cover all aspects of the time recorder s use If you feel however that some explanations are inadequate unclear or difficult to understand please do not hesitate to contact the dealer or the shop from which you have purchased your Time Recorder Be sure to use your Time Recorder after you have fully understood the hardware and software specifications and limits...

Page 4: ...rint Format ADVANCED SETTINGS Schedule Setting the Schedule Common Schedule Extra Schedule Max in Value Special Mark Printing Setting the Special Mark Printing Program List for Setting Schedules Rounding Setting the Rounding Weekly Program Setting the Weekly Program Setting the Password How to Change Settings When the Password Is Set Cancelling the Password ADDITIONAL FUNCTIONS Resetting Card Reas...

Page 5: ...possibly leading to an electric shock Do not use any voltage of the power source other than designated Do not share a single outlet with another plug These may lead to fire or shock hazards Do not damage break or modify the power cord Do not put a heavy object on pull or forcefully bend the cord either These may damage the cord possibly resulting in a fire or electric shock If any anomaly occurs f...

Page 6: ...rd may be damaged possibly leading to a fire or electric shock Remove the line cord plug from the outlet before transferring the unit or it may damage the cord possibly leading to a fire or electric shock Make sure to insert the power plug as far as it will go Improper insertion of the plug may develop fire or shock hazards Do not insert or drop any other time card than specified into the slot Suc...

Page 7: ...column Automatic shifting print column is available with a VN card Weekly program can be set when you use a S card a weekly card or a bi weekly card You can program 2 types of schedules when using the unit with calculation Common schedule Extra schedule Selectable 6 print formats Date 24 hour Day of the week 24 hour 24 hour in large font AM PM Date AM PM or Day of the week AM PM The unit resumes w...

Page 8: ...ories User s manual Wall mount hardware Ribbon cassette Keys Daylight saving time indication Display Key hole Cover Display Control button Card slot Wall mounting hole Day of the week indication Current date Current time SU MO TU WE TH FR SA 8 4 6 1 2 3 4 ...

Page 9: ... as the arrow to tighten the ribbon 3 Place the ribbon cassette inside the time recorder as shown in the figure Push the ribbon cassette until it snaps into the clasps on both sides If it is difficult to insert the ribbon cassette try it while turning the knob Knob Clasp Clasp located at both sides Knob Make sure the power is on before installing 9 7 5 ...

Page 10: ... ribbon is placed behind the ribbon mask see the figure on the right 4 6 5 Leave the cover off while changing any settings in the next step When the settings are complete replace the cover Turn the knob of the ribbon cassette in the direction of the arrow to tighten the ribbon Knob Print head Ribbon mask Ribbon Print head Ribbon mask Ribbon 10 6 8 CORRECT WRONG ...

Page 11: ...ded for use on a thick wooden wall or wooden column Do not use them on any other materials There is a danger that the unit may come off if used on other materials Install wall mount screws supplied into a wall 10 cm 3 15 16 apart Be sure to keep about 3 mm 1 8 of the screw head out of the wall Use template on bottom of the next page if you prefer Environmental Conditions Avoid placing the unit in ...

Page 12: ...12 Wall Wall Mount Template Screws Level Line Wall Mount Template Template for wall mounting Please copy and use this page when needed Leave about 3mm gap between wall and screw head 10 8 ...

Page 13: ...the time card If you use the VN card the recorder will remember the last imprint and automatically switch the IN and OUT If you use other time cards such as S cards Weekly cards or Bi Weekly cards printing column will not shift automatically unless weekly program is set You may also manually switch the column position of the imprint by pushing the button If you don t need calculation you must chan...

Page 14: ...sh Schedule No setting 2 Rounding 1 min prints totals calculated 2 to exact minute Weekly Program No setting 3 Password No setting Setting Default Setting Note 14 10 10 1 Date and time are set at the same day of shipment by factory default setting 2 These settings are available only when you use the clock with calculation 3 This setting is available only when you use the clock without calculation ...

Page 15: ...ing the display Please refer to the following pages for the details of each setting 4 After the setting has been completed fit the plugs at the lower sides of the cover into the holes of the unit Replace the cover Key hole Make sure the power is on before making setting Control button Display 5 BASIC SETTINGS Preparation for setting Plug Hole 15 10 11 ...

Page 16: ...econds and position the under the HOURS mark 3 Push the SET button to finish the setting At that moment the display will change from flashing to steady and the setting is now completed 4 Push the SET button once again 2 Once a number on the display starts flashing push the CHANGE button to select either AM PM or 24 hour For example set 2 if 24 hour is desired HOURS HOURS DATE TIME CHANGE SET DATE ...

Page 17: ...hanges from Hour to Minute 4 Change the Minute for example from 8 minutes to 9 minutes Push the CHANGE button to set Minute at 09 and then push the SET button Now the minutes of 9 have been set TIME TIME TIME Example To change the time from 10 08 to 10 09 2 Push the DATE TIME button and position the under the TIME mark The flashing number can be changed Minute Second Hour DATE TIME DATE TIME DATE ...

Page 18: ...tton to set Date at 21 and then push the SET button and now the date of 21 has been set At that moment Date on the display will change from flashing to steady and the date change setting is now completed Setting the Date CHANGE SET DATE DATE DATE DATE CHANGE SET CHANGE SET CHANGE SET Example Change the date from October 20 2012 to October 21 2012 Year Month Date 1 Push the DATE TIME button for 3 s...

Page 19: ... on a time card for the next day This function enables the punch out time record to print on the same line of the previous working day even if leaving time is after midnight The clock default is 5 00 If error E 49 appears when you try to change settings then you must reset all cards before proceeding See All Cards Reset SET SET Example Change the line shift time from 5 00 a m to 7 00 a m Hour of t...

Page 20: ...17 00 18 30 17 00 17 00 17 00 8 00 3 00 4 00 1 00 8 00 8 00 0 00 8 00 11 00 15 00 16 00 24 30 32 30 40 00 OUT Daily Accumulation Option C2 VN cards barcoded time cards without calculation Printing line per day Not fixed as many punches as you like per day IN 9 00 12 45 9 00 9 00 12 45 9 00 9 00 10 00 15 00 12 00 10 00 17 00 12 00 18 00 10 15 15 30 13 00 10 15 12 00 17 00 18 00 12 30 OUT IN OUT 1 2...

Page 21: ... Fixed up to 4 punches 2 sets of IN OUT punches per day IN 9 00 9 00 9 00 9 00 9 00 12 00 12 30 12 00 12 00 13 00 13 30 13 00 17 00 17 30 18 00 18 00 OUT IN OUT 2 3 4 6 1 2 3 4 1 2 3 1 2 3 6 1 Please go to the next page for setting When you select VN Card the clock will remember the last imprint and automatically switch the IN and OUT columns by distinguishing each card with barcode Up to 100 card...

Page 22: ... the next page Pay period is fixed when you select Card Type After the Step 2 the display will be as shown in the left figure and the Step 3 is skipped You only have to do is set the pay period sending date day in the Step 4 If error E 49 appears when you try to change settings then you must reset all cards before proceeding See All Cards Reset on page 49 Example Change C1 with weekly period to C4...

Page 23: ...riod Set the desired pay period ending day which comes within two weeks from today Monthly Period Push the CHANGE button to set the desired date For example if the pay ending date is the 20th set the pay ending date at 20 Note If the pay ending date is the end of the month make sure to set at 31 Weekly Period Set the desired pay period ending day which comes within a week from today 1 Push the SET...

Page 24: ...y year thereafter No further manual setting is necessary 1 2 The setting for daylight saving time will be described using the following example When there is a time change between the IN and OUT because of the Daylight Savings settings an S will appear on the calculated result as a record mark In order to prevent miscalculations on the day you adjust the Daylight Savings time punching OUT the next...

Page 25: ...f the display changes from flashing to steady and the mark is displayed under SU Wait a few seconds then start on Step 6 SET FUNCTION CHANGE Month Date Year 1 Push the FUNCTION button for 3 seconds 2 Push the FUNCTION button and position the next to the DAYLIGHT SAVING mark DAYLIGHT SAVING DAYLIGHT SAVING DAYLIGHT SAVING DAYLIGHT SAVING mark means starting date setting SET FUNCTION CHANGE Month SE...

Page 26: ...d push the SET button At that moment ending date of the display changes from flashing to steady and the mark is displayed under SU SET FUNCTION CHANGE Month Date Year mark means ending date SU SU SET FUNCTION CHANGE Month SET FUNCTION CHANGE Month SET FUNCTION CHANGE Date SET FUNCTION CHANGE Date SET FUNCTION CHANGE DAYLIGHT SAVING DAYLIGHT SAVING DAYLIGHT SAVING DAYLIGHT SAVING DAYLIGHT SAVING DA...

Page 27: ...ime settings SET FUNCTION CHANGE Month Year SET FUNCTION CHANGE SU SET FUNCTION CHANGE SU Deleting the Daylight Saving Time Settings For cancelling the daylight saving time setting change the Month of the starting date to two dashes or 1 Push the FUNCTION button for 3 seconds 2 Push the FUNCTION button and position the next to the DAYLIGHT SAVING mark DAYLIGHT SAVING DAYLIGHT SAVING DAYLIGHT SAVIN...

Page 28: ...e setting these 2 options can not be selectable 2 Once you select Hundredths 1 100 rounding setting will return to the clock default If necessary see the Setting Rounding section in this manual 3 When you use the clock with calculation select C1 or C3 in Card Type setting only calculation result is printed in Hundredths 1 100 IN and OUT punches are always printed in Regular Minutes 1 60 24 The clo...

Page 29: ...FUNCTION button and position next to the PRINT FORMAT mark The flashing number can be changed Select the Print Format 4 Push the CHANGE button to set the middle number at 2 for Hundredths 1 100 and then push the SET button At that moment the flashing changes to Language Select the Minute Type 5 Push the CHANGE button to set the right side number at 4 for French and then push the SET button At that...

Page 30: ...ation effective time zone and maximum settings of 4 Break times and you can regulate the day s working rules The day s partition that is the schedule s standard is the Day advance time and this time is optional Example 6 ADVANCED SETTINGS Calculation effective time zone Day advance time Day advance time Common schedule START 8 30 12 00 13 00 15 00 15 30 END 17 30 No calculation No calculation Brea...

Page 31: ...you select C3 in the Card Type setting and exceed the Max in value within the same day no more punch is accepted on the rest of the day until the next Day advance time comes Then the next punch is regarded as the 1st IN punch on the next day when you exceed the Day advance time 31 IN OUT Max In Value Maximum hours for OUT punch Day advance time Day advance time When you reach the Max in value with...

Page 32: ...ON SCHEDULE mark start break2 start end break1 start break2 minutes Example 1 FUNCTION CHANGE SET COMMON SCHEDULE Hour Hour Start FUNCTION CHANGE SET COMMON SCHEDULE FUNCTION CHANGE 4 In this case push the CHANGE button to set at 30 And then push the SET button 3 Push the SET button At that moment the flashing changes to Hour In the case of the example push the CHANGE button to set at 8 and push t...

Page 33: ...ide number at 6 and push the SET button At that moment the flashing changes to Hour In the case of the example push the CHANGE button to set at 12 and then push the SET button At that moment the flashing changes from Hour to Minute Set the break 1 start time 8 In this case push the CHANGE button to set at 00 and then push the SET button Hour SET FUNCTION CHANGE SET FUNCTION CHANGE SET FUNCTION CHA...

Page 34: ...reak 1 start time as illustrated in the figure on the left Set the break 1 minutes Set the break 2 start time Set the break 2 minutes COMMON SCHEDULE 12 Make setting for the break 2 minutes in the same manner as for the break 1 minutes as illustrated in the figure on the left COMMON SCHEDULE FUNCTION CHANGE SET COMMON SCHEDULE FUNCTION CHANGE SET COMMON SCHEDULE FUNCTION CHANGE SET FUNCTION CHANGE...

Page 35: ...tart Example 3 3 Push the SET button At that moment the flashing changes to Number of a day of the week 4 In this case push the CHANGE button to set at 5 and then push the SET button 5 Next push the CHANGE button to set at 6 and then push the SET button When the extra schedule is applied to only one day in the week leave the right digit The schedule on Friday Saturday Monday Tuesday Wednesday Thur...

Page 36: ... set the left side number at 5 and then push the SET button At that moment the flashing changes to Hour In the case of the example push the CHANGE button to set at 12 and then push the SET button At that moment the flashing changes from Hour to Minute 9 In this case push the CHANGE button to set at 30 and then push the SET button Set the end time EXTRA SCHEDULE EXTRA SCHEDULE EXTRA SCHEDULE EXTRA ...

Page 37: ...sh the CHANGE button twice to set the left side number at 8 and then push the SET button At that moment the flashing changes to minute Set the break 1 start time Set the break 1 minutes 13 14 In this case push the CHANGE button to set at 30 and then push the SET button Range of values 1 90 min FUNCTION CHANGE SET FUNCTION CHANGE SET FUNCTION CHANGE SET FUNCTION CHANGE SET EXTRA SCHEDULE EXTRA SCHE...

Page 38: ...TION button and position the under the COMMON SCHEDULE mark 4 In this case push the CHANGE button to set at 17 and then push the SET button Range of values 1 24 hr 3 Push the CHANGE button 5 times to set the left side number at 5 and then push the SET button In case of EXTRA set at 6 At that moment the flashing changes to Hour SET FUNCTION CHANGE SET FUNCTION CHANGE COMMON SCHEDULE COMMON SCHEDULE...

Page 39: ...the SET button COMMON SCHEDULE COMMON SCHEDULE FUNCTION CHANGE SET FUNCTION CHANGE SET Minute Hour Minute COMMON SCHEDULE FUNCTION CHANGE SET Core start 39 31 35 IN OUT IN Example You can set the special mark printing which means the punch between Core start time and Core end time except Break time Special mark printing makes it possible to easily see an employee s late in or early out Calculation...

Page 40: ...our Minute COMMON SCHEDULE FUNCTION CHANGE SET Core end 40 7 Push the SET button once again 36 32 Applicable day s of the week 1 Start time of calculation effective time zone 1 2 Start time of core time for special mark printing 2 3 End time of core time for special mark printing 3 4 End time of calculation effective time zone 4 5 Max in value Limit hours for OUT punch 5 6 Start time of break time...

Page 41: ...t result with the Rounding Unit that you have selected The fractions that occur after rounding will be omitted For Punch Time Rounding the recorder rounds both the time IN and OUT and then it calculates the hours from the time IN and OUT When rounding the time IN it will raise the fractions that occur And for the rounding of time OUT it will omit the fractions IN OUT 9 05 16 55 Example Rounding Un...

Page 42: ...d then push the SET button Types of rounding hours Hourly rounding punch Punch time rounding 1 2 1min 3min 5min 6min 10min Rounding unit 12min 15min 20min 30min Example Type of rounding is the Punch Rounding unit is 15 min 1 When you select Hundredths 1 100 for the minute print format in the Print Format setting these 3 options can not be selectable ROUNDING FUNCTION CHANGE SET ROUNDING ROUNDING F...

Page 43: ...hen you select the option 5 or 6 in the Print Format setting the irregular mark appears instead of AM PM indication and will change to in the afternoon 43 15 39 1 2 Automatic IN OUT printing column shift 1 Irregular mark for irregular recognition 2 Function No Function Monday Friday Program No 1 No setting 05 00 Day advance time Next day 09 00 12 00 17 30 05 00 Program No 2 Program No 3 1 2 3 Mon ...

Page 44: ...o 1 1 Push the FUNCTION button for 3 seconds 2 Push the FUNCTION button and position the next to the WEEKLY PROGRAM mark 44 40 15 WEEKLY PROGRAM SET FUNCTION CHANGE Program No WEEKLY PROGRAM SET FUNCTION CHANGE Day o the week Select the Program No 4 Whenever you push the CHANGE button on and off appears on the display alternately In case of the example push the CHANGE button to show off because th...

Page 45: ...he right side digit 6 Select all applicable days of the week in the same manner as above When you finish setting the display changes as shown in the left figure and now you can set the starting time 45 17 41 WEEKLY PROGRAM SET FUNCTION CHANGE Starting Time Set the Starting Time 9 For the printing column Select the Desired Function WEEKLY PROGRAM SET FUNCTION CHANGE WEEKLY PROGRAM SET FUNCTION CHAN...

Page 46: ...TU WE TH FR SA WEEKLY PROGRAM SET FUNCTION CHANGE SU MO TU WE TH FR SA Setting the Program No 2 3 Push the CHANGE button and the Program No will start flashing Push the CHANGE button once again to set the Program No at 2 or 3 Make settings for the Program No 2 3 in the same manner as for the Program No 1 If you want to confirm all detailed settings in one time printing list of program setting is a...

Page 47: ... button and change settings in the same manner as you originally set Deleting the Weekly Program Refer to the previous setting section and select the program No by pushing the CHANGE button which you want to delete Once the desired program No starts flashing push the SET button and set off for all the days of the week At that moment the display will be as shown in the following figure and now the ...

Page 48: ... DATE TIME button and the FUNCTION button at the same time for 3 seconds Then the display changes and shows PS on the upper left and you can set a password The flashing number can be changed In case of the example push the CHANGE button to set at 12 and then push the SET button At that moment the flashing will change to the last two digits Set the first two digits 3 Next push the CHANGE button to ...

Page 49: ...will change to the last two digits 3 In case of the example push the CHANGE button to set at 34 and then push the SET button At that moment the mark is located under CARD TYPE 4 Select desired setting mode by pushing the FUNCTION button Then make any changes as explained Note If you want to change any DATE TIME settings push the DATE TIME button in Step 1 instead After entering the Password the di...

Page 50: ...epted the display changes and shows PS on the upper left At that moment the first 2 digits of the current password 12 starts flashing 3 Push the CHANGE button to set at 00 for all digits and then push the SET button At that moment display stop flashing and the setting is now completed To cancel the Password the current one must be changed to 0000 Example The current password is 1234 and cancel it ...

Page 51: ...from memory Only for VN card users If you want to just reset all cards refer to All Cards Resetting in the following pages of this section Only for VN card users Reset switch inside the small round hole Push the reset switch with a pointed implement while pushing the DATE TIME and CHANGE button At that moment the display change to AC And after a few seconds the display changes to date time 1 0 00 ...

Page 52: ...a new one with the same number or the one which is not used in the current pay period If you are already using all time cards from No 1 to 100 you can transfer the card only to the new one with the same card number If you prefer to use another time card with a different number you must reset the corresponding card first CHANGE Example 2 Push the CHANGE button for 3 seconds When you have a card tha...

Page 53: ...er 003 and then push the SET button 4 Next insert the card 017 or push the CHANGE button to pick a new card number 017 and then push the SET button When the card number is changed this mode will finish CHANGE SET CHANGE SET 53 1 Remove the cover Cover All Cards Reset Only for VN card users You want to reset all cards manually 49 49 ...

Page 54: ... push the SET button 4 Push the SET button 3 Push the CHANGE button to show ALL and then push the SET button 4 Push the SET button one more time FUNCTION CHANGE FUNCTION CHANGE FUNCTION CHANGE SET FUNCTION CHANGE SET 54 1 Remove the cover Cover The number of cards 50 2 Push the FUNCTION and CHANGE button for 3 seconds The number of cards that you are using will be shown on the display 2 Push the F...

Page 55: ...1 Push the CHANGE button and the SET button at the same time for 3 seconds At that moment CL is indicated on the upper left of display 2 Insert a blank time card and a list is printed out Note If no card is used in the current pay period the display automatically returns to normal clock indication in 3 seconds Total Pages Page No Total Pages Page No With this function you can check which numbers o...

Page 56: ...f the lid and then release it from the two clasps Position the battery as shown in the figure on the left The connector cord should be on the right side as shown in the figure Connect the connector Tuck away the connector cord into the open space in the compartment Insert the lid into the slot as shown on the left Keep pressing it down until it hooks to the clasp Make sure the cord is not caught w...

Page 57: ...above close the cover If the error number continues to be displayed contact the store from whom you bought the unit Input the correct password you set 4 digit numbers Correctly set the daylight saving time Check the setting contents and input the correct figures CPU Error The remaining life of lithium battery for memory back up is short Card inserted on wrong side Inserted time card was wrong type...

Page 58: ...emory error When the card that you are using becomes full before reaching the pay period ending date day E 50 E 51 E 52 E 59 End No Error causes Action 58 54 54 Error No Causes and Actions continued The unit does not operate Check whether the power cord is properly in an AC outlet The unit does not print Check whether the ribbon is installed in place Print is not located in the right place Check w...

Page 59: ...e years of cumulative power failure hours after the date of shipment Optional battery 100 time printing or 24 hours Temperature 5 to 45 C 23 to 113 F Humidity 20 to 80 RH no condensation The unit operates normally at temperatures of 5 C or below but the print density reaction of the liquid crystal display and the number of prints at power failure are inferior to those at normal temperature operati...

Page 60: ...t mm 11 TIME CARD SPECIFICATIONS Monthly Weekly Bi Weekly both sides with barcode 1 VN Card 86 7 R2 96 23 6 184 Signature From VN DEPT NO NAME 7 C8 96 23 6 001 Signature DEPT NO NAME Sample Recommended Paper Thickness 0 40 0 05mm Note ...

Page 61: ...es 2 S Card Front Side Back Side 61 62 57 NO DEPT PAY PERIOD ENDING NAME REGULAR TIME OVERTIME IN OUT IN OUT 1 Signature NO DEPT PAY PERIOD ENDING NAME REGULAR TIME OVERTIME IN OUT IN OUT 2 Signature 90 29 6 86 7 12 R2 C8 96 23 6 7 12 C8 R2 Unit mm 184 Note ...

Page 62: ...62 58 63 Unit mm Weekly one side 3 Weekly Card Bi weekly one side 4 Bi Weekly Card 7 12 R8 84 35 6 7 86 86 12 R8 42 35 6 184 184 Recommended Paper Thickness 0 45 0 05mm Note ...

Page 63: ...63 ...

Page 64: ...Q0285 61200 ALL RIGHTS RESERVED 2012 64 ...

Reviews: