


eNgLiSH
1. SET OF PARTS
User manual × 1
Removeable drawer × 1
Anchoring bolt (for concrete) × 1
AA batteries × 4
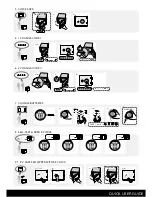
2. PREPARATIONS
NOTE: For security reasons the safe is shipped and delivered locked, without
batteries in the lock. The safe cannot be opened without batteries. Therefore
batteries have to be fitted before the safe can be opened for the first time.
The batteries are inserted behind the front panel on the front side of the safe
door.
Remove the front panel by turning it anti-clockwise and then pulling it towards your-
self. The front panel is connected to the back panel by wires. The battery compart-
ment is behind the front panel.
Insert the four AA batteries enclosed in the external battery pack. Pay attention to
the polarity (+ and -) of the batteries.
If the batteries have been inserted correctly, the LCD will display "SAFE" followed
by "good". A sound should be heard and a yellow and red light should come on. If
no sound is heard or nothing appears on the LCD, the batteries are either dead or
have been installed incorrectly.
Put the front panel back in place by first making sure that the clips fit into their
holes and then turning the front panel clockwise. Note: Make sure that none of
the wires are trapped.
The safe can now be locked/closed and unlocked/opened with the preset factory codes
"1 – 2 – 3 – 4 –5 – 6" and "5 – 6 – 7 – 8 –9 – 0". See 3. a) – d).
NOTE: The factory codes should immediatly be changed to personal codes as
soon as the preparations are complete.
3. OPEN SAFE
Press "START" and enter code* (entering will
always
be interrupted if there is an
interval of more than 5 seconds between two entered digits).
A sound and a yellow light confirm that the right code has been entered.
Turn the handle clockwise until it stops.
Open safe door by pulling the handle towards you.
*
The preset factory codes are "1 – 2 – 3 – 4 –5 – 6" and "5 – 6 – 7 – 8 –9 – 0"
.
NOTE:
If wrong code is entered 5 times in a row, the lock will be blocked for up to 3
minutes.
NOTE:
To hide the code which is normally displayed on the LCD while entered, keep
"START" pressed while entering the code.
•
•
•
•
a)
b)
c)
d)
a)
b)
c)
d)
4. ANCHOR SAFE
To prevent unauthorised individuals from moving the safe, anchoring the safe to the
floor is strongly recommended. There is an anchoring hole in the bottom of the safe.
The safe is anchored to a concrete floor using the anchoring bolt enclosed. If the floor
is not concrete, select a different type of anchoring (not enclosed), based on the mate-
rial into which the safe needs to be fixed.
4.1 ANCHORINg TOOlS
Pencil
Socket wrench 13 mm (concrete)
Drill Ø14 mm (concrete)
Electric hammer drill (concrete)
Hammer
4.2 ANCHORINg
Open the safe and remove all interior fittings.
Place the safe in an appropriate position.
Mark out the drill holes from the inside of the safe (using a pencil).
Drill holes, 55 mm deep (concrete).
Replace the safe.
Fix the safe with the anchoring bolt enclosed (concrete).
5. ClOSE SAFE
Push the safe door shut. (Before the door is shut, make sure that the bolts are
not sticking out. If the bolts are sticking out, repeat 3. a) – c).
Turn the handle anti-clockwise until it stops.
•
•
•
•
•
a)
b)
c)
d)
e)
f)
a)
b)
6. USER CODES
The electronic lock is equipped with two user codes (code I and code II) which can be
used and changed independently of each other.
6.1 CHANgE CODE I
Make sure that the safe door is open.
Press "START". The LCD displays "– – – – – –”
Enter your new code (6 digits) then press the white button on the inside of the
door.
The LCD displays "IN", followed by the new code.
Test the new code
by locking and unlocking the lock
with the safe door open
.
If it works, the safe is ready to be used with the new code. If it does not work,
repeat steps a) – e).
6.2 CHANgE CODE II
Make sure that the safe door is open.
Press the white button on the inside of the door.
Press "START" within 10 sec. The LCD displays "– – – – – –"
Enter your new code (6 digits). The LCD displays "IN", followed by the new code.
Test the new code
by locking and unlocking the lock
with the safe door open
.
If it works, the safe is ready to be used with the new code. If it does not work,
repeat steps a) – e).
7. CHANgE BATTERIES
The batteries last for about 1 year under normal circumstances. Low batteries are indi-
cated by the LCD which displays "LOW-BAT" when "START" is pressed.
Note: Once you have begun changing the batteries, you have 1 hour to com-
plete the process. Otherwise the pesonal codes may be reset to factory codes
"1 – 2 – 3 – 4 –5 – 6" and "5 – 6 – 7 – 8 –9 – 0".
Remove the front panel by turning it anti-clockwise and then pulling it towards your-
self. The front panel is connected to the back panel by wires. The battery compart-
ment is behind the front panel.
Remove the old batteries.
Insert the four AA batteries enclosed in the external battery pack. Pay attention to
the polarity (+ and -) of the batteries.
If the batteries have been inserted correctly, the LCD will display "SAFE" followed
by "good". A sound should be heard and a yellow and red light should come on. If
no sound is heard or nothing appears on the LCD, the batteries are either dead or
have been installed incorrectly.
Put the front panel back in place by first making sure that the clips fit into their
holes and then turning the front panel clockwise. Note: Make sure that none of
the wires are trapped.
a)
b)
c)
d)
e)
a)
b)
c)
d)
e)
a)
b)
c)
d)
e)
8. SElF-TEST & ERROR CODES
Each time batteries are inserted, the lock automatically runs a system self-test. If the LCD
displays "SAFE" followed by "good", eveything is OK.
If an error code is displayed, a problem has occured. Please contact your local dealer/
retailer.
Err F
"START" button error
Err B
white button error
Err E
EPROM error
Err 1 – 9
numerical button error
9. SAFES EQUIPPED WITH KEY lOCK
9.1 OPEN SAFE
Insert one of the keys supplied into the keyhole.
Note:
The key only fits the keyhole in one position – do not force it.
Turn the key clockwise until it stops.
Open the safe door by pulling the key towards you.
9.2 ClOSE SAFE
Insert one of the keys supplied into the keyhole.
Note:
The key only fits the keyhole in one position – do not force it.
Push the safe door shut. (Before the door is shut, make sure that the bolts
are not sticking out. If the bolts are sticking out, repeat steps a) – b) in section
"9.1
open
safe
").
Turn the key anti-clockwise until it stops.
Remove the key from the keyhole and keep it in a safe place, away from the safe.
Note: The spare key must not be kept in the safe.
a)
b)
c)
a)
b)
c)
d)
Summary of Contents for Secure Disc
Page 16: ......


