background image

Quick Reference Guide

6

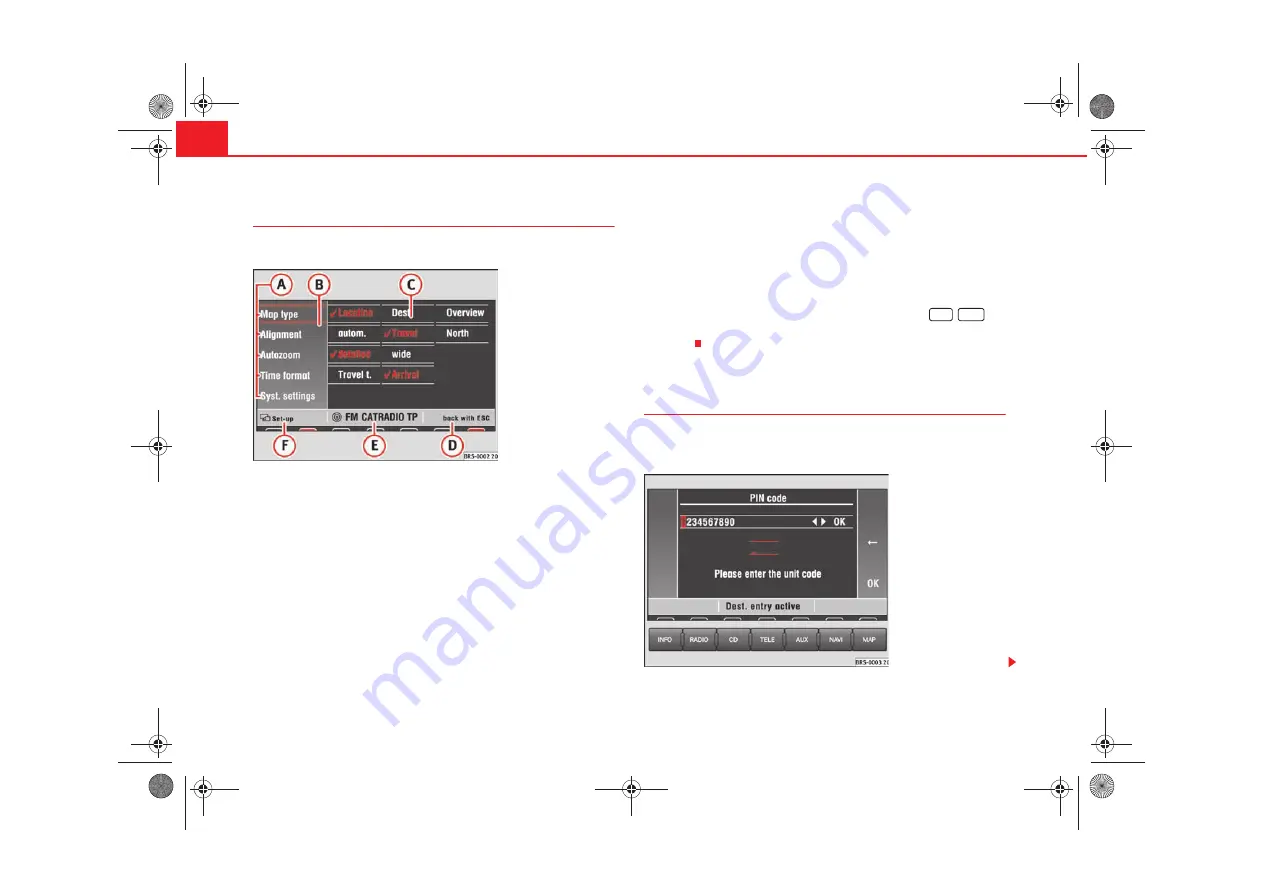
Display elements on the screen

This section describes the elements seen in the display.

The functions or sub-menus shown on the screen can be called up by 
pressing the function key situated directly next to them. This can also be 
carried out by first turning the menu knob and then pressing it.

Use the menu button to move the red selector frame. It will disappear 
from the screen if the unit is not used for 30 seconds and will appear 
again if the menu knob is turned.

 The selection of the function characteristics, such as 

Destin

 or 

Overview

,  

can 

only

 be reached by pressing and turning the menu knob.

The right part of the status bar contains additional information or the 
option “back with ESC”

Details of the active audio source or navigation status are shown in the 
centre part of the status bar.

The left part of the status bar shows the current menu.

Below the status bar

A light red marking indicates which source is active. Press the key beneath it 
to call up the main menu for this source.

A dark red marking indicates which source is still active in the background 
(the radio in this example). Press the key beneath it to call up the main menu 
for this source.

If the text  

CD ?

  is displayed in the small marking above the 

/

button, the CD inserted in the CD drive can not be read and may be 
damaged.

Switching on and off

A safety code made up of four characters must be entered 
when switching on for the first time.

Fig. 2  Display elements

A

A

A

B

A

C

A

D

A

E

A

F

CD6

NAVI

Fig. 3  Entering the safety 
code

radionaving  Seite 6  Mittwoch, 30. März 2005  12:26 12

Summary of Contents for MFD2

Page 1: ...auto emoci n radio navigation MFD2 system owner s manual manual de instru es...

Page 2: ...focus and volume Navigation General frame Destination entry Destination memory Parameters for route calculation Map and symbol displays Route guidance Information and system settings Information Syst...

Page 3: ...tated Some sections of this booklet do not apply to all vehicles If this is the case a text at the start of the section indicatesto which vehicles it applies e g Applies to vehicles with CD changer Th...

Page 4: ...the different radio functions The high volume may present a danger to you and for others Adjust the volume in a way that you can distinguish surrounding noise for example horns sirens etc The auto ra...

Page 5: ...will help you to quickly familiarise yourself with the control elements On off knob push and volume control turn The volume control will regulate the volume of the audio source currently Fig 1 Operat...

Page 6: ...ulled back into the unit if it is not fully withdrawn within 10 seconds Store flagged destination The unit will store the current vehicle position when this button is pressed When this button is press...

Page 7: ...n or the option back with ESC Details of the active audio source or navigation status are shown in the centre part of the status bar The left part of the status bar shows the current menu Below the st...

Page 8: ...switched off It will be switched off automatically after an hour to stop the vehicle battery from running down If no CD has been introduced into the unit upon entering the safety code and pressing the...

Page 9: ...fic radio mute function page 9 Setting waveband Muting Set up for RDS functions page 11 Settings Scan AS The stations with the strongest reception are either scanned or stored automatically Playing st...

Page 10: ...n buttons will be overwritten The process of searching for and storing the station names takes a few seconds Setting waveband Muting Press in the radio main menu page 8 fig 4 to see the frequencies Pr...

Page 11: ...r in the middle of the screen The frequency will change as long as the buttons or are pressed and held For fine tuning release the button or and press the buttons or again within 2 seconds to set the...

Page 12: ...stations A tick will indicate which options have been selected Function keys fixed Only appears the station name variable Displays infor mation in continous text form Auto The selected regional progr...

Page 13: ...t The CD player contains no parts that have to be serviced Any repair work that needs to be done should therefore be carried out by an Official SEAT Service exclusively Caution Only 12 cm standard CDs...

Page 14: ...surfaces and strong vibrations may cause the CD to jump The CD play function should be switched off in this case Sound sound focus and volume This section describes how the sound character and the vol...

Page 15: ...d in the interior This system increases the equipment volume higher or lower according to the position selected Minimum volume of traffic announcements Minimum volume for telephone conversations Minim...

Page 16: ...this chapter answers can be found to the following questions What rules do I have to keep to when using the navigation system page 16 Safety How do I use the navigation CD page 16 The navigation CD C...

Page 17: ...and insert the navigation CD with the written side facing up Push the CD into the slot until the MFD2 radio navigation system pulls it in The program stored on the navigation CD is loaded Do not remov...

Page 18: ...guidance function page 38 Route guid ance Field for entering your destination page 18 Destination entry Allows entering a previous destination to the final destination A stopover destination is entere...

Page 19: ...d for the first time The last used destination will be displayed if a destination has already been entered There are various methods of entering a destination or a stopover destina tion The procedure...

Page 20: ...destination from the travel guide A travel guide is only available on certain navigation CDs Further search functions depend on the content of the travel guide Store delete or arrange destinations in...

Page 21: ...of how many people live there Both a village of 100 inhabitants and a city with 1 million are named as towns A list of names to choose from will appear for town names which are used more than once Th...

Page 22: ...not individually A total of 14 last destinations can be stored in the memory A destination will not be stored in Last dest until route guidance has started If you are not able to store any more desti...

Page 23: ...l be analysed and the special destinations there will be listed The type and number of special destinations will be determined by the content of the Navigation CD Destination on the map A crosshair ca...

Page 24: ...guidance function cannot be started if the figures entered are not within this area and the navigation CD for Germany has been entered Use the following data to estimate the position of your location...

Page 25: ...ter input menu Enter a name for the destination like for example Mr Smith or Vacations accomodations Press to save the destination with the name The destination can now be called up from the memory as...

Page 26: ...wish to keep the original name and not the new one press the button page 4 fig 1 Your alterations will not be stored Sorting destinations The various different addresses in the destination memory are...

Page 27: ...n Sort select now appears again at the top of the screen Press the button page 4 fig 1 to close the sort func tion The other destinations will be moved down if you move a destination to a position tha...

Page 28: ...o delete the destination press Deleting the entire destination memory Starting in the Navigation main menu press followed by then When asked for confirmation press If you do not wish to clear the dest...

Page 29: ...he traffic jam itself Once the dynamic route guidance function has been activated you will be informed that the route is being recalculated due to traffic problems if any have been registered Traffic...

Page 30: ...ur position either before or after this intersection in metres and also enter the direction of travel using the points of the compass Confirm your entry by pressing The screen display will return to t...

Page 31: ...etches of the journey Stretches of the journey ahead and or parts of the route list can be blocked manually Menu for blocking and traffic jams Press the traffic jam button page 4 fig 1 if you want to...

Page 32: ...n question The display will be switched to the map You will hear an announcement that The route is being calculated The excluded stretch of the route will be shown as a dotted blue line on the map Pre...

Page 33: ...ing and more detailed when making a turn Journey time or arrival time Distance to destination or stopover Road name Vehicle position The red arrow points in the direction of travel The route ahead is...

Page 34: ...away the turning point is The distance to the next change of direction will be shown in the display after you have turned Changing the scale You can choose from a total of 13 different scales Press o...

Page 35: ...of travel at the top and an overview map as of 5 km per cm with North at the top will be shown auto The system selects the map display Travel The display always adjusts to the direction of travel To t...

Page 36: ...he crosshair Press in the map display page 32 fig 37 to call up the shift function Using the right hand function keys or by turning pressing the menu knob move the the crosshair to the destination of...

Page 37: ...d Route list The route list is a list of all route sections which will be trav elled through with active route guidance Press in the map display page 32 fig 37 to see the route sections of your curren...

Page 38: ...only possible using the wheel sensors underground garage etc the GPS coordinates will be displayed in grey The GPS coordinates will no longer be shown following a long distance with NO FIX in the disp...

Page 39: ...re you have reached your destination The route guidance function can only be started if you have already entered a destination Note You should drive on a bit further if the system makes the announceme...

Page 40: ...on the left You will also be told which exit to use off a roundabout before you enter it e g That you should leave by the second exit In a roundabout this means Turn on the secound exit to the right...

Page 41: ...ortant safety warnings page 16 Safety Note The direction arrow in the map display will be faded out if you are travelling in the same direction for an extended period WARNING continued radionaving Sei...

Page 42: ...messages are stored chronologically The latest message is at the top of the list The selection bar will spring automatically to the next message once the first message has been played The system will...

Page 43: ...start of your journey TIM standby Traffic reports will be recorded for two hours after you have switched off the unit Note The list of announcements cannot be opened whilst a traffic announcement is b...

Page 44: ...between the day and night displays and Sets the screen settings for the day and night display If the system does not have the correct time you may adjust the clock by turning and pressing the menu but...

Page 45: ...Aor video V source Switches to an audio unit which is connected to the system Settings for the units connected to the system A V The unit AV1 or AV2 sends audio and video signals sound and picture AUD...

Page 46: ...destinations 21 Letters symbols numbers 20 Demonstration 29 Destination 18 Renaming 25 Sorting 25 Storing 24 Destination entry 18 Destination memory 21 Destination on the map 22 Intersection centre 2...

Page 47: ...1 Route guidance 30 38 Route list 36 42 Route options 27 S Safety code 7 Scale 33 Scan 12 Radio stations 8 Setting the clock 42 Settings Radio 8 Software version 42 Sound 13 Special characters 20 Spok...

Page 48: ...Index 47 W Waveband setting 9 radionaving Seite 47 Mittwoch 30 M rz 2005 12 26 12...

Page 49: ...t All rights on changes are reserved This paper has been manufactured using bleached non chlorine cellulose SEAT S A Reprint 15 04 05 SEAT S A preocupa se por manter um constante desenvolvimento dos s...

Page 50: ...Ingl s Portugu s 5P0012006G 02 05 GT9 auto emoci n...

Reviews: