background image

11

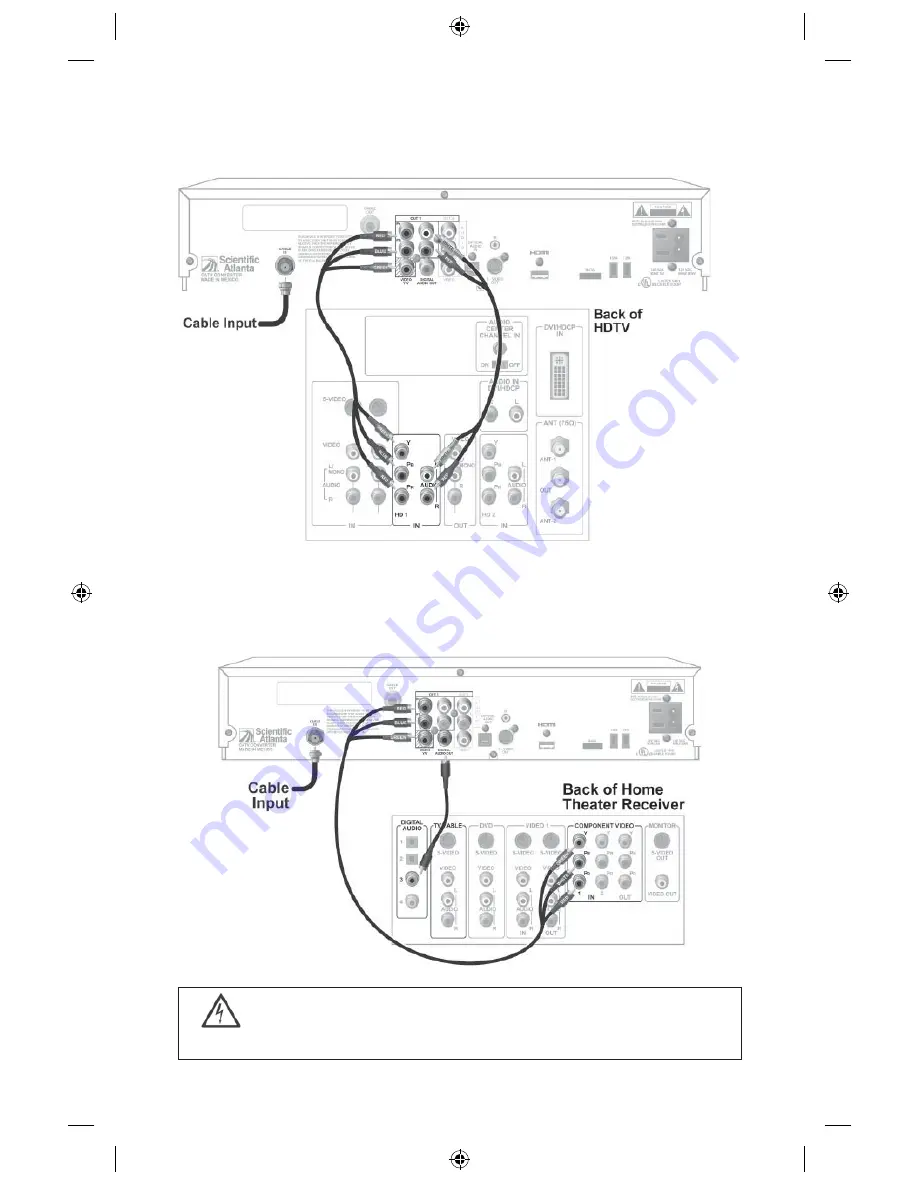
WARNING:

 Electric shock hazard! Unplug all electronic devices before 

connecting or disconnecting any device cables for the digital receiver.

Connecting the Digital Receiver to a Theater System  

with Component Input (PrPbY/V)

View picture on component input.

Connecting the Digital Receiver to an HDTV  

with Component Input (PrPbY/V) — continued

View picture on component input.

CBS90064_SciAtl-Pgs   11

5/29/09   2:31:17 PM

Summary of Contents for Cox Business Video Digital Receivers

Page 1: ...CBS90064_SciAtl Pgs 1 5 29 09 2 31 13 PM...

Page 2: ...have questions would like to inquire about other programming options or want to learn about Cox Business InternetSM and Cox Digital Telephone please call your local customer care representative at the...

Page 3: ...w Program Event 16 Browse By Date 16 Parental Control Features How to Change Your Blocking PIN 17 How to Block Channels 17 How to Watch a Blocked Program 18 How to Turn Parental Control On Off 18 Cox...

Page 4: ...usic on Television Music Choice 27 Performance Rights Guidelines for Music Choice 27 Pay Per View Events 28 Helpful Hints and Troubleshooting 28 Frequently Asked Questions 29 Index 35 CBS90064_SciAtl...

Page 5: ...location please contact Cox Business customer service at 866 272 5777 Safeguard Your Equipment Avoid personal injury and damage to your equipment Place all electronic equipment on a flat surface that...

Page 6: ...power surge protector is recommended for use with your equipment Make Sure Your Equipment Is Properly Grounded This equipment has a two prong plug It is grounded when the plug is inserted properly in...

Page 7: ...osure to rain or water Operation is not normal even after attempts to rectify as outlined in this guide The equipment is dropped or the cabinet of this equipment is damaged This equipment exhibits a d...

Page 8: ...n lit not used at this time 4 Increases or decreases volume 5 Confirms or accesses on screen options 6 Scrolls up or down through the channels 7 Accesses on screen Interactive Program Guide IPG 8 Conn...

Page 9: ...am to reconnect your system if you move the equipment or add new equipment Disconnect the power from the digital receiver before connecting or changing cable connections Do not place another component...

Page 10: ...or channel 3 10 WARNING Electric shock hazard Unplug all electronic devices before connecting or disconnecting any device cables for the digital receiver To TV Connecting the Digital Receiver to an HD...

Page 11: ...ice cables for the digital receiver Connecting the Digital Receiver to a Theater System with Component Input PrPbY V View picture on component input Connecting the Digital Receiver to an HDTV with Com...

Page 12: ...tlet Be sure the cable connections to the television and digital receiver are finger tight only Never use a wrench to tighten these connections Connecting the Digital Receiver to a Theater System with...

Page 13: ...of cable receiver s menu and IPG SETUP to all devices Select digital CABLE receiver Use keypad 0 9 to directly select channels Select AUX device Use A B C or SETTINGS to access additional cable featur...

Page 14: ...tuning To go one channel up from the current channel press CH To go one channel down from the current channel press CH To see the previously tuned channel press LAST To see the next channel that you s...

Page 15: ...Asterisks indicate that a program is showing now Browse By Theme A theme is a category that describes the kind of programs available such as adventure comedy news sports etc 1 Press GUIDE on the remot...

Page 16: ...in the Title view Or press SELECT to watch the highlighted program if it is in the current time period Note Asterisks indicate that a program is showing now Browse By Date Use the Browse By Date featu...

Page 17: ...2 At the General Settings menu press s or t to highlight BLOCK PIN then press SELECT 3 Press s or t to highlight CHANGE then press SELECT 4 Enter your CURRENT PIN 5 Enter your NEW PIN 6 Re enter your...

Page 18: ...s How to Turn Parental Control On Off When Parental Control is on the blocks set up earlier are enabled blocked channels or programs are locked out A padlock symbol on the Channel Banner shows that a...

Page 19: ...slow motion press PLAY 8 To see an instant replay press replays last 8 seconds 9 To return to live TV press LIVE Recording Programs There are several ways to record your favorite programs Record Live...

Page 20: ...then tuning to another channel and recording a second program For details on recording programs live see Record Live TV on page 19 When recording two live programs at the same time you can watch them...

Page 21: ...ng 2 Red area of bar indicates missed programming 3 Paused status bar 4 Triangle indicates your current position in program 5 Live point of programming 6 Clear area of bar indicates programming not ai...

Page 22: ...se them manually Play a Saved Program Press DVR LIST to access saved programs Press s and t to highlight program Press SELECT Scroll to PLAY and press SELECT Erase a Program Press DVR LIST to access s...

Page 23: ...ress SELECT to edit Make edits to program Press A to accept all edits Cancel a Scheduled Recording Press DVR LIST Press A Scheduled Recordings Use s or t to highlight program and press SELECT Press B...

Page 24: ...view one program in a smaller screen while simultaneously watching another program on the main screen Watch Two Shows at Once Using PIP Press PIP ON OFF to activate the screen Change Channels in PIP S...

Page 25: ...u have an HD capable DVR receiver from Cox and an HDTV you may need to set up the HD DVR receiver so that it provides video to your HDTV in picture formats that your HDTV supports to provide the optim...

Page 26: ...g TV make sure the remote control is in Cable mode Selecting Picture Formats for High Definition TVs At any time you can change the picture format for your HDTV to select the best picture quality for...

Page 27: ...time day or night Performance Rights Guidelines for Music Choice Your commercial Music Choice subscription includes performance rights for all Music Choice channels Make sure you are complying with th...

Page 28: ...ake sure the power light on the digital receiver is on indicated by a green light on the front of the digital receiver Make sure the power to the TV is on If the system setup includes a VCR DVD and or...

Page 29: ...connected and that all connections are tight If the electrical outlet is controlled by a wall switch make sure the switch is in the ON position Frequently Asked Questions Find Answers to Frequently A...

Page 30: ...ing information across the bottom of the TV screen for example news and sports tickers The DVR on screen status bar and other graphics may cover up information scrolling on screen Press EXIT to remove...

Page 31: ...om the DVR No There is no way to recover a recording that has been erased from the Recorded List screen You can however copy programs to a VCR tape before they are erased For details see Copy a Record...

Page 32: ...own the digital receiver At 1 00 a m the inactivity clock begins If you do not press a remote button or front panel key between 1 00 a m and 1 10 a m the digital receiver displays a 5 minute warning b...

Page 33: ...storage capacity you must make space to record other programs To make more space on the DVR 1 Erase recordings that you no longer want or copy recordings you want to keep to a VCR tape and then erase...

Page 34: ...wide format the picture does not fill the width of the screen To fill the space the digital receiver automatically places bars on the sides of non HD programs You can change this display to one that r...

Page 35: ...cordings 23 moving 30 pause programs 19 30 picture formats for High Definition TVs 26 Picture In Picture PIP using 24 playing programs 19 30 power save mode 25 32 recording programs 19 31 rewind progr...

Page 36: ...ce Rights Guidelines 27 Picture formats for High Definition TVs using DVR 26 Picture In Picture PIP using DVR 24 PIN changing parental control 17 Playing programs using DVR 19 30 Power save mode using...

Reviews: