background image

OPERATING MANUAL STIMAWELL® 120MTRS                                           EN


13


3


Set-Up And First Time Starting 

The following describes the set-up and first time starting for the  
StimaWELL

®

120MTRS System: 

1.  

Place the control unit on a smooth, even surface. Please ensure that the ventilation slits 
are not covered.  

 
2.  

Please ensure that  the StimaWELL

®

120MTRS  System and other electrical  devices are not 

positioned directly adjacent to each other nor stacked; this to avoid mutual interference. 
Should this not be possible, the function of the respective devices must be monitored to 
ensure proper function. 

 
3.  

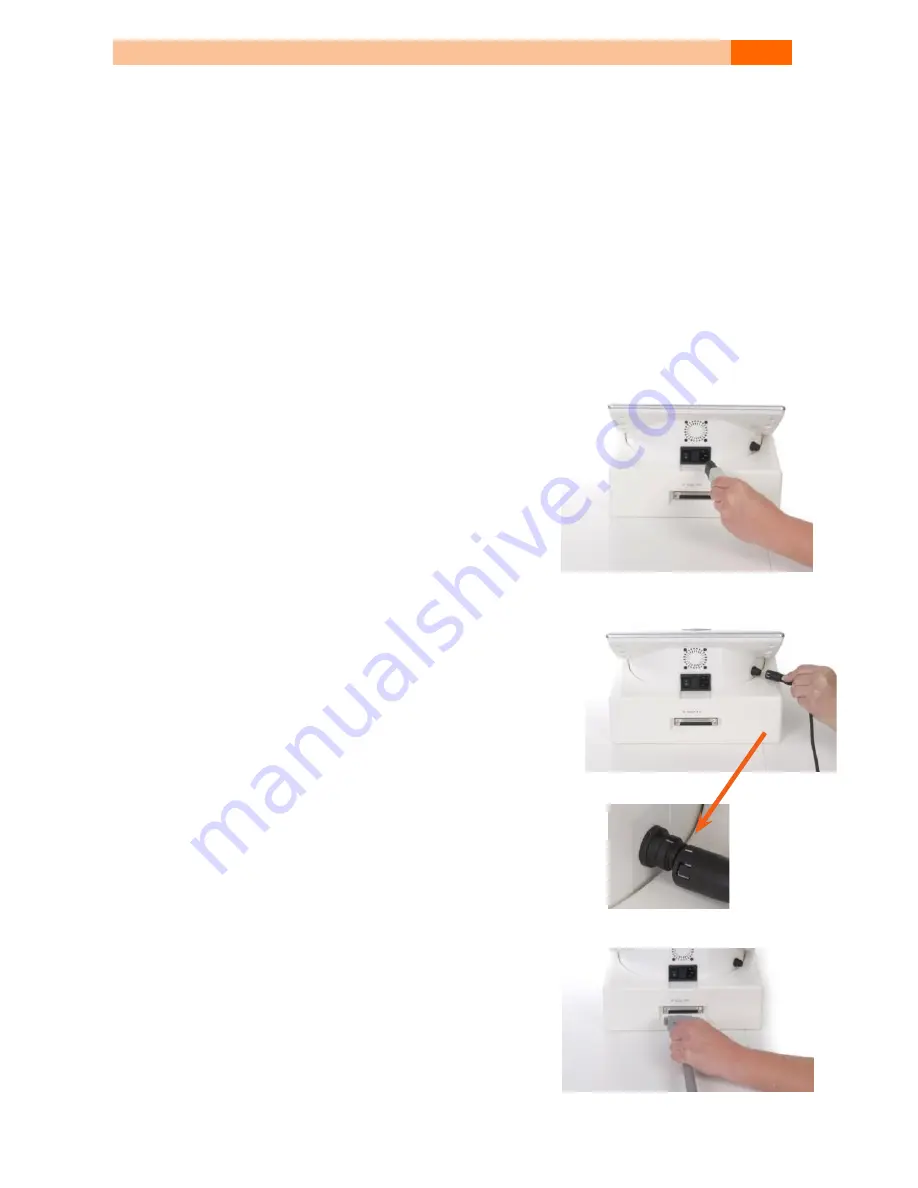
Connection For The Supply Voltage 


The connection for the mains power cable is located 
on the  rear  side of the StimaWELL

®

120MTRS Control 

Unit.  It  should  be  checked  that  the  available  mains 
power voltage and frequency values comply with the 
data on the rating plate. The control unit is then to be 
connected  to  the  mains  cable  and  the  plug  plugged 
into the mains electricity socket. 

 
4.  

Connecting The Remote Control Unit 


Connect the remote control via the connection provided 
on  the  rear  side  of  the  StimaWELL

®

120MTRS  Control 

Unit.  When  disconnecting  the  remote  control  from  the 
socket  always  grip  the  plug  housing.  Never  pull  on  the 
cable.  Please  note  here  the  white  marking  on  the  plug 
and on the socket. 

 
5.  

Place  the  StimaWELL

®

  Stimulation  Mat  and  the  Sti-

maWELL

®

120MTRS Control Unit in the required position. 

Whenever  changing  the  position  relative  to  each  other, 
first  remove  the  plug  for  the  StimaWELL

®

  Stimulation 

Mat. Do not allow the StimaWELL

®

 Stimulation Mat to fall 

when  positioning  to  avoid  damaging  the  connecting  ca-
ble and the plug. 

 
6.  

Connecting The StimaWELL

®

 Stimulation Mat 


Connect  the  StimaWELL

®

  Stimulation  Mat  via  the 

connection  socket  on  the  rear  side  of  the  Sti-
maWELL

®

120MTRS  Control  Unit.  Please  ensure  here 

the  correct  alignment.  When  disconnecting  the  Sti-
maWELL

®

 Stimulation Mat from the socket always grip 

the plug housing. Never tug/pull on the cable. 


Summary of Contents for StimaWELL 120MTRS

Page 1: ...StimaWELL 120MTRS DYNAMIC DEEP WAVE THERAPY DTW Operating Manual Art No 101781 V05 EN ...

Page 2: ...represents for your patient an effective deeply relaxing therapy system Two of the many advantages of medium frequency stimulation compared with other types are the attainment of a high level of patient compatibility and the soothing sensation which is generated by the flow of electrical current This process activates powerful muscle contrac tions and larger treatment areas and volumes can be addr...

Page 3: ... have any questions please do get in touch with us We will always be glad to help you You can reach us at schwa medico Medizinische Apparate Vertriebsgesellschaft mbH Wetzlarer Str 41 43 35630 Ehringshausen Germany Tel 49 0 6443 8333 113 Fax 49 0 6443 8333 119 export schwa medico de We at schwa medico wish you every success with your StimaWELL 120MTRS System Dr Roger Pierenkemper Dr med Bertram Di...

Page 4: ..._________________________________________________23 9 Patient Profiles ________________________________________________________24 Patient Administration __________________________________________________24 9 1 Creating A New Patient__________________________________________________24 9 2 9 2 1 Inputting Patient Data___________________________________________________25 9 2 2 Setting The Mat Size __...

Page 5: ...__________________________________58 14 3 Stimulation With Cards __________________________________________________58 14 4 Editing Or Deleting Therapy Cards _________________________________________59 14 5 14 5 1 Patient Administration __________________________________________________59 14 5 2 Evaluation ____________________________________________________________59 15 General ___________________...

Page 6: ...g spinal discs bones and soft tissue With malignant diseases in the area of application With acute new slipped disc or other instabilities in the area of application With high grade osteoporosis in the area of application With the danger of serious haemorrhaging Application on infants and children or persons with restricted communication or reaction abilities Side Effects 1 3 In the event of the o...

Page 7: ...rns below the electrode areas of the stimulation current device and result in damage to the stimulation current device Operation in close proximity e g 1 m to a shortwave or microwave therapy ME equip ment may produce instability in the stimulator output Application of electrodes near the thorax may increase the risk of cardiac fibrillation Any electrodes that have current densities exceeding 2 mA...

Page 8: ...or sensory loss in the application area Moisten the whole underlay well and evenly with water prior to the treatment to ensure sufficient and constant current flow Description Of The Symbols 1 5 Serial number Catalogue number Follow instructions for use Attention Read accompanying documents especially user manual Class II equipment Type BF applied part Manufacturer Output Date of manufacture Fuse ...

Page 9: ...ximum current take up on 240 VAC RL 500 Ω ca 0 9 A inc Heating and Stimulation Maximum power take up ca 200 W Mains fuse T 3 15 A H 250 V Max output voltage at loading RL 500 Ω 65 Vss Display Capacitive touch screen Size 7 TFT Resolution 800 x 480 Pixel Number of colours 262K Basic frequency Impulse form Biphasal symmetric rectangular Frequency 2 kHz 6 kHz deviation 1 Low frequency modulation Impu...

Page 10: ...ative humidity 30 to 90 Air pressure 500 hPa to 1060 hPa Note The respective tolerance is 15 unless otherwise stated Illustration 1 Basic frequency Illustration 2 Low frequency modulation Illustration 3 Threshold modulation Illustration 4 Combination low frequency modulation and threshold modulation Classification 2 2 The StimaWELL 120MTRS System has been classified as Class IIa in accordance with...

Page 11: ...WELL 120MTRS 1 Display Touch Screen 2 Rotary pressure controller 3 USB slot 4 Chip card insertion slot View Of The Rear Side Of The StimaWELL 120MTRS System 5 Mains cable connection 6 ON OFF switch 7 Connection for remote control plug 8 Connection for StimaWELL Stimulation Mat 9 Holder for the remote control ...

Page 12: ... button StimaWELL Stimulation Mat And Accessories 13 StimaWELL Stimulation Mat with 12 channels 14 Mat connection plug 15 StimaWELL Mat underlay 16 StimaWELL Cushion 17 StimaWELL Lordosis Cushion 18 Cable holder Leg foot elevation cube Paper roll as mat overlay Handkerchief as mat overlay Spray can for moistening the mat ...

Page 13: ...nected to the mains cable and the plug plugged into the mains electricity socket 4 Connecting The Remote Control Unit Connect the remote control via the connection provided on the rear side of the StimaWELL 120MTRS Control Unit When disconnecting the remote control from the socket always grip the plug housing Never pull on the cable Please note here the white marking on the plug and on the socket ...

Page 14: ... the StimaWELL 120MTRS Control Unit please see also Section 13 Chip Cards 4 Preparations For Stimulation 1 Place the StimaWELL Stimulation Mat on a soft couch e g a patient s couch ideally with an adjustable head piece If required you can use a StimaWELL Mat underlay 2 If you want to use mat heating it is better to switch on the heating approx 10 20 minutes before the patient s appointment time so...

Page 15: ... at the head end of the StimaWELL Stimulation Mat to provide a comfortable position for the patient 8 Hand your patient the remote control unit 5 Operating The operations menu of the StimaWELL 120MTRS Control Unit is effected directly via the integrated touch screen Simply touch the required dialog element with the finger List views can be moved by touching with the finger and then moved up or dow...

Page 16: ... 5 Button Settings Carry out general control unit settings and software updates please see Section 12 6 Button Changing View Change between the main menu and the detailed display of the proportional intensity please see Section 10 Operating Elements 7 Display Temperature The set temperature of the StimaWELL Stimulation Mat please see Section 6 1 8 Display Intensity Main intensity of the stimulatio...

Page 17: ... pressure on the respective button The temperature will then continue to be decreased increased until the finger is removed from the button or the limit value has been attained If you touch the field at a temperature of 20 C on the sym bol the mat heating is switched off Renewed touching on the symbol will reactivate the heating If you touch the field at a temperature of 20 C on the symbol the mat...

Page 18: ... can set the mat size With size L the stimulation wave moves via all 12 channels of the StimaWELL Stimula tion Mat With size M the two lower chan nels are inactive the wave moves only via 10 channels With size S only 8 channels are used whereby the 4 lower channels of the StimaWELL Stimulation Mat are inac tive This enables the area of the stimula tion area to be adapted to the body size of the pa...

Page 19: ...e Automatic Program Selection Based On Indications can be found in Section 9 2 4 1 The progression of the therapy with the Sti maWELL 120MTRS in the mode Automatic Program Selection Based On Indications is auto matically documented in the StimaWELL 120MTRS Control Unit and can therefore at all times be recalled and evaluated All important information on patient profiles can be found in Sec tion 9 ...

Page 20: ...cluding the stimulation time is reset to the status at the start If you activate the button Stop you will be asked if you really want to end the therapy session Touch on Yes to terminate the session and reset the program as well as the stimulation time to the start status Please note that In this case a session running in the mode Automatic Program Selection Based On Indications is not saved and w...

Page 21: ...to the type of the waves With a wave the impulse flows once over the whole of the StimaWELL Stimulation Mat or the selected partial area CS TS LS The number of waves in all programs is selected in such a way that as a rule the sum of the individual sequence running times produces a total running time of 10 minutes If you now set a stimulation time in excess of 10 minutes the program starts again f...

Page 22: ...n further sub groups the list will only then be displayed after selection of the respective sub group Mark the required program by touch ing If there is an information text available for the marked program the button Info is active and by touching on this button you will generate a display of the program description After marking the program confirm your input with OK to select the marked program ...

Page 23: ... as favourite the list cannot be opened If you wish to select a favourites program mark by touching If you wish to delete the selected program from the fa vourites list touch on Delete The deleted program is then no longer contained in the Favourites Touch on the button Info to view the program description for the selected program With OK you accept the program with Cancel you exit the list withou...

Page 24: ...e mode Automatic Program Selection Based On Indications the therapy is continued directly with the appropriate program which is dependent on a fixed therapy time The selected patient is displayed down left in the main menu Patient Administration 9 1 To create a new patient edit an existing patient data set and to select a patient touch in the main menu on the button Patient Administration The pati...

Page 25: ...range coloured data are obligatory in other words data such as Surname and First Name must be completed in order to continue with the patient data input procedure The white coloured data are optional and should serve for example to filter the data more precisely if you wish to carry out an evaluation of the patient data sets with your Sti maWELL 120MTRS System please see Section 12 1 1 Touch on th...

Page 26: ...ministration without having implemented the changes 9 2 2 Setting The Mat Size After confirming the patient data there opens automatically the window for the setting of the mat size Please also see Section 6 3 According to the size of your patient select the mat size S M or L Confirm your selection with Continue or return with Back to the window for the input of patient data 9 2 3 Calibration Sett...

Page 27: ...be repeated at any time if necessary Body Side Related Calibration 9 2 3 1 After selection of the mat size a help text will be displayed and this will guide you through the calibration procedure How to de activate the help texts can be found in Section 12 2 1 During the calibration you will be guided through the whole calibration procedure by text instructions which appear above the display Touch ...

Page 28: ...intensi ty of each individual channel and set to a pleasurable level for your patient If you return once more to the previous window and wish to change the main intensity stop the calibration via the Stop button and adjust the intensity by turning the rotary pressure controller again to a stimulation level which is pleasurable for your patient In our example we have set the main intensity to a val...

Page 29: ...lue of the intensity of the two lateral channels which form this channel The intensity of longitudinal channel 12 is therefore the mean value of the two lateral channels 11 and 12 because the two lower electrodes of these lateral channels form the longitudinal channel 12 Now set the required intensity of all longitudinal channels This functions in exactly the same way as for the setting of the lat...

Page 30: ...e composition of a program list with preferred programs possi ble Please Note If in isolated cases the Au tomatic Program Selection Based On Indica tions does not invoke a sufficiently compati ble and efficient program then of course you can as an alternative always resort to the Manual Program Selection mode Therapy in the mode Automatic Program Selection Based On Indica 9 2 4 1 tions Touch in th...

Page 31: ... the therapeutic measures Please Note Please note that the button Continue is only then active as long as a selection has been recorded in all three areas Course Location and Pain Scale With a pain level of 4 or less enter now the condition of the musculature of your patient You have the selection options Hypertonic Normotonic and Hypotonic Touch on one of the fields to select the musculature cond...

Page 32: ... mus culature You will then receive a description of the selected condition in the form of a text which appears below the three fields After the selection touch on Continue to proceed with the selection of a therapy focus With Back you return to the window for the selection of the therapeutic measures Now please select a therapy focus for the area muscle therapy Then touch on Continue to complete ...

Page 33: ...atient profile with the next step or recall with Back the previous window By touching the button Continue is the patient profile automatically saved If the help text is active there now opens the window Therapy Notes In this case you are only able to view the notes on the intensity settings because the program description was already available in the previous window Activate Commence Stimulation t...

Page 34: ...ual Program Selection 9 2 4 2 Touch in the window Select Therapy Mode on Manual Program Selection You now have the option to compile a program list for the patient or to save the profile 9 2 4 2 1 Compiling Individual Program Lists You have the option to save up to 20 differing programs together with the patient profile If you later select a patient for therapy you can recall such saved programs s...

Page 35: ...gram from the list first mark it and then touch on Delete With Save the program list together with the patient profile is saved The main menu is displayed and the created patient is selected for therapy Touch on Close to return to the window Complete Patient Profile 9 2 4 2 2 Saving Patient Profiles If after selection of mode Manual Program Selection you wish to save the patient profile without th...

Page 36: ... patient list is involved this expedites access to the data set of a specific patient With Cancel you return to patient administration Once you have selected a patient you arrive in the next window Depending on whether the selected patient has already been treated in the mode Automatic Program Selection Based On Indications or in the mode Manual Program Selection you have various selection options...

Page 37: ...le which equates to the actual level being experienced by the patient Please note that neither the course nor the location can be changed in this window Should you wish to change one of these val ues you have to start a new therapy By means of the button Back you return to the previous window Touch on Continue to change to the next window If the selected pain level is 4 or less you will be prompte...

Page 38: ...ession button the program groups for selecting a therapy program for the current session will be displayed Please touch on the required group The list of the programs of this group is now displayed Should a program group contain further sub groups the list will only then be displayed after selection of the respective sub group Mark the required program by touching If an information text is availab...

Page 39: ...d after selection of the respective sub group Mark the required program by touching If there is an information text available for the marked program the button Info is active and by touching this button the program description is displayed Confirm your input after marking the programs with OK to select the marked program The selected program is displayed in the display field of the main menu and t...

Page 40: ...nt Touch on Body Side Related Calibration to re run a calibration With the button Indicate Evaluation the evaluation of the last calibra tion is displayed Touch on History to display the therapy histo ry of the marked patient Note that the Histo ry box is only available for selection for pa tients who have already undergone a therapy in Automatic Program Selection by Indications mode at least once...

Page 41: ...ction Based On Indications with the therapeutic measures Pain Therapy 9 4 1 History Evaluation After you have touched on History all com pleted therapies of the patient are displayed in a list Each entry consists of the date of the therapy the therapy measures including the flow form and localisation as well as the num ber of the therapy sessions Please note that only fully completed sessions are ...

Page 42: ...vel of the actual therapy session the selected value can be seen once again on the right hand side of the graphics Beneath the bars is displayed the running number of the ther apy session Because only a limited number of sessions can be displayed you have the option by activating the field Forward and Back to scroll through the course of the therapy Touch on Close to return to the window Select Th...

Page 43: ...isplayed in white text the proportional intensities 2 Beneath these values there appear during the stimu lation the intensity levels 3 of the individual channels The main intensity 4 and the running therapy time 5 are also displayed With the rota ry pressure controller you can start the stimulation and set the main intensity With paused stimulation set the proportional intensity with the button St...

Page 44: ...44 OPERATING MANUAL STIMAWELL 120MTRS EN Detailed Display Longitudinal Stimulation Detailed Display Lateral Stimulation ...

Page 45: ...hose channels which are sensed by your patient as being too powerful or too weak Each channel can be discreetly activated by touching the sliding controller 1 The impulse changes immediately to this channel Now you have the possibility to change the proportional intensity level by use of the sliding controller or by turning the rotary pressure controller The intensity should be changed to the same...

Page 46: ...Programs Or Changing User Programs 11 1 A new user program is characterised by the control unit in text form as user program followed by a consecutive number Example user program 1 You can change the text according to your requirements For this touch directly on the text field in which the notation is displayed You can compose a user program from indi vidual sequences Touch on the button Insert to...

Page 47: ...h of a user program may not exceed a maximum of 30 minutes To change a sequence or its running time mark it and touch on Edit If you wish to delete a sequence assignment then touch on the sequence and confirm with the button Delete The entry preceding the deleted assignment slides up one position Confirm your input with OK or discontinue the editing with Cancel 12 Settings To open the overview of ...

Page 48: ...green hook You can now set the individual filter within the filter criteria Where more than two selection options are involved multi selection is possible If you do not select filter criteria or select filter criteria without setting a filter located below then all data are evaluated in this area The following filter criteria are available Course only pain therapy Location only pain therapy Sex If...

Page 49: ...ontains muscular rehabilitation therapies and dynamic deep massages If no results appear for your filter selection this will be indicated on the screen Touch on Close to return to the menu Patient Database Please Note The filter criteria Sex can only then be evaluated if the field Sex has been en tered in the patient data 12 1 2 Administering The Database You have the option to copy the patient da...

Page 50: ...patient database to your Sti maWELL 120MTRS Control Unit first copy the data to an empty USB flash drive Then select in the menu Database the menu point Copy From Flash Drive To Unit and insert the USB flash drive with the database to be copied in the USB slot located on the front side of your StimaWELL 120MTRS Control Unit Activate the button Start and wait until the data have been completely cop...

Page 51: ...e applies if with a selected patient the control unit has not been operated for a period of 15 minutes When you activate the selection field Set User Program Time As Therapy Time the total run ning time of the user program is set as the running time for the therapy For example if you have a user program with a total running time of 12 minutes its therapy time is set at 12 minutes This option only ...

Page 52: ...irm with OK In this way you can number up to 10 devices consecutively If a patient database is already present on your second or other StimaWELL 120MTRS device please select Convert Database when assigning the device number so that the patient data base is coordinated to the device number of this device You can now export the database of your second or other StimaWELL 120MTRS device to a USB stick...

Page 53: ... discard the changes simply touch on Cancel Setting The Time 12 3 To set the time use the arrows above and below the hours and minutes display Touch the arrow button above the value to increase with the arrow button below the value to decrease If you retain pressure on the arrow button the values will continue to be in creased decreased until the pressure is re leased Confirm your input with the b...

Page 54: ...Control Unit yourself The necessary files for this should be copied onto an empty USB flash drive As an alternative you can request a pre set USB flash drive from us Insert the USB flash drive in the USB slot on the front side of the control unit The requirements appear with the selection of the menu point Software Update automatically The software now checks if there is a new software version on ...

Page 55: ...ssibility to store patient data on the therapy card Next to the name and personal data of the patient you can save on the therapy card up to 20 programs the personal setting of the proportional intensity mat size and the number of sessions you have booked for the patient Therapy cards are directly pro grammed via the StimaWELL 120MTRS Control Unit 14 Therapy With Therapy Cards Creating Therapy Car...

Page 56: ... the list will be deleted With the button Delete you delete the marked program from the list With the button Info you can generate a display of an infotext regarding the marked therapy program in the list Touch on the button Save to save the select ed therapy programs with the respective settings to the therapy card In this case the menu closes and the patient just created is selected for the ther...

Page 57: ...rs a welcome screen which includes the display of the number of sessions still un used on the card If there are no more unused applications on the therapy card no further therapy with the StimaWELL 120MTRS System is possible This information is also displayed on the welcome screen If new applications are to be saved on the card you can call up once the welcome screen has been closed the respective...

Page 58: ...ed touching on the button Changing View you close the setting menu and return to the main menu If you have carried out changes you can at all times save the new settings to the therapy card by touching on the button Save Stimulation With Cards 14 4 After starting a therapy program the therapy can no longer be stopped only paused and no further program selection is possible At the start of a therap...

Page 59: ...election or to delete the therapy card To edit the patient data such as for example name weight address or insurance please activate Edit Patient Data There now opens a window in which you can edit the data This functions exactly in the same way as for the creation of a new patient profile please see Section 9 2 1 You have the option via the menu point Change Therapy Sessions And Programs to chang...

Page 60: ... free spray and wipe disinfectants but please take great care that no moisture penetrates the plug via the connection socket However should moisture have penetrated the StimaWELL Stimulation Mat it must undergo a technical safety check before being re used The cover for the StimaWELL Head Cushion can be removed and washed in the washing machine at 40 C The inner part can be cleaned with a moist cl...

Page 61: ...Delivery Content Standard Accessories 15 7 Quantity Item Article No 1 StimaWELL 120MTRS 200199 G 1 StimaWELL Stimulation Mat 200199 M 1 Remote Control Unit StimaWELL 200208 1 StimaWELL Admin Card 200217 1 Pressurised Spray Canister 200209 1 Mains Cable 450810 0043 1 Cable Holder 451090 0179 1 Operating Instructions 451600 0393 1 StimaWELL Head Cushion 200211 1 StimaWELL Mat Underlay 200212 1 Stima...

Page 62: ... Electromagnetic environment guideline RF emissions as per CISPR 11 Group 2 The StimaWELL 120MTRS needs to emit electromag netic energy in order to perform its intended function Neighbouring electronic devices may be affected by this RF emissions as per CISPR 11 Class B The StimaWELL 120MTRS is suitable for use in all establishments including residential ones and those connected directly to a powe...

Page 63: ...r input and output supply 2 kV for mains supply 1 kV for input and output supply The quality of supply voltage should correspond to that of a typical commercial or hospital environment Surges as per IEC 61000 4 5 1 kV Push pull voltage 2 kV Push push voltage 1 kV Push pull voltage 2 kV Push push voltage The quality of supply voltage should correspond to that of a typical commercial or hospital env...

Page 64: ...t guidelines Conducted RF interference as per IEC 61000 4 6 Emitted RF interference as per IEC 61000 4 3 3 V eff 150 kHz to 80 MHz 3 V m 80 MHz to 2 5 GHz 3 V eff 3 V m Portable and mobile communication devices should not be used in a closer proximity to the StimaWELL 120MTRS or its cable than the protective distance calculated according to the equation calculated for the transmission frequency Re...

Page 65: ...commended protective distances between portable and mobile RF telecommunications devices and the StimaWELL 120MTRS The StimaWELL 120MTRS is designated for operation in an electromagnetic environment in which RF interference is controlled The customer or operator of the StimaWELL 120MTRS can help to avoid elec tromagnetic interference by maintaining a minimum protective distance between portable an...

Page 66: ...66 OPERATING MANUAL STIMAWELL 120MTRS EN NOTES ...

Page 67: ...OPERATING MANUAL STIMAWELL 120MTRS EN 67 ...

Page 68: ...33 119 info schwa medico de I schwa medico de I schwa medico com ÖSTERREICH schwa medico Handelsgesellschaft m b H Industriezeile 25 I 5280 Braunau Tel 07722 66122 I Fax 07722 66123 info schwa medico at I schwa medico at Pierenkemper GmbH Am Geiersberg 6 I 35630 Ehringshausen I Deutschland Art No 451600 0393 Stand 2017 01 11 Software Version V 3 5 ...

Reviews: