Configuration
01.02|SPG 100|en
21
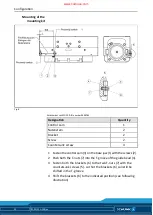
Gripper open:
1 Set the gripper to the position »Open«.
2 Push the proximity switch 1 in to the bracket (6), so that the
sensing distance between the front face of the proximity
switch and the control cam (3) is 0.8 mm.
3 Then fasten the bracket (6) and the inserted proximity switch
1 by tightening both the countersunk screws (5).
4 Test the proper function by closing the gripper and then
opening it again.
Gripper closed:
1 Set the gripper to the position »Closed«.
2 Push the proximity switch 2 in to the bracket (6), so that the
sensing distance between the front face of the proximity
switch and the control cam (3) is 0.8 mm.
3 Then fasten the bracket (6) and the inserted proximity switch
2 by tightening both the countersunk screws (5).
4 Test the proper function by opening the gripper and then
closing it again.
Part gripped (O.D. gripping):
1 Clamp the part to be gripped.
2 Undo the countersunk screws (5) and shift the bracket (6) with
the proximity switch 2 away from the centre of the gripper
until the proximity switch is activated.
3 Proceed as described under Points 3 – 4 under »Gripper closed«.
Part gripped (I.D. gripping):
1 Clamp the part to be gripped.
2 Undo the countersunk screws (5) and shift the bracket (6) with
the proximity switch 2 away from the centre of the gripper
until the proximity switch is activated.
3 Proceed as described under Points 3 – 4 under »Gripper closed«.
www.comoso.com


