


9
Montage- und Betriebsanleitung
für Schwenkeinheit Type OSE 22
Assembly and Operating Manual for
for Swivel Unit Type OSE 22
Environmental temperatures of more than 60° C / 140° F can
harden the used lubricants faster. Therefore, lubrication and
maintenance works have to be carried out more often.
–
Change the seals at every maintenance and control the
function of the shock absorbers.
–
The wear parts (seal kit and shock absorber) can be ordered
from SCHUNK.
–
Lubrify the serration and the pinion during every maintenan-
ce work with “Molykote BR2 plus” or an equivalent lubricant.
All other sliding surfaces and seals have to be lubrified with
“Renolit HLT2” or any equivalent grease.
–
If not advised differently, secure all screws and nuts with
“Loctite No. 243”.
9.2
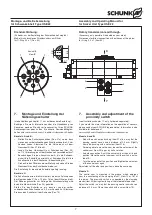
Assembly of the swivel unit:
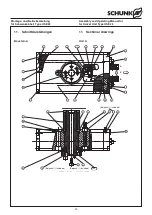
(For item nos. see sectional view chapter 11).
1.
Remove all compressed air lines.
2.
Unscrew the cover (Pos. 3) and (Pos. 4).
3.
Mark the installation position of the pinion (Pos. 14/15), the
piston (Pos. 2). In case of a unit with integrated air feeding,
please also mark the position of the rotary transmission lead
through (Pos. 17).
4.
Disassemble the safety ring (Pos. 85).
Please note:
5.
In case of the design with rotary transmission lead through
(Pos. 85), this component is existing twice. The second
safety ring can’t be disassembled before the rotary transmis-
sion lead through is put off.
6.
Press the pinion (Pos. 14/15) out of the housing.
7.
Push the piston (Pos. 2) in “X”-direction out of the housing.
8.
Remove all sealings.
9.
Clean all components and check all components on damage
and wear out.
Assembly is done in reverse order.
Hereby, please consider the notes at the beginning of this chapter.
Carefully assemble the rotary transmission lead through (Pos.
17) and make sure that no O-rings (Pos. 50) will be damaged.
9.3
Disassembly and assembly of the shock
absorbers
(For item nos. see sectional view chapter 11).
NOTE:
The shock absorbers can be ordered from SCHUNK.
1.
Remove the cover (Pos. 3).
2.
Remove the safety ring (Pos. 86).
3.
Take off the shock absorber (Pos. 30) with the adjusting
washer (Pos. 93/94).
4.
Assembly is done in reverse order.
Umgebungstemperaturen über 60° C führen zu schnellerem Aus-
härten der eingesetzten Schmierstoffe. Bitte führen Sie Schmier-
und Wartungsarbeiten dementsprechend häufiger durch.
–
Wechseln Sie bei jeder Wartung die Dichtungen und kon-
trollieren Sie die Funktion der Stoßdämpfer.
–
Die Verschleißteile (Dichtsatz und Stoßdämpfer) können Sie
bei SCHUNK bestellen.
–
Fetten Sie bei der Wartung die Verzahnung und das Ritzel
mit »Molykote BR 2 plus« oder einem gleichwertigen
Schmierstoff.
Alle anderen Gleitflächen und Dichtungen mit »Renolit
HLT 2« oder einem gleichwertigen Fett einfetten.
–
Soweit nicht anders vorgeschrieben, sichern Sie alle
Schrauben und Muttern mit Loctite Nr. 243.
9.2
Zerlegen der Schwenkeinheit:
(Positionsnummern siehe Schnittdarstellungen Kapitel 11.)
1.
Entfernen Sie die Druckleitungen.
2.
Schrauben Sie die Deckel (Pos. 3) und (Pos. 4) ab.
3.
Markieren Sie die Einbaulage des Ritzels (Pos. 14/15), der
Kolben (Pos. 2) und bei der Ausführung mit integrierter
Luftdurchführung die der Drehdurchführung (Pos. 17).
4.
Demontieren Sie den Sicherungsring (Pos. 85).
Beachten Sie:
5.
Bei der Ausführung mit Luftdurchführung ist die (Pos. 85)
zweimal vorhanden. Den zweiten Sicherungsring können Sie
erst demontieren, wenn Sie die Drehdurchführung (Pos. 17)
abgezogen haben.
6.
Drücken Sie das Ritzel (Pos. 14/15) aus dem Gehäuse.
7.
Schieben Sie die Kolben (Pos. 2) in »X«-Richtung aus dem
Gehäuse.
8.
Entfernen Sie alle Dichtungen.
9.
Reinigen Sie alle Teile und kontrollieren Sie alle Teile auf
Defekt und Verschleiß.
Der Zusammenbau erfolgt in umgekehrter Reihenfolge.
Beachten Sie dabei die Hinweise am Anfang des Abschnitts.
Gehen Sie beim Einbau der Drehdurchführung (Pos. 17) vor-
sichtig vor, damit Sie die O-Ringe (Pos. 50) nicht beschädigen.
9.3
Aus- und Einbau eines Stoßdämpfers
(Positionsnummern siehe Schnittdarstellungen Kapitel 11.)
HINWEIS:
Die Stoßdämpfer können Sie über die Firma SCHUNK beziehen.
1.
Deckel (Pos. 3) abnehmen.
2.
Sicherungsring (Pos. 86) entfernen.
3.
Stoßdämpfer (Pos. 30) mit Passscheiben (Pos. 93/94) ent-
nehmen.
4.
Einbau in umgekehrter Reihenfolge.
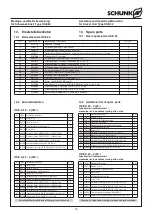
OSE
22
Wartungsintervalle (Mio. Zyklen)
2
OSE
22
Maintenance intervals (million cycles)
2
9.
Wartung und Pflege
9.1
Wartungs- und Pflegeintervalle
9.
Maintenance and care
9.1
Maintenance intervals


