background image

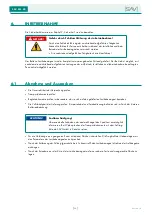
7 BETRIEB

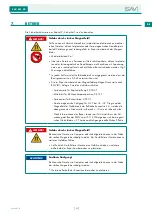
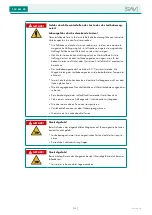
HINWEIS!

Der Lasthebemagnet fängt an, die magnetische Leistung schrittweise zu 
senken. Gleichzeitig ertönt ein akustisches Warnsignal, das das Bedie-
nungspersonal und die Umgebung auf die durchgeführte 

TIP-OFF

 Funktion 

aufmerksam macht, bei der besondere Vorsicht geboten ist. Die Reduzierung 
auf die minimale magnetische Leistung dauert ca. 12 s. Abschließend führt 
der Lasthebemagnet einen entmagnetisierenden Impuls durch.

Unterbrechung der TIP-OFF Funktion


Beide 

LIFT

 und 

RELEASE

 Tasten an der Fernbedienung loslassen oder die Fernbedienung vom Anzeigepanel 

am Lasthebemagnet ablenken (die Kommunikation zwischen der Fernbedienung und dem Lasthebemagnet wird 
dadurch unterbrochen).

HINWEIS!

Nach dem Loslassen der 

LIFT

 und 

RELEASE

 Tasten bleibt die zuletzt er-

reichte Haltekraft für die Dauer von 3 s aufrechterhalten, danach schaltet 
der Lasthebemagnet auf die volle Magnetleistung um. Während dieser Zeit 
kann die 

TIP-OFF

 Funktion erneut aktiviert und die Reduzierung der Mag-

netleistung fortgesetzt werden. Diese Betriebsart kann wiederholt werden, 
ohne die Magnetisierung ausschalten zu müssen.

SAV 531.42

Version 1.0

[


46


]

Summary of Contents for SAV 531.42

Page 1: ...BATTERIE LASTHEBEMAGNETE BATTERY POWERED LIFTING MAGNETS BETRIEBSANLEITUNG OPERATING INSTRUCTIONS Version 1 0 just experts SAV 531 42 ...

Page 2: ...Translation of the original operating instructions retain for reference Originalbetriebsanleitung Aufbewahren zum Nachschlagen ...

Page 3: ...BATTERIE LASTHEBEMAGNETE BETRIEBSANLEITUNG Version 1 0 DE SAV 531 42 just experts ...

Page 4: ...nische Daten 21 3 1 Typenschild 25 3 2 Energiequelle 25 3 3 Standardumgebungsbedingungen für den Betrieb 25 3 4 Emissionen in die Umwelt 26 3 5 Beleuchtung und Sichtbarkeit am Arbeitsplatz 26 3 6 Lärm 26 3 7 Vibrationen 26 3 8 Betriebseinschränkungen 26 3 8 1 Versorgungsbatterie 12 V DC 26 3 9 Batterie der Fernbedienung 27 3 10 Verschleiß des Lasthebemagneten 27 4 Transport und Lagerung 28 4 1 Tra...

Page 5: ... 2 1 Vorbereitung zur Handhabung 40 7 2 2 Grundbedienung des Lasthebemagneten und Zustandsanzeige 40 7 2 3 Steuerung mit Fernbedienung 41 7 2 4 Lastbewegung 43 7 3 Erweiterte Funktionen des Batterie Lasthebemagneten 44 7 3 1 VARIABLE FORCE Funktion 44 7 3 2 TIP OFF Funktion 45 8 Wartung und Instandhaltung 47 8 1 Wartungs und Inspektionsplan Zeitplan der Instandhaltung 48 8 2 Wartung der Versorgung...

Page 6: ...Bedienung und Wartung die sich auf die Batterie Lasthebemagnete beziehen HINWEIS Die Betriebsanleitung ist frei zugänglich am Einsatzort der Batterie Lasthebe magnete griffbereit aufzubewahren Die Betriebsanleitung ist von jeder Person zu lesen zu verstehen und anzuwenden die mit folgenden Arbeiten an den Batterie Lasthebemagnete beauftragt ist Transport und Lagerung Montage und Inbetriebnahme Bed...

Page 7: ...ramme Des Weiteren wird mit einem Signalwort Panel eine Gefährdungsstufe zugeordnet Warnsymbole Allgemeines Warnzeichen Warnung vor elektrischer Spannung Warnung vor magnetischem Feld Warnung vor herabfallenden Gegenständen Warnung vor Quetschgefahr Verbotssymbole Schalten verboten kein Zutritt für Personen mit Herzschrittmachern oder implantierten Defibrillatoren kein Zutritt für Personen mit Imp...

Page 8: ...ge haben WARNUNG WARNUNG Dieser Hinweis kennzeichnet eine Gefahr mit mittlerem Risiko Werden die Sicherheitsbestimmungen nicht beachtet kann die Gefahr möglicher weise Tod oder schwere Körperverletzung zur Folge haben ACHTUNG ACHTUNG Dieser Hinweis warnt vor einer Situation die zu Schäden oder Zerstörung von Sachgegenständen führen kann wenn sie nicht vermieden wird HINWEIS Dieser Hinweis hebt nüt...

Page 9: ...unsachgemäß durchgeführte Installation Nichtbeachten und Nichteinhalten der Hinweise Gebote und Verbote der Betriebsanleitung Unberechtigte Produktänderungen und anpassungen sowie eigenmächtige bauliche Veränderungen der Batte rie Lasthebemagnete Mangelhafte Überwachung von Teilen die Verschleiß unterliegen Nicht sachgemäß und nicht rechtzeitig durchgeführte Wartungs und Instandhaltungsarbeiten Be...

Page 10: ... geliefert wurde Bitte nehmen Sie Kontakt zu SAV auf falls eventuelle Mängel vorhanden sind Der Lieferumfang beinhaltet Lasthebemagnet Betriebsanleitung Lasthebemagnete Steht auf unserer Homepage zum Download zur Verfügung Typenschild und Instruktionsschild befestigt auf dem Magneten Prüfzertifikat SAV 531 42 Version 1 0 10 ...

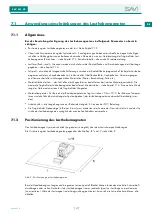
Page 11: ...on Lasten ferromagnetischem Flach und Rundmaterial in horizontaler Ebene waagerechte Lastposition bis zur angegebe nen Nenntragfähigkeit siehe Kapitel 3 Technische Daten mit einer bedienergeführten Hebeanlage Der Verwendungszweck des Lasthebemagneten ist die Handhabung Transport einer Last metallurgisches Material Werkstück etc durch Anwendung magnetischer Anziehungskräfte Magnetkreis zwischen dem...

Page 12: ...en Schmutz und Grate möglichst vermeiden Dünne Lasten möglichst vermeiden Lasten aus Material mit möglichst hohem ferromagnetischen Legierungsanteil z B Fe und Co heben und bewe gen Bei rostfreien Stählen Gusseisen oder hohem Nickelanteil reduzieren sich die Haftkräfte erheblich 2 2 Personalqualifikation Das Mindestalter des Personals beträgt 18 Jahre Das Personal ist mit den Vorschriften über Arb...

Page 13: ...ektroausrüstung Die Anforderungen an das Personal sind im Kapitel 2 2 3 aufgeführt Wartungstechniker spezialisierter Elektromechaniker Sachkundige Person ab dem vollendeten 18 Lebensjahr von der SAV GmbH speziell geschulter oder belehrter Elektromechaniker der für die Durchführung der über den Rahmen der üblichen Instandhaltung oder In standsetzung hinausgehenden Arbeiten qualifiziert ist Die Anfo...

Page 14: ...Durchführung der laufenden Wartung kontrollieren und Wartungspläne erstellen Kleinreparaturen der Funktionsflächen durchführen Verantwortung für langfristige Einlagerung des Lasthebemagneten Wochen und Monatsinspektionen des Lasthebemagneten Wartungsprotokolle erstellen Zusammenarbeit mit dem Bedienungspersonal sowie mit den Verantwortlichen für den Betrieb der Hebeanlagen Wartung der Versorgungsb...

Page 15: ... Belastungsprüfungen Lasthebemagneten Jährliche Inspektion Revision des Lasthebemagneten Kontrollen Inbetriebnahme des Lasthebemagneten 2 3 Persönliche Schutzausrüstung Immer Schutzhelm Schutzbrille Sicherheitsschuhe und Schutzhandschuhe tragen Schutzhelm tragen Schutzbrille tragen Schutz hand schuhe tragen Sicherheits schuhe tragen 2 4 Mögliche Risiken und deren Beseitigung In den nachstehenden H...

Page 16: ...nd Prüfungsplan einhalten GEFAHR Sturzgefahr durch Bewegungen bei der Handhabung Sturzgefahr der Last mit Risiko einer Körperverletzung mit Dauerfolgen durch Bewegungen bei der Handhabung Unausgewogene Lasten nicht heben Allzu lange Lasten nicht heben Achtung auf Fehlanbringung des Last hebemagneten an der längsten Seite der Last Lasten nicht über Personen hinweg und in ihrer Nähe transportieren S...

Page 17: ...tück zum Magnet anziehen GEFAHR Verletzungsgefahr Stoßgefahr am Körper durch schwebende Last mit folgender Körperverlet zung Schwebende Last Lasthebemagnet nicht ohne Überwachung lassen Hinweise der vorliegenden Betriebsanleitung beachten GEFAHR Sturzgefahr durch Fehlanschlagen Sturzgefahr der Last mit folgendem Tod oder Körperverletzung mit Dauerfol gen durch Fehlanschlagen Zum Anschlagen am Kran...

Page 18: ...rfol gen durch Entladung der Versorgungsbatterie Die Last nicht bei schwacher Batterie handhaben Siehe Anzeige des Batteriezustands am Frontpanel Den aktivierten Lasthebemagnet mit Last nie unbeaufsichtigt lassen Wird eine Warnung auf eine niedrige Batteriekapazität ausgegeben die Handhabung so bald wie möglich beenden in 2 Minuten und Batterie aufladen siehe Kapitel 8 2 2 GEFAHR Verletzungsgefahr...

Page 19: ...leichzeitig auch gleichmäßig sein Die Last nicht an der kleinsten Seite heben Den zulässigen Bereich der Arbeitstemperaturen nicht übersteigen Hinweise der vorliegenden Betriebsanleitung beachten Informationen über das zu handhabende Material Zusammensetzung Maße etc so wie auch über das Gewicht immer prüfen und mit der Tabelle vergleichen siehe Kapitel 7 1 4 GEFAHR Sturzgefahr durch die Form der ...

Page 20: ...örperexposition 0 212 T Spitzenwert für Extremitäten 5 000 T Da die magnetische Sättigung für St 37 bei 1 6 1 9 T liegt und das Ma gnetfeld im Nahbereich der Polfläche konzentriert ist werden die oben genannten Grenzwerte im Bereich 10 cm nicht überschritten Nach Informationen des Bayer Landesamt für Umwelt bzw der Verord nung des Bundes EMFV vom 15 11 2016 ergeben sich bei magnetischen Gleichfeld...

Page 21: ...Tragkraft kg 2700 5000 7200 10000 3600 6800 Rundmaterial Tragkraft kg 1130 2260 Durchmesser dmin dmax mm 40 440 45 500 Geprüfte Tragkraft kg 2260 4520 Bei der Prüfung der Abrisskraft verwendetes Flachmaterial Stärke 80 mm Ra 1 6 S 235 JR ST 37 SAV Klassifizierungs Nr 531 42 max Lasttemperatur 70 C max Umgebungstemperatur 50 C Sonderspezifikationen 531 99 Bitte Anlage beachten bei Sonderausführung ...

Page 22: ...lusst Ein Blech muss mindestens so lang sein wie der Mag net Mindestgröße des Bleches nach 1 Spalte in der Tabelle siehe Seite 36 unter Tragfähigkeit Bei kleineren Blechgrößen Tragkraft reduzieren gemäß 2 Spalte Zu große Bleche hängen jedoch durch woraus sich ein Luftspalt zwischen Magnet und Blech ergibt Dieser Abschäl Effekt senkt die Tragfähigkeit und begrenzt die maximale Blechgröße Eventuell ...

Page 23: ...uss des unmagnetisierten Legierungsanteils auf die Haftkräfte Abb 3 Einfluss des Wärmebehandlungszustands auf die Haftkräfte Beispiel Bezeichnung Kurzname DIN Werkstoff Nr max unmagnetischer Legierungsanteil Wärmebehandlung Haftkraft Reineisen Fe 0 00 weich 100 Baustähle St37 2 1 0037 weich 95 St52 3 N 1 0570 weich 93 St50 2 1 0050 weich 75 Einsatzstähle C10 1 0301 1 22 weich 93 C15 1 0401 1 27 we...

Page 24: ...C22 1 0402 2 96 vergütet 49 C45 1 0503 3 20 vergütet 48 Ck45 1 1191 3 50 vergütet 47 C60 1 0601 3 57 vergütet 47 Ck60 1 1221 3 65 vergütet 47 43CrMo4 1 3563 3 62 vergütet 47 36CrNiMo4 1 6511 4 37 vergütet 45 Walzlagerstähle 100Cr6 1 3501 3 11 weich 83 100CrMn6 1 3520 5 26 weich 73 X102CrMo17 1 3543 22 72 weich 26 X82WMoCrV6 5 4 1 3553 11 40 weich 44 100Cr6 1 3501 3 11 gehärtet 43 100CrMn6 1 3520 5...

Page 25: ...V Batterie eingespeist 3 3 Standardumgebungsbedingungen für den Betrieb Die Lasthebemagnete sind für den Betrieb in der äußeren sowie auch in der inneren Umgebung beim Einhalten der nachstehend aufgeführten Parameter vorgesehen Luftfeuchtigkeit max 80 Lufttemperatur von 0 bis 50 C GEFAHR Gefahr durch falsche Umgebungsbedingungen Der Betrieb des Lasthebemagneten unter falschen Umgebungsbedingungen ...

Page 26: ...rm erzeugen können HINWEIS Die Pflicht eine Lärmmessung am Arbeitsplatz vorzunehmen obliegt dem Betreiber 3 7 Vibrationen Beim üblichen Betrieb des Lasthebemagneten entstehen keine Vibrationen mit Ausnahme der Entmagnetisierung des angezogenen Materials am Ende der Handhabung 3 8 Betriebseinschränkungen 3 8 1 Versorgungsbatterie 12 V DC Nur die im Kapitel 3 2 empfohlenen Batterien fgFORTE Deep Cyc...

Page 27: ...r Batterie auf 6 V kann ein Signal entsandt werden aber nur mit einer minimalen Reichweite Beim Austausch der Batterie gegen eine neue muss die neue Batterie eine höhere Spannung als 8 3 V aufweisen sonst kann die Meldung über niedrige Batteriespannung nicht ausgeblendet werden Eine Arbeitsumgebung mit verminderter Sicht durch Staub oder Rauch kann die von der Handbedienung gesendete Signalreichwe...

Page 28: ...oner zum Einsatz kommen Lasthebemagnete keinesfalls mit magnetischen Lasthebemitteln transportieren 4 2 Lagerung Den Lasthebemagnet für die Dauer der Außerbetriebnahme auf vorbehaltenen Stellen ablegen Die Lagerumge bung muss den im Kapitel 3 3 spezifizierten Parametern entsprechen Vor einer langfristigen Einlagerung folgende Handlungen vornehmen Die Batterie auf die volle Kapazität aufladen siehe...

Page 29: ...ustische Warnhupe Abb 5 Übersicht Batterie Lasthebemagnet 5 2 Bedienelemente 5 2 1 Anzeige der Fernbedienung Warnanzeige bei schwacher Batterie der Fernbedienung Falls die Batteriespannung der Fernbedienung unter 7 3 V sinkt erscheinen an der Anzeige zwei blinkende Striche siehe Kapitel 3 8 2 Bei den Funktionen VARIABLE FORCE siehe Kapitel 7 3 1 und TIP OFF siehe Kapitel 7 3 2 wird an der Fernbedi...

Page 30: ...epanel Der Batteriezustand wird wie folgt angezeigt Anzeige Angezeigter Zustand Alle Kontrollleuchten leuchten grün Die Batterie ist auf ihre maximale Kapazität geladen Es leuchten 3 orange Kontrollleuchten Die Batterie ist auf ca 30 ihrer sicheren Kapazität geladen Es leuchtet 1 rote Kontrollleuchte Der Batterieladezustand hat 9 der sicheren Kapazität unterschritten Es blinkt 1 rote Kontrollleuch...

Page 31: ... 2 Akustische Warnhupe Die akustische Warnhupe Pos 13 Abb 5 befindet sich an der Frontabdeckung links unterhalb der Bedienungs tasten und erfüllt folgende Funktionen Das akustische Warnsignal macht auf einen langen Stillstand beim aktivierten Zustand des Lasthebemagneten aufmerksam beim liegenden Lasthebemagnet nach 15 Sekunden beim gehobenen Lasthebemagnet nach 3 Minuten Das akustische Warnsignal...

Page 32: ...versehrtheit der Verpackung prüfen Transportdokumente prüfen Begleitdokumente prüfen insbesondere ob sie sich auf den gelieferten Lasthebemagnet beziehen Die Vollständigkeit der Lieferung prüfen Einspeisekabel und Fernbedienung befinden sich im Fach der hinteren Batterieabdeckung ACHTUNG Sachbeschädigung Über eventuelle Schäden oder andere Mängel den Spediteur unverzüglich informieren Bei Widerspr...

Page 33: ... sicherzustellen dass kein ferromagnetisches Material welches sich unter dem Lasthebemagnet befindet versehentlich angezogen werden kann 1 Lösen und entfernen Sie die beiden Schrauben mit denen die Batterieabdeckung befestigt ist die Batterie be findet sich unter der hinteren Abdeckung siehe Abb 7 Abb 7 Schrauben an der Batterieabdeckung 2 Stromführende Leiter an Batteriekontakte anschließen Den r...

Page 34: ...en Das Material wird an den Lasthebemagnet angezogen 2 Die Aufhängeöse in die höchste Position heben sodass der Sicherheitskontakt getrennt wird Die Kontrollleuchte READY leuchtet dauerhaft 3 Die rote OFF Taste betätigen der Lasthebemagnet darf nicht abschalten 4 Die Aufhängeöse in die ursprüngliche Stellung zurückbringen der Sicherheitskontakt schaltet ein 5 Die rote OFF Taste betätigen und halte...

Page 35: ...r Kopf oder Rumpf 2 000 T Mittelwert für 8h Ganzkörperexposition 0 212 T Spitzenwert für Extremitäten 5 000 T Da die magnetische Sättigung für St 37 bei 1 6 1 9 T liegt und das Magnetfeld im Nahbereich der Polfläche konzentriert ist werden die oben genannten Grenzwerte im Bereich 10 cm nicht überschritten Nach Informationen des Bayer Landesamt für Umwelt bzw der Ver ordnung des Bundes EMFV vom 15 ...

Page 36: ...Magnetisierung des Lasthebemagneten wird oberhalb dieser Temperatur eliminiert Immer Sicherheitshaken benutzen damit die Aufhängeöse nicht aus dem Haken gleiten kann Nie die angegebenen Nennhaltekräfte und Werkstückabmessungen über schreiten Kein beschädigtes oder schlecht funktionierendes Gerät benutzen Sich niemals unter eine freihängende schwebende Last begeben Nie über oder nahe an Personen tr...

Page 37: ...nitts Die maximale Tragkraft des Lasthebemagneten bedarf einer Mindeststärke siehe Kapitel 7 1 4 Eine weitere Minde rung der Stärke reduziert auch die Tragkraft des Magneten Materialtemperatur Der Bereich der Betriebstemperaturen liegt zwischen 10 bis 70 C Bei höheren Tempera turen wird die Schutzbeschichtung der Spule abgebaut der Lasthebemagnet kann dauerhaft beschädigt wer den Arbeitszyklus die...

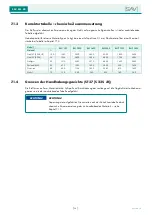
Page 38: ...0 5000 1800 3600 Stahl 52 E 295 96 1296 2400 3456 4800 1728 3456 Stahlguss 90 1210 2250 3270 4500 1620 3240 Edelstahl 430F 50 670 1250 1800 2500 900 1800 Gusseisen 45 600 1125 1620 2250 810 1620 Nickel 10 135 250 360 500 180 340 7 1 4 Grenzen der Handhabungsgewichte ST 37 S 235 JR Die Einflüsse von Form Materialstärke Luftspalt und Einschränkung der Lastlänge auf die Tragkraft des Lasthebema gnete...

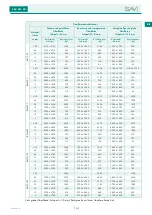
Page 39: ... 25 3300 3300 2400 3300 3000 2260 3000 2700 1900 19 3000 2700 1600 3000 2700 1400 2700 2700 1220 13 2700 2400 740 2700 2400 720 2400 2400 660 10 2100 2100 500 2100 2100 400 2100 2100 360 6 1800 1800 220 1800 1800 200 1800 1800 180 BM 3600 25 6000 3000 3600 6000 2700 3270 4500 3000 2730 19 6600 2400 2430 6000 2400 2230 4500 2400 1960 13 5100 2400 1250 4800 2400 1180 4500 2400 1090 10 3900 2400 720 ...

Page 40: ... Schwerpunkt positionieren das zu handhabende Material mit be kannten Parametern siehe Kapitel 7 1 2 Die Tragfähigkeit des Ganzen prüfen Die Tragkraft des Krans muss größer sein als die Summe der Gewichte der Last und des Lasthebemagneten zuzüglich des eventuellen Zubehörs Die Tragkraft des Lasthebemagneten entsprechend dem Lasttyp prüfen siehe Kapitel 7 1 4 7 2 2 Grundbedienung des Lasthebemagnet...

Page 41: ... das Zyklusende wird mit einem akustischen Signal angezeigt und der Lasthebemagnet schaltet aus Der eigentliche Entmagnetisierungszyklus Beim ausgeschalteten Lasthebemagnet die rote OFF Taste betätigen und halten 2 s dadurch wird nur der Ent magnetisierungszyklus eingeleitet die Funktion ist für eine bessere Entmagnetisierung der Last vorgesehen Anzeige des Batteriezustands nur am Panel Beim ausge...

Page 42: ...r und der Lasthebemagnet kann ausgeschaltet werden die grüne Kontrollleuchte READY blinkt Die rote RELEASE Taste betätigen und halten Der Lasthebemagnet führt einen Entmagnetisierungszyklus durch die rote Kontrollleuchte DANGER leuchtet das Zyklusende wird mit einem akustischen Signal angezeigt und der Lasthebemagnet schaltet aus Der eigentliche Entmagnetisierungszyklus Beim ausgeschalteten Batter...

Page 43: ...tigt lassen Die Umgebung auf den Beginn der Handhabung aufmerksam machen Die zu handhabende Last einige Zentimeter anheben und die Richtigkeit des Hebevorgangs prüfen die Last bleibt in waagerechter Position ohne dabei gehalten zu werden Die Sicherheit der Lastanziehung im angehobenen Zustand überprüfen Druck auf die Last ausüben z B mit einem Hammer anklopfen Werden mehrere dünne Bleche gehoben d...

Page 44: ...alette Kiste Maschinen tisch etc Prüfung der sicheren Handhabung Bei Bedenken bezüglich des Materials der Oberfläche usw kann diese Funktion zur vorübergehenden Senkung der Leistung genutzt werden Anschließend kann man versuchen die Last anzuheben Die VARIABLE FORCE Funktion aktivieren HINWEIS Die Funktion kann von der Fernbedienung aus aktiviert werden wenn die Magnetisierung ausgeschaltet ist un...

Page 45: ...matische Leistungserhöhung bis zur vollen 100 Magnetleistung somit wird die sichere Handhabung gewährleistet Während der aktiven TIP OFF Funktion wird das Bedienungspersonal auf den Zustand mit einem akustischen und visuellen Warnsignal aufmerk sam gemacht Verwendungsbeispiel Ablegen Freisetzen eines oder mehrerer dünnen Stahlbleche vom gehandhabten Paket Sicherheitsmaßnahmen vor der Verwendung de...

Page 46: ...on Beide LIFT und RELEASE Tasten an der Fernbedienung loslassen oder die Fernbedienung vom Anzeigepanel am Lasthebemagnet ablenken die Kommunikation zwischen der Fernbedienung und dem Lasthebemagnet wird dadurch unterbrochen HINWEIS Nach dem Loslassen der LIFT und RELEASE Tasten bleibt die zuletzt er reichte Haltekraft für die Dauer von 3 s aufrechterhalten danach schaltet der Lasthebemagnet auf d...

Page 47: ...lassen Vor jeder Benutzung Sichtkontrolle des gesamten Lasthebemagneten durchführen Die Polschuhe und Oberfläche der Last gut säubern und eventuell mit Hilfe einer Feile Grate Schweißperlen und Erhebungen entfernen Kontrollieren Sie die Funktion der Bedientasten am Anzeigepanel und der Fernbedienung Benutzen Sie den Magneten nicht wenn Sie Defekte feststellen Wöchentlich Kontrollieren Sie den gesa...

Page 48: ... Fachmechaniker Schilder nach dem lesbaren Zustand prüfen Bediener Wartungstechniker Mechaniker Wartungstechniker Fachmechaniker Korrosionsvorkommen prüfen Bediener Wartungstechniker Mechaniker Wartungstechniker Fachmechaniker Aufhängeöse prüfen maximal 10 des ursprünglichen Querschnitts Wartungstechniker Mechaniker Wartungstechniker Fachmechaniker Funktionsflächen nach Verschleiß prüfen maximal 1...

Page 49: ...aussichtliche Dauer des Batterieaufladens hängt von der Umgebungs temperatur und dem Entladezustand der Versorgungsbatterie ab Bei vollständiger Batterieentladung und einer Umgebungstemperatur von 20 C beträgt die voraussichtliche Ladedauer ca 8 9 Stunden bis zur vollen Kapazität Bei vollständiger Batterieentladung und einer Umgebungstemperatur von 20 C beträgt die voraussichtliche Ladedauer ca 1 ...

Page 50: ... handelt sich aber um eine Differenz in der Größenordnung von einigen Prozent 8 3 Wartungsbuch Der Hersteller des Lasthebemagneten empfiehlt ein Wartungsbuch der Hebeanlage zu führen Das Wartungsbuch dient zum Vermerken und Überwachen aller am Lasthebemagnet durchgeführten Leistungen und Instandhaltungen wobei die Verantwortung für diese Tätigkeiten nachverfolgbar ist Beispiel einer Tabelle im War...

Page 51: ...gleiten kann Störungsbeseitigung nur durch Fachpersonal durchführen lassen Mögliche Ursachen der Fehlfunktionen und empfohlene Abhilfemaßnahmen Fehler Störungsbeschreibung Mögliche Fehler Störungsursachen Mögliche Abhilfemaßnahmen Durchzuführen von Korrosion der Funktionsfläche Umgebungsfeuchtigkeit Korrosion reinigen Flächen vor Einlagerung konservieren Bediener Korrosion der Aufhängeöse Abrieb K...

Page 52: ...endienst der SAV GmbH Kontakt aufnehmen Wartungstechniker Fachmechaniker Batterieaufladen die Lade kontrollleuchte blinkt nicht Kein Anschluss an das Stromnetz Überprüfen ob an der benutzten Steck dose Spannung anliegt Wartungstechniker Mechaniker Beschädigung Prüfen und mit dem Kundendienst der SAV GmbH Kontakt aufnehmen Wartungstechniker Fachmechaniker Batterieaufladen die Batterie wird nicht au...

Page 53: ...9 MA16 BL0065960 MA16 BL0065961 MA16 BL0065962 Fernbedienung LH30EMBMP1941 Positionssensor der Öse MA15SO0002040 Externes Batterieladegerät 12 V MA15 SO0003040 MA15 SO0003062 MA15 SO0003062 MA15 SO0003062 MA15 SO0003062 MA15 SO0003062 Batterie 12 V DC MA15 SO0002070 MA15 SO0002030 MA15 SO0002030 MA15 SO0002030 MA15 SO0002030 MA15 SO0002030 Betriebsanleitung Auf Anfrage SAV 531 42 Version 1 0 53 ...

Page 54: ...ne und dem chemischen Symbol Cd Cadmium Hg Quecksilber oder Pb Blei des für die Einstufung als schadstoffhaltig ausschlaggebenden Schwermetalls versehen Schadstoffarme Batterien nur mit einer durchgestrichenen Mülltonne Gebrauchte Batterien dürfen nicht in den Hausmüll gelangen Batterien an den Handel bzw Wertstoff Entsorger z B kommunale Sammelstellen zurückgeben GEFAHR Gefahr eines elektrischen ...

Page 55: ... Buchstabe d entspricht Folgende Normen sind angewandt EN 13155 A2 Krane Sicherheit Lose Lastaufnahmemittel EN ISO 5817 Schweißen Schmelzschweißverbindungen an Stahl Nickel Titan und deren Legierungen ohne Strahlschweißen Bewertungsgruppen von Unregelmäßigkeiten EN ISO 12100 Sicherheit von Maschinen Allgemeine Gestaltungsleitsätze Risikobeurteilung und Risikominderung ISO 3864 Maschinenkennzeichnu...

Page 56: ...SAV 531 42 NOTIZEN Version 1 0 56 ...

Page 57: ...BATTERY POWERED LIFTING MAGNETS OPERATING INSTRUCTIONS Version 1 0 EN SAV 531 42 just experts ...

Page 58: ...on 69 3 Technical specifications 75 3 1 Type plate 79 3 2 Energy source 79 3 3 Standard ambient conditions for operation 79 3 4 Emissions into the environment 80 3 5 Illumination and visibility in the work area 80 3 6 Noise 80 3 7 Vibrations 80 3 8 Restrictions on operation 80 3 8 1 12 V DC power supply battery 80 3 9 Remote control battery 81 3 10 Wear of the lifting magnet 81 4 Transport and sto...

Page 59: ...ring for handling 94 7 2 2 Basic operation of the lifting magnet and status display 94 7 2 3 Using the remote control 95 7 2 4 Moving loads 97 7 3 Expanded functions of the battery powered lifting magnet 98 7 3 1 VARIABLE FORCE function 98 7 3 2 TIP OFF function 99 8 Maintenance and repairs 101 8 1 Maintenance and inspection plan service schedule 102 8 2 Maintenance of the 12 V DC power supply bat...

Page 60: ...on and maintenance with reference to the battery powered lifting magnets NOTE Store the operating instructions freely accessible ready to hand at the place of use of the battery powered lifting magnets The operating instructions must be read understood and applied by each person tasked with the following work on the battery powered lifting magnets Transport and storage Assembly and commissioning O...

Page 61: ...ymbols apply to the different warnings prohibitions and instructions In addition a second symbol is used to assign a hazard level Warning symbols General warning symbol Warning voltage Warning magnetic field Warning falling objects Warning risk of crushing Prohibition symbols Do not switch No access for persons with pacemakers or implanted defibrillators No access for persons with metal implants N...

Page 62: ... result in death or serious injuries WARNING WARNING This key word identifies a hazard with a medium risk level Failure to comply with the safety instructions may result in death or serious injuries CAUTION CAUTION This key word identifies a situation which can result in damage to or destruc tion of objects if it is not avoided NOTE This key word highlights useful tips and recommendations as well ...

Page 63: ...serve and comply with the information instructions and prohibitions in the operating instructions Unauthorised product changes and adaptations as well as unauthorised structural changes to the battery pow ered lifting magnets Insufficient monitoring of wear parts Maintenance and service work not carried out incorrectly or late Operation and maintenance carried out by untrained or non qualified per...

Page 64: ...red completely and is undamaged Please contact SAV if any defects are found The scope of delivery includes Lifting magnet Operating instructions for the lifting magnets available for download from our homepage Type plate and instruction label attached to the magnet Test certificate SAV 531 42 Version 1 0 64 ...

Page 65: ... ferromagnetic flat and round materials horizontally horizontal load position up to the specified rated capacity see section 3 Technical specifications using an operator controlled lifting system The purpose of the lifting magnet is to handle transport a load metallurgic material workpiece etc by applying magnetic attractive forces magnetic circuit between the lifting magnet and the load The batte...

Page 66: ... rough surfaces dirt and burrs Avoid thin loads if possible Lift and move loads made of material with the highest possible ferromagnetic alloy content e g Fe and Co The adhesion forces are significantly reduced on stainless steel cast iron or materials with a high nickel content 2 2 Personnel qualification The minimum age for personnel is 18 years The personnel have to be familiar with the regulat...

Page 67: ...for personnel are listed in section 2 2 3 Maintenance engineer specialised mechatronic Expert at least 18 years old mechatronic specially trained or instructed by SAV GmbH qualified for carrying out work going beyond the scope of the usual maintenance and repairs The requirements for personnel are listed in section 2 2 3 2 2 2 Requirements for operating personnel Operating personnel for the batter...

Page 68: ...and generating maintenance schedules Carrying out small repairs for the functional surfaces Responsibility for long term storage of the lifting magnet Weekly and monthly inspections of the lifting magnet Generating maintenance reports Working together with operating personnel and with the person responsible for operating the lifting system Carrying out maintenance on the supply battery checking th...

Page 69: ...ting magnet Calibration and load tests of the lifting magnet Annual inspection of the lifting magnet Checks Commissioning of the lifting magnet 2 3 Personal protective equipment Always wear a hard hat safety goggles safety shoes and safety gloves Wear a hard hat Wear safety goggles Wear safety gloves Wear safety shoes 2 4 Potential risks and their elimination The following provides information on ...

Page 70: ...ance work Follow the maintenance and checks schedule DANGER Risk of falling due to movement during handling Risk of the load falling and risk of injury with permanent consequences due to movement during handling Do not lift unevenly balanced loads Do not lift overly long loads check for incorrect attachment of the lifting magnet on the longest side of the load Do not transport load above persons o...

Page 71: ...ry Do not leave suspended loads lifting magnets without supervision Observe the information in these operating instructions DANGER Risk of falling due to incorrect attachment Risk of the load falling resulting in injury with permanent consequences or death due to incorrect attachment Use only tested load attachment gear for attaching the load to the crane Observe the information in these operating...

Page 72: ...lways proceed with caution during maintenance of the electric equip ment and observe these operating instructions DANGER Risk of falling due to exceeding the maximum permissible lifting capacity Risk of the load falling resulting in injury with permanent consequences or death due to exceeding the maximum permissible lifting capacity The lifting capacity of the lifting magnet must not exceed the li...

Page 73: ...tation with a physician Measurements may have to be carried out In any case the hazard zone has to be limited in such a way that the basic limit of 0 5 mT is not reached The applicable limits in the exposure zone of the magnetic field as per BGV B11 Regulation issued by the German Social Accident Insurance Institutions Annex 2 are not exceeded Peak values for head or torso 2 000 T Mean value for 8...

Page 74: ...ve effect of lifting magnets on electronic medical devices computers watches and data carriers must be noted Keep electronic medical devices computers watches and data carriers away from the exposure zone of the magnetic field SAV 531 42 Version 1 0 74 ...

Page 75: ...0 70 Tested lifting capacity kg 2700 5000 7200 10000 3600 6800 Round materials Lifting capacity kg 1130 2260 Diameter dmin dmax mm 40 440 45 500 Tested lifting capacity kg 2260 4520 Flat materials used for testing the pull off force thickness 80 mm Ra 1 6 S 235 JR St 37 SAV classification no 531 42 Max load temperature 70 C Max ambient temperature 50 C Special specifications for 531 99 Please note...

Page 76: ...d by the sheet thickness A sheet has to be at least as long as the magnet Mini mum size of the sheet according to the 1st column in the table see page 36 under Lifting capacity For smaller sheet sizes reduces the lifting capacity according to the 2nd column If sheets are too large however they will sag which produces an air gap between the magnet and the sheet This peel off effect reduces the lift...

Page 77: ...nce of the unmagnetised alloy component on the holding forces Fig 3 Influence of the heat treatment condition on the holding forces example Short designation as per DIN Material no Max non magnetic alloy component Heat treatment Holding force Pure iron Fe 0 00 soft 100 Construction steel St37 2 1 0037 soft 95 St52 3 N 1 0570 soft 93 St50 2 1 0050 soft 75 Case hardened steel C10 1 0301 1 22 soft 93...

Page 78: ...C22 1 0402 2 96 annealed 49 C45 1 0503 3 20 annealed 48 Ck45 1 1191 3 50 annealed 47 C60 1 0601 3 57 annealed 47 Ck60 1 1221 3 65 annealed 47 43CrMo4 1 3563 3 62 annealed 47 36CrNiMo4 1 6511 4 37 annealed 45 Ball bearing steel 100Cr6 1 3501 3 11 soft 83 100CrMn6 1 3520 5 26 soft 73 X102CrMo17 1 3543 22 72 soft 26 X82WMoCrV6 5 4 1 3553 11 40 soft 44 100Cr6 1 3501 3 11 hardened 43 100CrMn6 1 3520 5 ...

Page 79: ...es The hand held remote control is powered by a 9 V battery 3 3 Standard ambient conditions for operation The lifting magnets are designed for operation in outdoor and indoor environments provided that the following parameters are complied with Max humidity 80 air temperature between 0 and 50 C DANGER Hazard from wrong ambient conditions Operating the lifting magnet in the wrong ambient conditions...

Page 80: ...uring handling NOTE The operating company is obligated to carry out noise measurements in the work area 3 7 Vibrations Regular operation of the lifting magnet does not generate any vibrations with the exception of demagnetising the attracted material at the end of the handling process 3 8 Restrictions on operation 3 8 1 12 V DC power supply battery Use only the fgFORTE Deep Cycle AGM batteries rec...

Page 81: ... is ensured as a standard A signal can be sent even if the battery voltage drops below 6 V but only with a minimum range When replacing the battery the new battery has to have a higher voltage than 8 3 V as otherwise the low battery voltage warning cannot be removed A work environment with visibility reduced by dust or smoke can reduce the range of the signal sent by the remote control 3 10 Wear o...

Page 82: ...edge protectors Never transport lifting magnets with magnetic lifting equipment 4 2 Storage Place the lifting magnet in a reserved area for the period of non use The storage environment must comply with the parameters specified in section 3 3 Carry out the following tasks before long term storage Charge to battery to full capacity see section 8 2 2 the battery has to be recharged every 6 months Di...

Page 83: ...ning signal Fig 5 Overview of the battery powered lifting magnet 5 2 Control elements 5 2 1 Display of the remote control Warning display if the remote control battery is low If the battery voltage of the remote control falls below 7 3 V two flashing lines will appear in the display see section 3 8 2 For the VARIABLE FORCE see section 7 3 1 and TIP OFF see section 7 3 2 functions the remote contro...

Page 84: ...1 red Fig 6 Display panel The battery charge is displayed as follows Display Displayed status All indicator lights light up green The battery is charged to its maximum capacity 3 orange indicator lights light up The battery is charged to approx 30 its safe capacity 1 red indicator light lights up The battery state of charge has fallen below 9 of the safe capacity 1 red indicator light flashes and ...

Page 85: ...warning signal no 13 fig 5 is located on the front cover on the left below the control buttons It has the following functions The acoustic warning signal indicates a long standstill while the lifting magnet is activated after 15 seconds if the lifting magnet is set down after 3 minutes if the lifting magnet is lifted The acoustic warning signal for operating personnel and the surrounding area soun...

Page 86: ...ransport documents Check the accompanying documents in particular that these refer to the delivered lifting magnet Check that the delivery is complete The power supply cable and the remote control are located in the compart ment of the rear battery cover CAUTION Damage Inform the delivery company about any damage or other defects immediate ly If there are any contradictions between the transport d...

Page 87: ...ath the lifting magnet Ensure that no ferromagnetic material underneath the lifting magnet can be attracted accidentally 1 Release and remove the two screws holding the battery cover in place the battery is located under the rear cover see fig 7 Fig 7 Screws on the battery cover 2 Connect the power cables to the battery contacts Attach the red cable to the terminal and the blue cable to the termin...

Page 88: ...e material is attracted to the lifting magnet 2 Lift the lifting eye to the highest position so that the safety contact is interrupted The READY indicator light lights up continuously 3 Press the red OFF button the lifting magnet must not switch off 4 Return the lifting eye to the original position the safety contact switches on 5 Press and hold the red OFF button 2 s The lifting magnet runs throu...

Page 89: ...ns Annex 2 are not exceeded Peak values for head or torso 2 000 T Mean value for 8 h full body exposure 0 212 T Peak value for extremities 5 000 T As the magnetic saturation for St 37 is 1 6 1 9 T and the magnetic field is concentrated in the area near the pole surface the limits stated above are not exceeded in the range 10 cm According the Bavarian Environment Agency LfU and the German Federal O...

Page 90: ...ature magnetising of the lifting magnet is eliminated Always use safety hooks so the lifting eye cannot slip from the hook Never exceed the stated rated holding forces and workpiece dimensions Do not use damaged or poorly functioning devices Never walk or stand under a suspended load Never transport above or close to any persons Warn people in the surrounding area before starting the lifting proce...

Page 91: ...pacity of the lifting magnet requires a minimum thickness see section 7 1 4 A further reduction in the thickness also reduces the lifting capacity of the magnet Material temperature The operating temperature range is between 10 to 70 C At higher temperatures the protective coating of the coil degrades causing permanent damage to the lifting magnet Working cycle the length depends on the battery po...

Page 92: ...600 St 52 E 295 96 1296 2400 3456 4800 1728 3456 Cast steel 90 1210 2250 3270 4500 1620 3240 Stainless steel 430F 50 670 1250 1800 2500 900 1800 Cast iron 45 600 1125 1620 2250 810 1620 Nickel 10 135 250 360 500 180 340 7 1 4 Limits for handling weights St 37 S 235 JR The influences of shape material thickness air gap and restriction of the load length on the lifting capacity of the lifting magnet...

Page 93: ...3300 2400 3300 3000 2260 3000 2700 1900 19 3000 2700 1600 3000 2700 1400 2700 2700 1220 13 2700 2400 740 2700 2400 720 2400 2400 660 10 2100 2100 500 2100 2100 400 2100 2100 360 6 1800 1800 220 1800 1800 200 1800 1800 180 BM 3600 25 6000 3000 3600 6000 2700 3270 4500 3000 2730 19 6600 2400 2430 6000 2400 2230 4500 2400 1960 13 5100 2400 1250 4800 2400 1180 4500 2400 1090 10 3900 2400 720 3600 2400...

Page 94: ...vity material to be handled with known parame ters see section 7 1 2 Check the lifting capacity of the complete unit The lifting capacity of the crane must be greater than the sum of the weights of the load and the lifting magnet plus any accessories Check the lifting capacity of the lifting magnet in accordance with the load type see section 7 1 4 7 2 2 Basic operation of the lifting magnet and s...

Page 95: ...with an acoustic signal and the lifting magnet is switched off The actual demagnetising cycle When the lifting magnet is switched off press and hold the red OFF button 2 s This only initiates the demag netising cycle the function is provided for better demagnetising of the load Display of the battery state of charge only on the panel On the switched off lifting magnet press the green ON button and...

Page 96: ...es the safety switch and the lifting magnet can be switched off the green READY indicator light flashes Press and hold the red RELEASE button The lifting magnet executes a demagnetising cycle the red DANGER indicator light comes on the cycle end is indicated with an acoustic signal and the lifting magnet is switched off The actual demagnetising cycle When the battery powered lifting magnet is swit...

Page 97: ...ds unattended Notify everyone in the surrounding area that handling is about to start Lift the load to be handled by a few centimetres and check that the lifting procedure is correct load remains in horizontal position without being held Check the safety of the load attraction while the load is lifted Apply pressure to the load e g tap with a hammer If multiple thin sheets are lifted they must not...

Page 98: ...f there are any doubts about the material the surface etc this function can be used to temporarily lower the power You can then try again to lift the load Activate the VARIABLE FORCE function NOTE The function can be activated from the remote control if magnetising is switched off and the magnet is resting on the load safety switch on Briefly press the yellow SET button on the remote control to di...

Page 99: ...teel sheets from the handled package Safety measures when using the TIP OFF function DANGER Hazard from falling load Risk of death from suspended loads The TIP OFF function can be activated only when magnetising is active Se lecting this function entails an increased risk of accidents Falling parts e g from incorrect operation can cause serious injuries and even death Proceed with maximum caution ...

Page 100: ...e remote control and the lifting magnet NOTE After releasing the LIFT and RELEASE buttons the last achieved holding force is maintained for 3 s then the lifting magnet switches to the full mag netic power During this period the TIP OFF function can be re activated and the reduction of the magnetic power can be continued This operating mode can be repeated without having to switch off the magnetisi...

Page 101: ...ified personnel Before each use Carry out a visual inspection of the entire lifting magnet Clean the pole shoes and the surface of the load thoroughly and use a file to remove any burrs weld spatter and raised areas if necessary Check the function of the control buttons on the display panel and the remote control Do not use the magnet if any defects are found Weekly Check the entire magnet includi...

Page 102: ...eck labels for legible condition Operator Maintenance engineer mechanic Maintenance engineer specialist mechanic Check for corrosion Operator Maintenance engineer mechanic Maintenance engineer specialist mechanic Check the lifting eye max 10 of the original cross section Maintenance engineer mechanic Maintenance engineer specialist mechanic Check functional surfaces for wear max 10 of the surface ...

Page 103: ...TE The expected duration for charging the battery depends on the ambient temperature and the state of charge of the power supply battery If the battery is fully discharged and the ambient temperature is 20 C the expected charging period is approx 8 to 9 hours until the full capaci ty has been reached If the battery is fully discharged and the ambient temperature is 20 C the expected charging perio...

Page 104: ... is a difference in the range of only a few per cent 8 3 Maintenance record The manufacturer of the lifting magnet recommends keeping a maintenance record for the lifting system The main tenance record is used for noting down and monitoring all work and maintenance carried out on the lifting magnet whereby it is evident who was responsible for the individual tasks Example for a table in the mainte...

Page 105: ...leshooting carried out only by qualified personnel Potential causes for the malfunctions and recommended remedial measures Description of the fault mal function Possible causes of the fault malfunction Possible remedial measures To be carried out by Corrosion of the functional surface Ambient humidity Remove corrosion Preserve surfaces before storage Operator Corrosion on the lifting eye Abrasion ...

Page 106: ...ns contact customer service of SAV GmbH Maintenance engineer specialist mechanic Battery charging the charging indicator light is not flashing No connection to the mains power supply Check whether there is voltage on the socket used Maintenance engineer mechanic Damage Check and contact customer service of SAV GmbH Maintenance engineer specialist mechanic Battery charging the battery is not chargi...

Page 107: ...MA16 BL0065960 MA16 BL0065961 MA16 BL0065962 Remote control LH30EMBMP1941 Position sensor of the eye MA15SO0002040 External 12 V battery charger MA15 SO0003040 MA15 SO0003062 MA15 SO0003062 MA15 SO0003062 MA15 SO0003062 MA15 SO0003062 12 V DC battery MA15 SO0002070 MA15 SO0002030 MA15 SO0002030 MA15 SO0002030 MA15 SO0002030 MA15 SO0002030 Operating instructions On request SAV 531 42 Version 1 0 10...

Page 108: ... Cd cadmium Hg mercury or PB lead for the heavy metal that is decisive for the rating as a harmful substance Batteries with a low content of harmful substances have only a crossed out bin Used batteries must not be disposed of with household waste Return batteries to the retailer or to a recycling point DANGER Risk of electric shock An electric shock can result in death or serious injuries Disconn...

Page 109: ... applied EN 13155 A2 Cranes Safety Part 1 Non fixed load lifting attachments EN ISO 5817 Welding Fusion welded joints in steel nickel titanium and their alloys beam welding excluded Quality levels for imperfections EN ISO 12100 Safety of machinery General principles for design Risk assessment and risk reduction ISO 3864 Graphical symbols Safety colours and safety signs Part 1 Design principles for...

Page 110: ...NOTES SAV 531 42 Version 1 0 110 ...

Page 111: ......

Page 112: ...g Nuremberg Deutschland Germany Tel 49 0 911 9483 0 Fax 49 0 911 4801426 Mail info sav de www sav de MAGNETSYSTEME MAGNET SYSTEMS UMLAUFENDE SPANNTECHNIK ROTARY WORKHOLDING STATIONÄRE SPANNTECHNIK STATIONARY WORKHOLDING AUTOMATISIERUNG AUTOMATION ...

Reviews: