-19-
1
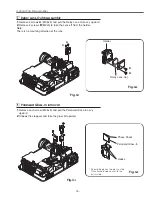
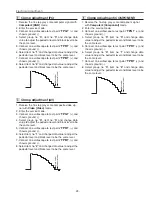
Turn the projector on by a state of without FPC cables.
2
Project all of lights on the screen.
3
Adjust the adjustment base of integrator lens assy to make color
uniformity in white.
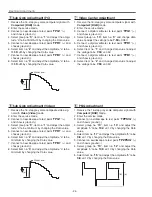
1) If the shading appears on the left or right of the screen as
shown in
Fig.2-1
, loosen 2 screws
A
, and adjust the slot
B
to
make color uniformity in white by using a slot screwdriver.
2) If the shading appears on the top or bottom of the screen as
shown in
Fig.2-2
, loosen 2 screws
C
, and adjust the slot
D
to
make color uniformity in white by using a slot screwdriver
4
Tighten screws
A
and
C
to fix the Integrator lens unit.
Note:
The relay lens adjustment must be carried out after completing this
adjustment.
Optical Adjustments
Integrator lens adjustment
Fig.2-
2
y
x
Moving of Slot D
Slot D
a
b
a
b
Moving of slot B
Fig.2-
1
Slot B
A
C
y
x
White
White
A
Summary of Contents for PLC-XU50
Page 51: ... 51 IC Block Diagrams AD8075 Selector IC201 AN7513 Audio Output IC5601 ...
Page 52: ... 52 BA7078 Sync Separator IC5341 IC Block Diagrams AN5870 RGB SYNC SW IC1201 IC5201 ...
Page 54: ... 54 FA5502 P F Control IC621 IC Block Diagrams CXD3536 LCD Driver IC401 ...
Page 55: ... 55 IC Block Diagrams M62392 M62393 D A IC6271 IC281 ML60851 USB Driver IC9801 ...
Page 56: ... 56 STR Z2156 Power Switching Control IC631 TB1274 Video Decoder IC3101 IC Block Diagrams ...
Page 57: ... 57 IC Block Diagrams TC90A69F Y C Separator IC2101 ...
Page 86: ...MW3 XU5000 MT3 XU5500 86 S5 S5 S5 L9 Projection Mechanical Parts List ...
Page 89: ...MW3 XU5000 MT3 XU5500 89 ...
Page 90: ... MT3A Sep 2003 BB 400 Printed in Japan SANYO Electric Co Ltd ...

