background image

10 


ADJUSTING THE TOUCH SENSITIVITY LEVEL 


Automatic Setup 

When you receive your unit, the sensitivity settings will have been optimised when the unit was 
manufactured. These settings should only be altered if you are experiencing problems such as 
an electrically noisy environment. Contact your supplier if you need further explanation. 
 
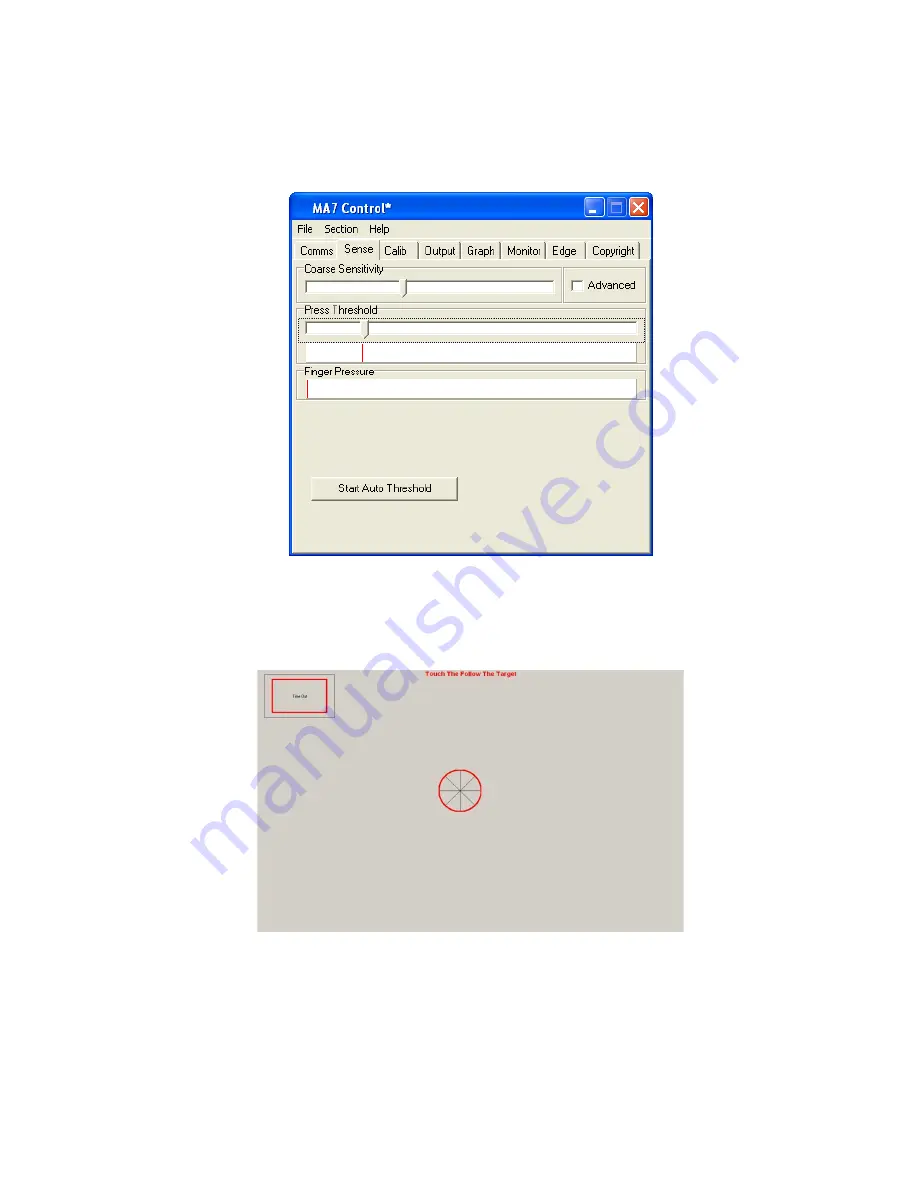
1.  To select the sensitivity setup click on the 

Sense


tab. 


Fig 3 

 
2.  First set the 

Course Sensitivity

 to approximately two thirds by dragging the bar with your 

mouse. 

3.  Set the 

Press Threshold

 to approximately one third by dragging the bar with your mouse. 

4.  Click on 

Start Auto Threshold

The following image appears: 


Fig 4


5.  Place your finger over the centre red circle (Fig4.) and follow it with your finger until it turns 

green, then remove your finger. The automatic adjustment of sensitivity is now complete and 
the screen returns to Fig 3. 


Manual Sensitivity Setup 


6.  The 

Coarse Sensitivity


slider is used to set the sensitivity of the touchscreen. If the slider is 

set to the right, the touchscreen is more sensitive to detecting a touch. More or less 
sensitivity may be required, dependent upon glass thickness or if the system is to be used 
with gloved hands. 

Summary of Contents for 42LM5WPTC

Page 1: ...Interactive Touchscreen User Guide For serial Interface For use with models 42LM4WPTC 42LM5WPTC 42LM4RTC 42LM5RTC Version 1 3 September 2007 Interactive Touchscreen User Guide ...

Page 2: ...2 ...

Page 3: ...GRAM 13 DIAGNOSTICS AND FREQUENTLY ASKED QUESTIONS 15 MONITOR MODE 16 USING EDGE ENHANCEMENT 17 DELAYED STARTING OF THE DRIVER OUTPUT 17 FAULT FINDING GUIDE 18 DRIVER DOES NOT SEE THE TOUCHSCREEN 18 TOUCHSCREEN PERFORMS BADLY NEAR THE EDGES OF THE DISPLAY 18 FALSE TOUCHES 18 FAILURE TO SEE TOUCH EFFECT 18 MOUSE MOVEMENT IS NOT SMOOTH 18 CHANGES TO THE DRIVER ARE NOT BEING SAVED 18 MOUSE CURSOR MOV...

Page 4: ...hipping carton for damage If any damage is seen that could have caused damage to the contents keep all packing materials for later inspection by the carrier who are responsible for any shipping damage CARE AND CLEANING OF THE TOUCHSCREEN Thorough cleaning of the touch screen should be performed regularly in order to assure optimum performance The touch screen surface should be kept free of dust di...

Page 5: ...eft button in various modes when a user touches the touchscreen The Control Program Ma7_Control_En exe is used to set up the driver The Setup Program Ma7_Setup_En exe is used to set up the calibration and sensitivity of the driver from the touchscreen without using the mouse The configuration of the touchscreen is stored in a file called Ma7 ini this file is saved in the same directory as the Ma7_...

Page 6: ...t the Touch software button from the on screen menu The software will create a subdirectory call TouchScreen on your PC in the Program Files sub directory and copy all the relevant files necessary to run the touchscreen into it Once completed launch the application will finish the installation Please follow the instructions in the next section to complete the installation and the setting up of you...

Page 7: ...on the desktop When the program is started it displays the following window Fig 1 Fig 1 CONFIGURING THE COMMUNICATIONS PORT When the program has loaded 1 Select the Comms tab 2 Select the comm port the Touchscreen is connected to 3 Make sure the driver box called Present is red and select the appropriate port that the touchscreen is connected to 4 Select a Baud rate of 19 200 5 Tick the Open box i...

Page 8: ...n Open is red Active will flash on and off to indicate there is activity on the port but it is some other hardware device Valid will only go red and remain in this state when both Open and Active are red and the Baud rate is set correctly Only when Open Active and Valid boxes have all changed to red and remain red is the touchscreen ready for the next stage of driver setup When communications exis...

Page 9: ...of the Control Program Details of this will follow later in this manual The Reset button loads fresh data from the touchscreen This is used as a reference for detecting any new touches This may be necessary if the touchscreen environment has been changed for example the touchscreen has been moved ...

Page 10: ...use 3 Set the Press Threshold to approximately one third by dragging the bar with your mouse 4 Click on Start Auto Threshold The following image appears Fig 4 5 Place your finger over the centre red circle Fig4 and follow it with your finger until it turns green then remove your finger The automatic adjustment of sensitivity is now complete and the screen returns to Fig 3 Manual Sensitivity Setup ...

Page 11: ... adjust the sensitivity of the touch to simulate a mouse button press The driver recognises a touch when the Finger Pressure indicator exceeds the position of the Press Threshold slider As default this is the same sensitivity level as required for mouse movement 9 To make certain that the touch is sensitive enough all over the display area move a finger around the touchscreen and make certain that...

Page 12: ... is displayed touch and hold your finger on the centre of the circular target You must touch all three targets in turn 4 The red circle in the target slowly moves towards the centre of the target 5 Remove your finger only when the next target appears and touch that one If the touch calibration is not correct after this procedure please run the process again and adjust your finger position on the t...

Page 13: ... Previously Drag and Drop enables the mouse pointer movement and left button down when the screen is touched The left button stays down as the finger is moved around the screen and left button click up does not occur until the finger is removed from the screen The item selected is dragged around the screen following the mouse cursor movement and it is released only when the finger is removed from ...

Page 14: ...14 You must now save the settings Fig 8 1 Fig 8 Click on file 2 Click on save to save the current settings When the touchscreen driver has been set up and there is no requirement to change it ...

Page 15: ...th the driver setup Contact your supplier for more information Signal to Noise Check 4 There will always be some noise pickup on the touchscreen this can be seen by slight movement of the 64 indicators The system can cope with this providing the noise is not excessive Compare the signal strength of a finger against the noise The touchscreen should function acceptably providing the peak noise is no...

Page 16: ...re testing 3 When the Advanced box is ticked the Inter Wire Linearity can be adjusted if necessary This allows the driver to handle different response curves caused by different sizes of touchscreen and different glass thickness 4 The linearity can be adjusted for correct positioning between the wires The default setting is centre which should be satisfactory for most applications Fig 11 12 5 If t...

Page 17: ...edge Too much edge enhancement will force the cursor to the edge of the display where it may not have the desired effect DELAYED STARTING OF THE DRIVER OUTPUT 1 When starting a touchscreen computer system it is sometime desirable to be able to prevent users from interfering with the start up procedures from the touchscreen Delaying the action from the touchscreen driver to the application can do t...

Page 18: ... the setting is to the left of the Finger Pressure indicator all over the display area when a finger is present MOUSE MOVEMENT IS NOT SMOOTH Refer to Monitor Mode and the effects of Inter Wire Linearity Adjustment to the Press Threshold may be required to ensure the setting is to the left of the Finger Pressure indicator all over the display area when a finger is present CHANGES TO THE DRIVER ARE ...

Page 19: ...ressing CTRL ALT and DELETE in that order and all at the same time Select Task Manager followed by Processes Scroll down the list of running processes until the MA7 driver is found and right click it Highlight the Set Priority and the following list should appear LOW BELOW NORMAL NORMAL ABOVE NORMAL HIGH and REALTIME The driver should be running in NORMAL change this to ABOVE NORMAL Test the respo...

Reviews: