background image

64

Setting the alarm clock

Your radio has two separate alarms which can be set to wake you to either the radio or a buzzer 
alarm. In the event of a power interruption your radio has built in memory that will retain your alarm 
settings. Ensure that the time is set correctly before setting the alarms.
If your radio is being used as part of a multi-room system, please also see 'Alarm and Multi- room'.
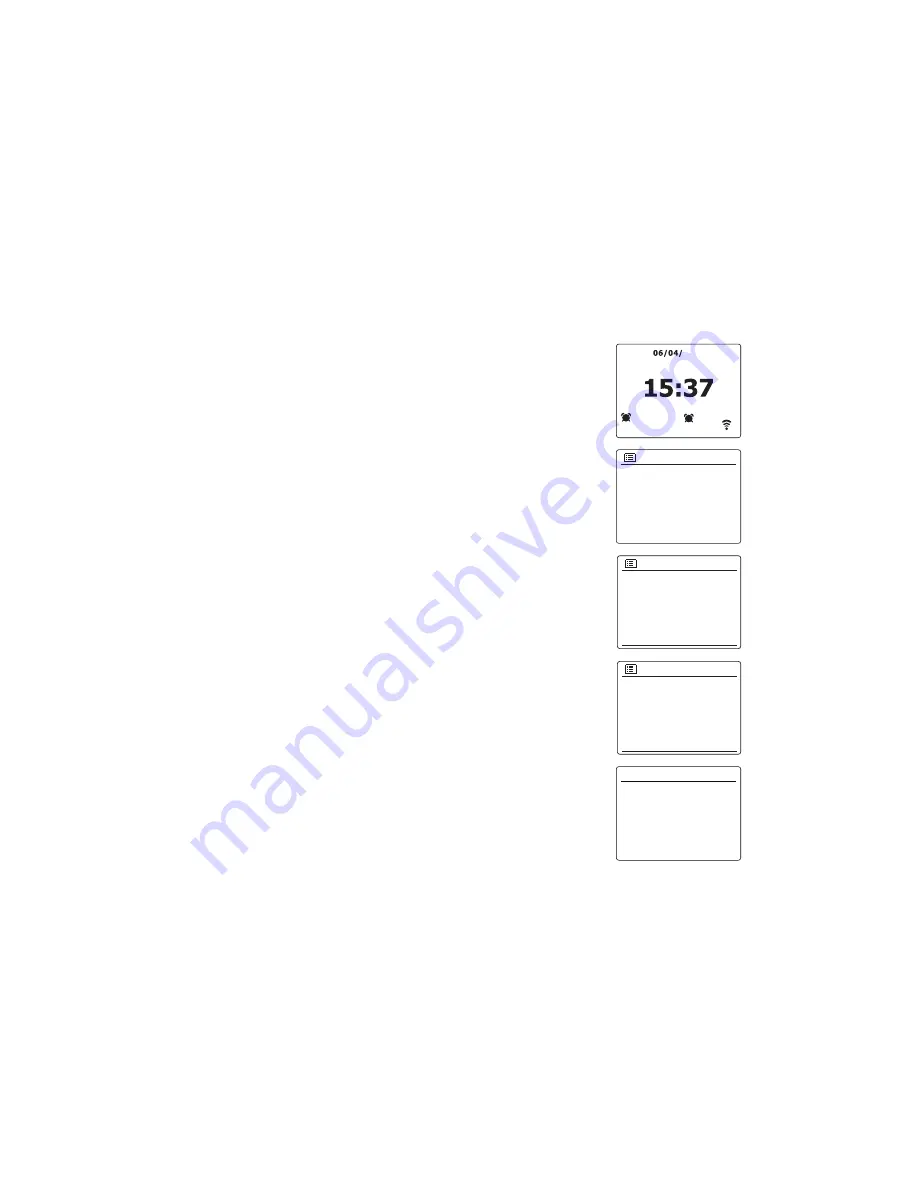
1.  While the radio is switched on, press and hold the Menu button to access the menu for the current 

mode. Press the Menu Up or Down buttons until 'Main menu' is highlighted on the display. Press 
and release the Select button to enter the Main menu.

2.  Press the Menu Up or Down buttons until 'Alarms' is highlighted on the display. Press and release 

the Select button to see the current alarm settings. If no change is required, press the Back button 
to exit.

3.  Press the Menu Up or Down buttons until the desired alarm (1 or 2) is highlighted on the display. 

Press and release the Select button to enter alarm setup.

4.  Press the Menu Up or Down buttons until 'Time' is highlighted on the display. Press and release the 

Select button to adjust the alarm time.

5.  Press the Menu Up or Down buttons to choose the alarm hour. Press and release the Select button 

to confirm the setting.

FM

Bluetooth

AUX-IN 

Sleep 
Alarms

Main menu

1

07:30

2

08:30

Alarms

Alarm 1: Off [00:00]

Alarm 2: Off [00:00]

Alarm 1 

Enable: Off 
Time: 00:00 
Mode: Buzzer
Volume: 20 
Save

07:00

Alarm 1 time

2017

Summary of Contents for REVERY R4 WFS-58

Page 1: ...Version 1 REVERY R4 WFS 58 GB...

Page 2: ...mply from the Apple iTunes App store or Android Google Play store to control your music now The Bluetooth word mark and logos are registered trademarks owned by Bluetooth SIG Inc and any use of such m...

Page 3: ...odes 27 Customising your radio 28 31 DAB mode 32 37 Selecting a DAB radio station 33 Display modes 34 Finding new DAB radio stations 35 Manual Tuning 35 Dynamic Range Control settings 36 Station order...

Page 4: ...Equaliser function 73 74 Streaming audio quality setting 75 Brightness control 75 Loudness 76 Inactive Standby timer 76 Language selection 77 Headphone socket 77 Auxiliary input socket 78 Information...

Page 5: ...awn to the environmental aspects of battery disposal Before you can use this product Before you can use your internet radio you must have the following A broadband internet connection not required for...

Page 6: ...y button 3 Band button 4 Info Menu button 5 Preset Bluetooth pairing button 6 Back Auto tune button 7 NFC detection area 8 Volume Up dowm button 9 LCD display 10 Select Play Pause button 11 Menu Down...

Page 7: ...6 Controls and connections cont 14 DC input socket 15 Stereo mode switch 16 Auxiliary input socket 17 Headphone socket 18 Battery compartment 19 NiMH Alkaline batteries switch...

Page 8: ...nd or low battery sign showing on the display are all signs that the batteries need replacing or recharging When playing on rechargeable batteries the output power is less compared to the output power...

Page 9: ...In lower or higher temperatures full charge cannot be achieved 8 Depending on the capacity of the batteries charging from empty to full can take several hours even up to 7 hours or more 9 Do not charg...

Page 10: ...llowing display is shown 6 battery icons animate When the charging process is completed the following display is shown 6 battery icons are full and stop animation When there is no battery missing batt...

Page 11: ...also allows the display of information relating to the radio station or music file being played 4 Many operations require the user to make a selection from the menu Highlight the menu item using the...

Page 12: ...ormal use In order to disconnect the radio from the mains completely the mains adaptor should be removed from the mains outlet completely 4 When you apply power the display on the radio will light up...

Page 13: ...ect button to enter the selection In the UK ON is equivalent to British Summer Time and OFF is equivalent to Greenwich Mean Time You will then need to set Keep network connected If you need to be able...

Page 14: ...ng broadcast and it was not found then try re scanning press the Back button and if necessary try moving your radio to a location closer to your access point router 15 When the SSID for the wireless n...

Page 15: ...reen have special functions You can quickly access these by pressing the Info button and then using the Menu Up or Down and Select buttons as needed select to erase a character just entered long press...

Page 16: ...twork wizard This will present you with details of any WiFi networks that are found Scroll down the list using the Menu Up or Down buttons to the desired network name Press the Select button to select...

Page 17: ...The device will be listed on the screen of the smart phone Select your radio for example Sangean WFS 58 xxxxxxxxxxxx the 12 digit alphanumeric code is the MAC address of your radio to establish a conn...

Page 18: ...8 For a WiFi connection the app will ask you to choose a WiFi network and enter the appropriate password Your radio will connect to your network Note If when setting up your radio your Android device...

Page 19: ...option in the Network settings menu The updated PIN should then be used in the UNDOK app to allow the app to reconnect to the radio The app will prompt you for the PIN as needed Keep network connected...

Page 20: ...the station and the country from which a station is broadcast this may be the easiest method to find a station It is also a great way to experience radio from other parts of the world You may also sea...

Page 21: ...st of continents When the desired continent is highlighted press and release the Select button to enter your selection 6 The display will show a list of countries within the chosen continent If there...

Page 22: ...dio station Note If your radio is unable to connect to an Internet radio station it will generally either display Network Error or Stopped This can be for many reasons but typically will be due to one...

Page 23: ...chosen genre or a list of countries Note if a country is not shown then the station may still appear in the All Stations list Press the Menu Up or Down buttons and press and release the Select button...

Page 24: ...ete character on the screen and then press and release the Select button Press and release the Menu Up or Down buttons or press Info again to go back to the character selection After the final charact...

Page 25: ...Station list is highlighted on the display and then press and release the Select button 2 Press the Menu Up or Down buttons until Stations is highlighted on the display and then press and release the...

Page 26: ...in exactly the same way as when searching for a conventional radio station Searching by location is done first by continent then by country You may then list All shows or search within a country by ge...

Page 27: ...t list until you reach an unused preset or a preset that you wish to change Press and release the Select button to store the preset Preset stored will be shown on the display Repeat this procedure as...

Page 28: ...ight of the dividing line then the data stream reliability may be poor and you may find that there are many breaks in the audio Date Displays the current date Additional or alternative information may...

Page 29: ...allows it to uniquely identify your Internet radio from the many others that it also provides data for To obtain the access code please follow these steps 2 With your radio switched on and in Interne...

Page 30: ...rite radio station click on the icon with a heart and minus symbol Configuring My Added Stations 1 If you wish to listen to a radio station which is not currently held in the database at http www wifi...

Page 31: ...highlight whichever you wish to listen to and then press the Select button to cause your radio to reconnect to that radio station or podcast Storing favourite stations with your radio It is also poss...

Page 32: ...Should you be unable to connect to a particular station please note that some radio stations do not broadcast 24 hours per day and some stations are not always on line In addition as mentioned in the...

Page 33: ...station counter will increase and the stations will be added to the list which is stored in the radio The bar graph indicates the progress of the scan 5 When scanning is completed the radio will list...

Page 34: ...ary service Some DAB radio stations can have one or more secondary stations associated with them Typically these are not broadcast continually If a station has a secondary station available then the s...

Page 35: ...ome stations may provide other programme related information for the display in addition to the regular text If none is available a message no info is displayed A signal strength indicator is always s...

Page 36: ...lows you to tune directly to the various Band III DAB channels 5A to 13F 1 When in DAB mode press and hold the Menu button so that the display shows the DAB menu 2 Press the Menu Up or Down buttons un...

Page 37: ...e radio will have no effect Station order setup Your radio has 3 station order settings from which you can choose The station order settings are alphanumeric ensemble and valid Note The default statio...

Page 38: ...Press and hold the Menu button to enter the DAB menu 4 Press the Menu Up or Down buttons until Prune is highlighted Press and release the Select button 5 To cause the stations list to be pruned elimin...

Page 39: ...ference simply press the Auto Tune button to scan further Your radio may have found a spurious interference signal 7 When the end of the waveband is reached your radio will recommence tuning from the...

Page 40: ...adio stations 1 Press and release the Band button as needed and then use the Menu Up or Down and Select buttons to select the FM Radio mode 2 Press and hold the Menu button to enter the FM menu 3 Pres...

Page 41: ...nt setting is indicated with an asterisk 4 To switch to mono in order to reduce the hiss from a weak FM signal press the Menu Left or Right buttons until YES is highlighted Press and release the Selec...

Page 42: ...for the remaining presets 4 Stations which are already stored in the presets may be over written by following the procedure above Recalling a preset using the unit 1 Select the DAB or FM radio mode 2...

Page 43: ...A Voice WMA 10 Professional and of files which have DRM protection is not supported by the radio Please note that when using a UPnP DLNA server the search and selection criteria that are available to...

Page 44: ...w media files to the library select Library then Music then All music or Artist Album etc This will show you the current library contents You may then simply drag and drop files from other locations i...

Page 45: ...m item to open the Media Streaming window Select Automatically allow devices to play my media then select Automatically allow all computer and media devices Alternatively select More Streaming options...

Page 46: ...table devices 4 The radio will now list the media categories which are made available by the UPnP server for example Album Artist and Genre Press the Menu Up or Down buttons to highlight which categor...

Page 47: ...h to showing the tracks in that album or folder When searching by UPnP they will normally be listed in track number order but as with the search criteria this can vary according to the server applicat...

Page 48: ...e player will move through the track Release the button when the desired point is reached Note that this feature is not supported when playing files encoded using the FLAC and ALAC format In the music...

Page 49: ...een the time is displayed in the top right corner of the display and a WiFi strength or Ethernet connection indicator is shown in the bottom right corner together with an indicator showing the method...

Page 50: ...e tracks within the album artist or folder selection will be added to the playlist individually This allows any unwanted tracks to be removed from the playlist if needed Viewing your playlist 1 Press...

Page 51: ...play Press and release the Select button to clear the playlist 4 If you do not wish to clear the playlist press the Menu Left or Right buttons to highlight NO and press and release the Select button t...

Page 52: ...and hold the Menu button to enter the main Music Player menu 2 Press the Menu Up or Down buttons until Prune servers is highlighted on the display Press and release the Select button 3 To remove serv...

Page 53: ...ng in DMR mode you can use the controls in the Play to Cast to Device window on your computer to skip tracks fast forward or rewind to pause or restart and to change the volume on the radio You may al...

Page 54: ...if needed 3 Press and release the Band button and then use the Menu Up or Down and Select buttons to select the Spotify Connect mode The message Waiting for Users is displayed 4 Play tracks via your r...

Page 55: ...hich the current track is taken d Bit rate Displays the bit rate and sampling rate of the track currently playing e Playback buffer Displays the soundbars internal buffer level Note If the Audio strea...

Page 56: ...ssword BKSP OK CANCEL Napster Deezer Qobuz TIDAL Library Charts New releases Napster playlists Editorial picks Napster Flow Charts Recommendations Mixes Genres Deezer New TIDAL Rising Playlists Genres...

Page 57: ...controls on your Bluetooth enabled device or on the radio to play pause and navigate tracks Note 1 If 2 Bluetooth devices pairing for the first time both search for your radio it will show its availa...

Page 58: ...ations or devices may respond to all of these controls 2 When you make or receive calls you radio will pause the music automatically to allow you to answer the phone Such behaviour is a function of th...

Page 59: ...d device you would like to connect and press the Select button to confirm the selection Bluetooth or connected Bluetooth device information display 1 Press and release the Band button and then use the...

Page 60: ...message is shown on your NFC enabled device 3 Use the controls on your device or on your radio to play pause and navigate tracks Note 1 NFC connectivity performance may vary depending on the connected...

Page 61: ...and hold the Menu button to access the menu for the current mode 2 Press the Menu Up or Down buttons until System settings is highlighted on the display Press and release the Select button to enter t...

Page 62: ...display Press and release the Select button to enter the System Settings menu 3 Press the Menu Up or Down buttons until Time Date is highlighted on the display Press and release the Select button to e...

Page 63: ...To change the current time or date setting press the Menu Up or Down buttons until Time Date is highlighted on the display then press and release the Select button to enter the time and date setting s...

Page 64: ...Select button to confirm the setting Press the Back button to exit or go to step 12 to set the summer winter time option 12 Press the Menu Up or Down buttons until Daylight savings is highlighted on...

Page 65: ...nter the Main menu 2 Press the Menu Up or Down buttons until Alarms is highlighted on the display Press and release the Select button to see the current alarm settings If no change is required press t...

Page 66: ...ll disable the alarm Press and release the Select button to confirm the selection If you choose to set the alarm to Once you will also need to set the date using the Menu Up or Down and Select buttons...

Page 67: ...or Down buttons until Save is highlighted Press and release the Select button to store the alarm settings Your radio will show Alarm saved and will then go back to the list of alarms with the new ala...

Page 68: ...ile the radio is snoozed will set the available snooze time to 5 10 15 or 30 minutes 2 While the snooze timer is active the remaining snooze time is shown next to the flashing alarm icon on the clock...

Page 69: ...ime setting is selected Press and release the Select button to confirm the setting 4 The sleep timer will be set to the chosen duration An active sleep timer is shown using a small timer indicator at...

Page 70: ...y not in a group will be listed on the screen of your smartphone Select the radio for example Sangean WFS 58 xxxxxxxxxxxx the 12 digit alphanumeric code is the MAC address of your radio to establish a...

Page 71: ...all the devices in this group If your radio is a client in a group Playback buffer is shown on the display b Add to group Devices in current network will be listed Select the client you desired to ad...

Page 72: ...the other one to the right 2 The speakers will then operate as a stereo pair Alarms and Multi room If your radio is configured as part of a multi room group then the radio will remove itself from that...

Page 73: ...y EQ option to adjust the bass mid range and treble setting Sleep timer Your radio can be set to turn off after a preset time has elapsed The sleep setting can be adjusted as follows 1 Set the sleep t...

Page 74: ...mode 3 Press the Menu Up or Down buttons until System settings is highlighted on the display Press and release the Select button to enter the System Settings menu 4 Press the Menu Up or Down buttons...

Page 75: ...ss and release the Select button to enter adjustment mode and press the Menu Up or Down buttons until the desired level between 6 and 6 is displayed The sound will change as you adjust the level Press...

Page 76: ...setting There are a range of Standby brightness levels and a range for when the radio is in use To change the current brightness setting please follow these steps 1 Press the On Standby button to swit...

Page 77: ...tandby timer The Inactive Standby timer allows your radio to save power by automatically going to Standby if no controls are used for a period of time 1 With your radio switched on access the menu for...

Page 78: ...guage is highlighted and press the Select button to confirm the setting Headphone socket A 3 5mm Headphone Socket located on the rear of your radio is provided for use with headphones Inserting a plug...

Page 79: ...ease the Band button and then use the Menu Up or Down and Select buttons to select the AUX IN mode 4 Press the play on the connected audio device If you are using its headphone output for the connecti...

Page 80: ...ess and release the Select button The display will revert to the previous menu 4 With YES highlighted press and release the Select button A full reset will be performed and the radio will restart as i...

Page 81: ...he Select button The radio will check to see if an update is available The display will show Checking for new versions If there are no updates then the display will show Software up to date If a softw...

Page 82: ...e Select button to enter the System Settings menu 3 Press the Menu Up or Down buttons until Network is highlighted on the display Press and release the Select button to enter the Network Settings menu...

Page 83: ...etwork settings menu 4 Press the Menu Up or Down buttons until Clear network settings is highlighted on the display Press and release the Select button 5 The radio will offer a YES or NO selection Pre...

Page 84: ...if the SSID is not broadcast WEP WPA WPA2 key and settings When entering numbers the SSID or the WiFi pass key the three controls on the right hand side of the screen have special functions You can q...

Page 85: ...me audio help for Internet Radio use 1 With your radio switched on and in the Internet Radio mode press and hold the Menu button 2 Press the Menu Up or Down buttons until Station list is highlighted o...

Page 86: ...oportada AAC LC HE HE V2 320 kbits seg ALAC 1 5 1 5 Mbits seg FLAC 2 5 1 5 Mbits seg LPCM 3 1 536 Mbits seg MP3 320 kbits seg WAV 3 1 536 Mbits seg WMA 4 320 kbits seg All codecs support 2 channel ste...

Page 87: ...Operations in the 5 15 5 35GHz band are restricted to indoor usage only Operating temperature range 0 C to 40 C Frequency Coverage FM 87 5 108MHz DAB 174 928 239 200MHz Circuit features Headphone sock...

Reviews: