background image

English _17

networ

K connection an

D S

etup

if not using a Broadband router 

For setting <

ip address

>, <

Subnet mask

>, and <

Gateway

>, contact your network administrator.
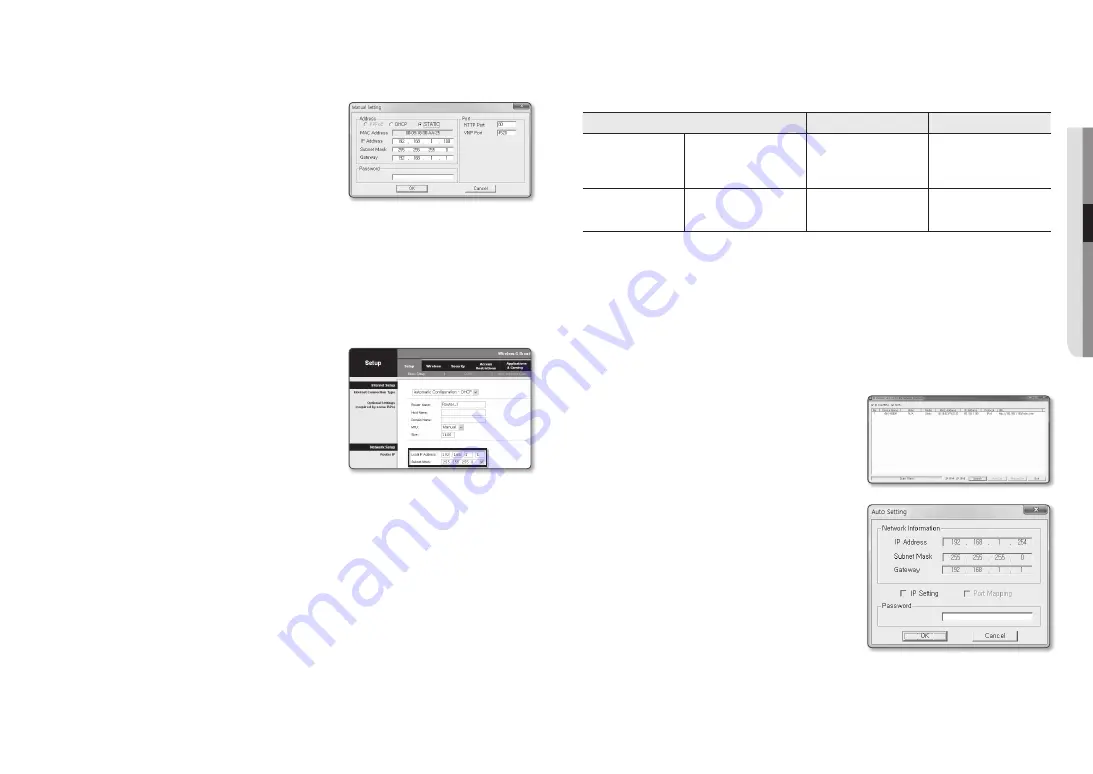
4. 

In the <

port

> pane, provide necessary information.


HTTP Port : Used to access the camera using the Internet 

browser, defaulted to 80. 


VNP Port : Used to control the video signal transfer, 

defaulted to 4520.

5. 

Enter the password.  

Enter the password of “

admin

” account, which was used to 

access the camera.


J


`

For the security purposes, you are recommended to use a combination of numbers, alphabets uppercase and lowercase and 

special characters for your password. 


`

If you want to change the password, refer to “

Administrator password change

” of the user setup. (page 29)

6. 

Click [

oK

]. 

Manual network setup will be completed.

if using a Broadband router


IP Address : Enter an address falling in the IP range provided 

by the Broadband Router. 

ex)  192.168.1.2~254, 192.168.0.2~254,  

192.168.XXX.2~254


Subnet Mask : The <

Subnet mask

> of the Broadband Router 

will be the <

Subnet mask

> of the camera.


Gateway : The <

Local ip address

> of the Broadband Router 

will be the <

Gateway

> of the camera.


M


`

The settings may differ depending on the connected Broadband 

Router model. 

For more information, refer to the user manual of the applicable router.


`

For more information about port forwarding of the broadband router, refer to “

Port Range Forward (Port Mapping) Setup

”. 

(Page 18)

if the Broadband router has more than one camera connected

Configure the IP related settings and the Port related settings distinctly with each other.
ex)

Category

Camera #1

Camera #2

IP related settings

IP Address 

Subnet Mask 

Gateway

192.168.1.100 

255.255.255.0 

192.168.1.1

192.168.1.101 

255.255.255.0 

192.168.1.1

Port related settings

HTTP Port 

VNP Port

8080 

4520

8081 

4521


M


`

If the <

HTTP Port

> is set other than 80, you must provide the <

Port

> number in the address bar of the Internet browser 

before you can access the camera.

ex)  http://IP address : HTTP Port 

http://192.168.1.100:8080

auto network Setup

Run <

ip installer_v2.XX.exe

> to display the camera search list. 

At the initial startup, both [

auto Set

] and [

manual Set

] will be grayed out.


M


`

For cameras found with the IPv6 setting, these buttons will be grayed out as the cameras do not support this function.

1. 

Select a camera in the search list. 

Check the MAC address of the camera on the camera’s label. 

Both the [

auto Set

] and [

manual Set

] buttons will be 

activated.

2. 

Click [

auto Set

]. 

The Auto Setting dialog appears. 

The <

ip address

>, <

Subnet mask

>, and <

Gateway

> will 

be set automatically.

3. 

Enter the password. 

Enter the password of “

admin

” account, which was used to 

access the camera.


J


`

For the security purposes, you are recommended to use a 

combination of numbers, alphabets uppercase and lowercase and 

special characters for your password.


`

If you want to change the password, refer to “

Administrator 

password change

” of the user setup. (page 29)

4. 

Click [

oK

]. 

Auto network setup will be completed.

Summary of Contents for XNO-6080R

Page 1: ...NETWORK CAMERA User Manual XNO 6080R XNO 8080R ...

Page 2: ... correctness of the contents in this document but no formal guarantee shall be provided Use of this document and the subsequent results shall be entirely on the user s own responsibility Hanwha Techwin reserves the right to change the contents of this document without prior notice Designandspecificationsaresubjecttochangewithoutpriornotice TheinitialadministratorIDis admin andthepasswordshouldbese...

Page 3: ...4 Vac 50 60 Hz min 1 05 A or 12 Vdc min 1 12 A 16 If you use excessive force when installing the product the camera may be damaged and malfunction If you forcibly install the product using non compliant tools the product may be damaged 17 Do not install the product in a place where chemical substances or oil mist exists or may be generated As edible oils such as soybean oil may damage or warp the ...

Page 4: ... input power with just one camera and other devices must not be connected The ITE is to be connected only to PoE networks without routing to the outside plant Please read the following recommended safety precautions carefully y y Do not place this apparatus on an uneven surface y y Do not install on a surface where it is exposed to direct sunlight near heating equipment or heavy cold area y y Do n...

Page 5: ...ra to a Broadband Router with the PPPoE Cable Modem 16 Buttons used in IP Installer 16 Static IP Setup 18 Dynamic IP Setup 18 Port Range Forward Port Mapping Setup 19 Connecting to the Camera from a Shared Local PC 19 Connecting to the Camera from a Remote PC via the Internet web viewer 20 20 Connecting to the Camera 21 Password setting 21 Login 21 Plug in support specifications for each browser 2...

Page 6: ...gering an event Fog detection Detects fog that is heavier than the detection level Face Detection Detects faces in the specified area from the camera s video input IVA Intelligent Video Analysis function Detects a motion or situation that meets the configured event rules Sound source classification Detects a sound source specified by the user ONVIF Compliance This product supports ONVIF Profile S ...

Page 7: ...nstallation guide Power Terminal Block 1 Plugged in the power plug CAUTION Be ware of the Rated Voltage and Polarity of the power connection Power Cable 1 Used to plug into the power port L Wrench 1 Used to control the direction of the camera Appearance Item Name Quantity Description Audio alarm cable 1 Used to connect with the audio and alarm port Tapping Screw 4 Used for installation on the wall...

Page 8: ...he IP Installer program to change the basic network settings such as IP address Subnet mask Gateway etc before you can connect to the network g Test Monitor Out Output port for test monitoring the video output Use the test monitor cable to connect to a mobile display and check the test video Item Description h Zoom Focus Control Button T Zoom in Tele W Zoom out Wide N Focusing on a near object Nea...

Page 9: ...cover using the 4 tapping screws provided 2 Hang the safety cable up on a hook that looks like an arrow in the Bottom cover 3 Connect the appropriate cables with camera terminals 4 Tighten the 3 screws on the Top cover using the L wrench provided 5 Adjust the camera direction using the L wrench provided J J When you adjust the camera position using a bracket please loosen the bracket screw adjust ...

Page 10: ... turn off the camera or go to Storage turn the device off and press the Apply button Page 42 If you turn off the camera or remove the Micro SD memory card that contains data from the product the data may be lost or damaged Memory Card Information Not Included What is a memory card The memory card is an external data storage device that has been developed to offer an entirely new way to record and ...

Page 11: ...ETIS WF2123 n300 EDIMAX EW 7811Un IP Time N100mini TP LINK TL WN823N V1 ASUS USB N13 NETGEAR WNA3100M Power Supply Use the screwdriver to connect each line of the power cable to the corresponding power port of the camera J J When supplying PoE and DC 12V or PoE and AC 24V power at the same time the equipment is powered by the external source AC 24V DC 12V You can also use a router featuring PoE to...

Page 12: ...nput impedance 2K Ohm Audio out Line out 3 5mm mono jack Maximum output 1Vms Line out impedance 600Ω Connecting to the I O port box Connect the Alarm I O cable to the corresponding port of the port box ALARM IN Used to connect the alarm input sensor or external day night sensor ALARM OUT Used to connect the alarm output signal GND Common port for alarm in output signal J J If devices e g flashing ...

Page 13: ... alarm out connection diagram below when connecting devices that exceed the voltage and current specifications Alarm Out Wiring Diagram Sensor GND RESISTOR ALARM IN 5mA SINK RESISTOR RESISTOR VCC_3 3V DIODE GND MLCC TRANSISTOR External connection Inside of the camera Warning lamp Siren power Warning lamp Siren ALARM OUT 12VDC 20mA MAX RESISTOR 10K ohm DIODE RELAY DC 5V or 3 3V TRANSISTOR GND GND T...

Page 14: ...HCP server automatically If there is no DHCP server available the IP address will be set to 192 168 1 100 To change the IP address use the IP Installer For further details on IP Installer use refer to Static IP Setup Page 16 Connecting the Camera Directly to a DHCP Based DSL Cable Modem 1 Connect the user PC directly with the network camera 2 Run the IP Installer and change the IP address of the c...

Page 15: ...nd Router Configuring the network settings of the local PC connected to a Broadband Router follow the instructions below Select Network Properties Local Area Connection General Properties Internet Protocol TCP IP Properties Obtain an IP address automatically or Use the following IP address Follow the instructions below if you select Use the following IP address ex1 If the address LAN IP of the Bro...

Page 16: ... Installer automatically configures the network settings l Manual Set You should configure the network settings manually m Exit Exits the IP Installer program M M For the IP installer use only the installer version provided in the installation CD or use the latest one if available You can download the latest version from the Hanwha Techwin web site If the supporting OS is Windows 8 1 it is recomme...

Page 17: ...Port Mapping Setup Page 18 If the Broadband Router has more than one camera connected Configure the IP related settings and the Port related settings distinctly with each other ex Category Camera 1 Camera 2 IP related settings IP Address Subnet Mask Gateway 192 168 1 100 255 255 255 0 192 168 1 1 192 168 1 101 255 255 255 0 192 168 1 1 Port related settings HTTP Port VNP Port 8080 4520 8081 4521 M...

Page 18: ...the Broadband Router The number of each port to be configured to the IP router should be set according to the port number designated in Setup Basic IP Port on the camera web viewer 3 When done click Save Settings Your settings will be saved M M Above sample instructions are based on the CISCO s Broadband Router The settings may differ depending on the connected Broadband Router model For more info...

Page 19: ...via the Internet Since using the IP Installer on a remote computer that is not in the Broadband Router s network cluster is not allowed users can access cameras within a Broadband Router s network by using the camera s DDNS URL 1 Before you can access a camera in the Broadband Router network you should have set the port range forward for the Broadband Router 2 From the remote PC launch the Interne...

Page 20: ...port of the UPnP protocol 2 Click the camera name for search In the Windows operating system click the camera name searched from the network menu The login window is displayed Connecting via Bonjour 1 Run the client or operating system in support of the Bonjour protocol 2 Click the camera name for search In the Mac operating system click the camera name searched from the Bonjour tab of Safari The ...

Page 21: ... allow the installation of plug ins such as IE and Safari installing the plug in is recommended According to the browser environment the following differences may be observed Chrome FireFox Windows 64bit only EDGE browser Although they don t support plug ins you can use a web viewer as a plug in free web viewer is embedded J J As the plug in free webviewer has lower performance than the plug in we...

Page 22: ...u need to move to the installation screen after installing the webviewer plugin check whether webviewer_activexplugin_lib control in the Tool Additional Function Management menu is Activated If not and if there is a persisting problem then select Tools Internet Options General and delete all the search records If the problem persists please register the IP or Domain of your camera in Tools Interne...

Page 23: ... on the screen under the following conditions if the video is played in the monitoring page The resolution is changed due to a profile change Incoming data is being slowed due to a network delay when the profile is changed The web browser window size and location is changed h PTZ Controls the PAN TILT ZOOM motion Zoom In Drag the bar on the right side of the UI up or click the button to zoom in th...

Page 24: ... the Status icon 2 The profile access information screen is updated whenever the screen is enabled Profile access Show the information of the newly added profile Profile Show the information of the newly added codec Bitrate kbps Show both the actual bit rate and the set bit rate Framerate fps Show both the actual frame rate and the set frame rate ATC Show the ATC status Concurrent users count Show...

Page 25: ... the aspect ratio to best fit the resolution Item Description e Search range setting Set the search date and time range for data saved in your Micro SD memory card or NAS f Capture Saves the current video screen in an image file format format may vary depending on the browser g Backup Set the desired date to make a backup copy of video data saved in your Micro SD memory card or NAS You can set up ...

Page 26: ...r methods are required To Play an AVI File 1 Micro SD memory card 1 Separate the Micro SD memory card from the camera J J Before separating the Micro SD memory card set the Device to Off in the Setup Event Storage menu 2 Insert the Micro SD memory card into the PC 3 Play the AVI file in the ch00 img YYYY_mm_DD AVI directory using a media player M M A filename starts with the format 001_YYYYMMDD_HH...

Page 27: ...rol framerate Reduce the frame rate if the network bandwidth drops down Control compression Control the compression rate if the network bandwidth drops down Compression adjustment can cause deterioration of the image quality Event MD Activated when the motion detection MD event is set Frame rate is adjusted when an event occurs If no motion is detected in the surrounding area the minimum amount of...

Page 28: ...ames Profile You can select the H 264 H 265 profiling method Entropy coding Reduce the possible compression loss due to encoding Smart codec Specify the use of Smart codec M M You can use this when the bit rate control value is CBR Detailed settings are configured in the Smart Codec on the Audio Video tab Page 37 Dynamic GOV When the bit rate control is VBR in H 264 H 265 codec it makes the GOV le...

Page 29: ...d because a client uses the previous password If you try to login with the registered account 5 or more consecutive password authentication has failed and then the account may be locked for thirty seconds When the password is changed while multiple connections are active from a PC the browser may malfunction In that case reconnect to the server Guest setup If you select Enable guest access the gue...

Page 30: ...th PC viewer check box the time of the webviewer is set to the time displayed on the PC that runs the webviewer Synchronize with NTP server Sync with the time of the specified server address 4 When done click Apply J J If you select the Synchronize with PC viewer the standard timezone should be set the same as the current timezone in PC IP Port 1 From the Setup menu select the Basic tab 2 Click IP...

Page 31: ...d 8080 http 192 168 1 100 8080 If HTTP port is set to 80 no need to specify the port number Using RTSP and HTTPS is recommended in order to prevent the image information from being restored 8 When done click Apply PTZ setup Digital PTZ Use this settings page to move the camera view and perform the digital zoom J J DPTZ profile from Video profile should be selected for the setting 1 From the Setup ...

Page 32: ...Click Audio setup 3 Set the audio input value Source Sets the audio input Line Connect the cable to the audio device External microphone Uses an external microphone Apply power to Ext Mic Select this check box when the external microphone is not powered and the power will be supplied from the camera to the microphone You can configure settings when selecting External microphone Codec Specify the a...

Page 33: ...ace like a museum or when you need to make a dark area in full video brighter Vivid video Makes the entire video displayed in vivid colors J J The contrast of the video reduces and the color reproducibility becomes low User preset Select it if you want to display video with settings chosen by you J J When selecting a mode other than the preset mode you can t set the shutter speed AGC SSDR SSNR and...

Page 34: ...ariable illumination the white balancing operation may be unstable To Set BLC You can specify a desired area on the video manually and set the area to be displayed more clearly 1 Select Back light 2 Set Mode to BLC 3 Set BLC level You can change the level to adjust the brightness of the monitoring area 4 Set the Top Bottom Left Right levels to specify the target area J J When setting BLC a green b...

Page 35: ...bility SSNR 2D Level Adjusts the 2DNR level 2DNR This is a method of reducing the noise by using the adjacent pixel information on a single video frame If you increase the level the noise will be reduced but the video may be blurred SSNR 3D Level Adjusts the 3DNR level 3DNR This is a method of reducing the noise by using multiple video frames If you increase the level the noise will be reduced but...

Page 36: ...og level set the defog mode to Manual If the manual defog level is high in a thin fog the image may become too dark Defog level Control the defog level LDC To determine whether or not to use the image distortion correction LDC Level To adjust the level of the distortion correction factor To Set OSD 1 Select OSD 2 Select each item and set it properly Camera title It specifies the name of the camera...

Page 37: ...mouse on the screen to designate a position on which to set the auto focus Press the button to automatically focus the video J J The Simple focus mode may not fit correctly in the following cases Sudden change to the object in Simple focus mode sudden movement appearance or disappearance Radical change to the brightness in Simple focus mode Image of a low contrast If the camera is exposed to a str...

Page 38: ... hub menu and activate port forwarding for your hub For more on how to set port forwarding for your hub refer to Port Range Forward Port Mapping Setup page 18 Public DDNS Select one of provided public DDNS servers when you use a public DDNS server Service Select desired public DDNS service server Host name Enter the name of the host that is registered with the DDNS server User name Enter the user ...

Page 39: ... the computer currently configuring should be assigned The IP address of the computer used for the current setup cannot be added to Deny registered IP it should be added to Allow registered IP Only the IP addresses that are set to Use will be displayed in the filter column 6 Select an IP to delete from the list Click the Delete button 7 When done click Apply HTTPS You can select a secure connectio...

Page 40: ...cted item 3 Press the Install button to start installation with a message of Installed next to the item 4 Press the Delete button to remove the certificate QoS You can specify the priority to secure a stable transfer rate for a specific IP 1 From the Setup menu select the Network tab 2 Click QoS 3 Click the Add button The IP list will be created 4 Enter an IP address to which you will apply QoS M ...

Page 41: ...njour Cameras can be automatically searched in the client and operating system in support of the Bonjour protocol Bonjour It specifies Able or Disable for Bonjour Friendly name Display the camera name Friendly name is displayed in the format of WISENET Model Name MAC Address M M In the Mac operating system which support Bonjour by default the connected cameras are automatically displayed in the Bo...

Page 42: ...ed than recommended For more details refer to Recommended Micro SD SDHC SDXC Memory Card Specifications Page 6 For a Micro SD memory card with a large capacity the formatting will be slowed down accordingly The data traffic will increase when the camera is set to higher resolution higher bit rate and or higher framerate If there is too much data traffic some frame may be skipped although it is sto...

Page 43: ...recommended that you use SD at the same time to prevent loss of recorded images The data traffic will increase when the camera is set to higher resolution higher bit rate and or higher framerate If there is too much data traffic some frame may be skipped although it is stored in a full frame When a frame skip occurs images are saved at the rate of min one image per sec NAS Network Attached Storage...

Page 44: ...output 1 From the Setup menu select the Event tab 2 Click Alarm output 3 Configure the camera alarm output settings If you change the alarm output type the alarm out button on the monitoring page and alarm output type displayed on Event Setup page will be changed accordingly Type N O Normal Open Considers Open circuit status of the sensor or alarm input device as normal and triggers alarm event if...

Page 45: ...more details page 41 E mail Specify the use of email transfer in the alarm input setup Refer to FTP E mail for more details page 41 Record You can set up the alarm to record to a Micro SD card or an NAS when operating Set Device to On in Storage page 42 Alarm output1 Select whether to set the alarm output if an alarm is incoming and specify the alarm output time 7 When done click Apply Time schedu...

Page 46: ...nerated Even on the chart if the motion is greater than the boundary of the level configured the color is displayed differently Sensitivity Sets the sensitivity of motion detection for each area Decrease the sensitivity in an environment where the background and the object are clearly distinguished and increase the sensitivity in a dark environment where the background and the object cannot be cle...

Page 47: ...etection function may malfunction Monitoring environment with simple background night and low light level environment Severe camera vibration or sudden lighting changes Defocus detection You can configure settings to generate an alarm signal when a defocus of the camera lens is detected 1 From the Setup menu select the Analytics tab 2 Click Defocus detection 3 Set whether or not to Enable Defocus ...

Page 48: ...n of a face in the specified area 1 From the Setup menu select the Analytics tab 2 Click Face detection 3 Set whether or not to Enable Face detection 4 Set an Area and Exclude area 5 Set the sensitivity level The higher the sensitivity the more detailed and precise face detection is available 6 Configure the event motion schedule and event motion conditions For more information about Event activat...

Page 49: ...the Setup menu select the Analytics tab 2 Click Audio detection 3 Set whether or not to Enable Audio detection 4 Set the audio detection s sound level The lower the level the smaller the sound change is detected M M The audio detection level is designed to normalize the input data to a value between 1 and 100 and detect the signal larger than threshold level It is unrelated to the decibel dB level...

Page 50: ...menu select the System tab 2 Click Product information 3 Check the camera information or provide details according to your network environment Model Model name of the product Serial number Product serial number Device name Provide a device name that will be displayed on the Live screen Location Specify the location where the camera is installed Description Provide detailed information about the ca...

Page 51: ...may malfunction and you need to change the setting manually Log You can check the system log or event log 1 From the Setup menu select the System tab 2 Click Log 3 Select a log type Access Log You can check the log information that contains the user s access and the access time System log You can check the system logs where any system changes are recorded including the time information Event log Y...

Page 52: ...utilization rate of the camera including main tasks and applications exceeds 80 an ongoing application will be forced to stop In this case the priority set by the user is used to determine which application should be stopped first Auto start When the camera s power supply or main task is running a certain application for which auto execution has been activated will run automatically Application ma...

Page 53: ... HLC Masking Dimming WDR Wide Dynamic Range 150dB 120dB Contrast Enhancement SSDR Off On Digital Noise Reduction SSNR5 2D 3D Noise Filter Off On Items Description XNO 6080R XNO 8080R Operational Digital Image Stabilization Off On Defog Auto input from fog Dust detection Manual Off Motion Detection Off On 8ea 8point Polygonal zones Handover Privacy Masking Off On 32ea polygonal zones Color Gray Gre...

Page 54: ... Way IP IPv4 IPv6 Items Description XNO 6080R XNO 8080R Network Protocol TCP IP UDP IP RTP UDP RTP TCP RTCP RTSP NTP HTTP HTTPS SSL TLS DHCP PPPoE FTP SMTP ICMP IGMP SNMPv1 v2c v3 MIB 2 ARP DNS DDNS QoS PIM SM UPnP Bonjour Security HTTPS SSL Login Authentication Digest Login Authentication IP Address Filtering User access Log 802 1x Authentication EAP TLS EAP LEAP Streaming Method Unicast Multicas...

Page 55: ...e Humidity 50 C 60 C 58 F 140 F Less than 90 RH Ingress Protection IP67 IP66 NEMA 4X Vandal Resistance IK10 Electrical Input Voltage Current 24VAC 10 12VDC 10 PoE IEEE802 3af Power Consumption Max 12W 12VDC Max 12 95W PoE Max 15W 24VAC Max 12 5W 12VDC Max 12 95W PoE Max 14 5W 24VAC Mechanical Color Material Dark gray Aluminum Dimension ØxH Ø91 x H368 6mm Ø3 85 x H14 51 Weight 2 18Kg 4 8lb ...

Page 56: ... a single address is used for multiple cameras the images may overlap No image appears y y If the transmission method is set to multicast check whether there is a router that supports multicast in the LAN the camera is connected to PROBLEM SOLUTION Motion detection of Analytics is set to Enable but no notification e mail reaches me even when an analysis event had occurred y y Verify the settings i...

Page 57: ...d modification are not covered by this License they are outside its scope The act of running the Program is not restricted and the output from the Program is covered only if its contents constitute a work based on the Program independent of having been made by running the Program Whether that is true depends on what the Program does 1 You may copy and distribute verbatim copies of the Program s so...

Page 58: ...ical commands show w and show c should show the appropriate parts of the General Public License Of course the commands you use may be called something other than show w and show c they could even be mouse clicks or menu items whatever suits your program You should also get your employer if you work as a programmer or your school if any to sign a copyright disclaimer for the program if necessary He...

Page 59: ...or for the User Product in which it has been modified or installed Access to a network may be denied when the modification itself materially and adversely affects the operation of the network or violates the rules and protocols for communication across the network Corresponding Source conveyed and Installation Information provided in accord with this section must be in a format that is publicly do...

Page 60: ... the distribution 3 All advertising materials mentioning features or use of this software must display the following acknowledgment This product includes software developed by the OpenSSL Projectfor use in the OpenSSL Toolkit http www openssl org 4 The names OpenSSL Toolkit and OpenSSL Project must not be used to endorse or promote products derived from this software without prior written permissi...

Page 61: ...THEORY OF LIABILITY WHETHER IN CONTRACT STRICT LIABILITY OR TORT INCLUDING NEGLIGENCE OR OTHERWISE ARISING IN ANY WAY OUT OF THE USE OF THIS SOFTWARE EVEN IF ADVISED OF THE POSSIBILITY OF SUCH DAMAGE Various copyrights apply to this package listed in various separate parts below Please make sure that you read all the parts Part 1 CMU UCD copyright notice BSD like Copyright 1989 1991 1992 by Carneg...

Page 62: ...USE OF THIS SOFTWARE EVEN IF ADVISED OF THE POSSIBILITY OF SUCH DAMAGE Part 9 ScienceLogic LLC copyright notice BSD Copyright c 2009 ScienceLogic LLC All rights reserved Redistribution and use in source and binary forms with or without modification are permitted provided that the following conditions aremet yy Redistributions of source code must retain the above copyright notice this list of condi...

Page 63: ...able version related documentation or collateral in which You describe recipients rights relating to the Covered Code You may distribute the Executable version of Covered Code or ownership rights under a license of Your choice which may contain terms different from this License provided that You are in compliance with the terms of this License and that the license for the Executable version does n...

Page 64: ...g to this software or products derived from it This software may be referred to only as the Independent JPEG Group s software We specifically permit and encourage the use of this software as the basis of commercial products provided that all warranty or liability claims are assumed by the product vendor ansi2knr c is included in this distribution by permission of L Peter Deutsch sole proprietor of...

Page 65: ...rious Execution of Patch Processing Article 6 Distribution and Registration of the Ported Source Code 1 The Source Code User and the System Developer may whether with or without charge distribute to any third party only the following parts of the Ported Source Code on the T Engine Hardware or the Similar Hardware to T Engine Hardware 1 The Hardware dependent Part and or Compiler dependent Part pro...

Page 66: ...customary use in describing the origin of the Work and reproducing the content of the NOTICE file 7 Disclaimer of Warranty Unless required by applicable law or agreed to in writing Licensor provides the Work and eachContributor provides its Contributions on an AS IS BASIS WITHOUT WARRANTIES OR CONDITIONS OF ANY KIND either express or implied including without limitation any warranties or condition...

Page 67: ...ns must be plainly marked as such and must not be misrepresented as being the original software 3 This notice may not be removed or altered from any source distribution Jean loup Gailly Mark Adler jloup gzip org madler alumni caltech edu The data format used by the zlib library is described by RFCs Request for Comments 1950 to 1952 in the files http www ietf org rfc rfc1950 txt zlib format rfc1951...

Page 68: ...www hanwha security com Hanwha Techwin America 500 Frank W Burr Blvd Suite 43 Teaneck NJ 07666 Toll Free 1 877 213 1222 Direct 1 201 325 6920 Fax 1 201 373 0124 www hanwha security com Hanwha Techwin Europe Heriot House Heriot Road Chertsey Surrey KT16 9DT United Kingdom Tel 44 1932 57 8100 Fax 44 1932 57 8101 www hanwha security eu ...

Reviews: