70
70
ENGLISH
ESPAÑOL
El modo de Macro permite a los usuarios obtener una imagen enfocada con
precisión de un objeto cercano en una distancia de 50 cm.
1.Gire el Dial de modo a
Photo (Foto)
.
2.Pulse el botón [POWER] (ENC.
) para encender la
Miniket Photo.
3.Pulse el botón [MENU].
◆
Aparece la pantalla del menú.
4.Mueva el joystick a la izquierda / derecha hasta
seleccionar <Macro>.
5.Seleccione la opción moviendo el joystick hacia
arriba / abajo y pulse el botón (OK) del joystick.
6.Pulse el botón [MENU] para salir del menú.
◆
Aparece en pantalla un icono que indica el modo de
macro seleccionado.
[ Notas ]
✤
Puede acceder a esta función utilizando el botón de
acceso directo (consulte la página 59).
✤
El ajuste de Flash no está disponible al fijar el modo
Macro en <Super Macro>.
✤
El zoom no está disponible al fijar el modo Macro en
<Super Macro>.
✤
<Super Macro> sólo está disponible al colocar zoom al
final de W.
✤
Cuando utilice el modo Macro y grabe un objeto
cercano, tenga cuidado de no dar sombra al objeto.
✤
Debido a que la distancia es mucho menor, se estrecha
el área enfocada.
✤
Si no se ajusta el enfoque, intente poner más distancia
entre usted y el objeto.
✤
Se recomienda utilizar un trípode para evitar imágenes
inestables y para obtener los mejores resultados.
✤
Cuando fije el modo Scene (Escena) en <Close-up> (Primer
Plano), definirá automáticamente el modo Macro.
✤
Mientras aparece el menú en pantalla, si se pulsa el botón
[Record / Stop] (Grabar / Detener) se saldrá del menú.
Modo Photo (Foto) :
Ajuste de las opciones de captura
Ajuste del modo de macro
Ajuste de macro
<Off> (Apagado)
<Macro>
<Super Macro>
Alcance de enfoque
50 cm ~ ∞
W: 10 cm ~ ∞
T: 30 cm ~ ∞
W: 1 cm ~ 5 cm
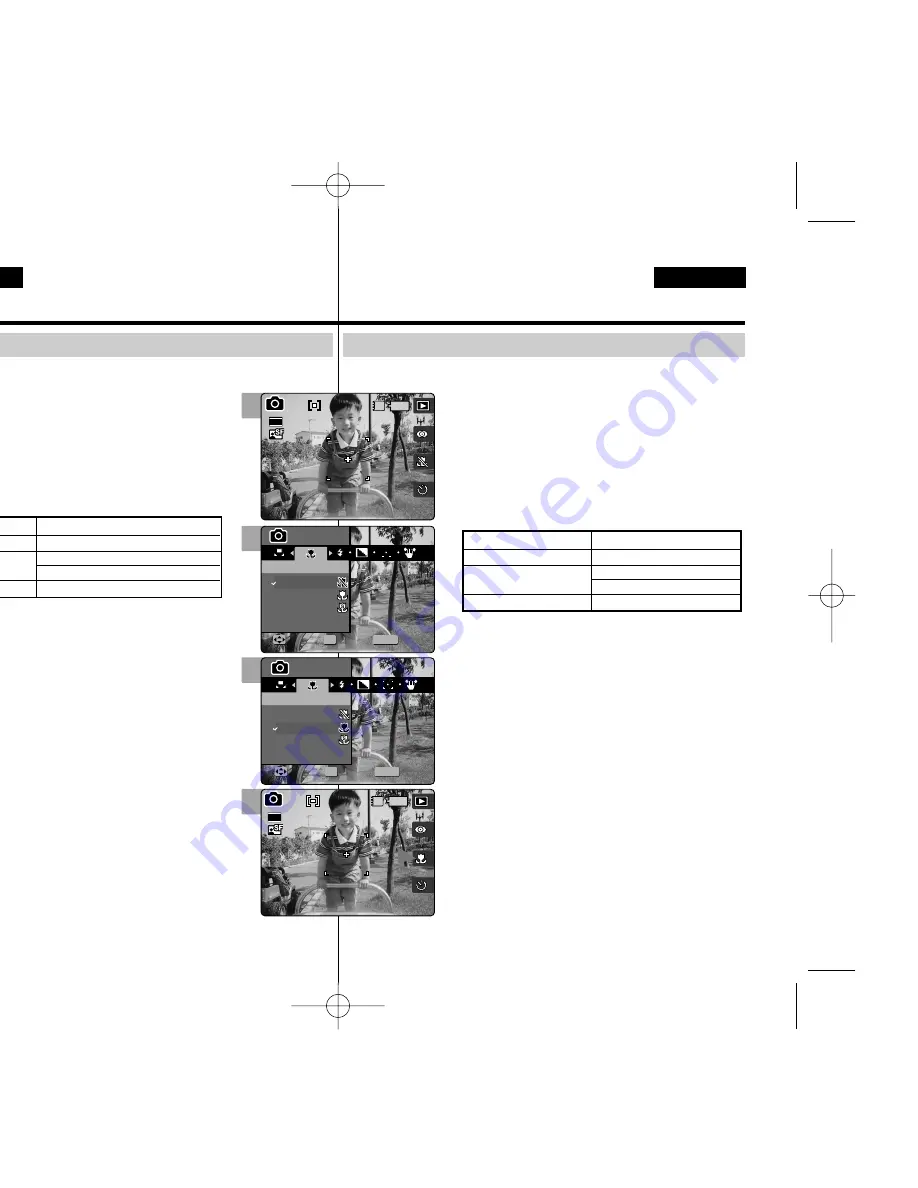
Macro mode allows users to have a fine focused image of a close-up
subject within 50 cm.
1.Turn the Mode Dial to
Photo
mode.
2
Press the [POWER] button to turn on the Miniket
Photo.
3.Press the [MENU] button.
◆
Menu screen appears.
4.Move the joystick left / right to select <Macro>.
5.Select an option by moving the joystick up / down,
and then press the joystick (OK).
6.Press the [MENU] button to exit the menu.
◆
An icon indicating the selected Macro mode appears on the
screen.
[ Notes ]
✤
You can easily access this function by using the
shortcut button (refer to page 59).
✤
Flash setting is not available when you set the Macro
mode to <Super Macro>.
✤
Zooming is not available when you set the Macro mode
to <Super Macro>.
✤
<Super Macro> is only available when the zoom is
positioned to W end.
✤
When you use Macro mode and record a close-up
subject, be careful not to shade your subject.
✤
As the distance gets closer, the focused area gets
narrower.
✤
If the focus will not set, try to put more distance between
you and the subject.
✤
It is recommended to use a tripod to avoid unstable
picture taking and have best results.
✤
When you set the Scene mode to <Close-up>, it will
automatically set the Macro mode.
✤
While the menu screen is displayed, pressing the [Record
/ Stop] button will exit the menu.
Photo Mode :
Setting the Capturing Options
Setting the Macro Mode
Macro Setting
<Off>
<Macro>
<Super Macro>
Focus Range
50 cm ~ ∞
W: 10 cm ~ ∞
T: 30 cm ~ ∞
W: 1 cm ~ 5 cm
4
5
6
MENU
Photo
Photo
Macro
Macro
Off
Macro
Super Macro
Move
Move
Select
Select
Exit
Exit
Photo
Macro
Move
Select
Exit
OK
23
23
Photo
Macro
Move
Select
Exit
MENU
Photo
Photo
Macro
Macro
Off
Macro
Super Macro
Move
Move
Select
Select
Exit
Exit
OK
23
23
2592
Photo
Macro
Move
Select
Exit
Photo
Macro
Move
Select
Exit
IN
23
23
23
3
IN
2592
Photo
Macro
Move
Select
Exit
Photo
Macro
Move
Select
Exit
23
23
23
00934M VP-MS10 UK+ESP~089 11/21/05 10:18 AM Page 70


