background image

ENGLISH

ESPAÑOL

Notas e instrucciones de seguridad

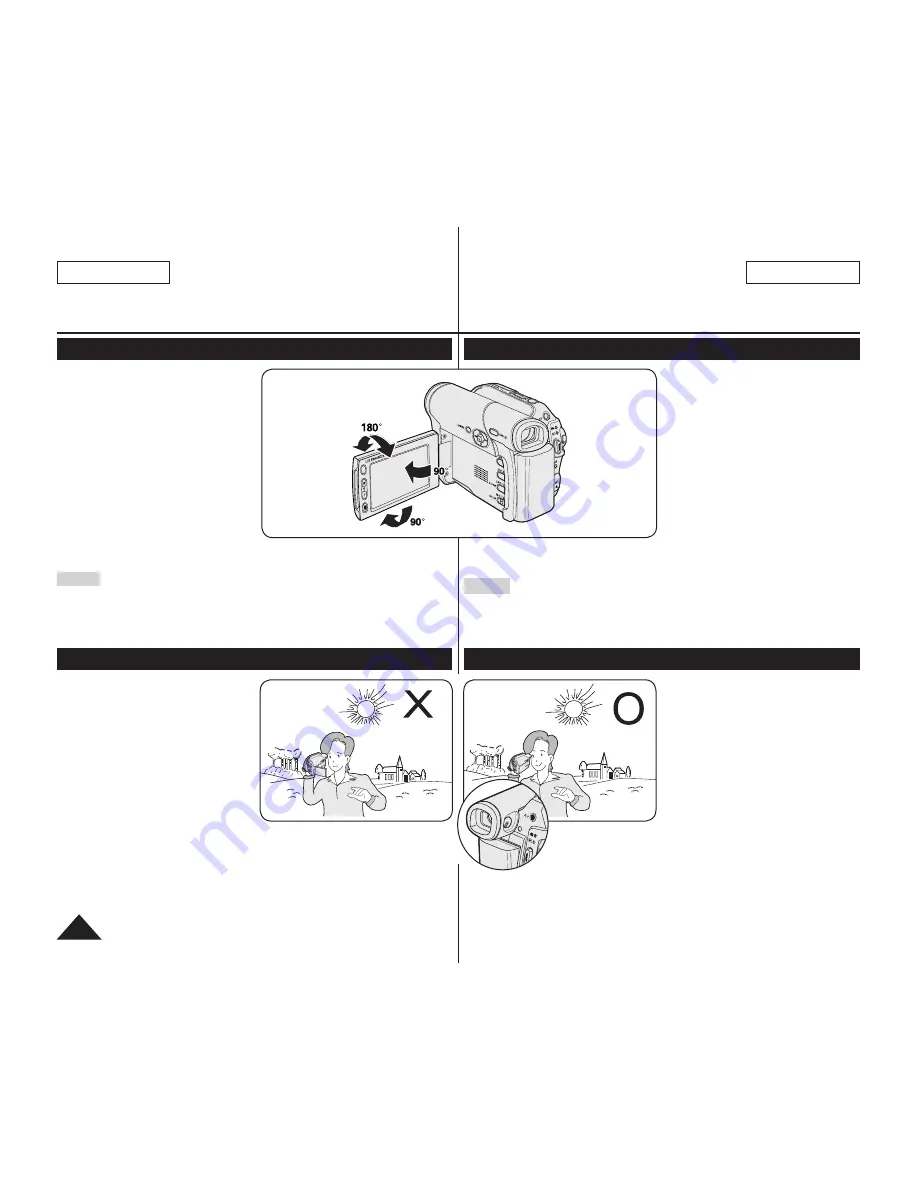
Notas referentes al giro de la pantalla LCD

Gire cuidadosamente la pantalla 

LCD como se indica en la figura.

Si se gira demasiado se puede 

estropear la bisagra interior de 

unión de la pantalla LCD con la 

Videocámara con DVD.

1.  Abra con el dedo la pantalla 

LCD formando 90 grados con la 

videocámara.

2.  Gírela al mejor ángulo para 

grabar o reproducir.

 

Si gira la pantalla LCD 180 grados 

hacia el lado de lalente,puede 

cerrar la pantalla LCD con el 

frente hacia afuera.

 

Esto resulta práctico durante las operaciones de reproducción.

Notas

 

Consulte la página 36 para ajustar el brillo y el color de la pantalla LCD.

 

Asegúrese de no pasar la banda magnética de la tarjeta de crédito cerca de la 

pantalla LCD. Se borrará la información de la tarjeta de crédito.

Notas relacionadas con la pantalla LCD, visor, objetivo

1.  La luz directa del sol puede 

dañar la pantalla LCD, el 

interior del visor o el objetivo. 

Tome imágenes del sol sólo 

con condiciones de luz escasa, 

como al anochecer.

2.  Para la fabricación de la pantalla 

LCD se ha empleado tecnología 

de alta precisión. 

Sin embargo, pueden aparecer 

en ella puntitos rojos, azules o 

verdes. Esta situación es normal 

y no afecta en modo alguno a la 

grabación.

3.  No agarre la Videocámara con DVD sujetando el 

visor, la pantalla LCD o la batería.

4.  La aplicación de fuerza excesiva en el visor puede 

dañarlo.

Notes and Safety Instructions

Notes regarding the Rotation of the LCD Screen

Please rotate the LCD Screen 

carefully as illustrated.

Over-rotation may cause damage 

to the inside of the hinge that 

connects the LCD Screen to the DVD 

Camcorder.

1.  Open the LCD Screen 90 

degrees with your finger.

2.  Rotate it to the best angle to 

record or play.

 

If you rotate the LCD Screen 

180 degrees to the lens side, 

you can close the LCD Screen 

with it facing out.

 

This is convenient during playback operations.

Notes

 

Refer to page 36 to adjust brightness and color of the LCD Screen.

 

Make sure not to contact the magnetic stripe of your credit card near the 

LCD panel. Your credit card information may be removed.

Notes regarding the LCD Screen, Viewfinder, Lens

1.  Direct sunlight can damage the 

LCD Screen, the inside of the 

Viewfinder or the Lens. Take 

pictures of the sun only in low 

light conditions, such as at dusk.

2.  The LCD Screen has been 

manufactured using high 

precision technology. 

However, there may be tiny dots 

(red, blue or green in color) that 

appear on the LCD Screen. 

These dots are normal and do 

not affect the recorded picture in any way.

3.  Do not pick up the DVD Camcorder by holding the Viewfinder, LCD 

Screen or Battery Pack.

4.  Applying excessive force to the Viewfinder may damage it.

6

PH

OT

O

PH

OT

O

Summary of Contents for SC-DC575

Page 1: ...iste peligro de sobrecalentamiento incendio o explosión Samsung no se hace responsable de problemas que se produzcan debido al uso de baterías no aprobadas DVD Camcorder SC DC171 DC173 U DC175 DC575 AF Auto Focus CCD Charge Coupled Device LCD Liquid Crystal Display Owner s Instruction Book Before operating the unit please read this Instruction Book thoroughly and retain it for future reference Use...

Page 2: ...OSD Language 34 Visualización de la demostración Demonstration 35 Ajuste inicial Ajuste del menú Display 36 Ajuste de la pantalla LCD LCD Bright LCD Color 36 Visualización de la fecha y hora Date Time 37 Contents Notes and Safety Instructions 6 Getting to Know Your DVD Camcorder 9 Features 9 Learning available Discs and Their Features 10 How to use the DVD Camcorder easily 12 Accessories Supplied ...

Page 3: ...cción 63 Videocámara con DVD 64 Reproducción de listas de títulos 64 Ajuste del volumen 64 Diversas funciones en modo Player 65 Eliminación de un título Delete 67 Eliminación de la sección de un título Partial Delete 68 Setting the TV Display TV Display 38 DVD Camcorder Before Recording 39 Using the Viewfinder 39 Using the LCD ENHANCER 39 Various Recording Techniques 40 Inserting and Removing a Dis...

Page 4: ...de memoria 90 Selección de la calidad fotográfica Photo Quality 91 Ajuste del tamaño de foto Photo Size sólo SC DC575 92 Ajuste del número de archivo File No 93 Captura de imagen de foto JPEG en la tarjeta de memoria 94 Visualización de imágenes fotográficas JPEG 95 Protección frente a borrado accidental Protect 96 DVD Camcorder Playlist 69 Creating a New Playlist New Playlist 69 Playing the Playlis...

Page 5: ...VD en el extranjero 115 Resolución de problemas 116 Resolución de problemas 116 Ajuste de opciones de menú 121 Información diversa 123 Descripción del tipo de disco 123 Especificaciones 124 Índice alfabético 125 Contents Deleting Photo Images and Moving Images Delete 97 Formatting the Memory Card Format 99 Recording Moving Images MPEG on a Memory Card 100 Playing the Moving Images MPEG on a Memory ...

Page 6: ...bación 3 No agarre la Videocámara con DVD sujetando el visor la pantalla LCD o la batería 4 La aplicación de fuerza excesiva en el visor puede dañarlo Notes and Safety Instructions Notes regarding the Rotation of the LCD Screen Please rotate the LCD Screen carefully as illustrated Over rotation may cause damage to the inside of the hinge that connects the LCD Screen to the DVD Camcorder 1 Open the...

Page 7: ...re los discos verticalmente en sus fundas de plástico cuando no se utilicen Guarde los discos fuera del alcance de la luz directa del sol de generadores de calor de la humedad y del polvo Notas e instrucciones de seguridad Notes regarding Disc Cleaning and Handling Take care not to touch the recording side the rainbow colored side of the disc with your fingers Discs contaminated by fingerprints or f...

Page 8: ...de repuesto asegúrese de que el técnico utiliza piezas especificadas por el fabricante o que tengan las mismas características que la pieza original Los repuestos no autorizados pueden producir incendios descargas eléctricas u otros peligros Notes and Safety Instructions Notes regarding DVD Camcorder Do not leave the DVD Camcorder exposed to high temperatures above 60 C or 140 F For example in a pa...

Page 9: ...secuencias de video posibilita la grabación de video en una tarjeta de memoria Ranura de tarjeta MMC SD Sólo SC DC173 U DC175 DC575 La ranura para la tarjeta MMC SD puede utilizarse para tarjetas MMC Tarjetas MultiMedia y SD OSD en varios idiomas Puede seleccionar el idioma de la OSD en la lista de OSD Getting to Know Your DVD Camcorder Features DVD Disc Camcorder DVD VIDEO recording with 3 1 2 in...

Page 10: ...s CD DVD de 5 pulg 12 cm Discos inutilizables de 3 pulg 8 cm CD CD R CD RW DVD ROM DVD R Una capa DVD RAM DVD R Dos capas Disquete MO MD iD LD No es posible utilizar los siguientes discos Getting to Know Your DVD Camcorder Learning available Discs and Their Features This DVD Camcorder can record or play back by using only the 3 1 2 inch 8cm DVD R R DL RW RW disc not supplied Please check whether y...

Page 11: ...se garantiza que todos los reproductores puedan reproducir el disco Para obtener información sobre compatibilidad consulte el manual del reproductor con el que desee reproducir el disco Para obtener información adicional sobre las categorías de discos disponibles consulte la página 123 Getting to Know Your DVD Camcorder Which discs recorded on the DVD Camcorder can be played in DVD players recorde...

Page 12: ...e antes de que puedan reproducirse en reproductores grabadores de DVD estándar Puede reproducir discos DVD RW en otros dispositivos sin finalizarlos Getting to Know Your DVD Camcorder P H O T O How to use the DVD Camcorder easily You can record any desired image and edit and playback the disc on a DVD Camcorder most common DVD players and PCs after finalizing the disc Recording Selecting the desired...

Page 13: ...regados junto con la Videocámara con DVD Getting to Know Your DVD Camcorder Basic Accessories 1 Lithium Ion Battery Pack SB LSM80 2 AC Power Adapter AA E9 TYPE 3 AV Cable 4 Instruction Book 5 Lithium Batteries for Remote Control SC DC175 DC575 only and Clock TYPE CR2025 6 Remote Control SC DC175 DC575 only 7 USB Cable SC DC173 U DC175 DC575 only 8 Software CD DV Media PRO SC DC173 U DC175 DC575 on...

Page 14: ...ens 4 LIGHT SC DC173U DC175 DC575 only page 50 5 Remote Sensor SC DC175 DC575 only 6 Internal MIC 7 EASY Q Button page 45 8 Q MENU Button page 27 9 Joystick Up Down Left Right OK FADE page 47 10 TFT LCD Screen M Player Mode Memory Player Mode Mode Joystick Player Mode Camera Mode M Player Mode SC DC173 U DC175 DC575 only Photo image Moving image Up FADE Down Stop Stop Left Backward Search Skip Bac...

Page 15: ...ágina 49 95 Botón C NITE sólo SC DC171 página 49 8 Botón MULTI DISP MF AF página 95 53 Vista lateral izquierda Getting to Know Your DVD Camcorder 1 Built In Speaker 2 LCD ENHANCER Button page 39 3 Zoom W T VOL Button page 46 64 4 Start Stop Button page 44 5 MENU Button 6 DISPLAY Button page 29 7 C NITE LIGHT S SHOW Button SC DC173U DC175 DC575 only page 49 50 95 C NITE S SHOW Button SC DC173 only ...

Page 16: ...C575 7 Palanca Zoom W T página 46 8 Interruptor Mode DISC CARD Sólo SC DC173 U DC175 DC575 9 Tapa del disco 10 Empuñadura Getting to Know Your DVD Camcorder 1 PHOTO Button SC DC173 U DC175 DC575 only page 94 2 Focus Adjustment Knob page 39 3 Viewfinder 4 Start Stop Button page 44 5 Power Switch ON OFF Camera Player 6 USB Jack SC DC173 U DC175 DC575 only 7 Zoom W T Lever page 46 8 Mode Switch DISC C...

Page 17: ...k 6 Tripod Receptacle 7 Memory Card Slot SC DC173 U DC175 DC575 only 8 BATT RELEASE Switch Rear Bottom View 17 1 2 4 3 5 7 8 6 Usable Memory Cards 2GB Max SC DC173 U DC175 DC575 only SD MMC 1 Indicador de carga 2 Tapa de la pila de litio 3 Terminal de AV 4 Toma DC IN 5 Enganche de la correa 6 Orificio para el trípode 7 Ranura de tarjeta de memoria Sólo SC DC173 U DC175 DC575 8 Interruptor BATT RELE...

Page 18: ...a OK 8 PHOTO página 94 9 W T Zoom página 46 10 Buscar 11 Lento 12 Q MENU Mando a distancia sólo SC DC175 DC575 Getting to Know Your DVD Camcorder 1 START STOP 2 DISPLAY page 29 3 Skip 4 Stop 5 Play Still 6 MENU 7 Up Down Left Right OK 8 PHOTO page 94 9 W T Zoom page 46 10 Search 11 Slow 12 Q MENU Remote Control SC DC175 DC575 only 18 1 10 11 8 12 9 2 3 4 5 6 7 ...

Page 19: ...ione los botones de ambos lados de la tapa del objetivo para que cubra el objetivo de la Videocámara con DVD Preparation Using the Hand Strap Lens Cover It is very important to ensure that the Hand Strap has been correctly adjusted before you begin your recording The Hand Strap enables you to Hold the DVD Camcorder in a stable comfortable position Press the Zoom lever and Start Stop button without...

Page 20: ...gual o de especificaciones equivalentes Advertencia Mantenga la pila de litio fuera del alcance de los niños En caso de que alguien se tragara una por accidente avise inmediatamente a un médico Preparation Lithium Battery Installation Lithium Battery Installation for the Internal Clock 1 Remove the Battery Pack from the rear of the DVD Camcorder 2 Open the Lithium Battery Cover on the rear of the D...

Page 21: ... parpadear y queda encendido 90 100 Encendido durante un segundo y apagado durante un segundo Error Reinicialice la batería y el cable de CC Preparation Using the Lithium Ion Battery Pack Use SB LSM80 or SB LSM160 not supplied Battery Pack only The Battery Pack may be charged a little at the time of purchase Charging the Lithium Ion Battery Pack 1 Turn the Power switch to OFF 2 Attach the Battery ...

Page 22: ...enda tener disponibles varias baterías Preparación Las cifras que se muestran anteriormente están basadas en el modelo SC DC175 22 Charging Recording Times based on Battery Type If you close the LCD Screen it switches off and the Viewfinder switches on automatically The continuous recording times given in the table below are approximations Actual recording time depends on usage The continuous recor...

Page 23: ...ones ni al calor No permita que se produzca un cortocircuito entre los polos y de la batería Podrían producirse pérdidas o calentamiento lo cual podría ocasionar sobrecalentamiento o un incendio Preparation Battery Level Display The battery level display indicates the amount of power remaining in the Battery Pack a Fully charged b 20 40 used c 40 80 used d 80 95 used red e Completely used Blinking...

Page 24: ...ará automáticamente para ahorrar energía de la batería Asegúrese de que la batería esté colocada correctamente en su sitio No deje caer la batería Si se llegara a caer podría estropearse Preparation Maintaining the Battery Pack Please refer to the Table on page 22 for approximate continuous recording time The recording time is affected by temperature and environmental conditions The recording time...

Page 25: ... de CC al terminal DC IN de la Videocámara con DVD 4 Ajuste la videocámara en cada modo manteniendo presionada la pestaña verde del interruptor Power y girándolo a ON o OFF Preparation Connecting a Power Source There are two types of power source that can be connected to your DVD Camcorder The AC Power adapter used for indoor recording The Battery Pack used for outdoor recording Using a Household ...

Page 26: ...ión de menú superior 5 Se pulsa para seleccionar la opción elegida OK Preparation About the Operating Modes The operating modes are determined by the position of the Power and Mode SC DC173 U DC175 DC575 only switch Set the Operation Mode by adjusting the Power and Mode SC DC173 U DC175 DC575 only switches before operating any functions Each time you move the Power switch downward it toggles betwe...

Page 27: ...stick 4 Para salir presione el botón Q MENU Preparation Using the Q MENU Q MENU is used to access DVD Camcorder functions by using the Q MENU button Q MENU provides easier access to frequently used menus without using the MENU button Functions available using the Q MENU are as below Camera Mode DIS Program AE White Balance BLC Shutter Exposure page 61 page 54 page 56 page 48 page 52 page 52 Player...

Page 28: ...ación en pantalla aquí mostrados son del modelo SC DC175 Preparation OSD On Screen Display in Camera Mode Player Mode 1 Battery Level page 23 2 Manual focus page 53 EASY Q page 45 3 DIS page 61 4 Program AE page 54 5 White Balance Mode page 56 6 Digital Effects Mode page 58 16 9 Wide page 60 7 Shutter Speed page 52 8 Exposure page 52 9 Date Time page 37 10 Color Nite pages 49 50 11 USB SC DC173 U ...

Page 29: ...ón de la fecha y hora Para activar o desactivar la fecha hora acceda al menú y cambie el modo Date Time página 37 Preparation OSD On Screen Display in M Cam Mode M Player Mode SC DC173 U DC175 DC575 only 1 Photo Quality page 91 2 Photo Size SC DC575 only page 92 3 Remaining Time Recordable time of moving images 4 CARD Memory Card Indicator 5 Image Counter Total number of recordable photo images 6 ...

Page 30: ...elementos reales de su Videocámara con DVD Initial Setting System Menu Setting Setting the Clock Clock Set Clock setup works in Camera Mode Player Mode M Cam Mode M Player Mode page 26 The date time is automatically recorded onto a disc Before recording please set the date time 1 Set the Mode switch to DISC or CARD SC DC173 U DC175 DC575 only 2 Set the Power switch to Camera or Player 3 Press the ...

Page 31: ...rpadeará por 3 segundos en la pantalla LCD y desaparecerá Initial Setting System Menu Setting Setting the Wireless Remote Control Acceptance Remote SC DC175 DC575 only The Remote function works in Camera Mode Player Mode M Cam Mode M Player Mode page 26 The Remote function allows you to enable or disable the remote control for use with the DVD Camcorder 1 Set the Mode switch to DISC or CARD 2 Set ...

Page 32: ...On u Off y presione el botón Joystick 7 Para salir presione el botón MENU Initial Setting System Menu Setting Setting the Beep Sound Beep Sound The Beep Sound function works in Camera Mode Player Mode M Cam Mode M Player Mode page 26 You can turn the Beep Sound on or off when on each press of a button sounds a beep 1 Set the Mode switch to DISC or CARD SC DC173 U DC175 DC575 only 2 Set the Power s...

Page 33: ... On u Off y presione el botón Joystick 7 Para salir presione el botón MENU Initial Setting System Menu Setting Setting the Shutter Sound Shutter Sound SC DC173 U DC175 DC575 only The Shutter Sound function works only in M Cam Mode page 26 You can turn the Shutter Sound on or off when on with each press of the PHOTO button the Shutter will sound 1 Set the Mode switch to CARD 2 Set the Power switch ...

Page 34: ...a en el idioma seleccionado 7 Para salir presione el botón MENU Nota Las opciones de Language pueden modificarse sin aviso previo Initial Setting System Menu Setting Selecting the OSD Language Language The Language function works in Camera Mode Player Mode M Cam Mode M Player Mode page 26 You can select the desired language to display the menu screen and the messages 1 Set the Mode switch to DISC o...

Page 35: ...se desactivará y se activará la función del botón presionado Initial Setting System Menu Setting Viewing the Demonstration Demonstration The Demonstration function may only be used in the Camera Mode with no disc inserted in the unit page 26 Before you begin Make sure that there is no disc inserted in the DVD Camcorder page 41 Demonstration automatically shows you the major functions that are incl...

Page 36: ...a al brillo ni al color de la imagen que se grabe Initial Setting Display Menu Setting Adjusting the LCD Screen LCD Bright LCD Color Adjusting the LCD Screen works in Camera Mode Player Mode M Cam Mode M Player Mode page 26 Your DVD Camcorder is equipped with a 2 5 inch SC DC171 only 2 7 inch wide SC DC173 U DC175 DC575 only color Liquid Crystal Display LCD Screen which enables you to view what yo...

Page 37: ...itio se debilita o se agota Antes de utilizar la función Date Time debe ajustar el reloj página 30 Initial Setting Display Menu Setting Displaying the Date Time Date Time The Date Time function works in Camera Mode Player Mode M Cam Mode M Player Mode page 26 The date and time are automatically recorded on a special data area of the disc 1 Set the Mode switch to DISC or CARD SC DC173 U DC175 DC575...

Page 38: ...ta Cuando TV Display se defina en Off el menú tampoco aparece en la pantalla de TV Initial Setting Display Menu Setting Setting the TV Display TV Display The TV Display function works in Camera Mode Player Mode M Cam Mode M Player Mode page 26 You can select the output path of the OSD On Screen Display This allows you to set the OSD for viewing on the viewfinder LCD screen or an external TV Use the ...

Page 39: ...de LCD ENHANCER presione de nuevo el botón LCD ENHANCER Nota La función LCD ENHANCER no afecta a la calidad de la imagen que se va a grabar DVD Camcorder Before Recording Using the Viewfinder You can view pictures through the viewfinder to avoid running down the battery or to see correct images when the picture on the LCD Screen is poor In the Camera or Player mode the Viewfinder will work when the L...

Page 40: ... gira demasiado se puede dañar el interior de la bisagra que une la pantalla LCD a la Videocámara con DVD DVD Camcorder Before Recording Various Recording Techniques In some situations different recording techniques may be required for more dramatic results 1 General recording 2 Downward recording Making a recording with a top view of the LCD Screen 3 Upward recording Making a recording viewing th...

Page 41: ...disc cover while loading Set the Mode switch to DISC SC DC173 U DC175 DC575 only and the Power switch to Camera to view menus and messages displayed on the LCD Screen page 28 Inserting a Disc 1 Push the OPEN switch in the direction of the arrow The disc cover will partially open 2 Gently open the cover the rest of the way by hand 3 Push the disc into the disc compartment until a click is heard The...

Page 42: ...rrarla Nota La función Format Finalize no está disponible en el nivel de batería o Consulte la página 11 para conocer la compatibilidad de un disco finalizado DVD Camcorder Before Recording When using a New Disc Formatting a new Disc Formatting may be required if a new disc is inserted Recognition of the disc will start For a DVD R R DL disc Formatting will automatically begin For a DVD RW disc You...

Page 43: ...nes de luz VBR es un sistema de codificación que ajusta automáticamente la velocidad en bits de acuerdo con la imagen de grabación DVD Camcorder Before Recording Selecting the Record Mode Rec Mode The Record Mode function works in both Camera Mode and Player Mode page 26 This DVD Camcorder can film in the XP extra play the SP standard play and the LP long play modes The SP mode is set as the factory...

Page 44: ... recuperan los datos ninguna otra función permanece habilitada Tras la recuperación de datos el sistema cambiará al modo STBY DVD Camcorder Basic Recording Making your First Recording 1 Connect a power source to the DVD Camcorder pages 21 25 A Battery Pack or a AC Power adapter Insert a disc page 41 2 Remove the Lens Cover 3 Open the LCD Screen Set the Mode switch to DISC SC DC173 U DC175 DC575 on...

Page 45: ... nuevo al volver a colocarla 16 9 Wide no está disponible en el Modo EASY Q sólo SC DC171 Digital Effect y Digital Zoom no están disponibles en el modo EASY Q DVD Camcorder Basic Recording Recording with Ease for Beginners EASY Q Mode The EASY Q function works only in Camera Mode page 26 The EASY Q function allows a beginner to easily make good recordings 1 Set the Mode switch to DISC SC DC173 U D...

Page 46: ...s cerca 3 W Gran angular el objeto se ve más lejos Puede grabar un objeto que se encuentre a unos 10mm unas 0 5 pulgadas de la superficie del objetivo en la posición W DVD Camcorder Basic Recording Zooming In and Out The Zoom function works in both Camera Mode and M Cam Mode page 26 Zooming is a recording technique that lets you change the size of the subject in a scene You can zoom using variable ...

Page 47: ...tener la grabación a Fade Out Aprox 4 segundos b Fade In Aprox 4 segundos DVD Camcorder Basic Recording Using the Fade In and Out FADE The Fade function works only in Camera Mode page 26 You can give your recording a professional look by using special effects such as fade in at the beginning of a sequence or fade out at the end of a sequence To Start Recording 1 Set the Mode switch to DISC SC DC17...

Page 48: ...er directamente a la función BLC utilizando el botón Q MENU página 27 La función BLC no está operativa en el modo EASY Q Videocámara con DVD Grabación básica DVD Camcorder Basic Recording Using Back Light Compensation Mode BLC BLC works in both Camera Mode and M Cam Mode page 26 Back lighting exists when the subject is darker than the background The subject is in front of a window The person to be...

Page 49: ...r Emboss2 y Pastel2 Una vez que se defina DIS se liberará el modo Zoom digital Videocámara con DVD Grabación básica Using the Color Nite Color Nite function works only in Camera Mode page 26 You can make the subject recorded appear to be in slow motion by controlling the shutter speed or a brighter image in dark places without a compromise in colors Please disable 16 9 Wide mode to use the Color Ni...

Page 50: ... desactivar mientras se graba El alcance de LIGHT es limitado Hasta 2 m 6 6 pies 16 9 Wide no está disponible en el modo LIGHT Videocámara con DVD Grabación básica Using the LIGHT SC DC173U DC175 DC575 only The LIGHT function works only in Camera Mode page 26 The LIGHT enables you to record a subject in dark places The LIGHT can be used with Color Nite function only Please disable 16 9 Wide mode t...

Page 51: ...uando quiera que el micrófono sea lo más sensible posible Videocámara con DVD Grabación avanzada Cutting Off Wind Noise Wind Cut The Wind Cut function works only in Camera Mode page 26 Use the Wind Cut when recording in windy places such as the beach or near buildings The Wind Cut function minimizes wind noise or other noise while recording When the Wind Cut is on some low pitched tones are elimin...

Page 52: ...grabar con una velocidad de obturador de 1 1000 o superior asegúrese de que el sol no se refleja sobre el objetivo Videocámara con DVD Grabación avanzada Setting the Shutter Speed Exposure Shutter Exposure The Shutter Speed function works only in Camera Mode page 26 The Shutter Speed refers to to the amount of time it takes the shutter to open and close The faster the speed is set the less light en...

Page 53: ...erecha se enfocará la imagen del fondo 5 Para salir pulse el botón MF AF Nota El Enfoque manual no está disponible en el modo EASY Q Videocámara con DVD Grabación avanzada Auto Focus Manual Focus The Auto Focus Manual Focus function works in both Camera Mode and M Cam Mode page 26 In most situations it is better to use the automatic focus feature as it enables you to concentrate on the creative si...

Page 54: ... Speed Velocidad de obturador alta Este modo se emplea para grabar escenas en que el movimiento es de gran velocidad por ejemplo jugadores de tenis o de golf Videocámara con DVD Grabación avanzada Programed Automatic Exposure Modes Program AE The Program AE function works only in Camera Mode page 26 The Program AE mode allows you to adjust shutter speeds and apertures to suit different recording c...

Page 55: ...on DVD Grabación avanzada Setting the Program AE 1 Set the Mode switch to DISC SC DC173 U DC175 DC575 only 2 Set the Power switch to Camera 3 Press the MENU button The menu list will appear 4 Move the Joystick up or down to select Camera then press the Joystick 5 Move the Joystick up or down to select Program AE then press the Joystick The available options are listed 6 Move the Joystick up or dow...

Page 56: ...l modo Auto no aparece ningún icono Videocámara con DVD Grabación avanzada Setting the White Balance White Balance The White Balance function works in both Camera Mode and M Cam Mode page 26 The White Balance is a recording function that preserves the unique image color of the subject in any recording condition You may select the appropriate White Balance mode to obtain good quality image color Au...

Page 57: ...ajusta en Auto en las grabaciones normales en exteriores se pueden obtener mejores resultados DVD Camcorder Advanced Recording Setting the Custom White Balance You can adjust the white balance as you wish based on the recording environment 1 Set the Mode switch to DISC or CARD SC DC173 U DC175 DC575 only 2 Set the Power switch to Camera 3 Press the MENU button The menu list will appear 4 Move the ...

Page 58: ...pastel pálido a la imagen 10 Modo Pastel2 Este modo aplica un efecto pastel pálido al área alrededor de la imagen DVD Camcorder Advanced Recording Applying Digital Effects Digital Effect The Digital Effect function works only in Camera Mode page 26 The Digital Effects enable you to give a creative look to your recording Select the appropriate Digital Effect for the type of picture that you wish to...

Page 59: ...con DVD Grabación avanzada Selecting the Digital Effects 1 Set the Mode switch to DISC SC DC173 U DC175 DC575 only 2 Set the Power switch to Camera 3 Press the MENU button The menu list will appear 4 Move the Joystick up or down to select Camera then press the Joystick 5 Move the Joystick up or down to select Digital Effect then press the Joystick 6 Move the Joystick up or down to select the desir...

Page 60: ... DIS EASY Q o Digital Effect con el modo 16 9 Wide definido se liberará el modo 16 9 Wide sólo SC DC171 DVD Camcorder Advanced Recording Setting the 16 9 Wide mode 16 9 Wide The 16 9 Wide function works only in Camera Mode page 26 Select to record a picture to be played back on a 16 9 Wide TV 16 9 Wide is the default setting for models SC DC173 U DC175 DC575 1 Set the Mode switch to DISC SC DC173 U...

Page 61: ...enor que en modo normal sólo SC DC173 U DC175 DC575 DVD Camcorder Advanced Recording Setting the Digital Image Stabilizer DIS The DIS function works only in Camera Mode page 26 DIS Digital Image Stabilizer is a function that compensates for any shaking or hand movement while holding the DVD Camcorder within reasonable limits It provides more stable pictures when Recording with the zoom Digital Zoo...

Page 62: ...idad de los datos del modo Digital Zoom Una vez definido DIS o Digital Zoom se liberará DVD Camcorder Advanced Recording Zooming In and Out with Digital Zoom Digital Zoom The Digital Zoom works only in Camera Mode page 26 Zooming more than 34x SC DC171 DC173 U DC175 only or 26x SC DC575 only is achieved digitally up to 1200x when combined with optical zoom The picture quality may deteriorate depend...

Page 63: ...cuperar el título de nuevo DVD Camcorder Thumbnail index and Playlist What is the Thumbnail Index The thumbnail index displays multiple titles scenes that have been recorded A title scene is created between the points where you start and stop a recording Once deleted you cannot recover the title scene again What s a Playlist DVD RW VR mode You can create a playlist on the same disc by gathering yo...

Page 64: ...el volumen Aparecerá el nivel de volumen en la pantalla LCD Los niveles se pueden ajustar de 00 a 19 Si cierra la pantalla LCD mientras reproduce es posible que no escuche ningún sonido en el altavoz Videocámara con DVD Playing Title Scenes DVD RW RW R R DL The recorded title scenes are displayed as a thumbnail index multiple images on the LCD Screen You can find the desired scene quickly using thi...

Page 65: ...ick left and hold one more time Move the Joystick right and hold Move the Joystick right and hold one more time scene 1 scene 2 scene 3 Parte que se va a reproducir Mantenga presionado el Joystick a la izquierda una vez más Mantenga presionado el Joystick a la izquierda Mantenga presionado el Joystick a la derecha Mantenga presionado el Joystick a la derecha una vez más Escena 1 Escena 2 Escena 3 ...

Page 66: ... botón Notas No se oirá ningún sonido durante la búsqueda de imágenes o durante la reproducción lenta En el avance por fotograma o en la reproducción es posible que la imagen de los objetos aparezca distorsionada DVD Camcorder Picture Search Forward Reverse Moving the Joystick left right once while a disc is playing back will increase the play speed to approximately X2 and pressing twice plays at ...

Page 67: ...s los títulos seleccionados Se eliminarán los archivos relacionados de la lista de reproducción DVD RW sólo modo VR Nota Un título borrado no podrá recuperarse DVD Camcorder Deleting a Title Scene Delete DVD RW RW Delete function works only in Player Mode page 26 Individual or all title scenes can be deleted 1 Set the Mode switch to DISC SC DC173 U DC175 DC575 only 2 Set the Power switch to Player...

Page 68: ...te borrada del título no podrá recuperarse Cuando presione el botón MENU durante el borrado parcial se detendrá el borrado y saldrá DVD Camcorder Deleting a Section of a Title Scene Partial Delete DVD RW VR mode Partial Delete function works only in Player Mode page 26 A title scene can be partially deleted The editing function only works on a DVD RW VR Mode You should format the DVD RW to VR Mode...

Page 69: ...eproducción Notas Pueden crearse hasta 99 listas de reproducción En una lista de reproducción pueden registrarse hasta 999 escenas de títulos capítulos Videocámara con DVD Lista de reproducción Creating a New Playlist New Playlist DVD RW VR mode This function works only in Player Mode page 26 The editing function only works on a DVD RW VR Mode You should format the DVD RW to VR Mode before recordi...

Page 70: ...Se desplaza al menú Scene tras reproducir escenas a partir de la escena seleccionada hasta la última de la lista de reproducción 7 Pulse los botones VOL para ajustar el volumen El sonido se oirá a través del altavoz incorporado DVD Camcorder Playlist Playing the Playlist DVD RW VR mode This function works only in Player Mode page 26 The playlist scenes are displayed in the form of a thumbnail inde...

Page 71: ...eleccionar Execute y pulse el botón Joystick Aparecerá el mensaje Delete 8 Mueva el Joystick a la izquierda o a la derecha para seleccionar Yes y pulse el botón Joystick Se suprimirán todas las listas de reproducción seleccionadas Deleting a Playlist Delete DVD RW VR mode Delete function works only in Player Mode page 26 You can delete undesired playlists The editing function only works on a DVD R...

Page 72: ...quierda o a la derecha para seleccionar Yes y pulse el botón Joystick Aparecerá el mensaje Now adding Las escenas seleccionadas se añadirán a la lista de reproducción La nueva escena se añadirá como la última escena Adding Scenes to Playlist Scene Add DVD RW VR mode This function works only in Player Mode page 26 You can add more scenes in an existing playlist The editing function only works on a ...

Page 73: ... el Joystick a la izquierda o a la derecha para seleccionar Yes y pulse el botón Joystick Aparecerá el mensaje Now moving Puede mover las escenas tantas veces como desee DVD Camcorder Playlist Changing the Order of Scene Playing within a Playlist Scene Move DVD RW VR mode This function works only in Player Mode page 26 You can change the order of scene playing within a playlist The editing functio...

Page 74: ... 9 Mueva el Joystick a la izquierda o a la derecha para seleccionar Yes y pulse el botón Joystick Aparecerá el mensaje Now deleting Se suprimirán las escenas seleccionadas DVD Camcorder Playlist Deleting Scenes from Playlist Scene Delete DVD RW VR mode This function works only in Player Mode page 26 You can delete the scenes inside the playlist The editing function only works on a DVD RW VR Mode Y...

Page 75: ...botón Joystick 7 Utilice el Joystick para seleccionar la escena que se va a borrar parcialmente y pulse el botón Joystick Aparecerá la pantalla Partial Delete Continúa DVD Camcorder Playlist Deleting a Section of a Playlist Scene Partial Delete DVD RW VR mode This function works only in Player Mode page 26 A scene inside the playlist can be partially deleted The editing function only works on a DV...

Page 76: ... para volver a la pantalla del índice de miniaturas Nota Cuando presione el botón MENU durante el borrado parcial se detendrá el borrado y saldrá DVD Camcorder Playlist 8 Use the Joystick to search the start point of deletion Whenever you press the Joystick right it toggles between forward at speed 1 and 2 Whenever you press the Joystick left it toggles between backward at speed 1 and 2 When the n...

Page 77: ...olver al menú Disc Manager DVD Camcorder Disc Manager Disc Information Disc Info DVD RW RW R R DL This function works in both Camera Mode and Player Mode page 26 It shows you the disc information as disc name disc type disc format etc 1 Set the Mode switch to DISC SC DC173 U DC175 DC575 only 2 Set the Power switch to Camera or Player 3 Press the MENU button The menu list will appear 4 Move the Joy...

Page 78: ... Editing the Disc Name Disc Info Rename DVD RW RW R R DL This function works in both Camera Mode and Player Mode page 26 You can specify a disc name 1 Set the Mode switch to DISC SC DC173 U DC175 DC575 only 2 Set the Power switch to Camera or Player 3 Press the MENU button The menu list will appear 4 Move the Joystick up or down to select Disc Manager then press the Joystick 5 Move the Joystick up...

Page 79: ...ue no se apague la Videocámara con DVD mientras formatea un disco DVD Camcorder Disc Manager Formatting a Disc Disc Format DVD RW RW This function works only in Camera Mode page 26 You can format a recorded disc to be used again By formatting all existing data will be deleted 1 Set the Mode switch to DISC SC DC173 U DC175 DC575 only 2 Set the Power switch to Camera 3 Press the MENU button The menu...

Page 80: ...l en un disco DVD RW sin anular la finalización tras finalizarlo DVD Camcorder Disc Manager Finalizing a Disc Disc Finalize DVD RW R R DL This function works only in Camera Mode page 26 To play the contents of a DVD RW R R DL on other DVD Players Recorders you must finalize the disc When finalizing there should be enough power in the batteries If an the AC Power adapter is to be used make sure that th...

Page 81: ...o del Reproductor Grabadora de DVD Para reproducir discos DVD RW grabados en modo de VR Un DVD RW finalizado en modo VR se puede reproducir utilizando una Grabadora de DVD que sea capaz de reproducir discos DVD RW en modo VR Videocámara con DVD Administrador de discos Playing Back on a PC with DVD drive The DVD disc can be played on a PC with a DVD running media DVD drive 1 Turn on your PC 2 Insert...

Page 82: ...braciones Esto podría causar averías DVD Camcorder Disc Manager Unfinalizing a Disc Disc Unfinalize DVD RW This function works only in Camera Mode page 26 If a DVD RW disc had been finalized in the VR mode or Video mode you can unfinalize the disc for further recording When unfinalizing there should be enough power in the batteries If an AC Power adapter is to be used make sure that the jack is properl...

Page 83: ...abar el contenido de un dispositivo externo en la videocámara Para salir pulse el botón MENU DVD Camcorder Connection Setting the AV In Out SC DC175 DC575 only AV In Out function works only in Player Mode page 26 AV In Out setting enables you to record signals from external sources Also you can send your videos to external devices to record or playback 1 Set the Mode switch to DISC 2 Set the Power...

Page 84: ...por el altavoz de la Videocámara con DVD Si sólo está disponible una entrada de audio monoaural en el equipo de TV utilice el cable de audio con el terminal blanco Audio L DVD Camcorder Connection Viewing Recordings on TV The Playback function works only in Player Mode page 26 Playing back on a TV Monitor To play back a disc the television must be NTSC compatible page 115 We recommend that you use...

Page 85: ...duzca el disco páginas 65 66 Nota Si sólo está disponible una entrada de audio monoaural en el equipo de video utilice el cable de audio con el terminal blanco Audio L DVD Camcorder Connection Connecting to a TV that has no Audio Video Input Jacks You can connect your DVD Camcorder to a TV through a VCR 1 Connect the DVD Camcorder to your VCR with the AV cable The yellow jack Video The white jack ...

Page 86: ...play en Off en el MENÚ página 38 Una vez completada la copia Deje de grabar en el VCR y a continuación mueva el Joystick hacia abajo en la Videocámara con DVD DVD Camcorder Connection Copying a Disc onto a Tape The copying function works only in Player Mode page 26 Connect your DVD Camcorder to a VCR using the AV jack to dub the recording from a disc onto a VCR tape Set the AV In Out to Out before...

Page 87: ...en del dispositivo externo esté bajo si no lo hace podrían producirse pitidos en los parlantes del dispositivo externo Videocámara con DVD Conexión DVD Camcorder Connection Using the Voice Plus The Voice Plus function works only in Player mode page 26 This function enables you to narrate over a pre recorded disc via the DVD Camcorder s microphone When you want to copy a DVD onto other AV devices D...

Page 88: ...ara con DVD desde la toma de CA utilizando el adaptador de CA Las cintas de video con protección de copia como Macrovision o señales de TV inestables no se pueden grabar en esta Videocámara con DVD DVD Camcorder Connection Recording Copying a TV Program or Video Tape onto a Disc SC DC175 DC575 only The Recording Copying function works only in Player Mode page 26 Connect your DVD Camcorder to a VCR...

Page 89: ... ser inferior ya que el firmware interno utiliza una parte de la memoria DigitalStillCameraMode SC DC173 U DC175 DC575only Using a Memory Card Usable Memory Card not supplied This DVD Camcorder can use SD memory cards and MMC Multi Media Cards Some cards are not compatible depending on the memory card manufacturer and memory card type The Memory Card stores and manages Photo Moving images recorded ...

Page 90: ... Joint Photographic Experts Group El tamaño de imagen es 800x600 o 1152x864 sólo SC DC575 página 92 Imagen en movimiento Los videos se comprimen en formato MPEG4 Moving Picture Experts Group El tamaño de la imagen es de 720x480 DigitalStillCameraMode SC DC173 U DC175 DC575only Notes Do not apply excessive force when you insert eject the Memory Card Do not turn the power off while recording loading...

Page 91: ...abación normales En una tarjeta de memoria pueden almacenarse hasta 20 000 imágenes fotográficas JPEG DigitalStillCameraMode SC DC173 U DC175 DC575only Selecting the Photo Quality Photo Quality Photo Quality function works in both Player Mode and M Cam Mode page 26 You can select the quality of a photo image to be recorded Select the Photo Quality 1 Set the Mode switch to DISC or CARD 2 If the Mode...

Page 92: ...ución más baja Por tanto cuanto más alta sea la resolución seleccionada menor será el número de imágenes disponible Setting the Photo Size Photo Size SC DC575 only Photo Size function works only in M Cam Mode page 26 You can select the size of a photo image to be recorded 1 Set the Mode switch to CARD 2 Set the Power switch to Camera 3 Press the MENU button The menu list will appear 4 Move the Joy...

Page 93: ...ivo se le asigna un número diferente para evitar la duplicación de nombres de archivos Es conveniente cuando se desea administrar los archivos en un PC DigitalStillCameraMode SC DC173 U DC175 DC575only Setting the File Number File No File Number setting works only in M Cam Mode page 26 File Numbers are given to images in the order they were recorded when they are stored on the Memory Card File num...

Page 94: ...eta de memoria con un formato 800 x 600 o 1152 x 864 sólo SC DC575 El número de imágenes fijas que se pueden guardar depende de la calidad de la imagen DigitalStillCameraMode SC DC173 U DC175 DC575only Taking a Photo Image JPEG on a Memory Card You may take photo images while in M Cam Mode and store the images on the Memory Card page 26 You can take photo images using the remote control SC DC175 DC...

Page 95: ... desde la imagen actual Para detener la presentación presione de nuevo el botón S SHOW Notas El tiempo de carga puede variar dependiendo del tamaño de la imagen Cualquier imagen grande tomada con otro dispositivo aparecerá como una imagen en miniatura DigitalStillCameraMode SC DC173 U DC175 DC575only Viewing Photo Images JPEG This function works only in M Player Mode page 26 You can playback and v...

Page 96: ...marca cuando aparecen Si la pestaña de protección contra escritura en la tarjeta de memoria está colocada en LOCK no puede definir la protección de imagen DigitalStillCameraMode SC DC173 U DC175 DC575only Protection from accidental Erasure Protect The Protect function works only in M Player Mode page 26 You can protect important images from accidental erasure If you execute format all images includ...

Page 97: ...dental active la protección de imágenes página 96 No es posible borrar la imagen protegida Mododecámarafotográficadigital sóloSC DC173 U DC175 DC575 Deleting Photo Images and Moving Images Delete The Delete function works only in M Player Mode page 26 You can erase the photo images and moving images recorded on the Memory Card If you want to delete protected images you must first deactivate the imag...

Page 98: ...a dé formato a la tarjeta de memoria tras hacer una copia de seguridad de los archivos en otro dispositivo de almacenamiento página 99 DigitalStillCameraMode SC DC173 U DC175 DC575only Deleting All Images at Once Steps from 1 to 5 are the same as described in p 97 6 Move the Joystick up or down to select Delete All then press the Joystick The message Delete all is displayed 7 Move the Joystick lef...

Page 99: ...ca el mensaje Not formatted si se introduce una tarjeta de memoria formateada en un PC DigitalStillCameraMode SC DC173 U DC175 DC575only Formatting the Memory Card Format The Format function works only in M Player Mode page 26 You can use the Format functions to completely delete all images and options on the Memory Card including protected images The Format function restores the Memory Card to it...

Page 100: ...Mientras graba en una tarjeta de memoria no expulse la tarjeta de memoria o puede dañar los datos de la tarjeta o la propia tarjeta Apagar el equipo mientras se accede a la tarjeta de memoria puede dañar los datos almacenados en la misma DigitalStillCameraMode SC DC173 U DC175 DC575only Recording Moving Images MPEG on a Memory Card You can record moving images while in M Cam Mode page 26 You can r...

Page 101: ...t Windows Media Player en diversos idiomas en la página Web de Microsoft http www microsoft com windows windowsmedia download default asp Las secuencias grabadas en la tarjeta de memoria pueden reproducirse en el Macintosh DigitalStillCameraMode SC DC173 U DC175 DC575only Playing the Moving Images MPEG on a Memory Card The moving images playback function works only in M Player Mode page 26 You can...

Page 102: ...afías copiadas desde el DVD a la tarjeta de memoria se guardan en formato 640x480 El número de imágenes que puede guardar varía dependiendo de la resolución de la imagen DigitalStillCameraMode SC DC173 U DC175 DC575only Recording Still images onto a Memory Card during DVD playback DVD RW RW R R DL This function works only in Player Mode page 26 If you press the PHOTO button during DVD disc playbac...

Page 103: ...hacia abajo para seleccionar la cantidad y presione el botón Joystick 9 Para salir presione el botón MENU Aparece el icono de marca y número de impresiones DigitalStillCameraMode SC DC173 U DC175 DC575only Marking Images for Printing Print Mark The Print Mark function works only in M Player Mode page 26 This DVD Camcorder supports the DPOF Digital Print Order Format print format You can automatica...

Page 104: ...tiempo de funcionamiento dependiendo del número de imágenes guardadas Existen en el mercado impresoras que soportan DPOF Utilice el cable USB que se facilita con la Videocámara con DVD DigitalStillCameraMode SC DC173 U DC175 DC575only Removing the Print Mark To remove all Print Marks select All Off To remove an individual file s Print Mark select the file and set This File to 000 Notes You can direc...

Page 105: ...inas o mueva el Joystick a la izquierda o derecha mientras se resalta la flecha de desplazamiento de páginas PictBridge SC DC173 U DC175 DC575 only Printing Your Pictures Using PictBridge PictBridge function works only in M Player Mode page 26 By connecting the DVD Camcorder to printers with PictBridge support sold separately you can send images from the Memory Card directly to the printer with a f...

Page 106: ...esora Consulte el manual del usuario de la impresora para obtener detalles Al definir la opción de estampado de fecha y hora podrá ver la hora formato de 24 horas una vez que se haya grabado la imagen PictBridge SC DC173 U DC175 DC575 only Setting the Number of Prints 1 Move the Joystick up or down to select Copies then press the Joystick 2 Move the Joystick up or down to set the number of prints t...

Page 107: ... en los sistemas operativos Windows VISTA 64 bits y Macintosh Los requisitos del sistema mencionados anteriormente son recomendaciones Incluso en un sistema que cumpla los requisitos es posible que no se asegure la operación dependiendo del sistema USB Interface SC DC173 U DC175 DC575 only Using USB Interface Transferring a Digital Image through a USB Connection The DVD Camcorder supports both USB...

Page 108: ... el HUB USB o con otros dispositivos al mismo tiempo puede causar conflictos y puede que no funcione correctamente Si esto ocurre retire el resto de dispositivos USB e intente la conexión de nuevo USB Interface SC DC173 U DC175 DC575 only Notes On a slower PC than recommended movie playback may not be smooth or video editing may take a long time On a slower PC than recommended movie playback may sk...

Page 109: ...ter para utilizar la función Pictbridge página 105 7 Para salir presione el botón MENU USB Interface SC DC173 U DC175 DC575 only Selecting the USB Device USB Connect The USB Connect function works only in M Player Mode page 26 Using the USB cable you can connect your DVD Camcorder to a computer to copy your moving images and photo images from the Memory Card or to a printer to print your images 1 ...

Page 110: ...con DVD al PC a través de un cable USB Ver grabaciones de películas y fotos en el PC DV Driver DirectX9 0 Video Codec Función de Webcam Flujo USB DV Driver DirectX9 0 Video Codec Edición de fotos Photo Express USB Interface SC DC173 U DC175 DC575 only Installing DV Media PRO Program Before your start Turn on your PC Exit all other running applications Insert the provided CD into the CD ROM drive T...

Page 111: ...ound Firma digital no encontrada o algo similar ignore el mensaje y continúe con la instalación Durante la instalación si aparece el aviso de prueba de Microsoft LOGO haga clic en Continue C Continuar USB Interface SC DC173 U DC175 DC575 only Application Installation Photo Express 1 Click Photo Express on the Setup screen It is a photo editing tool that allows users to edit images Application Inst...

Page 112: ...sconecte del PC los otros aparatos USB y vuelva a conectar la Videocámara con DVD Debe fijar USB Connect Conexión USB en Computer PC para conectar a un PC a través del cable USB página 109 USB Interface SC DC173 U DC175 DC575 only Connecting to a PC 1 Connect a USB cable to the USB jack on the PC 2 Connect the other end of the USB cable into the USB jack on the DVD Camcorder USB jack If a PC is con...

Page 113: ...r Mode en DISC 2 Coloque el interruptor Power en Camera 3 Conecte un extremo del cable USB al conector USB de la Videocámara con DVD y el otro al conector USB del PC USB Interface SC DC173 U DC175 DC575 only Using the PC Camera Function This function works only in Camera Mode page 26 To use the PC Camera function the DV Driver Video Codec and DirectX 9 0 programs must be installed in the PC You ca...

Page 114: ... DVD y el otro al terminal USB del PC 3 Para verificar si se ha reconocido correctamente el disco extraíble abra el Explorador de Windows y localice el disco extraíble USB Interface SC DC173 U DC175 DC575 only Using the USB Streaming Function This function works in both Camera Mode and Player Mode page 26 To use USB streaming the DV Driver Video Codec and DirectX 9 0 programs must be installed in t...

Page 115: ...n NTSC Bahamas Canadá Corea Estados Unidos Filipinas Japón México Taiwán etc Nota Puede hacer grabaciones con la Videocámara con DVD y ver las imágenes en la pantalla LCD en cualquier lugar del mundo PAL compatible Countries Regions Australia Austria Belgium Bulgaria China CIS Czech Republic Denmark Egypt Finland France Germany Greece Great Britain Holland Hong Kong Hungary India Iran Iraq Kuwait ...

Page 116: ...co Es posible que la recuperación de datos no sea satisfactoria según los ajustes de tiempo de apagado Al grabar desde otras videocámaras con DVD o grabadoras presentes en el disco es posible que la recuperación de datos no se realice correctamente Troubleshooting Troubleshooting Before contacting a Samsung authorized service center perform the following simple checks They may save you the time an...

Page 117: ...eriores con una temperatura baja en invierno y después utilizarla en interiores 2 Al grabar en exteriores con temperaturas altas después de estar en interiores o dentro de un coche utilizando CA Troubleshooting Self Diagnosis Display in M Cam M Player Modes SC DC173 U DC175 DC575 only Display Blinking Informs that Action No memory card Slow M Cam M Player There is no Memory Card in the DVD Camcord...

Page 118: ...ajustado la lente del visor Desplace la palanca de control del visor hasta que los indicadores que aparecen en el visor muestren que está bien enfocado Troubleshooting If these instructions do not solve your problem contact your nearest Samsung authorized service certre Symptom Explanation Solution You cannot switch the DVD Camcorder on Check the Battery Pack or the AC Power adapter Replace it wit...

Page 119: ...res sometidos a fuerte magnetismo Manténgala alejada de materiales magnéticos Si acerca un objeto magnético al lado izquierdo de la Videocámara con DVD es posible que se apague la pantalla LCD pero no se trata de ninguna avería Troubleshooting Symptom Explanation Solution Auto focus does not work Check the Manual Focus menu Auto focus does not work in the Manual Focus mode When the power is turned...

Page 120: ...úrese que no se líe la empuñadura Asegúrese de que el disco se ha insertado correctamente Cuando no se cierre la cubierta en casos excepcionales póngase en contacto con el centro de servicio local Troubleshooting Symptom Explanation Solution Playback screen interrupted unexpectedly Check the Power supply Battery Pack or AC Power Adapter is properly connected and stable Cannot play back a recorded ...

Page 121: ...36 LCD Color Ajuste de los tonos de color de la pantalla LCD 36 Date Time Ajuste de la visualización de fecha y hora 37 TV Display Ajuste de activación desactivación de OSD de TV 38 sólo SC DC175 DC575 sólo SC DC173 U DC175 DC575 sólo SC DC575 Troubleshooting Setting menu items Main Menu Sub Menu Functions Available Mode Page Camera Mode Player Mode M Cam Mode M Player Mode Camera Program AE Selec...

Page 122: ...lby Laboratories El resto de nombres y productos no mencionados anteriormente pueden ser marcas comerciales o marcas registradas de sus respectivas empresas Troubleshooting Main Menu Sub Menu Functions Available Mode Page Camera Mode Player Mode M Cam Mode M Player Mode System Clock Set Setting the date time 30 Remote Using the remote control 31 Beep Sound Setting the Beep sound 32 Shutter Sound S...

Page 123: ...n anulación de finalización Al formatear un disco grabado los datos grabados en el disco se borran y se recupera la capacidad del disco permitiendo la reutilización del disco O posible X no posible no necesario O possible X not possible not needed Miscellaneous Information Disc Type Description DVD R 3 1 2inch 8cm DVD R DL 3 1 2inch 8cm DVD RW 3 1 2inch 8cm DVD RW 3 1 2inch 8cm Mode VR Video Record...

Page 124: ... 52 cm 49 pies en línea recta en exteriores más de 499 87 cm 16 4 pies en línea recta Estas especificaciones técnicas y el diseño están sujetos a cambios sin previo aviso Specifications Model Name SC DC171 DC173 U DC175 DC575 System Video signal NTSC Picture Compression format MPEG 2 Audio Compression format DOLBY DIGITAL STEREO CREATOR Recording Quality XP about 9Mbps SP about 6Mbps LP about 3Mbps ...

Page 125: ...nd 33 T Tarjeta de memoria 89 Title List 63 TV Display 38 U Unfinalizse 82 V Velocidad del obturador 52 Video 100 Visor 39 Voice Plus 87 W White Balance 56 Wind Cut 51 Z Zoom 46 Index A Accessories 13 Add 72 AF MF 53 AV In Out 83 B Beep Sound 32 BLC 48 C Clock Set 30 Color Nite 49 Connection 83 Copying 86 88 D Date Time 37 Delete 67 71 74 Demonstration 35 Digital Effect 58 Digital Zoom 62 DIS 61 Di...

Page 126: ......

Page 127: ... samsung com fi FRANCE 3260 SAMSUNG or 08 25 08 65 65 0 15 Min www samsung com fr GERMANY 01805 121213 0 14 Min www samsung de HUNGARY 06 80 SAMSUNG 7267864 www samsung com hu ITALIA 800 SAMSUNG 7267864 www samsung com it LUXEMBURG 0032 0 2 201 24 18 www samsung lu NETHERLANDS 0900 20 200 88 0 10 Min www samsung com nl NORWAY 231 627 22 www samsung com no POLAND 0 801 801 881 www samsung com pl POR...

Page 128: ...rominated Diphenyl Ethers PBDEs in our products Normes RoHS Notre produit respecte les normes de restrictions sur les substances dangereuses pour l équipement électrique et électronique Nous n utilisons pas les 6 produits dangereux suivants dans nos produits Cadmium Cd Plomb Pb Mercure Hg Chrome hexavalent Cr 6 Polybromobiphényle PBB Éther diphénylique polybromé EDP SAMSUNG ELECTRONICS MÉXICO S A ...

Reviews: