background image

USB Interface

The USB Version function works only in M.Cam and M.Player
modes. 

To ensure proper communication between the camcorder and a
PC, please set the USB Version before connecting the Camcorder
to a PC.

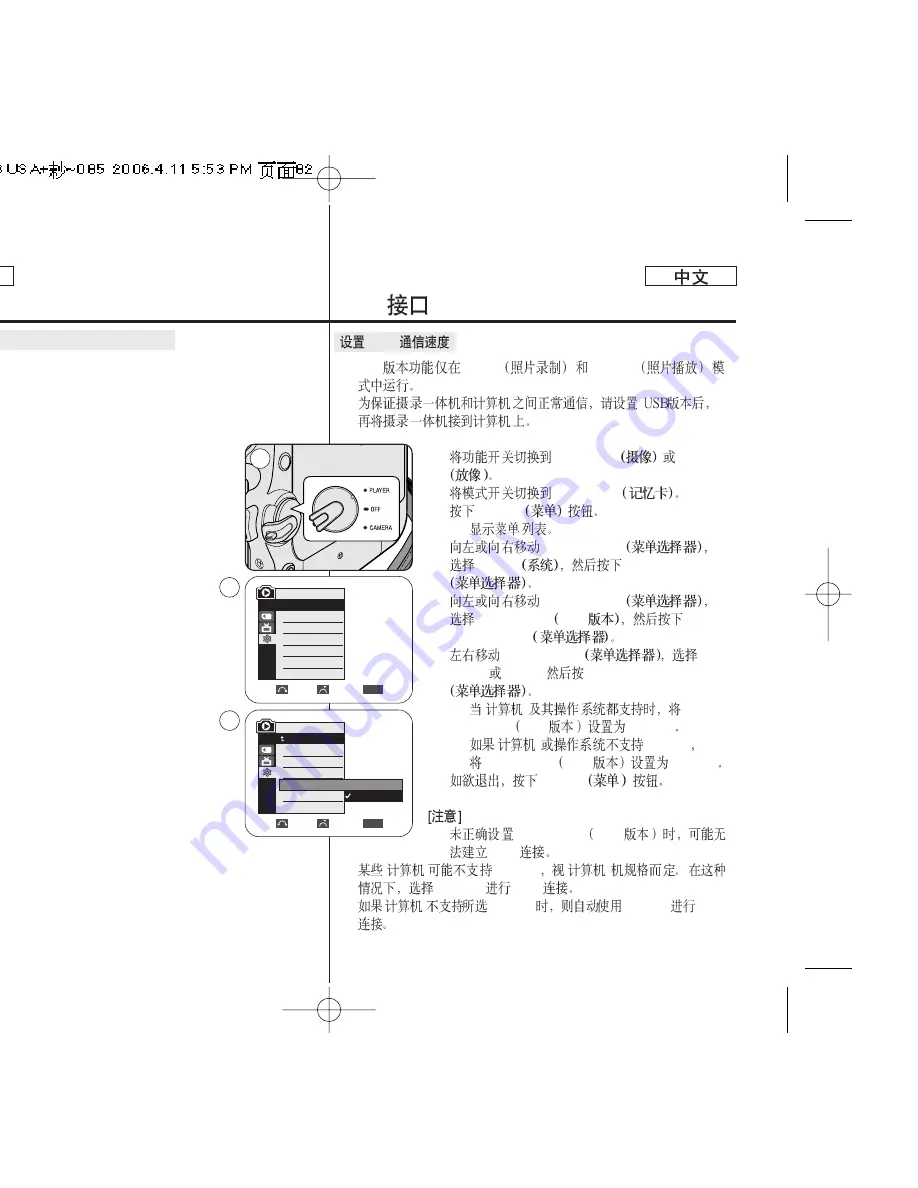
1. Set the 

Power

switch to 

CAMERA

or 

PLAYER

.

2. Set the 

Mode

switch to 

MEMORY

.

3. Press the 

MENU

button.

The menu list will appear.

4. Move the 

Menu selector

to the left or right to

select 

System

, then press the 

Menu selector

.

5. Move the 

Menu selector

to the left or right to

select 

USB Version

, then press the 

Menu

selector

.

6. Move the 

Menu selector

to the left or right to

select 

USB 1.1 

or

USB 2.0

, then press the 

Menu selector

.

Set the USB Version to USB 2.0 when it is
supported by both PC and its OS (Operating
System).

If either the PC or OS does not support
USB 2.0, set the USB Version to USB 1.1.

7. To exit, press the 

MENU

button.

[ Notes ]

When USB Version is not set properly, the USB
connection may fail to establish.

USB 2.0 may not be supported by certain PCs
depending on their specifications.
In this case, choose the USB 1.1 for USB connection.

If USB 2.0 is not supported by the PC, USB 1.1 will automatically
be used for the USB connection.

Setting the USB Communication Speed

ENGLISH

82

82

USB

USB

M.Cam

M.Player

1.

CAMERA

PLAYER

2.

MEMORY

3.

MENU

4.

Menu selector

System

Menu selector

5.

Menu selector

USB Version USB 

Menu selector

6. 

Menu selector

USB1.1 USB2.0.

Menu selector

USB

Version USB 

USB 2.0

USB 2.0

USB Version USB 

USB 1.1

7. 

MENU

USB Version USB 

USB 

USB 2.0

USB 1.1 

USB 

USB 2.0 

USB 1.1 

USB

USB 

M.Player Mode

System

Clock Set
Remote
Beep Sound
USB Version
USB Connect
Language

On

On

USB 2.0

Computer

English

Move

Select

Exit

MENU

Move

Select

Exit

MENU

1

USB 1.1
USB 2.0

M.Player Mode

Back

Clock Set
Remote
Beep Sound

USB Version

USB Connect
Language

4

6

Summary of Contents for SC-D463

Page 1: ...horoughly and uture reference Auto Focus Charge Coupled Device iquid Crystal Display SC D463 B D465 B AF CCD LCD SC D463 B D465 B AD68 00971Y proved battery packs here is a danger of overheating fire or explosion not responsible for problems occurring due to using batteries ...

Page 2: ... Control 19 ower Source 20 AC Power Adapter and DC Cable 20 e Camcorder Mode 20 um Ion Battery Pack 21 e Lithium Ion Battery Pack 21 tinuous Recording Time based on Model and Battery Type 22 el Display 23 en Display in Camera Player Modes 24 en Display in M Cam M Player Modes 25 D On Screen Display On Off 25 OSD Language 26 ck 27 eless Remote Control Acceptance Remote SC D465 B only 28 p Sound 29 ...

Page 3: ... rch REC SEARCH 41 o Memory SC D465 B only 42 ng the Remote Control SC D465 B only 43 Out 44 Macro 45 Menu Tele Macro 46 In and Out 47 ording 47 ording use Fade In Fade Out 47 ht Compensation Mode BLC 48 Nite LED Light SC D465 B only 49 Functions 50 u Items 50 ailability in each Mode 52 ecord Mode 53 Mode 54 d Noise Wind Cut 55 tter Speed Exposure 56 ded Shutter Speeds when Recording 56 nual Focus...

Page 4: ... 69 70 the LCD Screen 70 a TV Monitor 70 to a TV which has Audio Video Input Jacks 70 to a TV which has no Audio and Video Input Jacks 71 71 ns while in Player mode 72 ause 72 rch Forward Reverse 72 ack Forward Reverse SC D465 B only 72 nce To play back frame by frame SC D465 B only 73 k Forward Reverse SC D465 B only 73 yback SC D465 B only 73 g Playback PB ZOOM 74 D465 B only 75 SC D465 B only 7...

Page 5: ...94 ngle Image 94 de Show 94 Multi Display 95 Accidental Erasure 96 Menu Protect 97 ages and Moving Images 98 Menu Delete 99 Memory Card 100 ng 101 ng Picture File onto a Memory Card 101 k 102 Menu M Play Select 103 mage from a Cassette as a Still Image 104 ages from a Cassette to Memory Card 105 s Files from the Memory Card to the Built in Memory nly 106 s for Printing 107 Menu Print Mark 108 a Re...

Page 6: ...n to the en closed recording using the LCD the LCD screen with your g when looking at the LCD om the top g when looking at the LCD om the front g when looking at the LCD om the left g with the LCD screen nd Safety Instructions arding the Rotation of the LCD Screen H 1 2 3 4 5 6 1 2 3 4 5 6 LCD open ...

Page 7: ...side to inside during the winter you move the Camcorder from a cool location to a hot n e g from inside to outside during the summer DEW protection feature is activated leave the er for at least two hours in a dry warm room with the ompartment opened and the Battery pack removed ave the Camcorder exposed to high temperatures above 40 F For example in a parked car in the sun or exposed unlight the ...

Page 8: ... t will automatically turn itself off to protect against ary battery discharge e that the Battery pack is fitted firmly into place rop the Battery pack Dropping the Battery pack may t new Battery pack is not charged ing the Battery pack you need to charge it completely harging a Lithium Ion battery damages the internal cells ry pack may be prone to leakage when fully discharged arding the Video He...

Page 9: ...t screen has been ured using high precision y However there may be red blue or green in color ar on the LCD screen s are normal and do not recorded picture in any way u use the LCD screen under light or outdoors difficult to see the picture clearly urs we recommend using the Viewfinder light can damage the LCD screen a steady picture while filming check that strap is properly adjusted ce your hand...

Page 10: ...e camcorder to power to fully recharge n lithium battery If the same problem occurs with a fully d battery contact a Samsung authorized Service Center to e battery pt to service this Camcorder yourself emoving covers may expose you to dangerous voltage or s icing to qualified service personnel LITHIUM BATTERY Remote Control out of reach of battery be swallowed consult a doctor immediately explosio...

Page 11: ...o magnify an image up to 900 times its e LCD olution color TFT LCD gives you clean sharp images as well as o review your recordings immediately ge Stabilizer DIS mpensates for any handshake reducing unstable images at high magnification gital Effects effects allows you to give your films a special look by adding ecial effects t Compensation BLC unction compensates for the bright background behind ...

Page 12: ... the image y worsen ssories to Know Your Camcorder es Supplied with Camcorder ccessories H 1 2 AA E8 3 4 S 5 6 USB 7 CD 8 9 10 SC D465 B 11 SC D465 B 12 1 Lithium Ion Battery Pack 2 AC Power Adapter AA E8 TYPE 4 Multi AV Cable Audio Video S VideoCable 5 Instruction Book 10 Lithium Battery CR2025 11 Remote Control 12 Memory Stick 6 USB Cable 7 Software CD 8 Lens Cover 9 Lens Cover Strap 3 AC Cord C...

Page 13: ...Jack 9 USB Jack 10 AV S Video Jack 11 Jack Cover H 13 13 1 2 LED 49 SC D465 B 3 SC D465 B 4 5 6 EASY Q 40 7 TFT LCD 8 IEEE1394 9 USB 10 AV S 11 1 Lens 2 LED Light C D465 B only Remote Sensor C D465 B only 5 Internal MIC 7 TFT LCD Screen 6 EASY Q button and Strap Hook 8 IEEE1394 Jack 9 USB Jack 10 AV S Video Jack 11 Jack Cover ...

Page 14: ... SLIDE SHOW P BLC MULTI H 1 2 MEMORY TAPE 3 DISPLAY 25 4 5 6 7 COLOR NITE PB ZOOM 49 74 3 DISPLAY 2 Mode Switch 1 Speaker 5 Viewfinder 4 Focus Adjustment Knob 7 COLOR NITE PB ZOOM 6 Function buttons S SHOW MULTI FADE BLC REC SEARCH PLAYER CAMERA M Player EASY Q REW REC SEARCH REV FF REC SEARCH FWD PLAY STILL FADE S SHOW SLIDE SHOW STOP BLC MULTI M Player CAMERA ER ...

Page 15: ...O button see page 67 9 External MIC 10 Cassette Door H 15 15 1 Menu selector VOL MF 2 MENU 3 Start Stop 4 CAMERA PLAYER 5 DC 6 TAPE EJECT 7 8 PHOTO 67 9 10 2 MENU button 3 Start Stop button 4 Power Switch Menu Selector VOL MF 5 DC Jack 6 TAPE EJECT 7 Zoom Lever 8 PHOTO button 10 Cassette Door 9 External MIC ...

Page 16: ...tacle Release Card Slot Usable Memory Card C D463 B only Memory Stick Memory Stick PRO SC D465 B only Memory Stick Memory Stick PRO SD MMC H 1 2 3 RESET 52 4 5 SC D463 B PRO SC D465 B PRO SD MMC 4 Tripod Receptacle emory Card Slot 5 Battery Release arging indicator RESET button ...

Page 17: ... TIME 16 X2 see page 73 17 Zoom 18 DISPLAY H 17 17 SC D465 B 1 PHOTO 67 2 START STOP 3 SELF TIMER 43 4 ZERO MEMORY 42 5 PHOTO SEARCH 67 6 A DUB 76 7 8 9 10 72 11 F ADV 73 12 13 14 15 DATE TIME 16 X2 73 17 ZOOM 18 DISPLAY 1 PHOTO 2 START STOP 3 SELF TIMER 4 ZERO MEMORY 5 PHOTO SEARCH 6 A DUB 7 FF 8 REW 9 PLAY 0 Direction 18 DISPLAY 17 Zoom 16 X2 15 DATE TIME 14 SLOW 13 STILL 11 F ADV 12 STOP ...

Page 18: ...hand Hand strap into the p hook on the front Camcorder and d through the hook r hand into the hand adjust its length for enience Hand strap pen the Hand strap elease the Hand from the ring and ength and through the p and close the and Strap he Lens cover with over strap as he Lens cover e Hand strap and llowing the steps ed for the Hand Hand strap arry Your e Lens Cover H ZOOM Start Stop 1 2 3 1 2...

Page 19: ...ry m battery must be inserted in the correct direction k up the battery using tweezers or other metal tools ill cause a short circuit charge disassemble heat or immerse the battery in avoid the risk of explosion eep the Lithium battery out of the reach of the ildren hould any battery be swallowed consult a doctor mediately attery Installation SC D465 B only allation for the Remote Control H 19 19 ...

Page 20: ...r and wall socket type may differ to your resident country he DC cable to the DC jack the Camcorder amcorder to each mode by own the tab on the Power d turning it to the CAMERA or mode nt to use this unit as a Camcorder set the tch to TAPE nt to use this unit as a DSC Digital Still set the Mode switch to MEMORY AC Power Adapter and DC Cable he Camcorder Mode H 1 2 AA E8 3 4 CAMERA PLAYER TAPE DSC ...

Page 21: ... a slight charge at the time of t reduction in the life and capacity of the Battery pack move it from the Camcorder after it is fully charged unt of continuous recording time available depends on pe and capacity of the Battery pack you are using ften the zoom is used of use Camcorder Camera With LCD screen etc nt temperature commended to have additional battery packs available n the Power switched...

Page 22: ... 32 F 0 C nd capacity of the Battery pack will be reduced if it is used atures below 32 F 0 C or left in temperatures above 0 C for a long period of time even when it is fully d t the Battery pack near any heat source i e fire or a sassemble apply pressure to or heat the Battery pack ow the and terminals of the Battery pack to be short may cause leakage overheating or fire SM80 or SB LSM160 Batter...

Page 23: ...ding time is affected by temperature and environmental s ding time shortens dramatically in a cold environment nuous recording time in the operating instructions are using a fully charged Battery pack at 77 F 25 C since nmental temperature and conditions vary The remaining me may differ from the approximate continuous recording n in the instructions el Display H 23 23 a b 20 40 c 40 80 d 80 95 e 2...

Page 24: ...62 6 White Balance 58 7 Shutter speed 56 8 Exposure 56 9 Manual focus 57 10 Date Time 33 11 Zoom position 44 12 Color nite 49 13 USB 14 Remote SC D465 B 28 15 Wind cut 55 16 BLC Back Light Compensation 48 17 LED SC D465 B 49 18 54 19 Remaining tape 20 Tape counter 21 Zero memory SC D465 B 42 22 Record speed mode 23 Operating mode 24 Self timer SC D465 B 25 Photo image 26 Tele MACRO 45 27 Audio pla...

Page 25: ...ayed on the OSD for 3 seconds before it turns off he Date Time on off e Date Time on or off access the menu and change the e mode see page 33 ation Screen Display in M Cam M Player Modes e OSD n Display On Off H 25 25 1 Photo quality 2 CARD Memory Card indicator 3 Image counter 4 Image recording and loading indicator 5 Erase protection indicator 96 6 Print mark 107 7 Folder number file number 88 8...

Page 26: ... language options are listed Menu selector to the left or right to sired OSD language then press the ector OSD will display the most recently selected language ess the MENU button nguage in the menu is always indicated in English H System Camera Player M Cam M Player Language Language 1 CAMERA PLAYER 2 TAPE MEMORY 3 MENU 4 Menu selector System Menu selector 5 Menu selector Language Language Menu s...

Page 27: ... in the camcorder t use the camcorder for a long period of ge the Lithium battery at least once a charge the built in Lithium battery supply he camcorder and set the Power Switch to CAMERA or Lithium battery loses its charge after about 3 months me appears on the screen as 12 00 AM JAN 1 2005 et the year up to 2037 in lithium battery is not charged any input data will not d up e Clock H 27 27 Syst...

Page 28: ...NU button Remote to Off in the menu and try to use control icon will blink for 3 seconds creen and then disappear m Menu Setting e Wireless Remote Control Acceptance SC D465 B only H Camera Player M Cam M Player Remote Remote 1 CAMERA PLAYER 2 TAPE MEMORY 3 MENU 4 Menu selector System Menu selector 5 Menu selector Remote Menu selector 6 Menu selector On Off Menu selector 7 MENU Remote Off 3 System...

Page 29: ...nu selector to the left or right to or Off then press the Menu selector ess the MENU button e recording the Beep Sound is automatically set to Off H 29 29 System Camera Player M Cam M Player Beep Sound 1 CAMERA PLAYER 2 TAPE MEMORY 3 MENU 4 Menu selector System Menu selector 5 Menu selector Beep Sound Menu selector 6 Menu selector On Off Menu selector 7 MENU Move Select Exit MENU Camera Mode Back ...

Page 30: ...o the left or right to utter Sound then press the ector Menu selector to the left or right to or Off then press the Menu ess the MENU button m Menu Setting e Shutter Sound H Player M Cam Shutter Sound 1 CAMERA PLAYER 2 CAMERA MEMORY PLAYER TAPE 3 MENU 4 Menu selector System Menu selector 5 Menu selector Shutter Sound Menu selector 6 Menu selector On Off Menu selector 7 MENU System Move Select Exit...

Page 31: ... mode is automatically activated Camcorder is left idle for more than s after switching to the Camera mode s inserted in the Camcorder ss other buttons FADE BLC PHOTO COLOR NITE PB ZOOM during the ation mode the demonstration stops y and resumes 10 minutes later if you do e any other functions Menu Setting he Demonstration H 31 31 36 Demonstration CAMERA Demonstration Off 1 CAMERA 2 TAPE 3 MENU 4 ...

Page 32: ... the left or right to value of the selected item LCD Bright or or then press the ector an set values for LCD Bright and LCD between 0 35 ess the MENU button ht LCD Color functions do not affect the s and color of the image to be recorded y Menu Setting the LCD Screen H Camera Player M Cam M Player 2 5 LCD Bright LCD LCD Color LCD 1 CAMERA PLAYER 2 TAPE MEMORY 3 MENU 4 Menu selector Display Menu se...

Page 33: ...ns g playback of a blank section of a tape ape was recorded before setting the Time in the Camcorder the Lithium battery becomes weak or dead u use the Date Time function you must set the clock ng the Clock on page 27 Menu Setting the Date Time H 33 33 Camera Player M Cam M Player Date Time 1 CAMERA PLAYER 2 TAPE MEMORY 3 MENU 4 Menu selector Display Menu selector 5 Menu selector Date Time Menu se...

Page 34: ...ight to splay then press the Menu selector Menu selector to the left or right to Display then press the Menu e TV Display function move the ector to the left or right to select On or press the Menu selector ress the MENU button H Camera Player M Cam M Player TV Display TV OSD Off OSD On OSD DISPLAY OSD 1 CAMERA PLAYER 2 TAPE MEMORY 3 MENU 4 Menu selector Display Menu selector 5 Menu selector TV Di...

Page 35: ...es LCD screen and pull out the Viewfinder ocus adjustment knob of the Viewfinder to picture he sun or any strong light source through the Viewfinder onged period may be harmful or cause temporary nt finder will work either in PLAYER mode with LCD screen in CAMERA mode with LCD screen closed he Focus Viewfinder H 35 35 1 2 PLAYER CAMERA ...

Page 36: ...cassette d wait until it clicks and goes back into place t apply excessive force or pressure on the cassette holder ot forcibly push the cassette holder into the Camcorder assette is automatically loaded cassette door ave recorded something that you wish to keep ect it so that it will not be accidentally erased ng a tape safety tab on the cassette so that the hole is d g the tape protection longer...

Page 37: ...he horizontal plane r possible use a tripod Camcorder firmly using the hand strap r right elbow against your side r left hand under the Camcorder to support it ot to touch the built in microphone comfortable stable position for the shots that aking ean against a wall or on a table for greater n object through the Viewfinder pull it out until the click sound Excessive force may cause o the Viewfind...

Page 38: ...ng recording viewing the LCD screen w rding recording viewing the LCD screen ront g with the Viewfinder stances where it is difficult to use screen the Viewfinder can be used enient alternative the LCD screen carefully as excessive rotation may ge to the inside of the hinge that connects the LCD screen rder ecording Techniques H 1 2 3 4 5 1 2 3 5 4 ...

Page 39: ...ion tab to record sure the image you want to record appears on the LCD n or Viewfinder sure the battery level indicates that there is enough ning power for your expected recording time cording press the Start Stop button is displayed on the LCD screen cording press the Start Stop button again is displayed on the LCD screen attery pack when you are finished recording to prevent battery power consum...

Page 40: ...EASY Q mode off ASY Q function will not turn off while you cording amera will return to the settings that were or to activating EASY Q mode Q mode certain functions are not such as Menu BLC and Manual focus nt to use these functions you must first ASY Q mode off Y Q mode settings are deleted when the ck is removed from the Camcorder and must be reset Battery pack is replaced photo image using the ...

Page 41: ... battery power iew a recording using the REC SEARCH ion in STBY mode ARCH enables you to play the recording s and ARCH enables you to play it forwards g as you keep each button pressed down ss the REC SEARCH button in STBY ur Camcorder will play in reverse for 3 and return to the original position ally ed distortion may appear on the screen in Record Search H 41 41 REC SEARCH STBY REC SEAERCH REC ...

Page 42: ... stop mode ape stops automatically when it reaches ro position you have finished recording set the r switch to PLAYER and press the EW button ape stops automatically when it reaches the zero position counter with the Zero Memory indicator disappears display and the tape counter is changed to the time code owing situations Zero Memory mode may be canceled ally end of the section marked with the Zer...

Page 43: ...und gets faster then recording starts atically want to cancel the Self Timer function recording press the SELF TIMER Start Stop button again when you wish cording struct the remote control sensor by stacles between the remote control and er te control range is 4 5m 13 17 ft ive remote control angle is up to 30 degrees left right enter line pod is recommended for delayed recording d using the Remot...

Page 44: ...e can lead to unprofessional looking results and a of battery usage time Zoom Lever slightly for a gradual zoom move it further speed zoom zooming is monitored on the OSD oto side Subject appears closer angle side Subject appears farther away an record a subject that is about 10mm about 0 5 inch from the lens surface in the Wide position In and Out H Camera M Cam 1 OSD 2 T Telephoto 3 W Wide angal...

Page 45: ... the recording subject may be us od to prevent hand shake in the Tele ode dows when recording in the Tele Macro mode tance to the subject decreases focusing area narrows u can not get proper focus use the Zoom Lever Tele Macro Camera M Cam Tele Macro Tele Macro 50cm 19 7 100cm 39 4 1 CAMERA 2 TAPE MEMORY 3 MENU 4 Menu selector Camera Menu selector 5 Menu selector Macro Menu selector 6 Menu selecto...

Page 46: ... Menu selector to the left or right to n or Off then press the Menu selector ress the MENU button k Menu Tele Macro MENU 1 Menu selector 2 Menu selector Macro Menu selector 3 Menu selector On Off Menu selector 4 MENU Tele Macro H 60min 0 00 10 SP STBY Exit MENU Off Macro DIS Program AE White Balance Shutter Exposure Manual Focus 1 60min 0 00 10 SP STBY Exit MENU On 3 Off Macro DIS Program AE White...

Page 47: ...arts and the picture and adually appear fade in u wish to stop recording hold FADE button cture and sound gradually pear fade out picture has ed press the p button to stop 4 seconds 4 seconds cording n Fade Out cording Fade In and Out H 47 47 Camera FADE 1 CAMERA 2 TAPE 3 FADE 4 Start Stop FADE FADE 6 Start Stop a Fade Out 4 b Fade In 4 Gradual appearance b Fade In Release the FADE button Hold dow...

Page 48: ...oors and the background is overcast ght sources are too bright ubject is against a snowy background ower switch to CAMERA ode switch to TAPE or MEMORY BLC button con will be displayed LC mode press the BLC button again press of the BLC button toggles al BLC Normal ction will not operate in EASY Q mode k Light Compensation Mode BLC H Camera M Cam BLC 1 CAMERA 2 TAPE MEMORY 3 BLC BLC 4 BLC BLC BLC N...

Page 49: ...hoto image or EASY Q is in use om photo image recording Mosaic Mirror Pastel2 or 16 9 Wide is not available in the mode ASY Q is set Color Nite mode will be released Light can become extremely hot ch it while in operation or soon after turning it ise serious injury may result ce the Camcorder in the carrying case immediately after LED Light since it remains extremely hot for some time e near flamm...

Page 50: ...1 102 103 98 99 98 96 97 107 108 106 100 92 Selecting the Program AE Function Setting White Balance Setting the Digital special effect Setting the Tele Macro Selecting the Digital Image Stabilizing Selecting Digital Zoom Searching pictures recorded in Tape Copying still images from a cassette to Memory card Selecting the Audio playback channel Selecting the recording speed Selecting Sound Quality ...

Page 51: ...r ced Recording nu Functions Page M Player M Cam Player nd ct on 32 32 33 34 27 28 29 30 82 81 26 31 Setting the Brightness tone of the LCD screen Setting the Color tones of the LCD screen Setting the Date and Time Selecting OSD on off of TV Setting the time Using the remote control Setting the Beep sound Setting the Shutter sound Setting the USB Version Setting the USB device Selecting the OSD la...

Page 52: ...button using an object with sharp h as a small screwdriver Digital functions DIS Digital Zoom PHOTO TAPE Color Nite 16 9 Wide Digital Effects O O O O O O O O Emboss2 Pastel2 Mirror Mosaic The other Digital Effect H O X RESET RESET DIS Digital Zoom PHOTO TAPE Color Nite 16 9 Wide 16 9 Emboss2 2 Pastel2 2 Mirror Mosaic the other Digital Effect Digital Effects Digital functions DIS DigitalZoom PHOTO ...

Page 53: ...on will be displayed mmend that you use this Camcorder to any tapes recorded on this Camcorder ack a tape recorded in other equipment uce mosaic shaped distortion u record a tape in SP and LP modes or LP y the playback picture may be distorted or ode may not be written properly if there is a een scenes sing SP mode for best picture and sound ced Recording the Record Mode H 53 53 Camera Player Rec ...

Page 54: ...rd then press the Menu selector Menu selector to the left or right to dio Mode then press the Menu selector Menu selector to the left or right to sired audio mode 12Bit or 16Bit s the Menu selector ess the MENU button s selected no 12Bit indication will be ced Recording H Camera Player Audio Mode 12 16 12 12 Main Sound1 Sub Sound2 16 16 1 CAMERA PLAYER 2 TAPE 3 MENU 4 Menu selector Record Menu sel...

Page 55: ...Menu selector e the Wind Cut function move the ector to the left or right to select On s the Menu selector ess the MENU button Cut icon will be displayed ind Cut is set to off when you want the o be as sensitive as possible ced Recording ff Wind Noise Wind Cut H 55 55 Camera Player Wind Cut Wind Cut Wind Cut Wind Cut 1 CAMERA PLAYER 2 TAPE 3 MENU 4 Menu selector Record Menu selector 5 Menu selecto...

Page 56: ...s basketball 1 100 nually change the shutter speed and the value when Program AE option is selected hanges are applied first e may not seem as smooth when a high shutter speed is corder returns to the auto shutter and auto exposure when you set the change to the EASY Q mode cording with a Shutter Speed of 1 1000 or higher make sun is not shining into the lens e Shutter Speed Exposure ded Shutter S...

Page 57: ...e a car objects moving constantly or quickly like an a crowd ower switch to CAMERA ode switch to TAPE or MEMORY Menu selector Menu selector to the left or right to select ocus then press the Menu selector Menu selector to the left or right to select press the Menu selector us will blink Menu selector to the left or right until the object is is not available in the EASY Q mode ced Recording using n...

Page 58: ... will appear Menu selector to the left or right to mera then press the Menu selector Menu selector to the left or right to hite Balance then press the ector Menu selector to the left or right to sired mode Auto Hold Indoor or then press the Menu selector ess the MENU button elected icon will be displayed the Auto mode is selected no icon will be yed A ced Recording e White Balance H Camera M Cam A...

Page 59: ...in mode digital zoom off if necessary to set a urate white balance white balance if lighting conditions rmal outdoor recording setting to provide better results k Menu White Balance H 59 59 Menu selector MENU 1 Menu selector 2 Menu selector White Balance Menu selector 3 Menu selector Auto Hold Indoor Outdoor Menu selector 4 MENU EASY Q White Balance 60min 0 00 10 SP STBY Exit MENU Macro DIS Progra...

Page 60: ...ant to use the DIS function e DIS menu to Off ress the MENU button icon will be displayed om Color Nite Mosaic Mirror Pastel2 and 16 9 Wide are not available in mode u press the PHOTO button while the DIS s enabled the DIS will be released shortly me automatically after the photo recording ced Recording e Digital Image Stabilizer DIS H Camera DIS DIS 10 DIS 1 CAMERA 2 TAPE 3 MENU 4 Menu selector C...

Page 61: ... that you deactivate the DIS when using a tripod the DIS function the picture quality may e mode automatically sets the DIS to On k Menu Digital Image Stabilizer DIS H 61 61 Menu selector MENU 1 Menu selector 2 Menu selector DIS Menu selector 3 Menu selector On Off Menu selector 4 MENU DIS DIS EASY Q DIS On DIS 60min 0 00 10 SP STBY Exit MENU 2 60min 0 00 10 SP STBY œ 60min 0 00 10 SP STBY Exit ME...

Page 62: ...rtrait mode is most effective when used outdoors hutter speed automatically varies from 1 60 to 1 1000 per d mode ding correctly when there is only light on the subject and st of the picture ow mode ding when people or objects are darker than the nd because of reflected light from sand or snow ed High Shutter Speed mode ding fast moving subjects such as players in golf or tennis AE function will n...

Page 63: ...ording Program AE k Menu Program AE H 63 63 1 CAMERA 2 TAPE 3 MENU 4 Menu selector Camera Menu selector 5 Menu selector Program AE Menu selector 6 Menu selector Menu selector 7 MENU 1 Menu selector 2 Menu selector Program AE Menu selector 3 Menu selector Menu selector 4 MENU Program AE Auto Auto Off Off Off Off Move Select Exit MENU Camera Mode Camera Program AE White Balance Digital Effect Macro ...

Page 64: ...reddish brown mode e reverses the colors creating a mage ode e cuts the picture in half using a ect HT mode e changes the images to black and 1 mode e creates a 3D effect embossing 2 mode e creates a 3D effect embossing nding area of an image mode e applies a pale pastel drawing n image mode e applies a pale pastel drawing urrounding area of an image e mode record a picture to be played back Wide ...

Page 65: ...ode ect modes other than Mosaic Mirror Emboss2 Pastel2 Wide are available while DIS is in use ge recording is not available in the 16 9 Wide mode H 65 65 1 CAMERA 2 TAPE 3 MENU 4 Menu selector Camera Menu selector 5 Menu selector Digital Effect Menu selector 6 Menu selector Menu selector 7 MENU DIS Color Nite Pastel2 2 Emboss2 2 16 9 Wide 16 9 Mirror Mosaic EASY Q DIS EASY Q Color Nite 16 9 Wide 1...

Page 66: ...de is in use oto image recording Color Nite Mosaic mboss2 Pastel2 or 16 9 Wide is set Digital de will be released The Digital Zoom be backed up S or EASY Q is set Digital Zoom mode will be released ced Recording In and Out with Digital Zoom he Digital Zoom H Camera 10 900 1 CAMERA 2 TAPE 3 MENU 4 Menu selector Camera Menu selector 5 Menu selector Digital Zoom Menu selector 6 Menu selector Off 100x...

Page 67: ...Pressing the PHOTO he remote control records the still image with ocusing SC D465 B only e are no still images recorded on the tape it will wound or forwarded ge recording is not available while Color Nite or is in use Zoom Color Nite or Digital Effect is not available g a photo image hoto image while EASY Q DIS or Digital Zoom use will release current mode After a photo ken the mode will return a...

Page 68: ...LAY STILL button to start an view the picture you recorded on the screen p the play operation press the STOP adjust the LCD Bright Color during stment method is the same procedure as amera mode see page 32 also view the picture on a TV screen after connecting the er to a TV or VCR see pages 70 71 unctions are available in Player mode see page 72 hing and viewing still images recorded onto tape e 6...

Page 69: ...me me level display will appear on the LCD n may be adjusted from anywhere en 00 to 19 You will not hear any sound the volume is set on 00 close the LCD screen while playing you t hear sound from the speaker AV cable is connected to the Camcorder ot hear sound from the Built In Speaker ot adjust the volume d will return when you remove the d AV cable from the jack of your er g Sound from the Speak...

Page 70: ...nd set the TV VIDEO n the TV to Video to the TV user s manual ape use the S Video connector on the cable to obtain better tures if you have an S Video jack on your TV u use the S Video connector you still need to make nections on your TV nect the cable to the Audio Video jack you will not hear m the Camcorder s speakers mono audio input is available on the TV set use the Audio the white jack Audio...

Page 71: ... will appear on the TV after a few ds pe reaches its end while being played back the tape will d automatically ack mode SP LP is determined by the mode in which was recorded R has an S Video input terminal you may use S Video r for better quality eo Connector transmits video only Connect Audio cables mono audio input is available on the TV set use the audio the white jack Audio L to a TV which has...

Page 72: ...ormal playback press the ILL button ssing the REW FF buttons during e normal playback release the button Slow Playback the SLOW button on the remote control playback ume normal playback press the Y STILL button Slow Playback the button during forward slow ack ume forward slow playback press the button ume normal playback press the PLAY STILL button ack Forward Reverse only rch Forward Reverse ause...

Page 73: ... button during forward X2 playback ume normal playback press the PLAY STILL button ck in reverse at normal speed press the button mal forward playback PLAY STILL or button to return to normal ayback aped distortion may appear on the screen while in some ous playback modes haped distortion or noise may be experienced when you tapes recorded in LP which contain various playback l only be heard durin...

Page 74: ...er of the nly ot apply the PB ZOOM function to pictures which are ut from an external video source OOM image cannot be imported to your PC from the er s DV jack OOM images cannot be exported to a PC not be displayed on the LCD screen while the PB ZOOM s being operated y OSD press the PB ZOOM button once to stop PB ZOOM function or press the STOP button to back ck during Playback PB ZOOM H PB ZOOM ...

Page 75: ...MENU button Start Stop button to set the Camcorder AUSE mode E appears on the LCD screen TV programme or play back the VHS tape Start Stop button to start recording want to temporarily pause a recording press art Stop button cording press the STOP button ord the images being played back on an analog VCR if they played back at normal speed for example more than double playback only a gray image app...

Page 76: ... the front f camcorder see to page 75 PLAY STILL button and find ame of the scene to be dubbed PLAY STILL button to scene A DUB button on the remote dubbing icon will be yed amcorder is ready for dubbing PLAY STILL button to start dubbing STOP button to stop the dubbing ot use the Audio dubbing function while playing a write video tape an external MIC or sound source connect a microphone to ck or ...

Page 77: ... 2 equally ess the MENU button PLAY STILL button to playback ed tape ayback added sound Sound 2 or MIX mode you may loss of sound quality udio Playback H 77 77 1 PLAYER 2 TAPE 3 MENU 4 Menu selector Tape Menu selector 5 Menu selector Audio Select Menu selector 6 Menu selector Menu selector Sound 1 1 Sound 2 2 MIX 1 2 1 2 1 2 7 MENU 8 PLAY STILL Sound2 MIX Move Select Exit MENU Player Mode Back Pho...

Page 78: ...r ON again ot transmt data from the Camcorder to PC in M Player se the Camcorder and IEEE1394 together as this will EE1394 to shut off onnect the Camcorder to a PC using both DV and USB may not operate properly n is not guaranteed for all computer environments nded above E1394 cable DV cable is sold separately pture software is commercially available enabled PCs have a 6 pin socket In this case a ...

Page 79: ...device while you monitor the Start Stop button to start recording nt to pause recording momentarily press the Start Stop ain cording press the STOP button ng this Camcorder as a recorder the pictures that appear ernal monitor may seem distorted however recorded will not be affected is not guaranteed for all the recommended computer ents mentioned above with a DV Connection Cable quirements H 79 79...

Page 80: ... cting USB cable If no Memory card or an unformatted Memory card is will not recognize your camera as a removable disk ng requires Video Codec DV Driver and DirectX 9 0 nect the USB cable from the PC or the Camcorder during the data transfer sfer will stop and the data may be damaged ct the USB cable to a PC using a USB HUB or with other devices at the may cause conflict and may not work properly ...

Page 81: ...ess the ector an select Computer to use the order as a PC Camera USB Stream movable disk an select Printer to use the Pictbridge e see page 109 ess the MENU button e USB Device H 81 81 USB M Player USB Connect USB USB SC D465 B 1 PLAYER 2 MEMORY 3 MENU 4 Menu selector System Menu selector 5 Menu selector USB Connect USB Menu selector 6 Menu selector Computer Printer Menu selector Computer Printer ...

Page 82: ...ersion is not set properly the USB n may fail to establish may not be supported by certain PCs g on their specifications se choose the USB 1 1 for USB connection 0 is not supported by the PC USB 1 1 will automatically or the USB connection USB Communication Speed H USB USB M Cam M Player 1 CAMERA PLAYER 2 MEMORY 3 MENU 4 Menu selector System Menu selector 5 Menu selector USB Version USB Menu selec...

Page 83: ...w to install the selected software ver Click emovable Disk Driver Windows 98SE only C CAMERA STREAMING Driver CAPTURE DRIVER nnect a Camcorder to your PC to complete the DV Driver tallation Set the camcorder Power switch to CAMERA Set the camcorder Mode switch to TAPE Connect the camcorder to the PC using the USB cable The SAMSUNG A V Capture driver installation begins on the PC X 9 0 Click Codec ...

Page 84: ...n video conferencing by using the Camcorder Net meeting program installed amera s screen size Transfer video frame rate for the ra function is max 15 fps 240 QVGA pixels for USB 1 1 connection onnected with the USB to the Camcorder only the Power d Zoom switches can be operated ower switch to CAMERA ode switch to TAPE one end of the USB cable to the USB jack mcorder and the other end to the USB on...

Page 85: ...able is connected to the Camcorder s USB jack nothing is ed on a TV other end of the USB cable into the USB jack on the Camcorder is connected to the Camcorder with a USB cable only Zoom switch de switch operate eting the data transmission you must he cable in the following way emovable disc icon and click the right on to select Eject irm and disconnect the USB cable when s Splash screen appears n...

Page 86: ... on the screen while recording to the Memory Stick ording or loading an image do not eject the Memory a Memory Stick while recording or loading an image can a damage nt to save all images on the Memory Stick set the write b on the Memory Stick to LOCK tick Optional Accessory TM TM ry Stick and are trademarks of Sony Corporation r product names mentioned herein may be the arks or registered tradema...

Page 87: ...play on the screen rding loading erasing or formatting n off the power or change the mode n the power off before you insert or eject the Memory Card lose data on the Memory Card ow metal substances to come in contact with the terminals of ry Card nd drop or apply strong shock to Memory Card g the Memory Card out from the Camcorder please keep ry Card in a soft case to prevent static shock d conten...

Page 88: ...4 Picture Experts Group format re size is 720x480 use this Camcorder as a Digital Still DSC to set the Mode switch to Memory Card to use this er as Digital Still Camera e Memory record mode ower switch to CAMERA ode switch to MEMORY de Memory playback mode ower switch to PLAYER ode switch to MEMORY mat f Folders and Files on the Memory Card the Camcorder Mode Still Camera Mode H JPEG MPEG4 DCAM000...

Page 89: ...ss the Menu selector Menu selector to the left or right to Memory or Memory Card then press selector ess the MENU button he Built in Memory SC D465 B only k Menu Memory Type Still Camera Mode H 89 89 Player M Cam M Player SC D465 B 32MB 1 CAMERA PLAYER 2 CAMERA MEMORY PLAYER TAPE MEMORY 3 MENU 4 Menu selector Memory Menu selector 5 Menu selector Memory Type Menu selector 6 Menu selector Int Memory...

Page 90: ...tton elected icon will be displayed umber of images that you can record varies depending on e pproximation is based on a 8MB Memory Stick under ding conditions mage Quality the Image Quality TY 8MB 16MB Fine Approx 34 Approx 68 Approx 45 Approx 90 al Approx 74 Approx 148 Images on the Memory Card Still Camera Mode H Player M Cam 1 CAMERA PLAYER 2 CAMERA MEMORY PLAYER TAPE 3 MENU 4 Menu selector Me...

Page 91: ...e quality Super Fine Fine then press the Menu selector ess the MENU button elected icon will be displayed k Menu Photo Quality Still Camera Mode H 91 91 Menu selector MENU 1 Menu selector 2 Menu selector Photo Quality Menu selector 3 Menu selector Super Fine Fine Normal Menu selector 4 MENU Photo Quality 1min 46 Exit MENU 3 Super Fine Macro White Balance Photo Quality Exposure Manual Focus 1min 46...

Page 92: ... appear Menu selector to the left or right to mory then press the Menu selector Menu selector to the left or right to e No then press the Menu selector Menu selector to the left or right to sired option Series or Reset then press selector ess the MENU button ile Number Still Camera Mode H M Cam 0001 1 CAMERA 2 MEMORY 3 MENU 4 Menu selector Memory Menu selector 5 Menu selector File No Menu selector...

Page 93: ...A ode switch to MEMORY ing your object to record fully press the utton to take the picture cture is taken and saved in the Memory within a few seconds g another picture within this interval is not ble indicator appears on the LCD n during the time it takes to save the es are saved in the Memory Card in an ormat ber of still images that can be stored on the quality of the image otos Still Camera Mo...

Page 94: ... image press the REV button ng FWD when you are on the last image will take you first image and pressing REV when you are on the first will take you to the last image pressing FWD or REV to search for an image y ower switch to PLAYER ode switch to MEMORY st recorded image appears S SHOW button will be displayed ages will be played back consecutively for econds each e Slide Show press the S SHOW ai...

Page 95: ...he TI button again elected picture is displayed in full screen the previous six images press and hold the REV about 3 seconds the next six images press the FWD button for econds o use Delete Protect or Print Mark functions in while Multi Display use the Quick Menu by pressing the Menu Still Camera Mode H 95 95 1 PLAYER 2 MEMORY 3 MULTI 6 4 MULTI 6 6 Delete Protect Print Mark Menu Selector S SHOW M...

Page 96: ...Menu selector to the left or right to then press the Menu selector want to release the protection setting Off ess the MENU button rotection icon will be displayed pictures will show the mark when they are e protection tab on the Memory Card is set to LOCK you t image protection n from Accidental Erasure Still Camera Mode H M Player 1 PLAYER 2 MEMORY No image 3 4 MENU 5 Menu selector Memory Menu se...

Page 97: ...lector to the left or right to or Off then press the Menu selector ess the MENU button k Menu Protect Still Camera Mode H 97 97 Menu selector MENU 1 Menu selector 2 Menu selector Protect Menu selector 3 Menu selector On Off Menu selector 4 MENU Protect 800x600 2 46 Exit MENU M Play Select Delete Protect Print Mark 800x600 2 46 Exit MENU M Play Select Delete Protect Print Mark On 2 46 800x600 100 0...

Page 98: ...the MENU button mages at once nu selector to the left or right to select en press the Menu selector o you want to delete all appears nu selector to the left or right to select en press the Menu selector till Images and Moving Images Still Camera Mode H M Player 96 1 PLAYER 2 MEMORY 3 4 MENU 5 Menu selector Memory Menu selector 6 Menu selector Delete Menu selector Do you want to delete 7 Menu selec...

Page 99: ...ages from different digital devices g the Memory Card will delete all the stored images 100 important pictures from accidental deletion activate the tection see page 96 ll files using the Delete All menu may take a while all files much faster format the memory card after p the files into other storage device k Menu Delete Still Camera Mode H 99 99 Menu selector MENU 1 Menu selector 2 Menu selector...

Page 100: ... images motion e erased completely and erased still tion clips cannot be recovered the Memory Card using a different device will mory Card read errors the Memory Card deletes all the stored data in y Card the power off in the middle of the formatting Stick with the protection tab set to save will not be formatted 86 mat the Memory Card on a PC Not Formatted message may Memory Card formatted on a P...

Page 101: ...into the Camcorder ges that you recorded are saved in avi avi mat on the Memory Card at you recorded are saved in a following folder tion low right hand corner g picture images on a Memory Card are a e and lower definition than images on tape is recorded in mono ng functions are not allowed in M Cam Mode Image Stabilizer Digital Zoom Fade Program Effect Slow Shutter ding on a Memory Card don t ins...

Page 102: ...er manufacturer s equipment 4 movie recorded by another Camcorder may not play mcorder MPEG4 moving pictures on a PC the Video Codec in the CD h the camcorder should be installed ed Microsoft Windows Media Player Version 9 or higher in order to play 4 file on the Memory Card on your PC n download the Microsoft Windows Media Player applied each ges on Microsoft Website www microsoft com windows win...

Page 103: ... selector to the left or right to oto or Movie then press the ector ess the MENU button k Menu M Play Select Still Camera Mode H 103 103 Menu selector MENU 1 Menu selector 2 Menu selector M Play Select Menu selector 3 Menu selector Photo Movie Menu selector 4 MENU M Play 100 0002 800x600 2 46 Exit MENU M Play Select Delete Protect Print Mark Movie 3 800x600 2 46 Exit MENU M Play Select Delete Prot...

Page 104: ...de switch to TAPE the cassette PHOTO button ill image is recorded on the Memory Card g the time it takes to save an image the ack screen is paused and the OSD is yed as illustrated in the lower right hand es copied from the cassette to the memory aved in a 640x480 format f images you can save varies depending age resolution Still Camera Mode H Player COPY 1 PLAYER 2 TAPE 3 4 PHOTO 640 480 1 2 4 25...

Page 105: ...photo find still images and copy starts STOP button to stop copying matically stops when the cassette is Memory card is full opied from the cassette to the memory d in 640x480 format till Images from a Cassette to Memory Card Still Camera Mode H 105 105 Player 1 PLAYER 2 TAPE 3 MENU 4 Menu selector Tape Menu selector 5 Menu selector Photo Copy Menu selector 6 7 640 480 Move Select Exit MENU Player...

Page 106: ...us mode select File or All Files is selected Now ng is displayed on the screen and ng starts ess the MENU button Copies files From the Memory Card to the emory SC D465 B only Still Camera Mode H M Player Copy To 1 PLAYER 2 MEMORY 3 MENU 4 Menu selector Memory Menu selector 5 Menu selector Copy to Menu selector 6 Menu selector Back This File All Files Menu selector Back This File All Files Now copy...

Page 107: ...ion All Off This File or All n press the Menu selector ect This File move the Menu selector to right to select the quantity s the Menu selector ess the MENU button rint Mark icon will be displayed e Print Mark Print Marks select All Off dividual file s Print Mark select the file File to 000 mages for Printing Still Camera Mode H 107 107 M Player DPOF DPOF Print Mark This File 999 All Files 1 PLAYE...

Page 108: ...the copies from 0 to 999 t Mark is set to All Files you can set the copies to 1 es option may require extended operation nding on the number of stored images pporting printers are commercially SB cable provided with the Camcorder k Menu Print Mark Still Camera Mode H Menu selector MENU 1 Menu selector 2 Menu selector Print Mark Menu selector 3 Menu selector Menu selector 4 MENU 0 999 1 DPOF USB Pr...

Page 109: ...rinter using the provided rinter power on tBridge menu screen appears automatically short period sor highlights Printer ridge settings menu press the buttons to select an image to print enu selector to the left or right to select Copies then press the ctor enu selector to the left or right to set the number of prints then enu selector our Pictures Using the PictBridgeTM o a Printer ges umber of Pr...

Page 110: ...and Sony e supporting printers are commercially available SB cable provided with the Camcorder C power adapter for your Camcorder during PictBridge nting our Camcorder off during the printing might damage data mory Card ill images is supported Motion clips are not available for et various printing options depending on the printer er to the user s manual of the printer Date Time Imprint Option ages...

Page 111: ...r ejects the tape atically e wait until the tape is completely ejected oving the tape close the door and store order in a dust free environment other foreign materials can cause aped noise or unstable images ower switch to the OFF ct the power source or remove the Lithium y pack BATT RELEASE switch located on the the Camcorder and slide the Battery pack ction of the arrow hing a Recording nance H ...

Page 112: ...0 seconds quality of the picture using a videocassette picture quality has not improved repeat the operation video heads with a dry type cassette cleaner aning cassette products stop automatically Refer to the assette s instructions for detailed information lem continues after the cleaning consult your nearest dealer or Authorized Service Center nd Maintaining the Camcorder nance H 1 PLAYER 2 TAPE...

Page 113: ... must be NTSC compatible and have e audio video jacks u may need to use a transcoder ible Countries Regions stria Belgium Bulgaria China CIS Czech Republic ypt Finland France Germany Greece Great Britain g Kong Hungary India Iran Iraq Kuwait Libya auritius Norway Romania Saudi Arabia Singapore blic Spain Sweden Switzerland Syria Thailand atible Countries Regions anada Central America Japan Korea M...

Page 114: ... en the cassette compartment and remove the battery Camcorder in a dry warm room for at least two hours the Battery pack is almost discharged Change to a charged one When the remaining time on the tape is about 2 minutes Prepare a new one the tape reached its end Change to a new one there is no tape in Camcorder Insert a tape the tape is protected from recording If you want to record release the p...

Page 115: ...e Camcorder can not playback Format a Memory card or insert Memory card recorded on this Camcorder slow The Camcorder can not record Format a Memory card or change to a new Memory card slow The Memory card needs to format Format a Memory card see page 100 slow When progressing file delete Wait until delete has been finished slow If inserted Memory Card is not recognised by the Camcorder Eject and ...

Page 116: ...ged Use another Battery pack The video heads may be dirty Clean the head with a cleaning tape The contrast between the subject and the background is too great for the Camcorder to operate normally Make the background bright to reduce the contrast or use the BLC function while you are recording in bright surrounding he lurred The Viewfinder lens has not been adjusted Adjust the Viewfinder control l...

Page 117: ...ox 12 56mm s SP 60 minutes when using DVM 60 LP 90 minutes when using DVM 60 Approx 150 sec using DVM60 tape CCD Charge Coupled Device 680k pixels F1 8 10x Optical 900x Digital Electronic zoom lens Ø25 2 5 inches 123k TFT LCD Color LCD 1Vp p 75Ω terminated Y 1Vp p 75Ω C 0 286Vp p 75Ω 7 5dBs 600Ω terminated 4pin special in out connector Mini B type connector Ø3 5 stereo n ure e DC 8 4V Lithium Ion ...

Page 118: ...dio Mode 54 Battery Pack 21 BLC 48 Cassette 36 Cleaning 112 Clock Set 27 Connecting 70 Date Time 33 DC Cable 20 Deleting 98 Demonstration 31 DIS 60 Digital Effect 64 DV 78 79 EASY Q Mode 40 Exposure 56 Fade 47 Formatting 100 Frame advance 73 Function buttons 14 Hand Strap 18 IEEE1394 78 LCD 32 Memory card 87 Memory Stick 86 MPEG Recording MPEG 101 OSD 24 25 Photo Copy 105 Photo Quality 90 Photo Se...

Page 119: ...0 7267864 SAMSUNG www samsung com za U A E 800SAMSUNG 7267864 www samsung com mea Customer Care Center Web Site North America Latin America Europe CIS Asia Pacific Middle East Africa CANADA 1 800 SAMSUNG 7267864 www samsung com ca MEXICO 01 800 SAMSUNG 7267864 www samsung com mx U S A 1 800 SAMSUNG 7267864 www samsung com ARGENTINE 0800 333 3733 www samsung com ar BRAZIL 0800 124 421 www samsung c...

Page 120: ... The Restriction Of the use of certain azardous Substances in electrical and electronic equipment and e do not use the 6 hazardous materials Cadmium Cd Lead Pb Mercury Hg Hexavalent Chromium Cr 6 Poly Brominated PBBs Poly Brominated Diphenyl Ethers PBDEs in our products ...

Reviews: