background image

Using AVStation premium   83

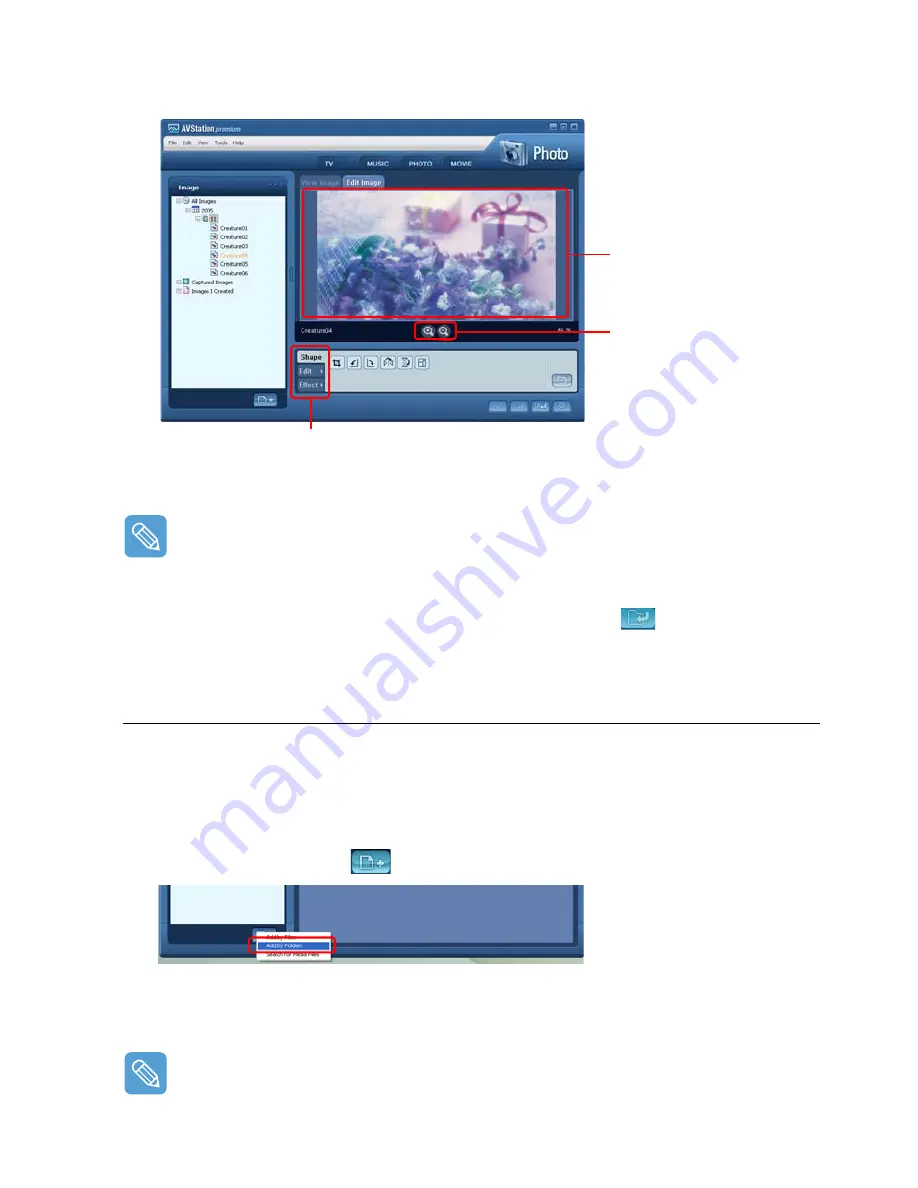
The Image Editor screen consists of an Image Workspace window and 3 Tool tabs.

2

Edit the image using the Shape, Edit and Effect tools.

Shape tool: Change the shape of an image through cut, resize.
Edit tool: Draw a line, add some clip art or enter letters.
Effect tool: Apply various effects to an image.

3

When finishing editing an image, click the Save Edited Image (

) button below the Im-

age Editor window. The edited image is saved.

Adding Images to the Library

The PHOTO Library is a library holding image files to be used by PHOTO Station. The procedures to 
add image files saved on the computer to the Library are described below.

You can add files, add folders or search and add files. As an example, the procedures to add folders 
are described below.

1

Click the Register a File (

) button below the Library and click on Add by Folders.

2

Select a folder which includes image files and click the OK button. The image files in the folder 
are added to the Library.

The image files used in AVStation are automatically added to the Library.

Image Workspace

Zoom In / Zoom Out

Tool Tabs

Summary of Contents for Q1 Ultra Series

Page 1: ...1 User s Guide ...

Page 2: ... PDA and Pocket PC restrictions Usability Similar to a Normal PC with Windows Powerful Multimedia Functions Various Multimedia Programs Such as AVStation etc 2 Built in Array Microphones for Higher Audio Recording Quality SRS Surround Sound Multiple Network Support Wired LAN Wireless LAN Bluetooth Optional Resolves Space Restrictions through the Wireless Communication Function Compact Light Weight...

Page 3: ...uter may differ from the pictures printed on the cover and in the User s guide This manual describes procedures with both the Stylus Pen and Mouse Single Click in this manual also means Single tap for the Stylus Pen Information Icons Three icons and their associated messages appear in this manual The information icons are placed before the step information they apply to Warning Indicates the possi...

Page 4: ...al View 34 Chapter 3 Using Microsoft Windows XP About Microsoft Windows XP 37 Get Going with Tablet PC 37 Tablet PC Tutorials 38 Reinstalling Windows XP 38 The Windows XP Screen Layout 39 Desktop 39 Understanding the Start Menu 40 Understanding a Window 41 Control Panel 42 Opening the Control Panel 42 User Account 43 Changing the Resolution and Colors 45 Chapter 4 Using the Network Connecting Thro...

Page 5: ...y 108 Monitoring the Battery Charge 108 Extending the Battery Usage Time 110 Chapter 7 Troubleshooting Appendix Using Magic Doctor 114 Using Norton AntiVirus 115 Restoring the System 116 Creating a Restore Point 116 Returning your computer to an earlier restore point 117 Undoing the last restoration 118 Reinstalling Software 119 Running the system software Media 119 Installing drivers and programs...

Page 6: ... plastic bags out of reach of children There is a danger of suffocation Power Related Do not touch the power cord when hands are wet There is a danger of electric shock Take care not to exceed the standard capacity voltage current of a multi tap or power outlet extension when using it for the product Electric leakage may cause electric shock or fire If the power cord or power outlet makes a noise ...

Page 7: ...er or the computer is broken disconnect the power cord and contact a service center for a safety check If you use a broken computer there is a danger of electric shock or fire Avoid direct sunlight when it is in an air tight location such as inside a vehicle The computer may become deformed or fire may be caused by high temperatures Do not scratch the surface of the LCD with a sharp object such as...

Page 8: ...l method relevant to your region The battery disposal method may differ depending on your location Dispose of the used battery in the appropriate way Do not throw or disassemble the battery This may cause injury fire or an explosion Use only batteries authorized by Samsung Electronics Otherwise there is a danger of an explosion Avoid contact with metal objects such as car keys or clips when storin...

Page 9: ...t and this may cause injury When using a walkie talkie please keep the distance between the walkie talkie and the computer at least at 1m Since a walkie talkie s transmission power is very high this may cause a computer malfunction Avoid dropping the product while using it Dropping the product may damage the product or cause data loss Take care not to drop the product when using the computer on th...

Page 10: ...damage the data on a hard disk drive A hard disk drive is extremely sensitive to external impact that any external impact may cause data loss on the surface of the disk The company is not liable to any loss of user data due to a user s carelessness or any external impact Causes that may damage the data of a hard disk drive The data may be lost when there is an external impact to the disk while dis...

Page 11: ...ture Do not use the computer on your lap or close to your skin for a long time There is a danger of burns due to the high temperature of the computer To use the computer while talking over the telephone use the ear microphone phone When using the computer while holding a phone over your shoulder and talking on the phone your posture becomes bad Keep frequently used work items within an easy workin...

Page 12: ...me Break Time When working for more than one hour take a 10 minute break after every 50 minutes of work Using this computer for two hours or less a day is recommended Illumination Do not use the computer in a dark location The illumination level for computer use must be bright so that you can read a book Indirect illumination is recommended Use a curtain to prevent the reflection of the LCD screen...

Page 13: ...er 1 Getting Started Overview 14 Front View Status Indicators 14 Top View 15 Right View 16 Left View 16 Rear View 17 Turning the Computer On and Off 18 To turn on the computer 18 To turn off the computer 18 ...

Page 14: ...480 Default Resolution 800x600 1024x600 sequen tially p 30 b Status Indicators Shows the operating status of the computer The corresponding operating LED is lit when the corresponding function operates p 15 n Array Microphone Used to record sound p 97 m Menu Button Press this button to launch the Menu Program p 27 The Menu Program provides shortcuts to frequently used functions on the computer You...

Page 15: ...ed connects the computer to a LAN p 47 x CF Card Slot A slot into which a CF card is inserted p 31 c Windows Security Button Pressing this button is the same as pressing the Ctrl Alt Del keys on the keyboard Press the Stylus Pen display the Windows Task Manager window v Power Switch AVStation NOW Switch You can turn the computer on or off by sliding this switch to the right and releasing it p 18 Y...

Page 16: ...ying power to the computer z External ODD Power Port A port used to supply power to the external USB ODD x USB Port A port used to connect a USB device such as a USB keyboard mouse USB ODD etc c Headphone Jack A jack used to connect the headphones v Volume Control Button A button used to control the volume p 26 b HOLD Switch When sliding the HOLD switch into the HOLD position upwards no buttons wi...

Page 17: ... text x 80 Stand You can position the computer at an 80 degree angle so that you can comfortably view the screen c Battery Latch The latch used to remove or install the battery p 107 v Battery A Lithium Ion rechargeable battery which supplies power to the computer p 107 x 80 Stand z 20 Stand c Battery Latch v Battery ...

Page 18: ... power the LCD brightness is automatically dimmed to save battery power To increase the LCD brightness press the Menu button and press Brightness Up p 27 Alternatively press the Volume Control buttons while holding down the Menu button to adjust the LCD brightness To turn off the computer 1 Click the start button on the taskbar 2 Click Turn Off Computer 3 Click Turn Off When the system cannot be s...

Page 19: ...2 Using the Tablet PC Input Panel 22 Dialkeys 25 Volume Control 26 Using the Buttons 27 The Menu Button 27 The Quick Launch Button 28 The Auto Scaler Button 30 CF Card Slot 31 Connecting a Monitor 33 Connecting a Monitor 33 Viewing on a Monitor 33 Dual View 34 ...

Page 20: ...rning How to Use the Stylus Pen Select Start Get Going with Tablet PC to learn how to use the Stylus Pen p 37 Operate the touch screen LCD with a Stylus Pen or your finger Sharp objects may scratch or damage the LCD surface Mouse Stylus Pen Function Single click Single tap Single tap with the pen to select an item Double click Double tap Double tap with the pen to run an item Right click Press and...

Page 21: ...ired you can correct the pointing position by using 9 Points or 25 Points Calibration z In the Linearization Style item in the Settings tab select 9 Points or 25 Points and then press the Apply button x In the Tools tab press Linearization The higher the number the more precise a correction is provided 3 Press and hold the X symbol displayed on the screen until it stops blinking The X symbol appea...

Page 22: ...is not available You can enter letters using the Tablet PC Input Panel in 3 ways Click on the Tablet PC Input Panel icon on the taskbar Entering text using the Writing Pad You can enter text on the Writing Pad using the Stylus Pen 1 In the Tablet PC Input Panel click the Writing Pad icon 2 Write text in the input area of the Writing Pad with the Stylus Pen and wait a moment The written letters are...

Page 23: ...Character Pad You can write a letter in each cell of the Character Pad with the Stylus Pen 1 In the Tablet PC Input Panel click the Character Pad icon 2 Write a letter in the cell of the Character Pad with the Stylus Pen and wait a moment The writ ten letter is converted into the corresponding computer character Press the Insert button to enter a converted letter Insert ...

Page 24: ...d The On Screen Keyboard displays a standard keyboard on the screen so that you can enter a letter by pressing the corresponding key on the screen 1 In the Tablet PC Input Panel click the On Screen Keyboard icon 2 Press a key on the screen with the Stylus Pen ...

Page 25: ...ou can launch the DialKeys as follows after the first launch 1 Click on the Dialkeys icon on the taskbar for more than 3 seconds and select Show Hide DialKeys from the pop up menu 2 Dialkeys appears on both lower corners of the screen Enter letters using your thumbs To View Detailed Usage of the Dialkeys Click on the Dialkeys icon on the taskbar for more than 3 seconds and select Help from the pop...

Page 26: ...me Control Button Press the top of the Volume Control Button to turn up the volume or press the bottom of the button to turn down the volume Using the Volume Control with the Volume Control Program Click on the Volume icon on the taskbar and slide the volume bar up or down Alternatively double click on the Volume icon and adjust the master volume control ...

Page 27: ...u Items Function Brightness Up Whenever this item is pressed the LCD brightness is increased by one step Brightness Down Whenever this item is pressed the LCD brightness is decreased by one step Wireless LAN ON OFF Press this item to turn the Wireless LAN on or off Wired LAN ON OFF Press this item to turn the Wired LAN on or off Sound ON OFF Press this item to turn the volume on or off Backlit OFF...

Page 28: ... selected WOW XT For listening to music Trusurround For watching movies SRS OFF Turns the SRS function off Battery Shows the remaining battery charge Rotation Whenever this item is pressed the screen rotates by 90 degrees to the left Button Function Description u1 Mouse Scroll Up Scrolls up in the current window u2 Back Moves to the previous page in Internet Explorer or Windows Explorer u3 Mouse S...

Page 29: ... field and select a shortcut key in the Select Shortcut Key field 4 Select the Run Program option click the Browse button select a program to be launched and click the Open button Example C Program Files Internet Explorer IEXPLORE To use the keyboard shortcut function select the Keyboard Effect option and then define a shortcut key combination 5 Click the Apply button and click the OK button to co...

Page 30: ... resolution When pressing the Auto Scaler button the Auto Scaler menu appears Whenever this button is pressed the screen resolution changes to 800 x 480 Default Resolution 800 x 600 1024 x 600 sequentially The Auto Scaler button provides a function that fits high resolution screen images to the screen size and does not support all resolutions supported by the graphics chipset To select a resolu ti...

Page 31: ...his computer supports CF card types I and II Using the Card 1 Insert a card into the slot in the correct direction 2 The card drive appears If it does not appear click Start My Computer 3 Double click the removable disk and you can save move and delete files on and to the card You can only use a formatted card If it is not formatted refer to the descriptions for Format ting a Card Removing the Car...

Page 32: ...tylus Pen for more than 3 seconds and select Format from the pop up menu 3 Click the Start button to begin formatting the card To use a CF card on both a computer and another digital device such as a digital camera we recommend formatting the memory card in the digital device When formatting the memory card in the computer you may have to format the memory card for the other digital device again t...

Page 33: ...Monitor OUT port cover by pulling the groove of the cover and connecting a monitor Viewing on a Monitor 1 Press the Menu button 2 Press the LCD CRT item once to display screen images on the LCD screen When pressing the item twice you can view screen images on both the LCD and CRT screens simultaneously LCD Computer Screen CRT External Monitor Screen Outputting to CRT only is not supported ...

Page 34: ...the Stylus Pen Using Dual View to View an Extended Screen Check if an external display device has been properly connected and configure Dual View 1 Select Start Control Panel Appearance and Themes Display 2 Click the Settings tab 3 Click the monitor 2 icon select the Extend my Windows desktop onto this monitor check box and click Apply and then the OK button 4 If you have set the LCD as the primar...

Page 35: ...he settings to the desired screen resolution and color quality To Move a Window between Monitors in Dual View Mode Click and hold a window title bar on the primary display device 1 with the mouse and drag the window title bar to the secondary display device 2 to move the window Deactivating Dual View Mode 1 Select the Start Control Panel Appearance and Themes Display Settings tab 2 Click the monit...

Page 36: ...oing with Tablet PC 37 Tablet PC Tutorials 38 Reinstalling Windows XP 38 The Windows XP Screen Layout 39 Desktop 39 Understanding the Start Menu 40 Understanding a Window 41 Control Panel 42 Opening the Control Panel 42 User Account 43 Changing the Resolution and Colors 45 ...

Page 37: ... through the Get Going with Tablet PC and Tablet PC Tutorials The computer has adopted touch screens so that you can operate the computer with your hands and does not accord completely with the characteristics of a typical tablet PC In addition since a Stylus Pen is provided instead of a Tablet Pen the Tablet and Pen Settings provided by the Windows XP Tablet PC Edition are not completely supporte...

Page 38: ...Display Settings tab and change the screen resolution to 1024x768 pixels Select Start All Programs Tablet PC Tablet PC Tutorials The Tablet PC Tour screen appears Click Next to learn how to perform Note Writing Entering texts with the Tablet PC Input Panel etc Reinstalling Windows XP If you cannot start up Windows due to damage to the system or errors frequently occur you can reinstall Windows usi...

Page 39: ... and a taskbar at the bottom as shown in the figure below z Start Opens the Start menu x Tablet PC Input Panel The Input Pad used to enter letters c Taskbar Running programs are displayed here v System Tray with Clock Displays some program icons that are currently running Infrequently used icons are hidden When clicking the left arrow icon hidden icons are displayed c Taskbar z Start v System Tray...

Page 40: ...ernet by clicking Search My Computer Displays the contents of the hard disk the CD ROM drive the network drive s and floppy disks It can also be used to search and open files and folders Control Panel Enables users to configure settings on the computer Help and Support Provides on line help information on Windows and troubleshooting Search Enables users to search for information in files or the In...

Page 41: ...n which files and folders are saved in and read from What is a folder A folder is used to group and manage files systematically and may include files in sub folders It is similar to a bookshelf What is a file A file is a document or various kinds of material that is generated as a result of program opera tion It is also called data To view the entire structure of the drive Click the Folder icon in...

Page 42: ...ou can adjust the volume select a sound scheme and set up speakers Performance and Maintenance Using this function you can set Windows performance options In addition you can manage the hard disk drive and hardware Printers and Other Hardware Using this function you can add or configure a printer mouse keyboard scanner camera or gaming device etc User Accounts Using this function you can add or se...

Page 43: ...ts and click Create a New account 3 Click the Tablet PC Input Panel icon enter a name and then click the Next button 4 Select an account type click Create Account and then check the newly created account in the user account screen If you cannot see the bottom of the screen press and drag the scroll bar of the window with the Stylus Pen 5 To change the user account information click an account to b...

Page 44: ...el User Accounts 2 Click a user account to be deleted and click Delete Account You cannot delete the current login user account Switching Users 1 Select Start Log Off 2 Click Switch User 3 Click a user account to login to the Start screen Login with a new user account ...

Page 45: ...pointer up down left or right to view the hidden part of the screen image If the 800x480 resolution is not available When selecting the 800x600 or 1024x600 resolution by pressing the Auto Scaler button the 800x480 resolution may not appear in the Display Properties window In this case press the Auto Scaler button and select the 800x480 resolution About the 1024X768 Pixels Resolution The 1024x768 p...

Page 46: ...o computer to computer networks peer to peer or ad hoc 51 Wireless Network Setup Using the Wireless LAN Setup Program 54 Using Samsung Network Manager 55 Setting Up a Network 55 Using the network after moving location 58 Sharing Internet Access 58 Network Status Diagnosis 61 Using Bluetooth Devices 62 Bluetooth Software Setup 63 Using Bluetooth 65 ...

Page 47: ...n if it is turned off Press the Menu button and press the Wired LAN ON item to turn it on 1 Connect a LAN cable to the computer s LAN port 2 Click Start Control Panel 3 Click Network and Internet Connections in the Control Panel window 4 Click Network Connections in the Network and Internet Connections window 5 Right click press and hold the Stylus Pen for more than 3 seconds the Local Area Connec...

Page 48: ...and Obtain DNS server ad dress automatically Click OK To use a static IP On the General tab select Use the following IP address and fill in the IP address Subnet mask Default gateway Preferred DNS server and Alternative DNS server fields Click OK To use both DHCP and static IP simultaneously On the Alternate Configuration tab click User configured and fill in the fields Click OK z x ...

Page 49: ...using the default settings provided by Windows XP for the wireless LAN set tings for Windows XP installed computers To setup using the software supplied by the wireless LAN card manufacturer refer to Wireless Network Setup Using the Wireless LAN Setup Program p54 To use the Wireless LAN you have to turn the Wireless LAN on first if it is turned off Press the Menu button and press the Wireless LAN ...

Page 50: ...ct View Available Wireless Networks 2 Select an AP E g Test to connect to and click Connect If there is a configured network key for the AP to connect to the Enter Network Key window appears Enter the Network Key in the window and then click the Connect button When a network key is not defined for a selected AP click on Link to display the warning mes sage box Then click Connect again in the box N...

Page 51: ...mpleting the following steps Step 1 Set up a computer to computer network on a computer Step 2 Connect to the configured computer from other computers Step 1 Setting up a computer to computer network 1 Right click press and hold the Stylus Pen for more than 3 seconds on the Wireless Network Connection icon on the taskbar and select View Available Wireless Networks 2 Click Change the order of Prefe...

Page 52: ...rk connection from an unauthorized user it would be better to configure a network key encryption key A network key consists of 5 13 alphanumeric characters e g magic or of 10 26 hexadecimal numbers a hexadecimal number is represented by numbers 0 to 9 or letters a to f 7 Check that the configured network name e g samsung is in the Preferred networks item and click OK Now your wireless network setu...

Page 53: ...rks peer to peer or ad hoc on page 51 and click Connect 3 Enter a cryptographic key in the network key box and click Connect If the network key is not configured in Connecting to computer to computer networks peer to peer or ad hoc on page 51 just click Connect without any keystrokes When connected to the wireless network the system displays Connected in the selected net work of the Network Connec...

Page 54: ...o search for available wireless networks 4 Select the name of an access point AP to connect to from the network name SSID and then click Activate 5 Enter a profile name to be used for the connection and select the security settings of the AP to be connected to in the Security tab The network authentication encryption type and password of an access point are configured through the access point mana...

Page 55: ...nt by connecting to the sharing server You can diagnose the network status You can diagnose the network status when the network is not properly connected Setting Up a Network This section describes the procedures to connect to the Internet by setting up a network The setting up procedures include the procedures to add a printer to the network 1 To use a wired LAN connect the LAN cable to the LAN p...

Page 56: ...ick Finish To add a printer click Add Printer The Add Printer Wizard appears Set up the printer accord ing to the instructions displayed on the screen When the printer has been added click the Show printer button select the newly added print er and then click the Finish button To not add a printer select No Default Printer and then click the Finish button When the network setting is complete the D...

Page 57: ...works x Click Search AP from the Wireless menu to search for wireless LAN APs Select an available wireless network e g SAMSUNG and click the Connect button For in formation on available wireless LAN APs ask your network administrator c The network key security key input window appears If a network key has been set for the wireless LAN AP enter the network key and click the Connect button For the n...

Page 58: ...puter that uses the Internet by connecting to a sharing server without itself having a direct connection to the Internet You can connect a sharing server and a sharing client as follows See Figure 5 on p 56 To use a wired LAN connect the LAN cable to the LAN port and turn the wired LAN on if it is turned off Press the Menu button and click the Wired LAN ON item to turn it on To use a wireless LAN ...

Page 59: ...n attempts using a firewall is recommended For more information on selecting a device and setting the IP address refer to the descrip tion of item 6 of Setting Up a Network on page 55 6 Select a network device to connect to the sharing client e g wireless LAN and click the Next button To Share Internet Access through a Wireless LAN In the Select Device field select Wireless In the Wireless Connect...

Page 60: ... server and click the Next button To connect through a wireless LAN enter the wireless connection name e g Samsung you entered in the sharing server If you have set a network key security key for the sharing server enter the network key 6 The setup information appears Confirm the information and click the Next button 7 When the Printer Setting window appears click Finish For the printer setup proc...

Page 61: ...Auto Diagnosis from the Manage menu 3 The Network Connections figure window appears Click the Start button to start the network diagnosis 4 When the diagnosis is complete out of order devices are marked by the exclamation mark icon For detailed device status read the description in the lower part of the window Reconnect and set up the device according to the diagnosis result ...

Page 62: ...u can exchange files with other com puters mobile phones PDAs etc Network Access You can connect to another computer with the Bluetooth function as you access a wireless LAN in Ad Hoc mode or connect to the Internet through an AP or Internet Connecting Sharing Server Network Access through a Phone Connection You can connect to the Internet through a Bluetooth mobile phone Data Sync Synchronization...

Page 63: ... displayed in the Bluetooth Manager program Enter a Name in the Computer Name field and select Laptop for the Computer Type field Also a step appears for selecting the services to be provided by your Bluetooth device for other Bluetooth devices At this point the program automatically detects available services and dis plays them as selected It is recommended not to change the default selection If ...

Page 64: ...e the next step proceeds which searches for nearby Blue tooth devices Since you do not have to search while setting up click the Skip button and finish the settings 4 When the settings are complete the Bluetooth icon menu of the notification area changes as shown in the figure ...

Page 65: ...ooth Help from the top menu Select Start Help and Support Networking and the Web Networking Wireless networking Bluetooth devices wireless to view Windows Help Exchanging Files between Bluetooth computers The procedures to exchange files and folders between Bluetooth computers are described below 1 On the computer which is sending a file hereafter Computer A right click press and hold the Stylus P...

Page 66: ...The Bluetooth PIN Code is a password used for the connection between two Bluetooth devic es the user just enter the same PIN Code E g same numbers on both Bluetooth devices to make a connection 4 After a short while the Bluetooth PIN Code required dialog box appears on Computer B enter the code that you have entered in Step 3 above 5 If the FTP File Access Privilege Request window appears on Compu...

Page 67: ...s keyboard mouse joystick etc or a headset etc on the computer are described below The Bluetooth PIN Code is a password used for the connection between two Bluetooth devices the user just enter the same PIN Code on both Bluetooth devices to make a connection 1 Turn on the Bluetooth function on the device to connect to mouse keyboard joystick or head set Some devices have a button to turn on the Bl...

Page 68: ...ices must be within a 3m 10 ft distance For a better communications environment use the devices in an open space where no wall or obstacle exists For a telephone connection data synchronization electronics business card exchange fax transmission reception sound related functions and serial port function you can connect with only one Bluetooth device Using the network connection or file transmissio...

Page 69: ...Program Launcher 76 Using AVStation premium 77 Start and Screen Layout 77 MUSIC Station 78 PHOTO Station 81 MOVIE Station 84 Using AVStation NOW AVStation Viewer 88 Start Exit AVStation NOW 88 Start Exit AVStation Viewer 89 Screen Layout 90 MUSIC Station 90 PHOTO Station 92 MOVIE Station 93 CyberLink PowerDVD 95 Voice Recorder 97 Recording 97 ...

Page 70: ...easily manage and access them This program is designed for the small LCD size so that you can easily use this program with the Stylus Pen or your fingers p 75 AVStation premium AVStation premium is an integrated multimedia program that enables users to enjoy better mu sic photographs video movies etc quality all with a single program p 77 AVStation Viewer AVStation Viewer is a program that enables...

Page 71: ...een developed to enable users to configure the network and internet sharing settings easily You can configure the network settings by the location and you can configure the Internet sharing settings and perform a network diagnosis p 55 Samsung Battery Manager Samsung Battery Manager is a power management program that provides easy to use power management and power saving settings so that the batte...

Page 72: ...er can diagnose system problems via one click or by selecting diagnostic items p 114 Norton AntiVirus Norton AntiVirus is a program that examines a computer and deals with found viruses Since viruses may damage the files and data on your computer it is recommended to examine your system frequently with the Norton AntiVirus program p 115 ...

Page 73: ...ll appear asking you if you agree to the agreement in the window Click Agree to use this software 2 Click Search for and Install Updates and click the Search for New Updates button 3 If there are available software or driver updates for your computer the available updates will be listed Select the required updates from the list and click Install Update to start the update The update list on the sc...

Page 74: ...able this is notified in the notification area Click the balloon help icon in the notifi cation area Here you will be able to find the latest available updates To change the automatic update settings click the Configuration button in Figure 2 and change the settings Samsung Update Plus does not provide updates for additionally installed software and device drivers ...

Page 75: ...ogram with the Stylus Pen or your fingers Program Launcher Screen Layout To launch the Program Launcher click Start All Programs Microsoft Touch Pack for Tab let PC Program Launcher The Program Launcher is launched Close View Taskbar Battery Charge Status When clicking the icon the Power Option Properties window appears Wireless LAN Status When clicking the icon the Network Connections window appe...

Page 76: ...gram Launcher 2 Select More Programs Calculator The Calculator program is launched For more detailed usage For more detailed usage click Program Launcher Help from the Tools category Program Launcher User Setting functions You can add a category and add or delete a shortcut icon Click on Customize Launcher from the Tools category to change the settings ...

Page 77: ...udio CD or DVD you have to connect the external USB ODD to the computer The following descriptions presuppose that the external ODD is connected For detailed usage refer to the program help Start and Screen Layout To launch the program select Start All Programs Samsung AVStation premium AVStation premium Alternatively double click the AVStation premium icon on the Desktop MUSIC You can play a musi...

Page 78: ...he EDS function when playing music or video on AVStation premium Playing an Audio CD The procedures to play an audio CD are described below 1 Launch AVStation premium and insert an audio CD into the CD drive 2 In the Audio CD window select Play Audio CD using Samsung AVStation and click the OK button z MUSIC Menu Bar x Station Bar c MUSIC Library v Register a File b Playlist n Playlist Control But...

Page 79: ...Audio CD folder of the Library and add the tracks to the Playlist The tracks added to the Playlist are played Playing a Music File If a music file is registered to the MUSIC Library you can easily play the music file For the procedures to register tracks to the Library refer to p 80 1 Move to MUSIC Station and double click on All Music 2 Double click a music file The file is added to the playlist ...

Page 80: ...tion in Help Adding Music Files to the Library MUSIC Library is a library holding music files used by MUSIC Station The procedures to add music files saved on the computer to the Library are described below You can add files folders or search and add files As an example the procedures to add a folder are described below 1 Click on the Register a File button below the Library and click on Add by Fo...

Page 81: ...low For the procedures to register image files to the Library refer to p 83 1 Move to PHOTO Station and double click on All Images 2 Click on a folder which includes images and the images in the folder are displayed in the Image Viewer window z x c b m v n z PHOTO Menu Bar x Station Bar c PHOTO Library v Register a File b Image Viewer Tab n Image Editor Tab m Move to a Higher Level Folder Preview ...

Page 82: ...To return to the Image Viewer window double click on the screen Watching a SlideShow while Listening to Music To watch a SlideShow while listening to music play music from MUSIC Station and run Slide Show Setting an Image as the Background Click the Set as Background button below the Image Viewer window The selected image is set as the Desktop background Editing an Image You can change the shape o...

Page 83: ...saved Adding Images to the Library The PHOTO Library is a library holding image files to be used by PHOTO Station The procedures to add image files saved on the computer to the Library are described below You can add files add folders or search and add files As an example the procedures to add folders are described below 1 Click the Register a File button below the Library and click on Add by Fold...

Page 84: ...can view a clearer and sharper picture by enabling the EDI function when watching TV or playing a video on AVStation premium However some TV tuners and graphics cards are not supported by EDI For information on EDS Enhanced Digital Sound refer to p 78 z MOVIE Menu Bar x Station Bar c MOVIE Library v Register a File b Video Play window n Play Control Buttons m Volume Control EDS Setting Button p 78...

Page 85: ...nstall the DVD playing software first 1 Launch AVStation premium and insert a DVD title into the DVD drive 2 In the What do you want Windows to do window select Play DVD Video using Sam sung AVStation and click the OK button 3 The DVD title is played If a DVD title is already in the DVD drive double click the DVD title in the DVD VCD folder of the Library The DVD title is played ...

Page 86: ...tered to the Library and played Playing a Video File in Full Screen 1 Double click on the current playback screen 2 The video is played in full screen In full screen move the mouse pointer to the bottom of the screen to show the Play Control bar To play at the default screen size double click on the screen Capturing the Video Screen Click on Capture Current Screen below the Play window when the de...

Page 87: ...e described below You can add files add folders or search and add files As an example the procedures to add folders are described below 1 Click the Register a File button below the Library and click Add by Folders 2 Select a folder which includes video files and click the OK button The video files in the folder are added to the Library The video files used in AVStation are automatically added to t...

Page 88: ...e folder is protected you cannot play the files in the folder on AVStation NOW AVStation Viewer Restrictions Using AVStation Viewer you can only play files registered to the AVStation premium Library For the procedures to register files to the Library refer to p 80 p 83 and p 87 Since the screen layout and usage of the two programs are similar the manual describes the functions and screens on the ...

Page 89: ... button Alternatively slide and hold the Power switch AVS NOW switch to the right for more than 0 1 seconds Start Exit AVStation Viewer Starting Select Start All Programs Samsung AVStation premium AVStation Viewer from Windows Exiting Move the mouse pointer to the top of the screen and click the Exit button ...

Page 90: ...tings To move to the start screen while using the program Click over the top left in the current screen Then the icon appears If you click this icon you can move to the start screen MUSIC Station The procedures to play a music file or an audio CD are described below Playing a Music File The procedures to play a music file registered to the MUSIC Library are described below For the procedures to re...

Page 91: ...dio CD into the CD drive 2 In the AVStation NOW start screen click on Music 3 Double click the Audio CD in the left pane and double click on an album or music file in the right pane The selected music file is played z My Computer This only appears in AVS tation NOW You can manually find and play files on My Computer or a removable disk x All Music c Playlist Window v Music File z x c v ...

Page 92: ... and double click on an image file in the right pane 3 The selected image is zoomed in on To view an image in Full Sreen or through a SlideShow Click on the SlideShow or Full Screen button below the zoomed in image To return to the previous status in the SlideShow or Full Screen double click on the screen In AVStation NOW double click and click on Back z My Computer This only appears in AVS tation...

Page 93: ...scribed below Refer to p 87 1 Launch AVStation NOW and click the Movie 2 Click on All Movies and double click a movie file in the right pane The movie file is played Showing the Play Control window When clicking on the screen once the Play Control window appears at the bottom z My Computer This only appears in AVS tation NOW You can manually find and play files on My Computer or a removable disk x...

Page 94: ...Station Viewer 94 Playing a DVD 1 Launch AVStation NOW and insert a DVD title into the DVD drive 2 In the AVStation NOW start screen click on Movie 3 Click on DVD VCD and double click on the DVD title The DVD title is played ...

Page 95: ... to use this program you have to install the program manually using the external USB ODD 1 Insert a DVD title into the DVD drive 2 Select Play DVD Video Using PowerDVD and click OK After a moment the DVD title is played 3 If the DVD title is not played automatically click Start All Programs CyberLink Pow erDVD CyberLink PowerDVD 4 Click the Play button in the CyberLink PowerDVD play control panel ...

Page 96: ...lay on a DVD drive with the same region code A DVD drive is sold with an empty region code and the region code is set when the user inserts a DVD title into the drive for the first time Whenever DVD title is inserted with a region code that is different from that of the DVD drive the region code of the DVD drive is automatically changed to the region code of the DVD title However the region code c...

Page 97: ...he built in microphone at the front of the computer by clicking the Record button 3 If the recording is complete click the Stop button In the Save window enter the file name and click Save A recording file is saved to the C My Recorded Files folder 4 To play a recorded file click the Play button To play a previously recorded file click the Open and select the file SETTING PLAY OPEN HELP STOP RECOR...

Page 98: ...microphone Click the SETTING button and check if the Recording device is set to SoundMAX HD Audio I and the Input Source is set to Microphone If the setting is not done properly you will not be able to make a proper recording For more detailed usage click the Help button ...

Page 99: ...tem Setup 100 System Setup Screen 101 Setting a Booting Password 103 Changing the Booting Priority 106 Using the Battery 107 Removing and Attaching Battery 107 Charging the Battery 108 Monitoring the Battery Charge 108 Extending the Battery Usage Time 110 ...

Page 100: ...alfunction or crash take care when set ting up the BIOS The functions of the BIOS setup are subject to change for product function enhancement purposes To adjust the LCD brightness press the Volume Control buttons while holding down the Menu button Starting System Setup 1 Slide the Power switch to the right to turn the computer on 2 The booting screen SAMSUNG logo appears Press the Menu button on ...

Page 101: ...Menu Function Main Changes the basic system Advanced Configures the advanced functions on your computer Security Enables the security functions including passwords Boot Specifies the order of the boot devices and configures them Exit Specifies how to exit System Setup z Setup Menu x Setup Items c Help Descriptions of the selected item are displayed z x c ...

Page 102: ...s When pressing the button again Help disappears Up Down Keys Move the Joystick up or down to move the cursor up and down Left Right Keys Move the Joystick left or right to move the cursor left or right u3 F5 u1 F6 Press the u3 F5 u1 F6 u3 and u1 buttons to change the value of an item u4 Esc Press the u4 button to return to a higher level menu or to move to the Exit menu Enter Selects an item or o...

Page 103: ... not lose or forget your password If you have forgotten your password contact a Samsung service center In this case a service fee will be charged For the setup buttons refer to the description of System Setup Buttons Keys p 102 Setting a Supervisor Password A Supervisor Password is required to turn the computer on or to start System Setup When setting a Supervisor Password users other than a super...

Page 104: ...e com puter on or to enter System Setup Setting a User Password Users can start the system with their user password but cannot enter the System Setup Before configuring a user password a supervisor password must have been configured Deactivating the supervisor password also deactivates the user password However please note that deactivating a user password does not deactivate the supervisor pass w...

Page 105: ... password in the Set Supervisor Password item press Enter 2 In the Enter Current Password item enter the currently configured password and press Enter 3 Leave the Enter New Password item field empty and press Enter 4 Leave the Confirm New Password field empty and press Enter 5 In the Setup Notice window press Enter The password is deactivated ...

Page 106: ... can change the booting priority using the Boot menu of the System Setup 1 Select the Boot menu in System Setup 2 Press Enter on the Boot Device Priority item 3 Use the u1 or u3 button to move a booting device up 4 Exit from the Boot menu by pressing the u4 button and move to the Exit Exit Saving Changes menu using the Joystick and press Enter to save the settings and exit the setup ...

Page 107: ...a short circuit between the battery pack terminals or disassemble the battery pack Carefully read and follow the precautions printed on the battery and the safety instructions in the user s guide before using the battery Please refer to the system operation environment of this manual and operate and the store the battery at room temperature p 138 Removing and Attaching Battery 1 Shutdown the syste...

Page 108: ...Battery Charge You can view the battery charge status by completing the following procedures Viewing through the Menu button Press the Menu button and press on Battery Viewing through the Control Panel Select the Start Control Panel Performance and Maintenance Power Options Power Meter tab Status Charge LED Charging Amber Charging complete Green AC adapter not connected Off z x z Power Supply Stat...

Page 109: ...ng battery charge is under 3 the computer automatically saves the cur rent work and turns off This may differ according to the settings in the Control Panel Performance and Maintenance Power Options Alarms tab Using the Battery A battery is an expendable supply so when using it for a long time the capacity battery life is short ened If the battery life is reduced to under half of the initial time ...

Page 110: ...is may degrade the performance of the system Normal Mode This mode is appropriate for normal conditions Both system performance and battery usage time are optimized Maximum Performance Mode This mode is appropriate for conditions that require maximum system performance Therefore the battery usage time may be reduced in this mode Custom Mode In this mode a user can configure a detailed configuratio...

Page 111: ... extend the battery usage time the performance of the system may be degraded When changing the power settings in Custom Mode in the Samsung Battery Manager the settings of the Power Options Properties window are changed accordingly To use Normal Mode in Samsung Battery Manager after reinstalling Windows XP you have to install the Samsung Battery Manager using the system software media Turning Off ...

Page 112: ...ction and then recharging it again 1 Disconnect the AC power adapter after turning off the system 2 Restart your computer and press the Menu button when the SAMSUNG logo appears to start System Setup 3 Using the arrow keys select Smart Battery Calibration in the Boot menu and press Enter 4 Highlight Yes in the Battery Calibration Confirmation window and press Enter The Battery Calibration function...

Page 113: ... Reinstalling Windows XP 121 Running the System Recovery Media 121 Quick Installation 122 Standard Installation 123 Installing Windows When You Cannot Run Windows 125 Questions and Answers 126 Windows Related 126 Display Related 126 Sound Related 128 Wired LAN Related 129 Wireless LAN Related 130 Games and Programs Related 134 Security Center 135 Other 137 Specifications 138 Glossary 140 Index 143...

Page 114: ...top of the screen OneClick Diagnosis You can diagnose problems affecting the system connections and system operations via one click User Diagnosis You can select the necessary diagnostic items and diagnose system problems System Recovery Launches the Restoring the System function of Windows XP p 116 3 When the system diagnosis is completed the diagnostic result appears If problems are found click ...

Page 115: ... To stop scanning click on Stop If you didn t configure the Norton AntiVirus program a security alert icon appears in the notification area on the right of the task bar This indicates that the current security state of your computer is not secure Configure the virus scanning program to make the security alert icon disappear 1 Select Start All Programs Norton AntiVirus Norton AntiVirus 200x 2 Click...

Page 116: ...tem files such as the registry A problem occurs after installing a new program Creating a Restore Point Restore points are created at predetermined times and at times of significant system events such as when a program or a driver is installed You can also decide when to create your own restore points There has to more than 200MB of free space on the hard disk drive If the disk space is insuffi ci...

Page 117: ... the Restore point description box type a name to identify the restore point and than click Create A restore point has been created Returning your computer to an earlier restore point The procedures to return your computer to an earlier restore point when a problem has occurred are described below 1 Click Start All Programs Accessories System Tools System Restore 2 Select Restore my computer to an...

Page 118: ...leted dialog click OK Your computer has been restored to the selected restore point Undoing the last restoration The procedures to undo a restoration are described below 1 Click Start All Programs Accessories System Tools System Restore 2 Select Undo my last restoration and then click Next 3 Confirm the restoration information to undo and than click Next System Restore shuts down Windows and start...

Page 119: ...cted This computer is optimized for Microsoft Windows XP therefore drivers for other operating sys tems are not included on the System Software Media Running the system software Media Insert the system software Media into the external USB ODD The initial screen appears automati cally Standard Installation This displays a list of drivers or programs that are not currently installed on your computer...

Page 120: ...n in the main window of the System Software Media Standard In stallation is recommended 2 The system is scanned to display the drivers and programs that need to be installed 3 Click OK The drivers and programs are automatically installed as factory defaults 4 When done restart the system ...

Page 121: ... Installa tion of the system recovery media a USB external keyboard is necessary Before turning the computer on connect the USB keyboard Then install Win dows If you connect the USB keyboard during the installation the system will not recognize the USB keyboard Reinstalling Windows may delete the data on the hard disk drive such as files programs etc In order to minimize damage from data loss plea...

Page 122: ...erved you do not have to reinstall device drivers and programs Quick Installation The Windows Quick Installation procedures are described below You can install using the Stylus Pen 1 In the system recovery media start screen click Quick Installation 2 The description for the Quick Installation appears Click Yes to start Windows installation When the installation is complete the Windows Desktop app...

Page 123: ...installation begins If you have set a booting password enter the booting password when booting the system to continue the installation 3 After the system has restarted the message Press any key to boot from DVD appears Do not press any key at this time After awhile the partition setting screen appears To not change the partition move to the C Partition 2 using the direction key and press Enter Par...

Page 124: ...en a window that requires your name and organization pops up enter your name and the organization and click Next A window that requires the computer name and the administrator password appears Enter the computer name and the administrator password and click Next 8 When the Date and Time Settings window appears click Next Setup continues and the sys tem restarts 9 When the system restarts the messa...

Page 125: ...ert the system recovery media into the external USB ODD and turn the computer on 2 When the system restarts the message Press any key to boot from DVD is displayed You do not need to press anything 3 After awhile the partition setting screen appears To install Windows in the selected partition without change press Enter 4 Select a file system format To keep the current file system press Enter 5 Se...

Page 126: ...on Display Related Q1 The LCD screen is too dark or too bright A Adjust the LCD brightness Press the Menu button and click on Brightness UP or Bright ness Down Alternatively press the Volume Control button while holding down the Menu button to adjust the LCD brightness Q2 The screen saver disturbs Media Player playing a movie or video clip after the screen saver is activated while Media Player is ...

Page 127: ...ode is selected When Dual View is selected the Clone Mode is not supported In this case unselect the Dual View press the Menu button to select the Clone Mode For the procedures to deactivate the Dual View refer to p 35 Q7 In the Display Properties window resolution starts from 800x600 A Even if the current resolution is 800x480 pixels it may be represented as 800x600 in the Dis play Properties Thi...

Page 128: ...rly z Select Start Control Panel Add or Remove Programs x Remove WOW XT and TSXT Filter Driver first c Remove SoundMAX and restart the computer Reinstalling the Sound Driver If there is an already installed sound driver uninstall the driver according to the procedures above The sound driver is included on the System Software Media z Connect the external USB ODD and insert the System Software Media...

Page 129: ... wired LAN while using a wireless LAN may not activate the Wake On LAN function Set the Wireless LAN to Disable to use the Wake On LAN function z Click on My Network Place View network connections on the Desktop x Right click press and hold the Stylus Pen for more than 3 seconds over Wireless Net work Connection and select Disable Q2 When I am connected to a 100Mbps wired LAN and the computer exit...

Page 130: ...work Even if the signal strength is excellent the network connection may not operate properly if the TCP IP properties are not properly configured or the network key encryption key is incorrect A1 Check that the TCP IP properties are configured properly When you connect to an AP click the Wireless Network Connection icon on the taskbar and select the Support tab If the IP is not allocated properly...

Page 131: ...nterference may occur between electronic waves Set the APs channels further apart from each other Ex Ch1 Ch5 Ch9 Ch13 When an AP s SSID Service Set ID option is set to Hide you cannot search for that AP on the computer We recommend canceling the Hide option for an AP The SSID is a name for distinguishing one wireless LAN from another wireless LAN It is recommended using Long Preamble Preamble is a...

Page 132: ...matically configured to an address within the subnet IP range This will take about 2 3 minutes If the IP address is configured to static IP in TCP IP properties select Use the following IP address in the TCP IP properties of the wireless adapter configure IP ad dress 10 0 0 1 10 0 0 254 and Subnet mask 255 255 0 0 and then try again A fixed IP is recommended for a small size network Q6 When using ...

Page 133: ...and then select View Available Wireless Net works Select Change Advanced Settings from the left menu select an AP from Preferred networks window in the Wireless Networks tab and click the Properties button Select Shared Mode in the Network Authentication field of the Association tab and then click the OK button If the Preferred networks window in the Wireless Network tab is empty click View Wirele...

Page 134: ...3 MVP Baseball 2003 etc Q5 The game screen is displayed small A z Right click on the Desktop and select Properties from the pop up menu x In the Display Properties window select the Settings tab Advanced Intel Graph ics Media Accelerator Driver for Mobile tab c Select the Display Device menu and click on Notebook in the Single Display field v Select the Display Setting menu click Full Screen in th...

Page 135: ...ows from a particular site z Click on Internet Options in Start Control Panel Security Center Manage security set tings for x In the Privacy tab of Internet Properties click on Settings from Block pop ups c Enter a URL to want to allow pop ups into Address of Web site to allow and click on Add v You will find that the entered address is added to the allowed sites list The next time you connect to ...

Page 136: ...utomatic recommended A3 Keep your computer current with the latest virus updates ex Norton Antivirus Even when you have installed Norton AntiVirus on your computer Windows cannot recognize the program until you configure the settings displaying a Security Alert icon When you first use or install Norton AntiVirus for the first time follow the Registration Wizard steps to configure the registration ...

Page 137: ...en when the computer is in the HOLD status When pressing a button or switch in the HOLD status the Charge LED blinks for a moment Slide the HOLD switch down wards and try again A2 To use the switch you have to slide and hold the switch for more than 0 1 seconds Slide and hold the switch for more than 0 1 seconds before releasing it A3 If the computer is running on battery power check the battery c...

Page 138: ... 8 HDD 20 60GB Optional Graphics Intel 915GMA 900 Graphics Optional Sound AD1986 2CH Network Interface Wired LAN Marvell Yukon 88E8036 PCI E Fast Ethernet Controller Wireless LAN 802 11BG Bluetooth 2 0 EDR Optional Optional Optional CF Card Slot Type I and II Compatible Ports USB 2 0 x 2 Video Monitor Out Port Headphone Jack Wired LAN Port DC in Jack External ODD Power Port Optional Dimensions mm ...

Page 139: ...sup ported IEEE 802 11g Item Detailed Specifications Physical Specifications Dimensions Width X Height 30 X 50 95 mm operation temperature and humidity Same as system operation Temperature 0 C 70 C Humidity 85 Power Specification Power Saving Mode 726mW Receiving Mode 1 353W Transmission Mode 2 046W Power 3 3V Network Specifications Compatibility IEEE 802 11g IEEE 802 11b Operating System Microsof...

Page 140: ...ver using the Device Manager Direct X An application interface that has been developed to enable Windows application programs to access hardware devices at a very high speed Since the operating speed of graphics memory and sound cards must be very fast to provide high quality video and sound for games Direct X enables a faster control and interaction between applications and hardware devices By us...

Page 141: ...e strain Network A group of computers and devices such as a printer and scanner connected by a communications link A network can be either small or large and can be connected permanently through cables or temporarily through a telephone lines or a wireless link The biggest network is the Internet a world wide network group Network Administrator A user who plans configures and manages network opera...

Page 142: ...operating system In general sys tem files must not be deleted or moved USB Universal Serial Bus This refers to a serial interface standard developed to replace the conventional interface standards such as Serial and PS 2 While USB 1 1 supports 12Mbps 12 million bits per second USB 2 0 supports a data rate that is 40 times 480Mpbs faster then that of USB 1 1 The data rate of USB 2 0 is equivalent t...

Page 143: ...Connection Output 33 Multimedia 70 Music Play 90 N Network 46 Network Status Diagnosis 61 Norton AntiVirus 115 O Overviews 14 P Password 103 104 Playlist 80 Program 70 Program Launcher 75 Q Quick Launch Button 28 R Resolution Color 45 S Samsung Battery Manager 110 Samsung Network Manager 55 Samsung Update Plus 73 Shared Server 58 Shared Client 58 Slideshow 92 Specifications 138 SRS 28 Status Indic...

Page 144: ...ams do not try to open the enclosure of a CD or DVD drive Power Cord Requirements The power cord set wall plug cable and AC adapter plug you received with your computer meets the requirements for use in the country where you purchased your equipment Power cord sets for use in other countries must meet the requirements of the country where you use the computer For more information on power cord set...

Page 145: ... circumstances require restrictions on wireless devices Examples of common restrictions are listed below Radio frequency wireless communication can interfere with equipment on commercial aircraft Current aviation regulations require wireless devices to be turned off while traveling in an air plane 802 11B G also known as wireless Ethernet or Wifi and Bluetooth communication devic es are examples o...

Page 146: ...reless devices on airplanes is governed by the Federal Aviation Administration FAA The use of wireless devices in hospitals is restricted to the limits set forth by each hospital Explosive Device Proximity Warning Do not operate a portable transmitter such as a wireless network device near unshielded blasting caps or in an explosive environment unless the device has been modified to be qualified f...

Page 147: ...perienced radio television technician for ad ditional suggestions The user may find the following booklet helpful Something About Interfer ence This is available at FCC local regional offices Our company is not responsible for any radio or television interference caused by unauthorized modifications of this equipment or the substitution or attachment of connecting cables and equipment other than t...

Page 148: ... embedded wireless device ETS 301 489 1 if fitted with a 2 4 GHz band embedded wireless device ETS 301 489 17 if fitted with a 2 4 GHz band embedded wireless device European Radio Approval Information for products fitted with EU approved radio devices This Product is a Notebook computer low power Radio LAN type devices radio frequency RF wireless communication devices operating in the 2 4 GHz band...

Page 149: ... harmonized in all countries 802 11b 802 11g products are designed for use only in specific countries or regions and are not allowed to be operated in countries or regions other than those of designated use As a user of these products you are responsible for ensuring that the products are used only in the countries or regions for which they were intended and for verifying that they are configured ...

Page 150: ... indicated in the manual as follows Dans le cas d une utilisation privée à l extérieur d un bâtiment au dessus d un espace public aucun enregistrement n est nécessaire pour une distance de moins de 300m Pour une distance supérieure à 300m un enregistrement auprès de l IBPT est requise Pour une utilisation publique à l extérieur de bâtiments une licence de l IBPT est requise Pour les enregistrement...

Page 151: ...al please separate this from other types of wastes and recycle it responsibly to promote the sustainable reuse of material resources Household users should contact either the retailer where they purchased this product or their local government office for details of where and how they can take this item for environmentally safe recycling Business users should contact their supplier and check the te...

Page 152: ...n Sam sung Kundendienst SPAIN Contacte con SAMSUNG WORLD WIDE Si tiene alguna pregunta o comentario referente a nuestros productos por favor contacte con nues tro Servicio de Atencion al Cliente Customer Care Center TEL Web Site U S A 1 800 SAMSUNG 7267864 www samsung com U K 0870 242 0303 www samsung com uk AUSTRALIA 1300 362 603 www samsung com au HONG KONG 2862 6001 www samsung com hk INDIA 303...

Page 153: ...ложения или вопросы по продуктам Samsung связывайтесь с информационным центром Samsung CHINA THILAND Rev 1 1 Customer Care Center TEL Web Site PORTUGAL 808 200 128 www samsung pt Customer Care Center TEL Web Site RUSSIA 8 800 200 0400 www samsung ru UKRAINE 8 800 502 0000 www samsung com ur Customer Care Center TEL Web Site CHINA 800 810 5858 010 64751880 www samsung com cn Customer Care Center TE...

Reviews: