background image

Connections

ENG-17

ENG-16

C

O N N E C T I O N S

C

O N N E C T I O N S

Note

- Please turn the volume down when you turn on the Amplifier. Sudden loud sound may cause

damage to the speakers and your ears.

- Please set the audio in the menu screen according to the Amplifier. (See pages 61 to 62)

- The position of terminals may vary depending on the Amplifier. 

Please refer to the user's manual of the Amplifier.

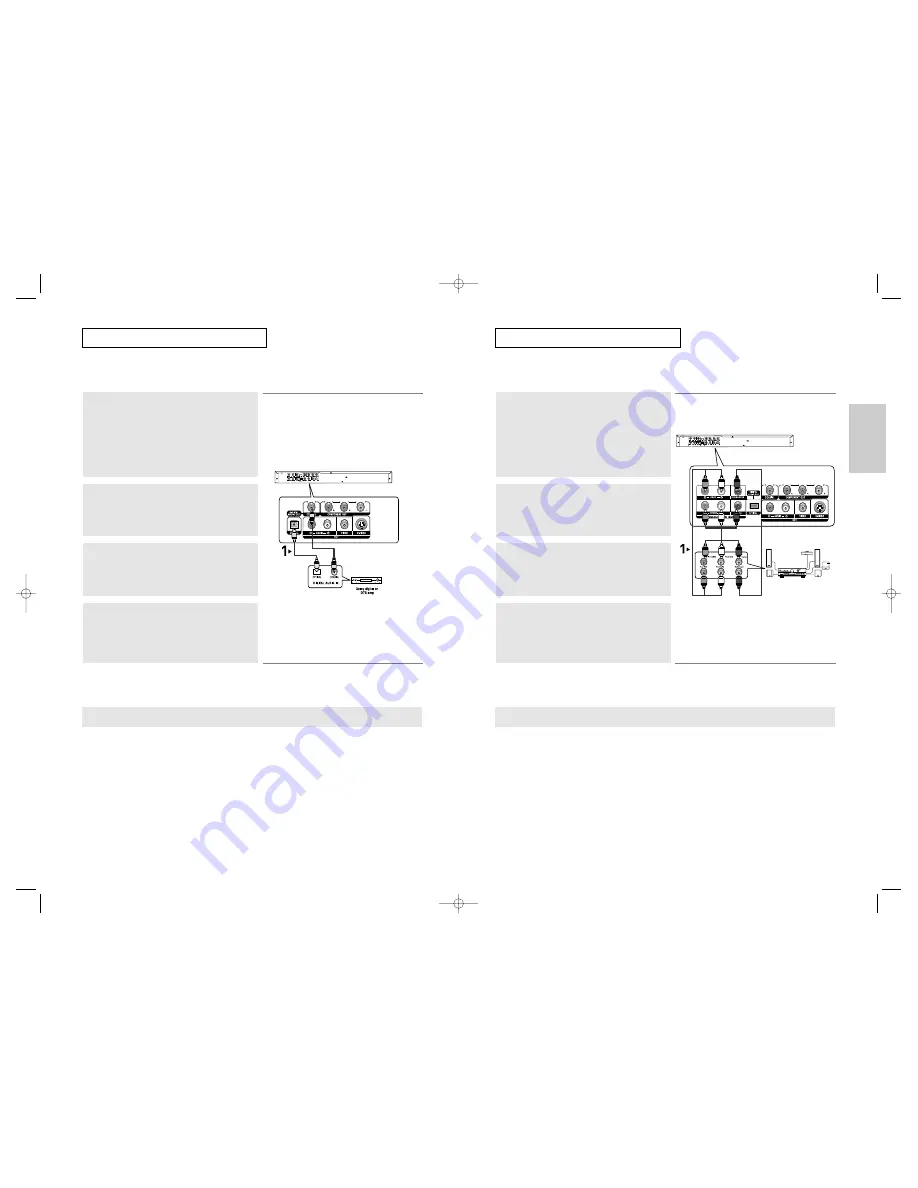
Connection to a 5.1CH Analog Amplifier

1

If using audio cables for 5.1 CH  Analog Amplifier (not included)
connect the 5.1CH ANALOG AUDIO OUT terminals on the rear
of the DVD player to the 5.1CH ANALOG AUDIO IN terminals
of the 5.1CH Analog Amplifier.

2

Using the video signal cable(s), connect the VIDEO, S-VIDEO
or COMPONENT terminals on the rear of the DVD player to the
VIDEOS-VIDEO or COMPONENT terminals of your TV as
described on pages 11 to 14.

3

Turn on the DVD player, TV, and Amplifier.

4

Press the input select button of the Amplifier to select external
input 
in order to hear sound from the DVD player.
Refer to your Amplifier's user manual to set the Amplifier's
audio input.

WHITE

BLACK

GREEN

WHITE

BLACK

GREEN

5.1ch Analog

Amplifier

Note

- Please turn the volume down when you turn on the Amplifier. Sudden loud sound may cause

damage to the speakers and your ears.

- Please set the audio in the menu screen according to the Amplifier. (See pages 61 to 62)

- The position of terminals may vary depending on the Amplifier. 

Please refer to the user's manual of the Amplifier.

- Please remove the dust cover before using the optical cable (not included) and put the cover on the cable

again when it's not used.

- DVD-AUDIO only plays back two channel audio through the Digital Audio out. 

Multi-channel DVD-Audio discs are output through the Analog outputs.

- SACD plays back only through the Analog outputs. (See pages 61 to 62)

Connection to an Audio System (Dolby digital, MPEG2 or DTS Amplifier)

1

If using an optical cable (not included), connect the DIGITAL
AUDIO OUT (OPTICAL) 
terminal on the rear of the DVD player
to the DIGITAL AUDIO IN (OPTICAL) terminal of the Amplifier.
If using a coaxial cable (not included), connect the DIGITAL
AUDIO OUT (COAXIAL) 
terminal on the rear of the DVD player
to the DIGITAL AUDIO IN (COAXIAL) terminal of the Amplifier.

2

Using the video signal cable(s), connect the VIDEO, S-VIDEO
or COMPONENT terminals on the rear of the DVD player to the
VIDEO, S-VIDEO or COMPONENT terminals of your TV as
described on pages 11 to 14.

3

Turn on the DVD player, TV, and Amplifier.

4

Press the input select button of the Amplifier to select external
input 
in order to hear sound from the DVD player.
Refer to your Amplifier's user manual to set the Amplifier's
audio input.

Optical Cable 
(not included)

Coaxial Cable 
(not included)

OR

00xxxx-P650K-XST-1 eng  6/2/05  08:00pm  Page 16

Summary of Contents for DVD-P650K

Page 1: ...j nvdkiB h ko DVD Player DVD P650K AK68 00xxxx ELECTRONICS THA ENG 00xxxx P650K XST Cover 5 26 05 10 17 PM Page 2...

Page 2: ...ve the player at room temperature until the inside of the player becomes dry and operational 4 Disc Do not clean record cleaning sprays benzene thinner or other volatile solvents that may cause damage...

Page 3: ...n Menu 26 Repeat Play 27 Slow Repeat Play 28 Program Play Random Play 29 Chapter 4 Advanced Functions Adjusting the Aspect Ratio EZ View 30 Selecting the Audio Language 32 Selecting the Subtitle Langu...

Page 4: ...ction technology must be authorized by Macrovision Corporation and is intended for home and other limited viewing uses only unless otherwise authorized by Macrovision Corporation Reverse engineering o...

Page 5: ...ve Scan settings in the TV s menu system If Component P SCAN Video Output is selected in Setup Menu Video and S Video Outputs do not work There may be no image output if the DVD player is connected to...

Page 6: ...o CD or CD playback mode 30 SUBTITLE Button 31 REPEAT Button Allows you to repeat play a title chapter track or disc 32 SHUTTLE DIAL Search mode Performs fast motion play 33 JOG DIAL Step mode Operate...

Page 7: ...Video Output to Component I SCAN in the Display Setup menu See pages 65 to 67 You can use the VIDEO SEL button to change the Video Output mode See page 11 RED WHITE RED WHITE RED BLUE GREEN RED BLUE...

Page 8: ...What is Progressive Scan Progressive scan has twice as many scanning lines as the interlace output method Progressive scanning method provides better and clearer picture quality 1 Using component vid...

Page 9: ...in the menu screen according to the Amplifier See pages 61 to 62 The position of terminals may vary depending on the Amplifier Please refer to the user s manual of the Amplifier Please remove the dust...

Page 10: ...s to select the desired player menu language then press the ENTER button EZ SETUP EZ Setup start Yes No Current Settings Player Menu Language English TV Aspect 4 3 L Box PCM Down Sampling On EZ SETUP...

Page 11: ...an invalid button press 4 Stopping Play Press the STOP button during play Note If the player is left in the stop mode for more than one minute without any user interaction a screen saver will be activ...

Page 12: ...to search at a faster speed Note The speed marked in this function may be different from the actual playback speed No sound is hearing during search mode Except CD Skipping Tracks When playing a DVD...

Page 13: ...is more than one movie on a DVD each movie will be identified Most DVD discs are recorded in chapters so that you can quickly find a specific passage similar to tracks on an audio CD Allows playback...

Page 14: ...s elapsed after point A has been set 3 To return to normal play press REPEAT button again then press the buttons to select Off and press ENTER button Note Depending on a disc the Repeat function may n...

Page 15: ...e played in programmed order PROGRAM 01 Track Program Order PROGRAM RANDOM PROGRAM RANDOM BASIC FUNCTIONS Slow Repeat Play This feature allows you slowly to repeat scenes containing sports dancing mus...

Page 16: ...ng on the screen setting in the Display Setup menu To ensure correct operation of the EZ VIEW button you should set the correct aspect ratio in the Display Setup menu See pages 65 to 67 If you are usi...

Page 17: ...the buttons to select the desired subtitle language on a MPEG4 then press the ENTER button MPEG4 NONE ENG 32 ADVANCED FUNCTIONS Selecting the Audio Language You can select a desired audio language qu...

Page 18: ...ED FUNCTIONS Changing the Camera Angle When a DVD contains multiple angles of a particular scene you can use the ANGLE function Using the ANGLE button DVD If the disc contains multiple angles the ANGL...

Page 19: ...he buttons to select Function then press the or ENTER button Note When VCD2 0 is in Menu Off mode only this function works Select Menu Off by pressing the DISC MENU buton Info Zoom Bookmark Repeat EZ...

Page 20: ...sic from a desired time by using the number buttons Slide V zone ENG 38 ADVANCED FUNCTIONS 5 To make the screen disappear press the INFO button again DVD AUDIO Playback 1 Open the disc tray Place the...

Page 21: ...u want to convert to regular CD mode press the SACD CD button During play or stop mode you can change the 2CH or MULTI mode by using LEFT RIGHT buttons You can use this function when Super Audio CD di...

Page 22: ...button to playback the CD layer of a dual layer Super Audio CD disc Refer to the page 23 for setting CD playback Function Note Some Super Audio CD discs do not include a CD layer Depending on a disc t...

Page 23: ...t files into different folders Open the disc tray Place the disc on the tray Close the tray The tray closes and this screen displays R O O T W M A J P E G M P 3 M P E G 4 R O O T Parent Folder Current...

Page 24: ...ters including Use a decompression transfer rate of at least 128 Kbps when recording MP3 files Sound quality with MP3 files basically depends on the rate of compression decompression you choose Gettin...

Page 25: ...button to display the menu Press the buttons to select the menu you want to view then press the ENTER button ENTER RETURN R O O T W M A J P E G M P 3 M P E G 4 R O O T 1 2 3 R O O T W M A J P E G M P...

Page 26: ...KARAOKE FUNCTIONS 1 Keycon Request ENG 50 ADVANCED FUNCTIONS CD R JPEG Discs Only files with the jpg and JPG extensions can be played If the disc is not closed it will take longer to start playing an...

Page 27: ...rk R Right stereo music L Left stereo music OFF Vocal Fader Off Keycon Request Vocal Fader Off Guide Melody Off ENG 52 Karaoke Functions Reserving a Song It is the function to reserve the desired song...

Page 28: ...owing you to select various language preferences set up a parental level even adjust the player to the type of television screen you have Language Setup Setup of the Language Audio Setup Setup of the...

Page 29: ...Setup Language Setup Audio Setup Display Setup Parental Setup DivX R Registration EZ Setup PLAYER MENU LANGUAGE Player Menu English Fran ais Deutsch Espa ol Thai ENG 56 CHANGING SETUP MENU 7 Press th...

Page 30: ...ntal Setup DivX R Registration EZ Setup AUDIO LANGUAGE English Fran ais Audio Deutsch Espa ol Thai Original Others ENG 58 CHANGING SETUP MENU Using the Disc Menu Language This function changes the tex...

Page 31: ...press the or ENTER button 5 Press the buttons to select the desired language then press the or ENTER button Select Automatic if you want the subtitle language to be the same as the language selected a...

Page 32: ...y available through the analog outputs It is not possible to output Super Audio CD audio via the Digital Audio Output Manufactured under license from Dolby Laboratories Dolby and the double D symbol a...

Page 33: ...bass frequencies of the speaker from the subwoofer Center None If you do not connect a center speaker select this Large Normally select this Small When the sound distorts select this This activates t...

Page 34: ...splay small text clearer Auto When selecting Auto Field Frame mode will be automatically converted Field Select this feature when the screen shakes in the Auto mode Frame Select this feature when you...

Page 35: ...Setup Display Setup Parental Setup DivX R Registration EZ Setup CHANGING SETUP MENU Setting Up the Parental Control The Parental Control function works in conjunction with DVDs that have been assigned...

Page 36: ...ODE NORDMENDE 72 73 NOKIA 74 PANASONIC 53 54 74 75 PHILIPS 06 55 56 57 PHONOLA 06 56 57 PIONEER 58 59 73 74 75 RADIOLA 06 56 RADIOMARELLI 57 RCA 45 46 REX 74 SABA 57 72 73 74 75 SALORA 74 SAMSUNG 01 0...

Page 37: ...c inside All settings including the password will revert to the factory settings Don t use this unless absolutely necessary Go to the contents and find the section of the instruction book that contain...

Page 38: ...ngle Layer Disc 135 min Reading Speed 4 8 5 6 m sec Maximum Play Time 74 min Reading Speed 4 8 5 6 m sec Maximum Play Time 20 min Reading Speed 4 8 5 6 m sec Maximum Play Time 74 min Video Audio 1 cha...

Reviews: