Samson STUDIOGT Owner'S Manual Download Page 17

Studio GT 

Owner’s Manual

11

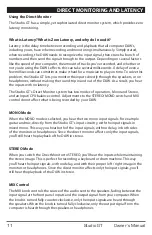
DIRECT MONITORING AND LATENCY

Using the Direct Monitor

The Studio GT has a simple, yet sophisticated direct monitor system, which provides zero 

latency monitoring.

What is Latency? What is Zero Latency, and why do I need it?

Latency is the delay time between recording and playback that all computer DAW’s, 

including yours, have when recording and monitoring simultaneously. Simply stated, 

when recording, the DAW needs to recognize the input signal, then crunch a bunch of 

numbers and then send the signal through to the output. Depending on several factors 

like the speed of your computer, the amount of tracks you’ve recorded, and whether or 

not you’re using the DAW’s effects, this can take several milliseconds. A delay of even a 

few milliseconds can sometimes make it hard for a musician to play on time. To solve this 

problem, the Studio GT lets you monitor the inputs directly through the speakers, or on 

headphones, without making the round-trip in and out of the DAW. As a result, you hear 

the inputs with no latency. 
The Studio GT's Direct Monitor system has two modes of operation, Mono and Stereo, 

and an Input/CPU balance control. Adjustments to the STEREO/MONO switch and MIX 

control do not affect what is being recorded by your DAW. 

MONO Mode

When the MONO mode is selected, you hear the two mono input signals. For example 

guitar and mic, directly from the Studio GT’s input circuitry, with the input signals in 

mixed mono. This way you hear both of the input signals, with no delay, in both sides 

of the monitors or headphones. Since the direct monitor affects only the input signals, 

you’ll still hear the playback of the DAW in stereo.

STEREO Mode

When you switch the Direct Monitor to STEREO, you’ll hear the inputs while maintaining 

the stereo image. This is perfect for recording a keyboard or drum machine. This way 

you’ll hear the input signals, with no delay, and with their proper left / right image in the 

monitors or headphones. Since the direct monitor affects only the input signals, you’ll 

still hear the playback of the DAW in stereo.

MIX Control

The MIX knob controls the source of the audio sent to the speakers, fading between the 

input signal at the front panel inputs and the output signal from your computer. When 

the knob is turned fully counter-clockwise, only the input signals are heard through 

the speakers. When the knob is turned fully clockwise, only the output signal from the 

computer is heard through the speakers or headphones.

Summary of Contents for STUDIOGT

Page 1: ......

Page 2: ...cient magnitude to constitute a risk of elec tric shock to persons The exclamation point within an equilateral triangle is intended to alert the user to the presence of important operating and mainten...

Page 3: ...y at the plugs convenience receptacles and at the point where they exit from the apparatus 11 Only use attachments accessories speci fied by the manufacturer 12 Use only with the cart stand tripod bra...

Page 4: ...die Gefahr eines Stromschlags zu verringern sollten Sie weder Deckel noch R ckwand des Ger ts entfernen Im Innern befinden sich keine Teile die vom Anwender gewartet werden k nnen berlassen Sie die W...

Page 5: ...a humedad si no funciona normalmente o si ha ca do al suelo ATTENZIONE per ridurre il rischio di incendio o di scariche elettriche non esponete questo apparecchio a pioggia o umidit Per ridurre il per...

Page 6: ...800 372 6766 Fax 631 784 2201 www samsontech com Table of Contents Introduction 1 Studio GT Features 2 Studio GT Front Panel Layout 3 Studio GT Rear Panel Layout 4 Studio GT Quick Start 5 Setting Up...

Page 7: ...he features of the Studio GT monitors as well as a guided tour through its control panel step by step instructions for its setup and use and full specifications You ll also find a warranty card enclos...

Page 8: ...are two 1 8 inch stereo headphone outputs with individual level controls The internal speakers automatically turn off when you plug into the right Headphone output For tight and controlled low frequen...

Page 9: ...dphones 8 Phones Level Controls the overall output level to the left HEADPHONE output 7 9 STEREO MONO Button This button allows you to select the direct input monitoring between stereo and mono operat...

Page 10: ...ector Connect the supplied USB cable to this rear panel USB B connector 4 LEFT SPEAKER OUTPUT Push Terminals for connecting the Left side Extension Speaker 5 POWER SWITCH Main power switch When set to...

Page 11: ...he passive speaker no knobs and jacks is the left side speaker 3 Connect the left and right speaker using the included speaker cable 4 Plug the included power cable into the AC IN jack 5 Connect the U...

Page 12: ...en turn the knob counter clockwise until the clip indicator no longer illuminates 4 Now raise the LEVEL control knob until you reach a comfortable listening level 5 In your DAW select the Studio GT LE...

Page 13: ...the CLIP indicator turns on Then turn the knob counter clockwise until the clip indicator no longer illuminates 4 Now raise the LEVEL control knob until you reach a comfortable listening level 5 In y...

Page 14: ...the GAIN knobs clockwise until the CLIP indicators turn on Then turn the knobs counter clockwise until the clip indicators no longer illuminate 4 Now raise the LEVEL control knob until you reach a co...

Page 15: ...EO position CHANNEL 1 will be heard in the LEFT speaker and CHANNEL 2 will be heard in the RIGHT speaker 3 The input signals are mixed with the output signal from your DAW The MONO STE REO switch does...

Page 16: ...viding 20 watts per channel through passive crossovers Positioning the Studio GT Near field monitoring has become the choice of many engineers in large and small studios because it minimizes the effec...

Page 17: ...CPU balance control Adjustments to the STEREO MONO switch and MIX control do not affect what is being recorded by your DAW MONO Mode When the MONO mode is selected you hear the two mono input signals...

Page 18: ...s the Default Device after you plug it in and defaults to maximum volume Double check this by hovering over the speaker icon in the bottom right hand corner of the screen It should show Volume 100 and...

Page 19: ...volume at 0 dB the audio signal is still passing through the Windows volume control and is not bit perfect You can use a free program like ASIO4ALL which is a hardware independent low latency ASIO dr...

Page 20: ...A bal loon tip will pop up telling you it has found the Samson StudioGT Figure 7 2 When it is finished installing the driv ers it will say Your new hardware is installed and ready to use Figure 8 Note...

Page 21: ...Output tab and select Samson StudioGT You may notice that the Volume slider sets itself to the full level This will allow you to have full range using Studio GT s hardware Volume con trol Figure 14 At...

Page 22: ...NSTRUMENT Input Connector Phone jack unbalanced Tip HOT Sleeve GND Input impedance 1 M Input level 14 dBu Trim max to 20 dBu Any gain Aux Input Connectors RCA 3 5mm Headphone Outputs Connector 1 8 Pho...

Page 23: ...Studio GT Owner s Manual 17 STUDIO GT DIMENSIONAL DRAWING 9 15 232mm 9 226mm 6 6 168mm...

Page 24: ...45 Gilpin Avenue Hauppauge New York 11788 8816 Phone 1 800 3 SAMSON 1 800 372 6766 Fax 631 784 2201 www samsontech com...

Reviews: