EB 8052-E EN
9-25
Servicing and conversion
17. Loosely screw lock nut (10) and stem
connector nut (9) onto the plug stem
(5.1).
Valve version with anti-rotation fixture
8. Continue as described in steps 8 to 16 of
the previously described procedure
‘Valve version without anti-rotation fix-
ture’ on page 9-24.
9. Apply a thin film of lubricant (114) to the
threads of the stem (9) and screws (303).
Impaired functioning due to incorrectly
applied lubricant.
Î
Do not apply any lubricant to the threads
of the clamps (301) or the plug stem.
10. Position the clamps (301) and stem (9)
on the plug stem according to the
'Mounting dimensions' table in the 'In-
stallation' section (under 'Mounting the
external anti-rotation fixture') and tighten
screws (303) and washers (304) by
hand.
f) Installing the cage and piston
1.
Clean the inside of the valve body (seat-
ing surfaces of the gaskets) and check it
to ensure that it is free from damage.
2.
Insert a new spiral gasket (127) into the
body (1) in the seat bridge area.
3. Place seat (4) onto the spiral gasket
(127) in the body (1).
4. Guide cage (124) into the body (1) and
position it onto the seat (4).
5. Insert piston (5) together with the piston
stem (5.1) through the cage (124) verti-
cally into the valve body (1) and position
it on the seat (4).
6. Apply a suitable lubricant (113) to the
piston stem (5.1).
7. Insert a new gasket (45) onto the cylin-
der (63). Make sure the gasket is proper-
ly aligned (see Fig. 9-7).
8. Place cylinder (63) together with the gas-
ket (45) over the piston stem (5.1) onto
the cage (124).
9.
Insert a new spiral gasket (126) onto the
cylinder (63).
10.
Insert a new spiral gasket (17) into the
body (1).
Valve version without anti-rotation fixture
11.
Standard and LLF 20 packing:
apply a
suitable lubricant (113) to all the packing
parts.
HT packing:
do not use any lubricant.
12.
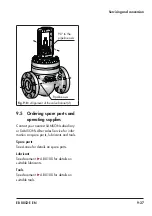
Place the valve bonnet (2) over the piston
stem (5.1) onto the body (1). Make sure
the valve bonnet (2) is properly aligned
(see Fig. 9-8).
13. Press piston (5) firmly into the seat (4),
while fastening down the valve bonnet
(2) with the body nuts (14). Tighten the
body nuts (14) gradually in a crisscross
pattern. Observe tightening torques.
14. Carefully slide the packing parts over the
piston stem (5.1) into the packing cham-
ber using a suitable tool. Make sure to
observe the proper order (see Fig. 9-4,
Fig. 9-5 or Fig. 9-6).
NOTICE
!
Summary of Contents for 3251-E
Page 6: ...Contents EB 8052 E EN ...
Page 34: ...4 6 EB 8052 E EN ...
Page 86: ...9 28 EB 8052 E EN Servicing and conversion ...
Page 92: ...12 2 EB 8052 E EN ...
Page 94: ...13 2 EB 8052 E EN ...
Page 96: ...14 2 EB 8052 E EN ...
Page 100: ...15 4 EB 8052 E EN ...
Page 101: ......

