


9-22
EB 8052-E EN
Servicing and conversion
4.
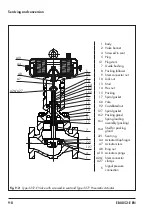
Valve versions without anti-rotation fix
-
ture:
unscrew the stem connector nut (9)
and lock nut (10) from the piston stem
(5.1).
Valve versions with anti-rotation fixture:
undo the screws (303) and remove the
clamps (301) of the anti-rotation fixture.
Set aside clamps (301), screws (303),
washers (304) and stem (9).
5. Gradually unscrew the two guide bolts
(163.1) of the spring loading assemblies
(163) at the hex head in a crisscross pat-
tern.
6. Lift off the two spring loading assemblies
(163) and packing gland (162) vertically
over the studs (164) off the valve bonnet
(2).
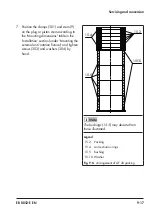
7. Unscrew castellated nut (92) and lift the
yoke (60) off the valve bonnet (2).
8. Pull out the packing follower (8).
9.
Pull piston stem (5.1) out of the valve
bonnet (2).
10.
Pull the entire packing out of the packing
chamber using a suitable tool.
11.
Clean the packing chamber thoroughly.
12.
Remove spiral gaskets (17, 126) from the
body (1) or cylinder (63) and valve bon-
net (2).
13. Remove cylinder (63) with gasket (45)
and cage (124) from the body (1). For
versions ≥NPS 6, special lifting equip-
ment is available from SAMSON
(
u
14. Remove seat (4) and spiral gasket (127)
from the body (1).
d) Installing the (clamped-in)
seat and plug
1.
Clean the inside of the valve body (seat-
ing surfaces of the gaskets) and check it
to ensure that it is free from damage.
2.
Insert a new spiral gasket (127) into the
body (1) in the seat bridge area.
3. Place seat (4) onto the spiral gasket
(127) in the body (1).
4. Guide seat retainer (124) into the body
(1) and position it onto the seat (4).
Align the windows of the seat retainer
(124) symmetrically with the pipeline ax-
is.
5. Place a new spiral gasket (126) onto the
seat retainer (124).
6. Insert a new spiral gasket (17) into the
body (1).
Valve version without anti-rotation fixture
7.
Standard and LLF 20 packing:
apply a
suitable lubricant (113) to all the packing
parts and to the plug stem (5.1).
HT packing:
do not use any lubricant.
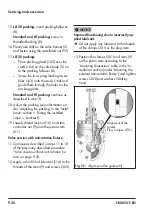
8. Insert the plug (5) together with the plug
stem (5.1) through the seat retainer (124)
vertically into the valve body (1) and po-
sition it in the seat (4) in the closed posi-
tion.
Version with V-port plug:
align the plug
(5), making sure that the largest
V-shaped port of the V-port plug faces
toward the valve outlet. See information
under 'Mounting the actuator onto the
valve' in the 'Installation' section.
Summary of Contents for 3251-E
Page 6: ...Contents EB 8052 E EN ...
Page 34: ...4 6 EB 8052 E EN ...
Page 86: ...9 28 EB 8052 E EN Servicing and conversion ...
Page 92: ...12 2 EB 8052 E EN ...
Page 94: ...13 2 EB 8052 E EN ...
Page 96: ...14 2 EB 8052 E EN ...
Page 100: ...15 4 EB 8052 E EN ...
Page 101: ......


