9-12
EB 8052-E EN
Servicing and conversion
Valve versions with anti-rotation fixture:
ensure that the clamps (301) are still fas-
tened tight to the plug stem (5.1).
4. Lift the valve bonnet (2) including yoke
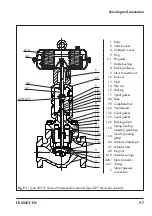
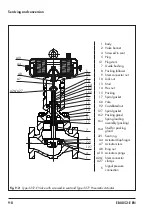
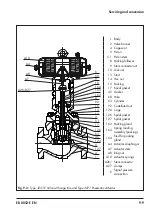
(60), plug (5) and plug stem (5.1) up-
wards off the body (1).
5. Remove spiral gaskets (17) from the
body (1) and valve bonnet (2).
6.
Valve versions without flow divider:
continue as described in step 7.
Valve versions with flow divider:
remove the spiral gasket (126), clamping
element (63) and flow divider (62) from
the body (1).
7.
NPS 3 and 4 only:
undo the seat ring
(221) using a special tool (
u
and remove it from the body (1).
It may be necessary to first unscrew a
few studs (13) from the body (1) before
the tool can be positioned properly.
8.
NPS 3 and 4 only:
remove seat (4) and
spiral gasket (127) from the body (1).
9.
Clean all parts that have been removed
and the inside of the valve body (seating
surfaces of the gaskets) and check them
to ensure that they are free from dam
-
age.
10.
NPS 3 and 4 only:
insert a new spiral
gasket (127) into the body (1) in the seat
bridge area.
11.
NPS 3 and 4 only:
place seat (4) onto
the spiral gasket (127) in the body (1).
12.
NPS 3 and 4 only:
apply a suitable lu-
bricant (114) to the thread and seating
surface of the seat ring (221). Screw the
seat ring (221) by hand a few turns into
the body (1).
13.
NPS 3 and 4 only:
tighten the seat ring
(221) using a special tool (
u
Observe tightening torques.
14.
Valve versions without flow divider:
continue as described in step 15.
Valve version with flow divider:
− Place flow divider (62) and clamping
element (63) into the body (1). Make
sure the parts are properly aligned.
− Insert a new spiral gasket (126) on
top on the clamping element (63).
15. Insert a new spiral gasket (17) into the
body (1).
16. Place valve bonnet (2) including yoke
(60), plug (5) and plug stem (5.1) verti-
cally onto the body (1).
Version with V-port plug:
place the valve
bonnet (2) onto the body, making sure
that the largest V-shaped port of the
V-port plug faces toward the valve outlet.
See information under 'Mounting the ac-
tuator onto the valve' in the 'Installation'
section.
17. Press plug (5) firmly into the seat (4),
while fastening down the valve bonnet
(2) with the body nuts (14). Tighten the
body nuts (14) gradually in a crisscross
pattern. Observe tightening torques.
Summary of Contents for 3251-E
Page 6: ...Contents EB 8052 E EN ...
Page 34: ...4 6 EB 8052 E EN ...
Page 86: ...9 28 EB 8052 E EN Servicing and conversion ...
Page 92: ...12 2 EB 8052 E EN ...
Page 94: ...13 2 EB 8052 E EN ...
Page 96: ...14 2 EB 8052 E EN ...
Page 100: ...15 4 EB 8052 E EN ...
Page 101: ......

