background image

80  |  SAMLEX AMERICA INC.    


APPENDIX A

Srl. 

No

Fault Message 

Symptoms and Troubleshooting

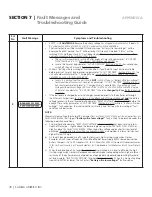
6

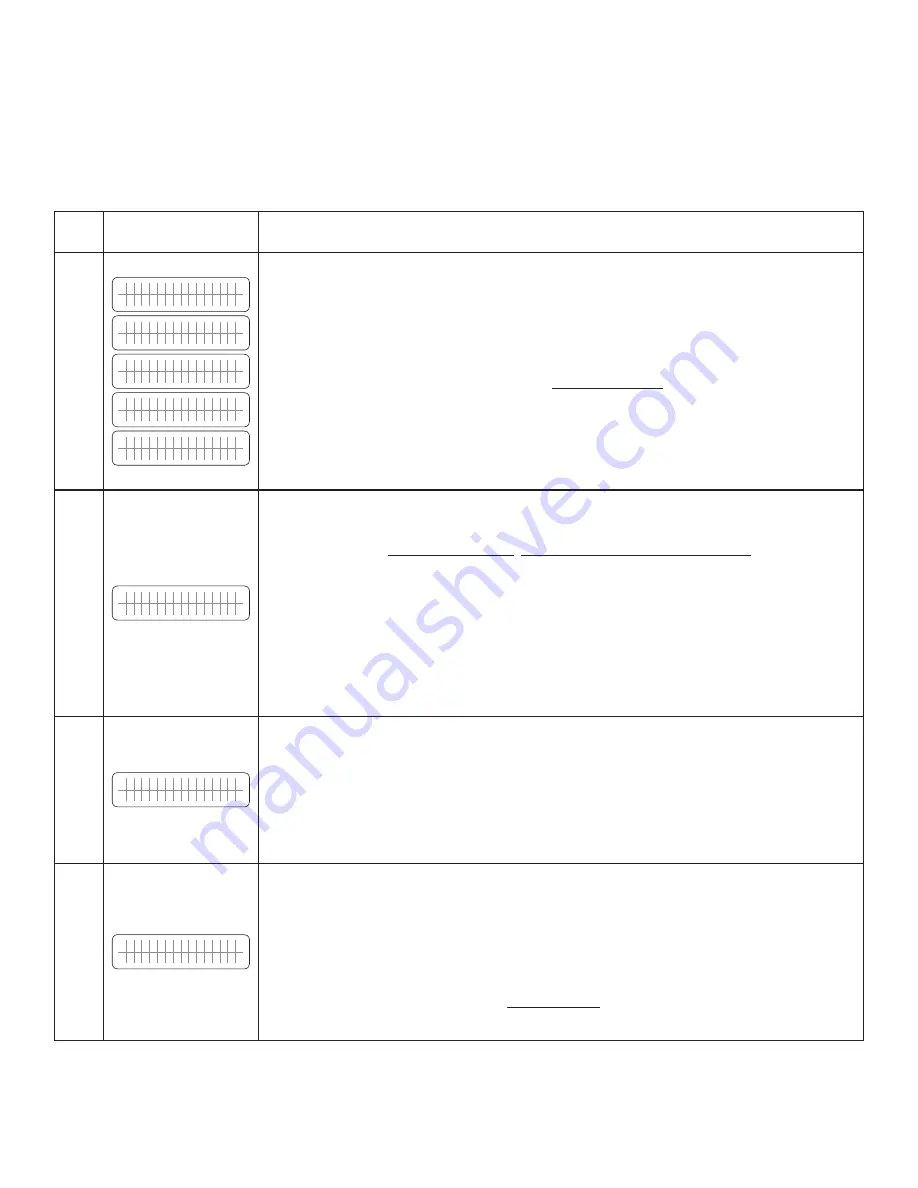
O u t p u t

o v e r

l o a d !

O u t p u t

o v e r

l o a d 1 !

O u t p u t

o v e r

l o a d 2 !

O u t p u t

o v e r

l o a d 3 !

O u t p u t

o v e r

l o a d 4 !

EVO™ Inverter/Charger is in 

FAULT MODE

 because of overload conditions in 

Inverting Mode:

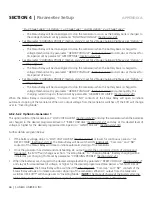
• 

There will be no AC output because the Inverter Section will be switched OFF. The Green LED 
marked “Status” will be switched OFF and the Red LED marked “Fault” will be steady ON. The 
buzzer in EVO™ Inverter/Charger will beep steady  

• 

EVO™ Inverter/Charger will be latched in OFF condition and will require manual reset 

by powering OFF, waiting for 1 minute and then powering ON again 

• 

Ensure that overloading is limited to the specified limit

Output voltage is less than 96Vrms for 300 cycles 

(5 seconds at 60Hz)

Output power is over the Power Boost Rating (110%) for 30 min
Output power is over the Power Boost Rating (120%) for 5 minutes
Output power is over the Power Boost Rating (140%) for 30 seconds
Output power is over the Power Boost Rating (150%) for 5 seconds

7

O u t p u t

s h o r t c i r c u i t

!

EVO™ Inverter/Charger is in 

FAULT MODE

 because there is a short circuit on the output side in Inverter 

Mode. Short circuit  protection is activated  when (i) the output current is over 18.33 Arms for EVO-
2212/2224, 25 Arms for EVO-3012 and 33.33 Arms for EVO-4024) and (ii) output voltage is less than 
15 Vrms for 6 cycles 

(0.1 second for 60 Hz)

(NOTE: Current is sampled every 33.3 µs)

• 

There is no AC output because the Inverter Section has been switched OFF. The Green LED 
marked “Status” will be switched OFF and the Red LED marked “Fault” will be steady ON. The 
buzzer in EVO™ Inverter/Charger will beep steady  

• 

EVO™ Inverter/Charger will be latched in OFF condition and will require manual reset 

by powering OFF, waiting for 1 minute and then powering ON again

NOTE:

 If there is short circuit condition in Charging Mode i.e. when AC input is available, short circuit 

condition on the output side will trip the AC input breaker. The load will be transferred to the Inverter 
Section and the Inverter Section will then see short circuit condition and will shut down as described 
above   

8

O u t p u t

f a i l u r e !

EVO™ Inverter/Charger is in 

FAULT MODE

 because AC input from Grid / Generator has been connected 

to the AC Output terminals by mistake. 10VAC or above seen at the AC Output Terminals at the time of 
boot up of EVO™ Inverter/Charger will activate this protection
• 

The Green LED marked “Status” will be switched OFF and the Red LED marked “Fault” will be 
steady ON. The buzzer in EVO™ Inverter/Charger will beep steady

• 

EVO™ Inverter/Charger will be latched in OFF condition and will require manual reset 

by powering OFF, waiting for 1 minute and then powering ON again

Check the connection. If there is 10V over at the output terminal, remove the connection.

9

T r a n s f o r m e r

o v e r h e a t

!

EVO™ Inverter/Charger is in 

FAULT MODE

 because the main Bidirectional Transformer in the EVO™ 

Inverter/Charger has overheated to 150°C
• 

The Green LED marked “Status” will be switched OFF and the Red LED marked “Fault” will be 
steady ON. The buzzer in EVO™ Inverter/Charger will beep steady

• 

If in Inverting Mode, Inverter Section will be switched OFF. If in Charging Mode, the Transfer Relay 
will be de-energized and the Inverter Section will be switched OFF. 

• 

Check that the fans are working properly, there is no blockage of air suction and discharge vents, 
adequate cool replacement air is available and the ambient temperature is within the limits. 
Reduce the load / “BULK CURRENT” 

(Section 4.4.2.1)

• 

The fault will be cleared when the transformer has cooled down to 80°C


SECTION 7  |


Fault 

Messages 

and 


 Troubleshooting Guide

Summary of Contents for EVO-RC

Page 1: ...Remote Control for Evolution Series Inverter Charger Model EVO RC Please read this manual BEFORE operating Firmware Rev 026 Owner s Manual APPENDIX A ...

Page 2: ...VIDED IN ITS MANUALS OR OTHER DOCUMENTATION 2 ASSUMES NO RESPONSIBILITY OR LIABILITY FOR LOSSES DAMAGES COSTS OR EXPENSES WHETHER SPECIAL DIRECT INDIRECT CONSEQUENTIAL OR INCIDENTAL WHICH MIGHT ARISE OUT OF THE USE OF SUCH INFORMATION THE USE OF ANY SUCH INFORMATION WILL BE ENTIRELY AT THE USERS RISK Samlex America reserves the right to revise this document and to periodically make changes to the ...

Page 3: ...y for clock operation 1 1 LAYOUT AND DIMENSIONS 1 LCD Screen 2 rows of 16 characters each 2 ON OFF Key 3 Green LED Status 4 Red LED Fault 5 Navigation Key Back 6 Navigation Key Up 7 Navigation Key Down 8 Navigation Key Enter 9 SD Card Slot FAT16 32 format Up to 16GB 10 RJ 45 Jack At the back not shown See pinout below Fig 1 1 Optional Remote Control EVO RC Layout Dimensions Pin Signal 1 12V 2 12V ...

Page 4: ...s of the connecting cable are as follows Length of cable 1 Fig 1 2 a 10m 33ft No of conductors 8 RJ 45 8P8C Plugs on either end 2 Fig 1 2 a Pinouts and interconnection of the RJ 45 Plugs are shown in Fig 1 2 b SECTION 1 Introduction and Layout Straight Connection Top view of Plug Locking Tab facing down 8P 8C RJ 45 Modular Plug 1 2 2 Fig 1 2 a Connecting Cable Fig 1 2 b Pinout and Interconnection ...

Page 5: ...ed with the unit 102 mm 4 02 in 122 mm 4 80 in 132 mm 5 18 in Cut the wall panel along the dotted line with a jig saw This will create a pocket in the wall panel for flush mounting the EVO RC Fig 2 1 EVO RC Remote Cutout Dimensions for Wall Panel Mounting 2 2 FLUSH MOUNT INSTALLATION To flush mount the wall opening must have at least a 2 5 cm depth to make room for the remote and cable Also the th...

Page 6: ... 2 EVO RC Flush Mounting The thickness of the wall panel board at the place of mounting should not be more than 15mm to ensure that the RJ 45 jack opening is not obstructed Fig 2 3 Wall Panel Thickness 3 0 GENERAL INFORMATION EVO RC Remote Control provides the user with the ability to modify EVO Inverter Charger s operating parameters The default settings in EVO Inverter Charger are adequate for s...

Page 7: ...programmed parameters See Section 5 SD Card 3 2 POWER ON POWER OFF i INFO a Minimum battery voltage required for initiating manual switching ON of the unit is as follows 12V units Higher than 9V 24V units Higher than 18V b Please note that this unit is designed to POWER ON AUTOMATICALLY if i AC voltage of 70V 5 VAC is available at the AC Input Terminals and ii DC input voltage is 12V for 12V versi...

Page 8: ...s found the display will then show the EVO Inverter Charger Model No and firmware version 3 digit number X XX Screen c The screen will then change to the Inverting Mode Screen Screen d 3 2 2 Power OFF AC INPUT IS NOT PRESENT NOTE If the EVO Inverter Charger has AC input voltage over 70 5 VAC available at AC input terminals the Power OFF function is disabled and the unit will remain in the ON condi...

Page 9: ...switched off using the On Off Push Button on the front panel of the EVO Inverter Charger Unit See Section 3 4 1 2 If EVO RC Remote Control has NOT been connected to the EVO Inverter Charger Unit Standby Mode cannot be entered using the On Off Push Button on the front panel of the EVO Inverter Charger Unit 3 4 1 1 Entering Standby Mode Using Remote Control EVO RC Changing over from any Operating Mo...

Page 10: ...hen Standby Mode is exited EVO Inverter Charger Unit will execute the programmed Operating Mode from the beginning It will NOT start from the last condition of the operating stage it was in when Standby Mode was activated 3 5 FAULT MESSAGES CLEARING FAULTS If any fault occurs the LCD screen will display the Fault Message and the Red LED Fault will be lighted Refer to Table 7 1 in Section 7 for det...

Page 11: ...ery over voltage or over temperature Section 3 9 Fig 3 5 INV STOP BY BMS Applicable when Parameter BATTERY TYPE Option 1 Lithium is selected This mode is activated when the Lithium Battery Management System BMS sends command to EVO contact closure signal to stop inverting to prevent deep discharge of the battery Section 3 10 Fig 3 6 3 6 2 Menu Map for Standby Inverting Charging Power Save Modes Fi...

Page 12: ...Bulk stage of 4 Stage Adaptive Profile for Equalization 0 CV Constant Voltage Absorption stage Parameter CHARGING PROFILE option 0 3Stg Adaptiv 1 CV Constant Voltage Absorption Stage Parameter CHARGING PROFILE option 1 3Stage Type1 2 CV Constant Voltage Absorption Stage Parameter CHARGING PROFILE option 2 3Stage Type2 3 CV Constant Voltage Absorption Stage Parameter CHARGING PROFILE option 3 2Stag...

Page 13: ...C C2 O U T P U T 1 5 0 0 A ò ñ ò ñ 11 I N V E R T I N G G R I D 0 0 0 V C H A R G I N G 0 C C2 O U T P U T 1 2 0 0 W ò ñ ò ñ 12 I N V E R T I N G G R I D X X X X H z C H A R G I N G 0 C C2 O U T P U T 1 2 0 0 V A ò ñ ò ñ 13 I N V E R T I N G G E N 0 0 0 V C H A R G I N G 0 C C2 O U T P U T P F 1 0 0 0 ò ñ ò ñ 14 I N V E R T I N G G E N X X X X H z C H A R G I N G 0 C C2 B A T T E R Y 1 2 0 0 0 V ò...

Page 14: ...NU MAPS FOR ON LINE MODE SCREENS i INFO Please refer to the following for additional information on On Line Mode Section 4 8 5 2 of the attached Owner s Manual for EVO 2212 3012 2224 4024 for description and application of On Line Mode Section 4 4 2 13 2 for selecting programming option 1 On Line for On Line Mode under programming Parameter MODE Section 4 4 2 13 On Line Mode Screens will be simila...

Page 15: ...ing Mode as long as qualified AC input voltage is available During the time AC input is available 19 scrollable Operating Mode Screens for CHARGING MODE will be available as per Menu Map shown in Fig 3 4 a on page 16 This Menu Map is also shown in the Menu Map in Fig 3 2 at Column 4 under heading GROUP 3 CHARGING MODE 3 8 2 In case AC input voltage fails or is switched off EVO will NOT change over...

Page 16: ... 4 0 0 A ò ñ 16 C H A R G I N G 0 C C2 B A T T E X T 0 0 A ò ñ 17 C H A R G I N G 0 C C2 B A T T E R Y 2 5 0 C ò ñ 18 C H A R G I N G 0 C C2 I D 1 R C X X X1 ò ñ 19 C H A R G I N G 0 C C2 E V O X X X X 1 V X X X1 UP KEY UP KEY UP KEY UP KEY UP KEY UP KEY DOWN KEY DOWN KEY DOWN KEY DOWN KEY DOWN KEY DOWN KEY UP KEY UP KEY UP KEY UP KEY UP KEY UP KEY UP KEY UP KEY UP KEY UP KEY UP KEY UP KEY UP KEY ...

Page 17: ...gement System BMS for on off control of charging operation of EVO Inverter Charger When BMS activates Stop Charging signal The Drain Source terminals of the BMS will close and short Pins 1 2 3 4 and 5 6 7 8 of RJ 45 Jack marked Battery Temp Sensor on the front panel of EVO EVO will stop charging Internally EVO will be in Charging Mode but the charging current will be reduced to 0A 19 scrollable di...

Page 18: ...VO Inverter Charger When BMS activates Stop Inverting signal The Drain Source terminals of the BMS will close and short Pins 1 2 3 4 and 5 6 7 8 of RJ 45 Jack marked Battery Temp Sensor on the front panel of EVO EVO will stop inverting Internally EVO will be in Standby Mode 7 scrollable display screens will be available to show the status of various operating parameters as shown in the Menu Map at...

Page 19: ...UP as shown in Parameter Setup Menu Map for PARAMETER GROUPS 1 4 in Fig 4 1 for PARAMETER GROUPS 5 7 in Fig 4 2 i INFO Parameter Setup Menu Maps in Figs 4 1 4 2 have been explained using LCD screen displays with information as seen on the actual LCD screens All values shown in the second row of setup screen displays are the default parameters for EVO 2212 3012 All voltage values related to battery...

Page 20: ...0 0 V UP KEY ò ñDOWN KEY C U T O F F V O L T 3 1 4 5 0 V UP KEY ò ñDOWN KEY 7 R E S E T V O L T A G E 1 4 0 0 V UP KEY ò ñDOWN KEY L OW R E S E T 5 6 0 0 H z UP KEY ò ñDOWN KEY D E T E C T T I M E 3 1 c y c l e D E T E C T T I M E 3 1 c y c l e 8 L OW V O L T A L A R M 1 1 0 0 V UP KEY ò ñDOWN KEY S Y N C G R I D 0 F i n e UP KEY ò ñDOWN KEY 9 B A T T L OW V O L T A G E 1 0 5 0 V UP KEY ò ñDOWN KE...

Page 21: ... O MM I D 1 UP KEY ò ñDOWN KEY 7 B U Z Z E R 1 O n UP KEY ò ñDOWN KEY 8 D I S C H A R G E B E E P 0 O f f UP KEY ò ñDOWN KEY 9 D E F A U L T R E S E T 0 N o UP KEY ò ñDOWN KEY 10 D A T A L O G T I M E 1 1 s e c UP KEY ò ñDOWN KEY 11 P A R A M E T E R S A V E 0 N o UP KEY ò ñDOWN KEY 12 T E M P U N I T 0 C UP KEY ò ñDOWN KEY 13 P A S S WO R D D I S A B L E 1 Y e s Fig 4 2 Parameter Setup Menu Map f...

Page 22: ...1 Displays SELECT PARAMETER Line 2 Displays the name of the PARAMETER GROUP Names of the 7 PARAMETER GROUPS are shown in Column 2 of Table under Section 4 1 2 b above ii Navigating through PARAMETER GROUP NOS 1 to 7 Press Up Key to scroll right to the next higher numbered PARAMETER GROUP Press Down Key to scroll left to the previous lower numbered PARAMETER GROUP Press Enter Key to select the desi...

Page 23: ...ord data logging files Refer to Section 4 9 for Date and Time set up Any Operating Mode Screen from Fig 3 2 to 3 6 SAY INVERTING Parameter Group Sub Menus Parameter Setup Screen eg BULK CURRENT I N V E R T I N G O U T P U T 1 2 0 0 0 V ENTER KEY ð ï BACK KEY PARAMETER GROUP NO 1 S E L E C T G R O U P C H A R G E C U R V E UP KEY ò ñDOWN KEY ENTER KEY ð ï BACK KEY B U L K C U R R E N T 4 0 A PARAME...

Page 24: ... the Enter Key HOLD for 3 to 4 sec and then release Process for writing the overall numerical value of the parameter into the memory will be initiated the screen will display WRITE SUCCESS on completion Please read Section 4 3 1 for example of programming a typical parameter BULK CURRENT i INFO 1 When the numerical value for any individual digit is changed that makes the overall numerical value of...

Page 25: ...alue of parameter BULK CURRENT K E Y I N P A S S WO R D 0 0 0 0 Password 8052 Password consisting of 4 digits will be requested as shown in the display screen on the left 4 digits will be displayed with initial value 0000 with the cursor blinking on the first digit 0 on the left shows digit 0 and cursor _ alternately Use Up Down Keys to scroll to number 8 for the first digit 8 of the password Mome...

Page 26: ...te blinking of digit 0 and curser _ Press the Enter Key HOLD for 3 to 4 sec and then release to initiate writing of the new value of 50A into the memory See NOTE below NOTE When the last digit is changed to the desired digit 0 in this case by using the Up Down Keys the Enter Key has to be pressed continuously for 3 to 4 sec till message WRITE SUCCESS is seen If the Enter Key is pressed momentarily...

Page 27: ... Voltage 12 00V 16 00V 24 00V 32 00V 14 40V 28 80V 3 EQUALIZE VOLTAGE Equalization Voltage 14 00V 16 50V 28 00V 33 00V 14 40V 28 80V 4 FLOATING VOLTAGE Float Voltage 12 00V 15 00V 24 00V 30 00V 13 50V 27 00V 5 COMPENSATE Temperature Compensation 3mV to 5mV C Cell 4mV C Cell 6 BATT OVER VOLT Battery Over Voltage Shutdown 14 00V 17 00V 28 00V 35 00V 16 00V 32 00V 7 RESET VOLTAGE Reset voltage for BA...

Page 28: ...ULK CURRENT value may automatically reduce in higher ambient temperatures of around 50 60 C if Power Transformer temperature exceeds 130 C or Heat Sink temperature exceeds 65 C See i INFO under Section 4 4 2 1 for details 4 4 2 Description of Parameters Under Parameter Group No 1 CHARGE CURVE 4 4 2 1 BULK CURRENT Table 4 1 Parameter Setup Screen No 1 Parameter BULK CURRENT sets the maximum chargin...

Page 29: ...ent Programmed Value of BULK CURRENT External Charging Current For example if the BULK CURRENT in the EVO 2212 is programmed at say the default value of 40A and the external Solar Charge Controller is generating 15A the internal Battery Charging Section of EVO 2212 will reduce its current from 40A to 25A so that the net charging current is equal to the programmed BULK CURRENT value of 40A 4 4 2 1 ...

Page 30: ...voltage will affect the Absorbtion Voltage Equalize Voltage Floating Voltage Batt Over Volt Restart Voltage Low Volt Alarm Batt Low Voltage when the Temperature Sensor is installed on the battery see Fig 2 5 in the Owner s Manual for Evolution Series Inverter Charger CAUTIONS 1 Lithium Ion charging does not require temperature compensation Hence do not use EVO BCTS Temperature Sensor when charging...

Page 31: ... on EVO Inverter Charger will beep steady The fault will be cleared automatically when the battery voltage drops to 0 5V below to the set upper threshold of BATT OVER VOLT The unit will start in Inverting Mode synchronize with the AC input and then the Transfer Relay will be energized to transfer to AC input at zero crossing The unit will thus resume operation in Charging Mode 4 4 2 6 1 Programmin...

Page 32: ...cted directly to the batteries or through the External Charger Input 3 4 in Fig 2 1 in the attached Owner s Manual for EVO 2212 3012 2224 4024 and the battery voltage recovers to the set RESET VOLTAGE Section 4 4 2 7 before the expiry of LV CUT OFF TIME Section 4 4 2 11 while in Battery low voltage fault condition the Inverter Section will restart and the Battery low voltage fault condition will b...

Page 33: ...0 5 0 V 4 4 2 10 LV DETECT TIME Table 4 1 Parameter Setup Screen No 10 To prevent Battery low voltage fault and shut down of the inverter due to momentary dips in battery voltage as a result of high power short duration AC loading e g motor starting inrush current etc a timer is used to qualify BATT LOW VOLTAGE condition only if the battery voltage drops to or below the set BATT LOW VOLTAGE thresh...

Page 34: ...or Equalization When AC input within the programmed window of voltage and frequency is available EVO will operate as a battery charger and charging will be carried out based on the selected option of parameter CHARGING PROFILE Parameter CHARGING PROFILE Section 4 4 2 21 allows option to select from 6 Charging Profiles 3 profiles of 3 Stage and 3 profiles of 2 Stage charging Default profile option ...

Page 35: ...k Stage See Section 5 8 2 of the attached EVO 2212 3012 2224 4024 Owner s Manual for details Transition to Float Stage thereafter 4 Stage 4 This stage will be the same as the last Stage of Charging Profile from where Equalization was started For details refer to Table 5 2 1 under Section 5 8 2 4 of the attached EVO 2212 3012 2224 4024 Owner s Manual Lead Acid Flooded only CAUTIONS 1 Equalize Flood...

Page 36: ... produced by EVO Charging Section Programmed value of charging current set by parameter BULK CURRENT Section 4 4 2 1 minus Value of current fed from the external solar charge controller When Grid AC input fails or is not within the programmed values of voltage and frequency the unit will change over to Inverting Mode and the AC Output will be fed from the internal Inverter Section of EVO When the ...

Page 37: ...is more cost effective For various display screens under this mode refer to Fig 3 3 a to d 4 4 2 13 3 Option 2 Charger Only In Off grid DC powered homes for efficiency consideration all lighting and other loads appliances are normally powered from batteries that are primarily charged through solar wind power Generator backup is used for powering AC to DC battery charger for charging the batteries ...

Page 38: ... Transfer Relay will be switched ON energized if the battery voltage drops to the voltage threshold of LOW VOLT ALARM Section 4 4 2 8 or lower for sustained period GS DETECT TIME Section 4 4 2 16 The EVO will change over to Charging Mode and qualified AC input from the AC input source will be passed through to the AC Output and at the same time the Internal AC Charger will start charging the batte...

Page 39: ...value Programmed Value of Bulk Current Value of Current fed from the external Solar Charge Controller Charging will proceed as per the Charging Profile selected through parameter CHARGING PROFILE Section 4 4 2 21 The Transfer Relay will be switched OFF de energized after the programmed value of GEN OFF DELAY Section 4 4 2 18 counted from the time the battery voltage rises to the programmed value o...

Page 40: ...R V E ð B U L K C U R R E N T 4 0 A ð G E N O N T I M E 6 0 m i n ð K E Y I N P A S S WO R D 0 0 0 0 Password 8052 See Section 4 3 1 ð G E N O N T I M E 0 6 0 m i n 4 4 2 18 GEN OFF DELAY Table 4 1 Parameter Setup Screen No 18 This parameter is a Programmable Timer 0 240min Default 60 min that is used for the following Programming Automatic Starting and Stopping of Generator Section 4 8 2 5 2 2 un...

Page 41: ...rging Profile See Section 4 4 2 21 is selected 2 3 Stage Type 2 Programmable range is 0 20A Default value is 4A 4 4 2 20 1 Programming Steps for Parameter ABSORP EXIT AMPS Enter Key Enter Key Up Key x 19 times Enter Key A N Y O P E R A T I N G M O D E S C R E E N ð S E L E C T G R O U P C H A R G E C U R V E ð B U L K C U R R E N T 4 0 A ð A B S O R P E X I T A M P S 4 A ð K E Y I N P A S S WO R D...

Page 42: ...sor Jack 6 Fig 4 1 Pinout at Fig 3 13 in the attached EVO 2212 3012 2224 4024 Owner s Manual may be used to feed potential free contact closing signal from the BMS to Stop Charging or Stop Inverting Refer to Section 4 4 2 22 2 for details ATTENTIONS Le système de gestion de la batterie BMS fourni avec le type de batterie au lithium ion utilisé doit pouvoir contrôler la charge et le déchargement de...

Page 43: ...K Default value is 12 0V for EVO 2212 3012 24 0V for EVO 2224 4024 For details of programming range procedure refer to Section 4 4 2 15 iii If the charger remains in the Float Stage for 10 days Lead Acid Flooded and sealed AGM Gel Cell ENSURE that there are no other DC load s on the batteries Load s on the battery may drain full or part of the charging current and will upset the Adaptive Time Algo...

Page 44: ... of programming range procedure refer to Section 4 4 2 15 iii If the charger remains in the Float Stage for 10 days Lead Acid Flooded and Sealed AGM Gel Cell Lithium See Section 5 11 EVO 2212 3012 2224 4024 Manual for details 4 3 2Stage Type1 1 Stage 1 Bulk Stage See Section 5 7 1 1 of the attached EVO 2212 3012 2224 4024 Manual for details Charge at constant current the programmed value of parame...

Page 45: ...ng range procedure refer to Section 4 4 2 2 2 Stage 2 Absorption Stage See Section 5 7 2 of the attached EVO 2212 3012 2224 4024 Manual for details Charge at constant voltage the programmed value for parameter ABSORP VOLTAGE Default value is 14 4V for EVO 2212 3012 and 28 8V for EVO 2224 4024 For details of programming range procedure refer to Section 4 4 2 2 Remain in Absorption Stage till the cu...

Page 46: ...f signals are normally used by the BMS for on off control of charging and inverting operation of the Inverter Charger Stop Charging Signal In case of i over voltage of individual cell overall battery pack or ii over temperature of individual cell or overall battery pack the signal will be enabled and SSR contacts will close Drain and Source Terminals will be shorted Stop Inverting Signal In case o...

Page 47: ...le of Screen No 1 of 19 Screens is shown below C H G R S T O P B Y B M S O U T P U T 1 2 0 0 0 V NOTE The 19 CHGR STOP BY BMS display screens shown in Fig 3 5 are the same as the 19 display screens shown for Menu Map for screens for Charging Mode Fig 3 2 Column 3 under heading GROUP 3 CHARGING MODE but with the 1st line replaced with CHGR STOP BY BMS EVO in Inverting Mode Inverting will stop Inter...

Page 48: ...VO have very high inrush current c When AC input power is restored during Battery low voltage fault condition Section 7 Srl 1 of Table 7 1 EVO will exit fault condition and change to Charging Mode say Condition 1 The AC input power may fail again within a short period of time and EVO will immediately revert back to Inverting Mode say Condition 2 During Condition 1 the battery voltage may not have ...

Page 49: ...r that recorded the time AC input was available Operating Condition 1 mentioned at Srl 5 above SAFE CHARGING Timer value has counted down to 0 min EVO will operate in Inverting Mode As the batteries were re charged for sizable time period the programmed time t of the SAFE CHARGING timer the battery would have charged appreciably higher than the BATT LOW VOLTAGE threshold Hence there is LESS likeli...

Page 50: ...nder Section 4 1 for Menu Map for navigating through various parameters under this Group No 2 TABLE 4 4 Programming Information for Parameter Group No 2 INPUT SETTING Parameter Setup Screen No for Parameter Group No 2 Fig 4 1 Parameter Setting range Default value EVO 2212 EVO 3012 EVO 2224 EVO 4024 EVO 2212 EVO 3012 EVO 2224 EVO 4024 1 DEFAULT FREQ 0 60Hz 1 50Hz 0 60Hz 2 GRIDMAXCURRENT 5 40A 5 70A...

Page 51: ...ses to a value of 1A more than the programmed value of GRID MAX CURRENT for 5 sec input over current protection will be activated based on option to either transfer to Inverting Mode or to shut down the EVO Refer to details of these 2 options under parameter INPUT OC PROTECT at Section 4 5 2 10 4 5 2 2 1 Programming Steps for Parameter GRID MAX CURRENT Enter Key Up Key Enter Key Up Key x 1 time En...

Page 52: ...e Section 4 3 1 ð H I G H C U T O F F 6 5 0 0 H z 4 5 2 5 HIGH RESET Table 4 4 Parameter Setup Screen No 5 This is the reset frequency at which the unit will revert to Charging Mode after it has switched over to Inverter Mode due to input frequency rising above HIGH CUT OFF 4 5 2 5 1 Programming Steps for Parameter HIGH RESET Enter Key Up Key Enter Key Up Key x 4 times Enter Key A N Y O P E R A T ...

Page 53: ...and iii high voltage limits TABLE 4 6 synchronization process is initiated to synchronize the frequency and phase of the Inverter Section with the incoming AC input voltage Details are given below a Parameter SYNC GRID set at Option 0 Fine Default This is the Default Setting This setting is applicable when Grid Inverter Generator is connected to AC Input Terminals marked GRID 4 5 6 in Fig 2 3 Sync...

Page 54: ...ramming options are available for this parameter i Option 1 Coarse Default option see Section 4 5 2 9 a below and ii Option 0 Fine see Section 4 5 2 9 b below When EVO is operating in Inverting Mode there is no AC input its output frequency will be equal to the frequency that has been selected by the programming parameter DEFAULT FREQ i e 60Hz Default or 50Hz See TABLE 4 4 and Section 4 5 2 1 When...

Page 55: ... I N P A S S WO R D 0 0 0 0 Password 8052 See Section 4 3 1 ð S Y N C G E N 1 C o a r s e 4 5 2 10 INPUT OC PROTECT Table 4 4 Parameter Setup Screen No 10 If the net AC input current is 1A more than the value of GRID MAX CURRENT See Section 4 5 2 2 or GEN MAX CURRENT See Section 4 5 2 3 for 1 sec the AC side charging current is clawed back to ensure that GRID MAX CURRENT GEN MAX CURRENT value is n...

Page 56: ...nder this option the unit will initially start in Inverting Mode synchronize with the AC input and then transfer to Charging Mode However if a user programs the value of BATTERY LOW VOLTAGE very close to the Battery ultra low voltage fault threshold of 9V for 1 ms for EVO 2212 3012 or 18V for 1 ms for EVO 2224 4024 Section 7 Table 7 1 Srl 2 a larger load larger starting surge on the inverter may d...

Page 57: ...6 2 4 or CUT OFF VOLT3 Section 4 6 2 6 4 6 2 1 1 Programming Steps for Parameter RESET VOLTAGE Enter Key Up Key x 2 times Enter Key Enter Key A N Y O P E R A T I N G M O D E S C R E E N ð S E L E C T G R O U P C H A R G E C U R V E ð S E L E C T G R O U P I N P U T L OW L I M I T ð R E S E T V O L T A G E 1 0 5 0 V ð K E Y I N P A S S WO R D 0 0 0 0 Password 8052 See Section 4 3 1 ð R E S E T V O ...

Page 58: ...or Parameter DETECT TIME 2 Enter Key Up Key x 2 times Enter Key Up Key x 4 times Enter Key A N Y O P E R A T I N G M O D E S C R E E N ð S E L E C T G R O U P C H A R G E C U R V E ð S E L E C T G R O U P I N P U T L OW L I M I T ð R E S E T V O L T A G E 1 0 5 0 V ð D E T E C T T I M E 2 6 0 c y c l e ð K E Y I N P A S S WO R D 0 0 0 0 Password 8052 See Section 4 3 1 ð D E T E C T T I M E 2 0 6 0...

Page 59: ...0 0V 5 DETECT TIME 2 0 2000 cycles 15 cycles 6 CUT OFF VOLT 3 120 0 150 0V 145 0V 7 DETECT TIME 3 0 2000 cycles 1 cycle 4 7 2 Description of Parameters Under Group 4 INPUT HIGH LIMIT i INFO The values shown under various screens are the Default Values for EVO 2212 4 7 2 1 RESET VOLTAGE Table 4 6 Parameter Setup Screen No 1 This is the reset voltage at which the unit will revert to Charging Mode af...

Page 60: ...imes Enter Key Up Key x 3 times Enter Key A N Y O P E R A T I N G M O D E S C R E E N ð S E L E C T G R O U P C H A R G E C U R V E ð S E L E C T G R O U P I N P U T L OW L I M I T ð R E S E T V O L T A G E 1 2 5 0 V ð C U T O F F V O L T 2 1 4 0 0 V ð K E Y I N P A S S WO R D 0 0 0 0 Password 8052 See Section 4 3 1 ð C U T O F F V O L T 2 1 4 0 0 V 4 7 2 5 DETECT TIME 2 Table 4 6 Parameter Setup ...

Page 61: ...TION Refer to Fig 4 2 under Section 4 1 for Menu Map for navigating through various parameters under this Group 5 TABLE 4 7 GROUP 5 PARAMETER SET UP OTHER FUNCTIONS Parameter Setup Screen No for Parameter Group No 5 Fig 4 2 Parameter Setting range Default value EVO 2212 EVO 3012 EVO 2224 EVO 4024 EVO 2212 EVO 3012 EVO 2224 EVO 4024 1 POWER SAVING 1 Enable 0 Disable 0 Disable 2 ENTER POINT 4 50W 6W...

Page 62: ...ter Key Up Key x 1 time Enter Key A N Y O P E R A T I N G M O D E S C R E E N ð S E L E C T G R O U P C H A R G E C U R V E ð S E L E C T G R O U P O T H E R F U N C T I O N ð P OW E R S A V I N G 0 D i s a b l e ð E N T E R P O I N T 6 W EVO 2212 2224 6W EVO 3012 4024 8W ð K E Y I N P A S S WO R D 0 0 0 0 Password 8052 See Section 4 3 1 ð E N T E R P O I N T 0 6 W 4 8 2 3 WAKE UP POINT Table 4 7 ...

Page 63: ...2 1 in the attached Owner s Manual for EVO 2212 3012 2224 4024 The Default Setting is Button Type If parameter REMOTE SWITCH is set to option 1 Switch the normal On Off operation of EVO using the front panel On Off Button Section 3 2 will be disrupted i e EVO will remain on as long as the On Off Button is kept pressed and will switch Off when the Button is released See logic diagram for Option 1 S...

Page 64: ...al States Options 0 and 1 a Option 0 Charger Other When the EVO Inverter Charger is in Charging Mode the Status Relay will be OFF de energized i Common and NO contacts will be in open condition and ii Common and NC contacts will be in closed condition In Other operating modes i e in Inverting Power Save or in Standby Modes the Status Relay will be ON energized i Common and NO contacts will close a...

Page 65: ...to 4 8 2 5 2 3 the Status Relay will be switched OFF de energized its Common and NO contacts will open and the external Generator Auto Start Control Control Module will initiate automatic stopping of the Generator When AC output of the generator is shut down the EVO will automatically transfer the AC load s to the Inverter Section within 16 ms Options 2 3 and 4 of Parameter RELAY FUNCTION related ...

Page 66: ...f the Generator When AC output voltage from the Generator switches off the EVO will change over to Inverting Mode 4 8 2 5 2 2 Option 3 Generator 1 This option will start the Generator at LOW VOLT ALARM Section 4 4 2 8 and stop the Generator when the batteries are charged to the desired programmed level of RESET VOLTAGE Section 4 4 2 7 and stay at this desired level of voltage or higher for the des...

Page 67: ...n switched OFF de energized and Generator is stopped will be indeterminate 4 8 2 5 3 Programming Steps for Parameter RELAY FUNCTION Enter Key Up Key x 4 times Enter Key Up Key x 4 times Enter Key A N Y O P E R A T I N G M O D E S C R E E N ð S E L E C T G R O U P C H A R G E C U R V E ð S E L E C T G R O U P O T H E R F U N C T I O N ð P OW E R S A V I N G 0 D i s a b l e ð R E L A Y F U N C T I O...

Page 68: ...Steps for Parameter DATALOG TIME Enter Key Up Key x 4 times Enter Key Up Key x 9 times Enter Key A N Y O P E R A T I N G M O D E S C R E E N ð S E L E C T G R O U P C H A R G E C U R V E ð S E L E C T G R O U P O T H E R F U N C T I O N ð P OW E R S A V I N G 0 D i s a b l e ð D A T A L O G T I M E 1 1 s e c ð K E Y I N P A S S WO R D 0 0 0 0 Password 8052 See Section 4 3 1 ð D A T A L O G T I M E...

Page 69: ... Y Y MM D D H H MM i INFO Time can be programmed from Year 2000 to 2099 only Month can be programmed from 01 to 12 only Day can be programmed from 01 to 31 only Hour can be programmed from 00 to 24 only Minute can be programmed from 00 to 60 only If the numbers Entered for Month Day Hour and Minute are not within the above ranges message OUT OF RANGE will be displayed and the display screen will g...

Page 70: ...on NOTES 1 Data logging records status of various operating parameters and events with respect to its internal Real Time Clock RTC It is therefore recommended that before starting data logging the current date and time should be set if not set already using programming Parameter TIME SETTING Section 4 9 2 In the factory default condition data logging has been enabled at 1 sec recording interval Pa...

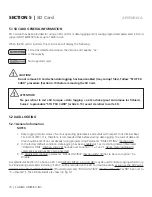
Page 71: ... be carried out automatically as soon as the SD Card is inserted in the SD Card Slot of EVO RC Provided parameter DATALOG TIME Section 4 8 2 10 has NOT been set to 0 Disable Operating screens are shown below F I L E C R E A T I N G Datalogfunctionhasbeeninitiatedandnewfileisbeingcreated Do not remove the SD card when file creating is displayed S D C A R D R E A D E R R O R Read error the data log ...

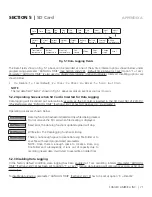
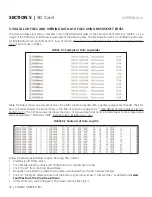
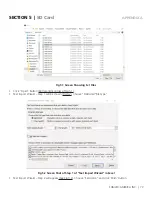
Page 72: ...Inverter Model the Second Row is the title of columns separate by See details of data fields at Fig 5 1 Section 5 2 1 The 3rd Row onwards shows the status of various data fields at time interval equal to the programmed value of parameter DATALOG TIME Section 4 8 2 10 Default is 1 sec TABLE 5 2 Contents of Data Log File Follow procedure given below to open Data Log Files in Excel Start Microsoft Of...

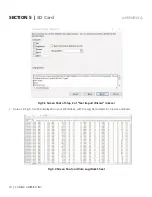
Page 73: ...tton Bottom right corner of Fig 5 1 Text Import Wizard Step 1 will be shown Fig 5 2 Choose Delimited File Type Fig 5 2 Screen Shot of Step 1 of Text Import Wizard in Excel Text Import Wizard Step 2 will appear See Fig 5 3 Choose Semicolon and click Finish button SECTION 5 SD Card ...

Page 74: ...DIX A SECTION 5 SD Card Fig 5 3 Screen Shot of Step 2 of Text Import Wizard in Excel Data as in Fig 5 4 will be displayed on your Worksheet with the Log Data stored in Columns and Rows Fig 5 4 Screen Shot and Data Log Work Sheet ...

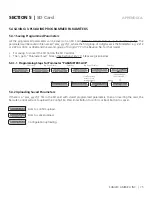
Page 75: ...R A T I N G M O D E S C R E E N ð S E L E C T G R O U P C H A R G E C U R V E ð S E L E C T G R O U P O T H E R F U N C T I O N ð P OW E R S A V I N G 0 D i s a b l e ð P A R A M E T E R S A V E 0 N o ð K E Y I N P A S S WO R D 0 0 0 0 Password 8052 See Section 4 3 1 P A R A M E T E R S A V E 0 N o ï S A V E D F I L E E N D ï P A R A M E T E R S A V E 1 Y e s ï P A R A M E T E R S A V E 0 N o 5 4 ...

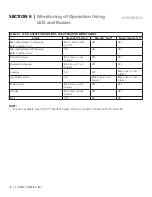
Page 76: ...Normal charging Blink once in 1 sec interval OFF OFF Equalization charging Blink twice in 1 sec interval OFF OFF Inverting ON OFF Beep once in 3 sec interval Low battery alarm ON Blink once in 1 sec interval Beep once in 1 sec interval Power saving Blink once in 3 sec interval OFF OFF Standby Blink once in 5 sec interval OFF OFF Fault OFF ON ON NOTE 1 Buzzer is available only in EVO Inverter Charg...

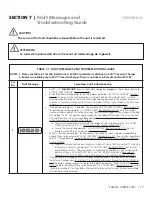
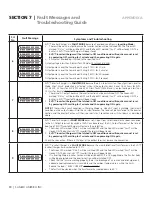
Page 77: ...een LED marked Status will switch OFF and the buzzer in EVO will now beep steady The unit will get locked in this condition and will be required to be switched off as follows o o The unit will automatically switch off after expiry of time set by parameter LV CUT OFF TIME See Section 4 4 2 11 LCD Display LED Buzzer will be OFF or o o In case the time set by parameter LV CUT OFF TIME See Section 4 4...

Page 78: ...d by external charger connected directly to the batteries or through the External Charger Input 3 4 in Fig 2 1 in the attached EVO Owner s Manual and the battery voltage recovers to the set threshold of parameter RESET VOLTAGE Section 4 4 2 7 before the expiry of time set by parameter LV CUT OFF TIME Section 4 4 2 11 while in Battery ultra low voltage fault condition the Inverter Section will rest...

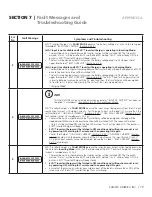
Page 79: ...put source Input current Charging Current Pass Through Current to the load is 1A more than the set threshold of GRID MAX CURRENT Section 4 5 2 2 GEN MAX CURRENT Section 4 5 2 3 for 5 seconds current is sampled every 33 3 µs There will be no AC output because the Transfer Relay will be de energized charging will be stopped and PWM drive to the Inverter Section will be switched OFF The Green LED mar...

Page 80: ...n OFF condition and will require manual reset by powering OFF waiting for 1 minute and then powering ON again NOTE If there is short circuit condition in Charging Mode i e when AC input is available short circuit condition on the output side will trip the AC input breaker The load will be transferred to the Inverter Section and the Inverter Section will then see short circuit condition and will sh...

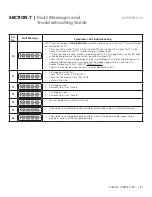
Page 81: ...vailable and the ambient temperature is within the limits Reduce the load and BULK CURRENT Section 4 4 2 1 The fault will be cleared when the heat sink has cooled down to 40 C 11 S D c a r d u n u s a b l e Data logging will not start Check that the format is FAT16 FAT32 Check that the capacity is less than 16 GB Re format the card 12 S D c a r d r e a d e r r o r Data logging stops Remove and re ...

Page 82: ...O 4024E DISPLAY LCD DISPLAY 2 Rows 16 Character each Alpha Numeric LCD Display LED INDICATORS Green Status Red Fault Alarm INPUT OUTPUT CONNECTION CABLE SET RJ 45 Data Cable Straight Wired 10 Meters 33 ft ENVIRONMENT OPERATING TEMPERATURE RANGE 20 C to 60 C DIMENSIONS W X H X D MM 144 x 114 x 35 4 W X H X D INCHES 5 6 x 4 5 x 1 4 WEIGHT WEIGHT WITHOUT CABLE 0 2 kg 0 4 lb WEIGHT WITH CABLES 0 5 kg ...

Page 83: ... number that has been altered removed or modified in any way There is no warranty for defects or damages to equipment or parts caused by Installation alternation inspection or removal Normal wear and tear Abuse or misuse of the equipment including exposure to excessive heat salt or fresh water spray or water immersion Corrosion fire lightening biological infestations or Acts of God Repairs attempt...

Page 84: ...84 SAMLEX AMERICA INC APPENDIX A NOTES ...

Page 85: ...SAMLEX AMERICA INC 85 APPENDIX A NOTES ...

Page 86: ...l Free Numbers Ph 1 800 561 5885 Fax 1 888 814 5210 Local Numbers Ph 604 525 3836 Fax 604 525 5221 Website www samlexamerica com USA Shipping Warehouses Kent WA Plymouth MI Canadian Shipping Warehouse Delta BC Email purchase orders to orders samlexamerica com ...

Reviews: