Maintenance and troubleshooting
User’s manual — 2900453/2
9
EN
•
Risk of skin irritation and chemical burns from contact with the
wash water:
the water contains dissolved industrial detergent
.
⇒
Wear waterproof rubber gloves when you have to put your
hands in the tank (emptying the tank) or when you have to
handle the detergent or rinse aid bottles.
⇒
Wash your hands immediately if they come into contact with
the wash water.
4.2
Machine maintenance
4.2.1
Maintenance plan
4.2.2
Daily drainage of the machine
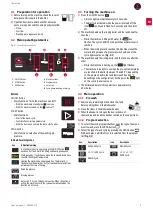
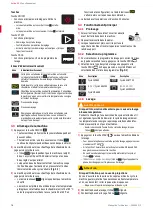
[Neutral models]
1)
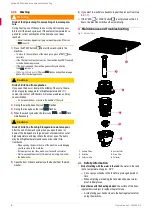
Open the door and remove the surface filter [
/1]
2)
Disconnect the overflow [
/2].
⇒
The water in the tank is drained by gravity.
3)
When the tank is fully drained, press the
ON/OFF
button
to
switch off the machine.
[Models with drain pump]
1)
Open the door and remove the surface filter [
/1]
2)
Disconnect the overflow [
/2].
3)
Press the
PROG
button
to choose the drainage option
.
4)
Press the START button
.
a)
The machine stops heating the elements.
b)
The drain pump drains the water from the tank according to the time
pre-set by model.
c)
The machine switches off automatically at the end of the drainage
cycle.
4.2.3
Daily cleaning of the machine
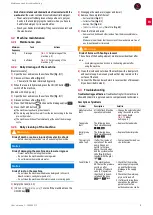
1)
Empty the tank (
).
2)
[Models without drain pump]
To turn off the machine Press the
ON/OFF
key
.
3)
Disengage the wash arms (upper and lower).
4)
Remove the complete filter set:
– Surface filters [
/1]
– Collector filter [
/3]
– Suction filter [
/4]
–
[Models with drain pump]
Drain filter [
/5]
5)
Clean the filters and arms:
– Remove food debris and other residue from the disassembled ele
-
ments.
– Make sure in particular that the nozzles of the wash arms are free of
any impurities and/or limescale.
6)
Clean the inside and outside of the machine with a damp cloth
and neutral soap. Remove any residue that may remain on the
surface of the tank.
7)
Connect the filters and wash arms in reverse order of disassem
-
4.3
Troubleshooting
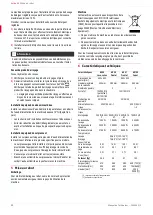
Troubleshooting qualification:
Troubleshooting for this machine is
allowed by
Sammic
-approved service companies and technicians.
Description of problems
Minimum
frequency
Task
Actions
Daily
Drainage
Daily
Self clean
⚠
Warning
Risk of death or serious injuries from electric shock
– Before cleaning the machine, turn off and unplug the machine.
Notice
Risk of damaging the machine due to water ingress
– Prevent water from entering the machine.
– Do not clean the machine under running water.
– Do not immerse the machine in water.
Notice
Risk of rust on the machine
– Do not clean the machine with abrasive detergents (nitric acid,
bleach, solvents, sandy detergents, etc.).
– Do not clean the machine with metal scrapers or scouring pads.
⚠
Warning
Risk of burns with heating element
The surface of the heating element maintains residual heat after
use.
– Avoid placing your hands close to the heating element after
using the machine.
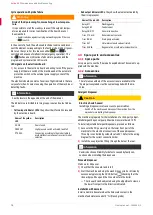
Problem
Description
Solution
Model selection
fault
All LEDs flash. Machine
operation is blocked.
⇒
Change the selected model
using the switches on the
electronics board.
Tank probe
fault
The following icons
flash simultaneously:
, ,
⇒
Replace the tank probe.
Boiler probe
fault
The following icons
flash simultaneously:
, ,
⇒
Replace the boiler probe.
Thermal lock
mode fault
If after 15
minutes of
operation of the wash
pump, it does not
switch to the rinse
phase, the cycle stops
and the cycle selection
LEDs [
/b] flash
together with the pilot
light .
⇒
Contact an authorised ser
-
vice technician.
Tank fill fault
If the machine does
NOT detect the pressure
switch on after
5
minutes of solenoid
valve (SV) operation,
then the SV is deacti
-
vated and the icons
and
flash.
1
Check that the machine
water supply stopcock is
on and that there is no
blockage in the supply
hose.
2
Check that the water sup
-
ply is not turned off.
3
If, after performing these
operations, the problem
persists, contact an
authorised service centre.
Summary of Contents for AX-50
Page 12: ...Active AX Technical specifications 12 User s manual 2900453 2...
Page 36: ...Active AX 36 Manual de usuario 2900453 2...
Page 37: ...Active AX 12 2900453 2...
Page 41: ...Active AX 8 2900453 2 4 5 6 3 4 1 1 PROG START 2 5 4 3 4 1 60 1 4 2 5 3 6 1 2 3 4 5 6...
Page 47: ......
Page 48: ...10 22 2900453 2 ER 0437 1 96 AX 40 AX 50 AX 100 ACTIVE AR...


