background image


Operator's manual 

Tractor sweeper 

MOP 


- 19 - 

6.3.  

Hydraulic emptying of container for impurities 

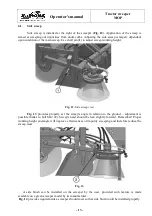
Sweeper  can  be  equipped  with  either  manual  or  hydraulic 

system  of  emptying  the  container.  In  case  of  the  hydraulic  one, 
cylinder  is  mounted  on  the  left  side  of  the  sweeper  (Fig. 23)  on 
specially prepared extension arm (1) and  
handle mounted directly to the container's side wall (2). Operating 
with hydraulic emptying is possible on condition, that the tractor's 
hydraulic  installation  features  an  additional  pair  of  EURO  type 
hydraulic connectors.  


Fig. 23.  


A hydraulic discharge unit can be installed on the sweeper by the user, provided such feature 

is made available on a  given sweeper model by its manufacturer.  Fig. 24  provides requirements  a 
sweeper should meet so that a hydraulic discharge unit could be installed properly. 


Fig. 24. Hydraulic discharge unit mounting points – requirements: 1 - pin 

20 for hydraulic cylinder 

installation, 2 - two holes 

11 for tightening hopper arm, 3 - hole for cotter pin 

6.3x71, 4 - hole for bolt 

M8 for tightening mounting bracket for the cylinder hydraulic hoses.


Before  approaching  the  installation,  prepare  any  tools  necessary  for  this  task  to  provide  a 

problem-free installation of the hydraulic discharge unit on the sweeper: 


two flat wrenches, possibly: flat wrench and ring/socket wrench, size: 13, 17; 


flat wrench: 19; 


outer snap ring pliers. 

All footnotes regarding assembly parts are in reference to items in  Table-7 of the sweeper's 

parts catalogue. 


Summary of Contents for MOP 120K

Page 1: ...ystok ul Trawiasta 15 Established 1984 tel 48 664 70 31 fax 48 85 664 70 41 e mail samasz samasz pl www samasz pl OPERATOR S MANUAL TRACTOR SWEEPER MOP 120K MOP 140 MOP 160 MOP 200 IN122EN004 27 03 2...

Page 2: ...weeps NOTE Prior service works turn tractor s drive off and take ignition key out NOTE Operating sweeper without previous familiarizing with its contents as well as by unauthorized personnel particula...

Page 3: ...NG AND OPERATING 9 5 1 Dismounting container for impurities 10 5 2 Adapting sweeper to sweep up impurities to the left or to the right 11 5 3 Replacing sweeps 11 6 OPTIONAL EQUIPMENT 12 6 1 Side sweep...

Page 4: ...re I bar code NOTE For more detailed information on the sweeper ask the manufacturer or your dealer 2 INTRODUCTION General information Prior to operating the sweeper its user must familiarize himself...

Page 5: ...Tractor class 06 09 09 3 point linkage category I II II Sweeping width mm 1200 1400 1600 2000 Sweep rears rpm 140 160 Sweep diameter mm 600 Number of sweeps pcs 15 16 13 14 17 19 15 16 19 20 18 19 24...

Page 6: ...mbly 4 hydraulic drive 5 extension arm with traction wheel 2 pcs 6 3 point linkage Cat 2 7 support 8 optionally hydraulic emptying of container or manual latch with link 9 side sweep arm 10 water spri...

Page 7: ...ons who are unauthorized unskilled ill drunk or under influence of drugs and children in particular Conveying persons animals or wares on the machine is forbidden NOTE Any sweeper service and repair w...

Page 8: ...ive lights mounted in such manner Design of sweeper enables portable lighting devices to be mounted and also warning and other plates into normalized catches designed for this purpose NOTE 1 Lighting...

Page 9: ...ith engine on Residual risk assessment Keep the following recommendations learn operator s manual thoroughly do not remain between sweeper and tractor with engine in motion maintenance and repair of t...

Page 10: ...er from shifting when transported use wedges and transport belts Standard dispatch kit comprises sweeper operator s manual parts catalogue declaration of conformity EC warranty card 4 4 Warning decals...

Page 11: ...ce surface to be cleaned examine whether sweep rotates in the right direction the same as arrow direction Fig 5 with rotating sweep lower the sweeper until it slightly touches the road surface immobil...

Page 12: ...ber guard Fig 8 c loosen bolts M12 Fig 9 and slide down the container along with linkage from sweeper s catches d install rubber guard on the sweeper with use of grip bar and bolt M10 see item a Fig 7...

Page 13: ...d at the sweeper Sweeper can be rotated thanks to adjustment bar item 10 Fig 10 Max rotation angle for the sweeper either to the right or to the left from position 0 is 12 Fig 8 Fig 10 Fig 11 5 3 Repl...

Page 14: ...t taking steps provided in items 5 1 in the reverse order 7 Prepare the sweeper for operation in accordance with item Servicing and operating 6 OPTIONAL EQUIPMENT Sweeper can have optional equipment a...

Page 15: ...iew Fig 13 provides properly set the sweep s angle in relation to the ground adjustment is possible thanks to bolt M12 2 Sweep s head should be lean slightly forward Remember Proper working height and...

Page 16: ...tall a side brush set the sweeper on an even paved ground and then proceed as follows on Fig 15 1 Dismount the original mounting bracket of the container on the left and install left bracket of the co...

Page 17: ...the sweeper equipment Dismount and replace hydraulic plug to the new supply hose Fig 15 Sequence of operations when installing the side brush Prior to operation commencement Grease lubrication points...

Page 18: ...weep also a fifth nozzle to be installed on side sweep base rod Electrical installation is powered by 12V DC current and terminated with trailer plug 7PIN Pump controlling on off is performed by opera...

Page 19: ...arts catalogue Before approaching the installation prepare any tools necessary for this task to provide a problem free installation of the water spray system on the sweeper s body Two flat wrenches po...

Page 20: ...hen slide the hose onto the ending Secure the hose from being retracted by tightening the clamp on the coupling use the screwdriver Fig 21 4 For installing the set on the sweeper with the side brush m...

Page 21: ...is made available on a given sweeper model by its manufacturer Fig 24 provides requirements a sweeper should meet so that a hydraulic discharge unit could be installed properly Fig 24 Hydraulic discha...

Page 22: ...n set it 1 secure with snap ring Z20 it 10 8 Install the cylinder eye at piston side in the hopper arm it 2 using cylinder pin II it 3 and protecting it with snap ring it 10 9 Secure the hopper pivot...

Page 23: ...ct Solution Lowe effectiveness of sweeping Worn sweeps Replace sweeps Uneven wearing of sweep Replace damaged sweeps Deposition of impurities on sweeps Clean sweeps Container excessively filled with i...

Page 24: ...ngevity of the sweeper is generally dependant upon operator s skills immediate removing even the most minor defects and proper maintenance Therefore each time upon completed operation follow the above...

Page 25: ...o cause any environment pollution 4 Rubber parts should be gathered separately to be further utilized NOTE Parts gathered as a result of withdrawal from use or dismounting should be protected from acc...

Page 26: ...anufacturer determines that the product being subject to claim is defect free and what is confirmed by a further expertise 7 The Manufacturer has the right to cancel the warranty in the following case...

Page 27: ...ual Tractor sweeper MOP 25 12 2 Warranty repairs record Repairs scope and spare parts replaced Date stamp and signature of repair shop Date stamp and signature of repair shop Date stamp and signature...

Reviews: