Operator's manual
Tractor sweeper
MOP
- 9 -
NOTE:
a)
all warning decals (labels) should be clean and legible,
b)
lost or damaged decals (labels) must be replaced with new ones,
c)
new decals (labels) may be ordered at the manufacturer,
5.
SERVICING AND OPERATING
Prior to operation commencement:
visually assess condition of sweeper, and if any defects are found have repair immediately,
mount the sweeper onto 3-point linkage frame,
connect hydraulic hoses from the sweeper to tractor's hydraulic assembly keeping order for
hoses with red marking POWER, hose with yellow/green marking OUTFLOW,
lift the sweeper up so that sweeps do not touch the road surface; move support into up position,
the same applies to traction system,
with use of central link, being part of tractor's equipment, set the sweeper parallel to the road
surface (surface to be cleaned),
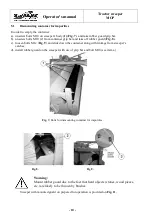
examine whether sweep rotates in the right direction (the same as arrow direction Fig. 5),
with rotating sweep lower the sweeper until it slightly touches the road surface,
immobilize sweeps and lower traction system,
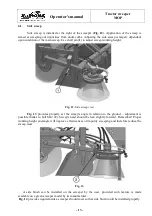
using guides, on which container is mounted and Roman screw of latch, set the container
parallel to the ground 5 to 7 cm high, keeping the same distance between the sweep and
container's edge (Fig. 6); pressure of sweeps onto the surface provides proper impurity removal;
it is improved thanks to shifting the traction system up and down.
NOTE:
Too big a sweep pressure onto the surface will lead to their premature
wearing.
In order to empty the container:
lift the sweeper up for about 30 cm and pull the link,
when driving the tractor forward slowly lower the sweeper on the ground and the container will
be closed automatically.
Prior to dismounting the sweeper from the tractor lower both support and traction system to low
position and disconnect hydraulic hoses.
Fig. 5.
Fig. 6.


