SaMASZ DUO 740 Operator'S Manual Download Page 40


Operator's manual 

Two-rotor in-line rake  

DUO 680 
DUO 740 


- 38 - 


NOTE: 

A  warranty  card  without  the  required  information  or  with  corrected  or  illegible 
information – 

is invalid. 


11.


WARRANTY TERMS 


11.1.


Warranty claims procedures 

 
1.


The manufacturer guarantees its products against faults in materials or production. 


2.


Warranty period is for two years from the date of sale to the purchaser, stated above. 


3.


Any repair which is subject to warranty should be carried out by an authorised SaMASZ dealer. 
Upon completion of the repair, the dealer must submit a warranty claim within 14 days. 


4.


Warranty  claims  regarding  replacing  of  the  product  are  considered  if  received  within  14  days 
after it is completed by the manufacturer. 


5.


The following parts and situations are not covered by warranty: 

a)


wearing parts: rotors, intersecting axis gears and parts inside the gearboxes, bushings 
and sliding elements, clutches, joints, tine holders, raking tines, bearings, rubber-metal 
fenders, safety curtains, swath guides rubbers, connective elements, etc. 
These repairs may be done only at purchaser’s cost. 

b)


use for any other purpose than those described in the operator’s manual,


c)


operation on rocky fields and results such as: damaging and bending of tines 

d)


running into any obstacle, 

e)


too fast lowering of the machine to the ground, 

f)


setting raking tines lower than 0.4"


above the ground, 

g)


using  PTO  shaft  featuring  parameters  other  than  provided  by  the  shaft's 
manufacturer, or length not adjusted to operating tractor, 

h)


transport and accidental damage. 


6.


The  Purchaser  bears  the  costs  of  technical  evaluation  -  when  the  manufacturer  finds  that 
a claimed product is free of defects and a technical report confirms that. 


7.


The manufacturer has the right to cancel a warranty in the following cases: 

a)


interference of the interior of the rake, changes of its mechanical design or intentional 
damages, bending parts of the rake and so on, 

b)


damage  caused  by  accidents,  running  into  obstacles  or  other  events,  for  which 
the warrantor is not responsible, 

c)


use of different tines - not original SaMASZ tines, 

d)


negligent maintenance, 

e)


use of non-genuine spare or replacement parts that are not specifically designed for the 
model in question, 

f)


lack  of  needed  records  in  the  warranty  card  or  filling  in  the  warranty  card 
independently, 

g)


use of the rake not in accordance with operator’s manual or for incorrect purpose, or 
use of the machine by untrained persons. 


8.


Manufacturer  can  break  the  service  agreement  with  immediate  effect  when  the  user  does  not 
pay  the  invoice  according  to  that  agreement  in  a  timely  manner  and  the  delay  in  payment  is 
longer than 30 days from maturity date. Breaking the service agreement caused by the user also 
invalidates the warranty. 


Summary of Contents for DUO 740

Page 1: ...1 Established 1984 NIP PL 966 159 29 76 tel 48 85 664 70 31 fax 48 85 664 70 41 e mail samasz samasz pl www samasz pl OPERATOR S MANUAL TWO ROTOR IN LINE RAKE DUO 680 DUO 740 IN306USA002 2017 08 28 E...

Page 2: ...WARNING Do not lift the rake before its working units have come to a complete standstill CAUTION Do not operate the rake when any person remains in the danger area of 170 NOTE Keep this manual for fut...

Page 3: ...r transportation on a large truck 22 5 5 Mounting PTO shaft 24 5 6 Moving from transport to working position 25 5 7 Preparing the rake for operation 25 5 8 Raking width adjustment 28 5 9 Operation 29...

Page 4: ...If the rake is used by another operator it should be in working condition and include this operator s manual and all other basic equipment Operator s manual is attached to every machine in order that...

Page 5: ...UO 680 DUO 740 Working width ft in 17 1 20 1 18 21 1 Rotor diameter ft in 10 2 10 6 Transport width max ft in 9 10 8 6 Transport width min ft in 5 11 8 6 Admissible transport speed 25 km h 15 mph Heig...

Page 6: ...s raking arms 8 3 Safety guards 13 reduce the risk of unwanted objects getting into the area of rotor arms operating The rake is equipped with adjustable swath guard both on front and rear raking asse...

Page 7: ...740 rakes Model Power Length Torque Symbol Clutch Manufacturer Remarks HP mm Nm DUO 680 DUO 740 35 4 3 6 1 620 8G7R130CEWR7001 unilateral Bondioli Pavesi Fig 4 PTO shaft lubrication points Mounting d...

Page 8: ...footwear safety gloves plus ear protection and dusk mask if necessary During use the machine may give rise to dust especially if the soil is dry You are advised to use a tractor with a cab fitted wit...

Page 9: ...and the levers that turn the hydraulics are in neutral position Never leave tractor s engine running without supervision Before you leave the tractor turn off the engine and remove the key from tract...

Page 10: ...specially on irregular surfaces or steep slopes The behavior of the tractor on the road such as its turning and braking capacities are affected by the implements mounted When driving on the road after...

Page 11: ...only PTO shafts recommended by rake s manufacturer with guards in good condition In order to operate safely use only undamaged PTO shafts and shields Damaged PTO shafts and shields must be repaired o...

Page 12: ...adjustments with the engine on 4 6 1 Danger of machine entanglement This risk occurs when 1 changing position of a rake 2 operating near rotating parts and 3 working without safety guards During oper...

Page 13: ...exceeds 80 dB 2 provide the operator with individual means of noise protection and supervise the correctness of its usage if the noise level in work place reaches or exceeds 85 dB 4 7 Safety labels a...

Page 14: ...ration of the hoist N 50 Do not get under the rake N 55 N 117 Avoid fluid escaping under pressure N 124 N 136 Raking height adjustment N 144 Description of hydraulic hoses N 145 Regulation of the spee...

Page 15: ...ile driving N 168 Do not touch the machine before the rotating parts have not come to a complete standstill N 183 Caution danger of leg drawing N 196 Recommended tire pressure rakes N 201 Admissible t...

Page 16: ...not working or damaged Replace protective cover if damaged 5 1 Attaching the rake to the tractor WARNING Only hitch and unhitch machine on a flat surface with compact dirt Keep everyone away from area...

Page 17: ...option is signaled with the corresponding diode 6 under the option To switch the work mode push button 5 on the controller until the corresponding diode 6 is lit Fig 9 Control panel ARDUO 1 controller...

Page 18: ...ard Fig 11 Setting the proper transport position of the rear rotor Lift rear swath guard Fig 12 For DUO 680 manually lift the swath guard until it has been locked in vertical position by pneumatic cyl...

Page 19: ...the rotations of the front rotor gear by means of locking assembly located by front rotor according to instructions in Fig 14 after firstly having folded the front guard Fig 15 Dismount the outer mos...

Page 20: ...o tractor located on carts cylinder s hose Location of valve is provided in Fig 16 Fig 16 Location of shut off valve on rake DUO 680 In the above case rake DUO 680 transport width is 9 10 Fig 17 and r...

Page 21: ...Operator s manual Two rotor in line rake DUO 680 DUO 740 19 Fig 17 Transport dimensions of rake DUO 680 Fig 18 Transport dimensions of rake DUO 740 9 10 9 10 9 10 8 10...

Page 22: ...ugh a narrow access road it is possible to reduce the transport width to 7 10 Therefore perform the following Unlock dismount and place raking arms in transport holder Fig 19 Fig 19 Raking arms in tra...

Page 23: ...rd The below Fig 22 shows dimensions of DUO 680 rake with raking arms dismounted and safety guards installed WARNING When transporting the rake do not exceed the speed of 25 km h 15 mph Otherwise the...

Page 24: ...g devices portable warning light plates to be mounted on both sides of rake top guard in their holders The panel consists of warning plate with combined lamp mounted parking stop lights and driving di...

Page 25: ...crew eight mounting bolts for both linkage segments supporting them with transport holders NOTE When dismounting the linkage use lifting devices to support both segments with use of transport holders...

Page 26: ...The PTO shaft must operate at the lowest possible angle This will ensure that both shaft and the machine last as long as possible CAUTION If need be shorten the PTO haft according to its operator s m...

Page 27: ...the ground Before the operation begins read operator s manuals of both the machine and PTO shaft 5 6 Moving from transport to working position WARNING Moving the rake to and from operating position fr...

Page 28: ...nders of carts NOTE Accidental falling of the machine may occur if the rake s lifting assembly is not tight When operating the rake being in transport position it is forbidden to walk under the machin...

Page 29: ...n Lower rear swath guard by pulling it downwards If need be set the distance between the rear guard and the rear rotor depending on the forage quantity Fig 30 Position of rear rotor in working positio...

Page 30: ...nt linkage links at such height H so that the front ground following wheel is on the ground and on the front drawbar cylinder there is a clearance which enables the front ground following function If...

Page 31: ...ansverse and length wise options Fig 33 and Fig 34 Fig 33 Transverse ground following Fig 34 Length wise round following WARNING When operating the machine do not try to overcome short and steep uneve...

Page 32: ...until the machine has been fully lifted Drive back or drive over the formed rows Operate single side controller for lowering until the machine has been fully lowered Set the controller in zero positio...

Page 33: ...ght and density of grass as well as other objects in the grass stones branches piles of soil In order to avoid clogging and jams operating speed should be adjusted to the mentioned conditions In case...

Page 34: ...off the tractor s ignition and remove the key Secure the tractor against free runaway Disconnect the rake s hydraulics from the tractor Dismount PTO shaft and place it on the shaft holder being the ra...

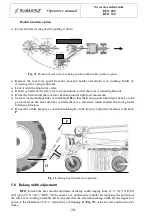
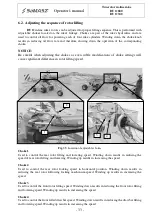
Page 35: ...ference in rotor lifting speed Fig 39 Location of adjustable chokes Choke 1 Used to control the rear rotor lifting and lowering speed Winding down results in reducing the speed of rear rotor lifting a...

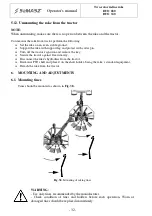
Page 36: ...ic hoses and electrical cables from the tractor and hang them onto corresponding holders on the 3 point linkage frame detach the rake from the tractor reverse procedure as in case of attaching the rak...

Page 37: ...level and if needed refill after having removed the vent A Fig 40 a on the top of the gear The oil level can be checked through check opening A on the side of the gear Please refill the oil until it i...

Page 38: ...ve shoes Use protective gloves too In case of a contact with skin immediately wash the infected area with plenty of soap water Do not allow the product to contaminate water outlets water courses and s...

Page 39: ...ce tines Too low rotation speed Increase rpm Incorrect working height Adjust working height according to section 5 6 Preparing the rake for work Excessive vibration during operation Damaged PTO shaft...

Page 40: ...st lowering of the machine to the ground f setting raking tines lower than 0 4 above the ground g using PTO shaft featuring parameters other than provided by the shaft s manufacturer or length not adj...

Page 41: ...your warranty rights NOTE The warranty card is valid only when it contains the following information address date and place of purchase rake type and invoice number 11 2 Warranty repairs record Repair...

Reviews: