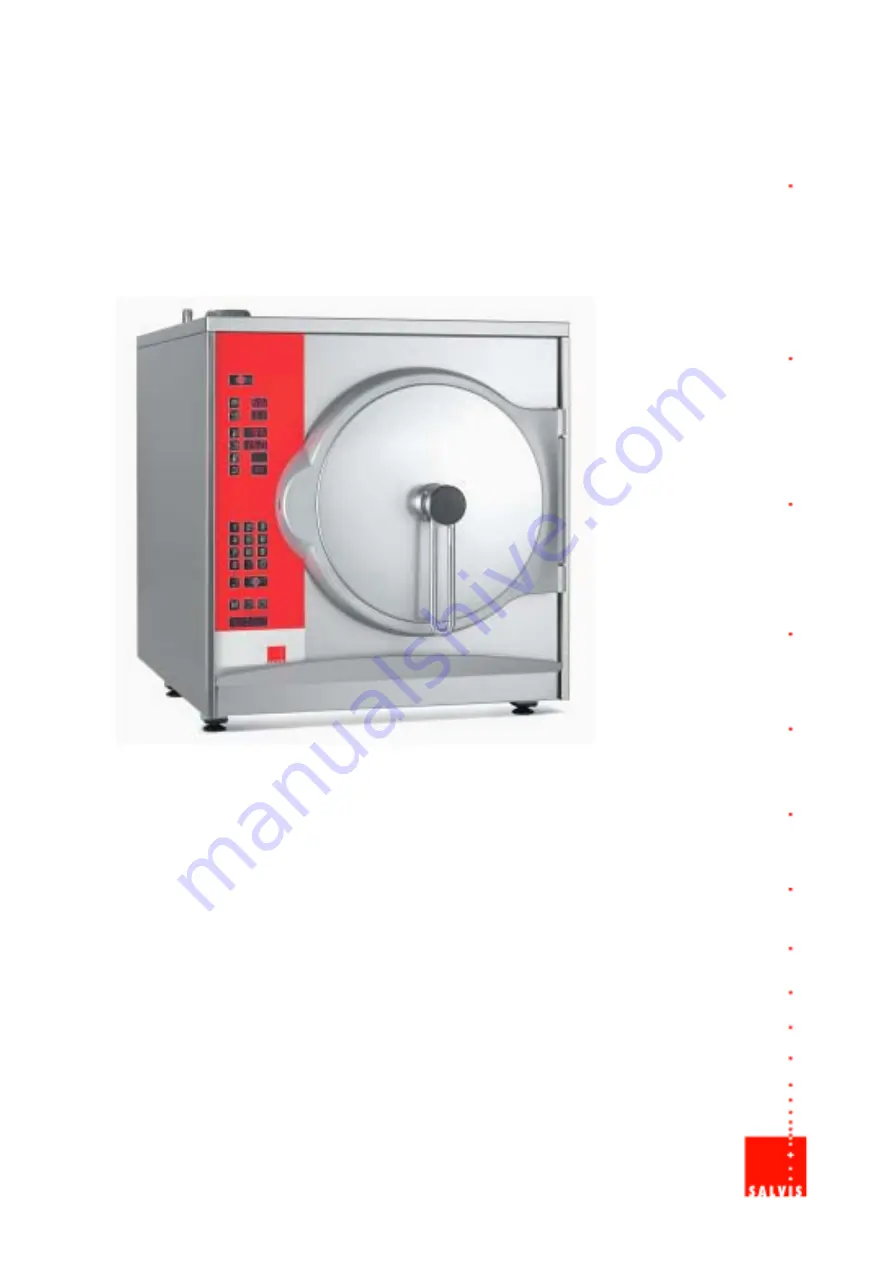
Steamer FS 1/1 P „Vitality“
12 kW15 kW
SALVIS AG
4663 Aarburg Switzerland www.salvis.ch
Installations- und Bedienungsanleitung
Instructions d’installation et mode d’emploi
Installation- and Operating Instruction
Page 1: ...amer FS 1 1 P Vitality 12 kW 15 kW SALVIS AG 4663 Aarburg Switzerland www salvis ch Installations und Bedienungsanleitung Instructions d installation et mode d emploi Installation and Operating Instruction ...
Page 2: ......
Page 3: ...nhinweise 11 6 2 Anforderungen an das Bedienpersonal 11 6 3 Beschicken 11 6 4 Betriebsbereitschaft Standby erstellen 11 6 5 Manuell Kochen 11 6 6 Kochen mit Programmen 11 6 7 Kochphasen abfragen löschen 11 6 8 Laden von Originalkochprogrammen 11 6 9 Programm abändern 11 6 10 Programm löschen 12 6 11 Neues Programm schreiben speichern 12 6 12 Kerntemperatur Regelung Option 12 6 13 Einstellen der St...
Page 4: ... gen und verhalten Sie sich in diesen Fällen besonders vorsichtig Geben Sie diese Warnungen auch an andere Benüt zer weiter Dieses Symbol finden Sie bei allen Ar beitsschritten die besonders zu beach ten sind damit Beschädigungen an den Geräten verhindert werden können Ge ben Sie auch diese Sicherheitshinweise an alle Gerätebenutzer weiter Dieses Symbol gibt Ihnen nützliche Tips und macht auf rich...
Page 5: ...s beim Öffnen der Kochkammer türe Verbrühungsgefahr Heisse Oberflächen im Bereich der Kochkammer und der Türe Verbrennungsgefahr Der Deckel des Wasserenthärters darf während dem Betrieb des Gerätes nicht geöffnet werden Zum Auffüllen des Regeneriersalzes beachten Sie bitte die Anweisung in Kapitel 6 14 Keine Manipulationen am Türverschluss Gerät steht unter Druck Am Drucksteamer dürfen nur ausgebi...
Page 6: ...ts vorsehen Allpolige Trennvorrichtung mit mind 3 mm Kontaktabstand Anschlusswerte Absicherung siehe 4 1 Eigene abgesicherte Zuleitung für jedes Gerät Gerät an Potential Ausgleich anschliessen Die Schraube befindet sich auf der linken Seite unter dem Gerät und ist mit folgendem Symbol gekennzeichnet Steckdose nahe am Gerät plazieren 4 Installation 4 1 Technische Daten 4 6 Anschluss Leistungsbegren...
Page 7: ... Anschluss Hartwasser Dampfablöschung an nicht aufbereitetes Netzwasser Kann auch an Weichwasser angeschlossen werden dann Anschluss über dieselbe Armaturengruppe mittels Tee Stück Wasserverbrauch total Ca 30 l h Hart und Weichwasser 4 8 1 Zubehör zu Wasserablauf Option 4 8 2 Zubehör zu Wasserzulauf Option Für Geräte mit integriertem Enthärter Anschlussgruppe komplett BI 172449 bestehend aus 1 Rüc...
Page 8: ...zung 6 Enthärter Salzeinfüllstutzen 7 Elektrischer Anschluss Pg 29 8 Elektrischer Anschluss Pg 21 9 Separates Steuerungskabel LBS 3 10 Sicherheitsventil Dampferzeuger 11 Kondensatablauf 3 4 4 9 1 Anschlüsse Detailmasse mit und ohne Enthärter min Wandabstand 70 29 5 126 74 150 120 85 50 19 152 107 133 83 278 130 min Seitenabstand Ausführung mit Enthärter Ausführung ohne Enthärter 2 1 11 3 4 5 7 8 1...
Page 9: ...ben Wie man den Wasserkredit einstellt wird in der Beschreibung im Servicehandbuch Einstellung des Regenerationsintervalls der Wasserenthärter be schrieben und ist ebenfalls jedem Gerät beigelegt siehe Dokument unten S a l z H a r z S a l z B e c h e r Drucksteamer FS 1 1 P Vitality Einstellung des Regenerationsintervalls der Wasserenthärter Es sind drei Enthärtertypen möglich Im Gerät eingebaut V...
Page 10: ...ngabe aller Werte und Funktionen Enter Taste Eingabebestätigung Programmspeicher Taste Tageszeit Taste Tageszeit Anzeige Anzeige Programmnummer Anzeige Kochphasen Aktuelle Phasen Belegte Phasen Anzeige Temperatur Anzeige Zeit Summer Anzeige Clear Taste Löschen Start Stop Taste Startzeitvorwahl Taste 24 Stunden Anzeige Tageszeit Startzeit Vorwahl Bedienungsfehler Funktionsfehler Kerntemperatur Wahl...
Page 11: ...rücken Das zuletzt eingegebene Programm wird angezeigt z B P drücken die Diode blinkt abwechslungsweise mit der Anzeige Gewünschte Programmnummer mit 10er Tastatur eingeben Bereits existierende Programmplätze siehe Programmregister drücken Das Programm wird angezeigt drücken Das Gerät startet Während des Betriebes können alle Werte verändert werden Diese müssen mit Taste oder bestätigt werden Die ...
Page 12: ...höht werden ist eine Temperaturdifferenz von mind 3 C notwendig 6 13 Einstellen der Startzeitvorwahl P Gewünschtes Kochprogramm eingeben drücken Diode blinkt letzte Eingabe erscheint drücken Diode blinkt Anzeige mit 10er Tastatur Zeit eingeben drücken zum Speichern drücken Anzeigen verlöschen Gerät startet selbständig Wenn das Kochprogramm beendet ist ertönt der Summer Durch Drücken der Taste werd...
Page 13: ...g Kühlhaus Temperaturüberwachung Gerätesteuerung vom zentralen Leitstand Frühwarn und Alarmsystem u s w Salvis Data Manager Voraussetzung Freigabe Schnittstelle RS232 und Anschluss auf PC über Konverterkabel Eigenschaften Verwaltung der Combi und Druck Steamer Programme auf dem PC Programme neu schreiben abändern sowie up und download zu den Geräten HACCP Protokolldrucker Voraussetzung Muss im Ser...
Page 14: ...e mit einem feinen Scotch Brite Schwamm reinigen bevor die Türdichtung wieder an der Türe angebracht wird 8 Unterhalt 8 1 Kundendienst Bei Störungsfällen am Drucksteamer kontaktieren Sie bitte Ihren regionalen SALVIS Vertreter oder wenden Sie sich bitte an den SALVIS Kundendienst in Aar burg Geben Sie bitte bei jeder Meldung an unsere Service stelle die Apparatenummer sowie den Typ an Sie finden d...
Page 15: ...2 6 Utilisation 23 6 1 Signalement des dangers 23 6 2 Exigences envers le personnel utilisateur 23 6 3 Chargement 23 6 4 Etablir la situation d attente Standby 23 6 5 Cuisson manuelle 23 6 6 Cuisson avec programme 23 6 7 Interrogation annulation des phases de cuisson 23 6 8 Chargement de programmes de cuisson originaux 23 6 9 Modification de programmes 23 6 10 Effacement de programmes 24 6 11 Ecri...
Page 16: ...escription des procédures qu il faut particulièrement observer pour éviter des dommages aux appareils Communiquez aussi ces aver tissements aux autres utilisateurs Ce symbole donne des conseils utiles et vous familiarise avec les démarches et comportements les plus adéquats En observant ces remarques vous pouvez contourner des difficultés et gagner du temps 2 Sécurité 2 1 Légende des remarques Dan...
Page 17: ...ure de la chambre de cuisson Danger de brûlures Surfaces chaudes dans la zone de la chambre de cuisson et de la porte Danger de brûlures Le couvercle de l adoucisseur d eau ne doit pas être ouvert durant le fonctionnement de l appareil Pour le remplissage de sels régénérateurs veuillez consulter le chapitre 6 14 du mode d emploi Ne pas manipuler la fermeture de la porte lorsque l appareil est sous...
Page 18: ...nv 1 5 m de câble sans fiche de connexion A prévoir dans le local d installation dispositif de coupure sur tous les pôles avec un écartement des contacts de 3 mm au minimum Données de raccordement fusibles de sécurité voir page 4 1 Conduite d alimentation sécurisée individuelle pour chaque appareil Relier l appareil à la compensation de potentiel La vis se trouve du côté gauche sous l appareil et ...
Page 19: ...eur Le branchement peut aussi se faire à l eau adoucie avec un té sur le même groupe de raccordement Consommation d eau maximum Env 30 l h eau adoucie et non adoucie 4 8 1 Accessoires pour évacuation d eau Option 1 min 5 cm 2 4 8 2 Accessoires pour alimentation d eau Option Pour appareils avec adoucisseur intégré Groupe de raccordement compl BI 172449 comprenant 1 Soupape de retenue 1 Vanne de réd...
Page 20: ...on sans adoucisseur Légende 1 Raccordement d eau 3 4 HW eau non adoucie 2 Eau adoucie 3 4 3 HACCP raccordement des intersections 4 Ligne d ordres LBS 2 und 3 5 Raccordement LBS limitation de puissance 6 Adoucisseur manchon de remplissage de sel 7 Raccordement électrique Pg 29 8 Raccordement électrique Pg 21 9 Câble de commande séparé LBS 3 10 Vanne de sécurité génerateur de vapeur 11 Raccordement ...
Page 21: ...te au chapitre 6 14 La manière de régler la réserve d eau est décrite dans le chapitre Réglage de l intervalle des régénérations de l adoucisseur d eau du manuel de service qui est également joint à chaque appareil voir document ci dessous S e l R é s i n e G o b e l e t à s e l Cuiseur à vapeur FS 1 1 P Vitality Réglage de l intervalle régénération de l adoucisseur Il y a 3 types d adoucisseurs I...
Page 22: ...che Entrée Confirmation de saisie Touche d enregistrement des programmes Touche de l heure Indication de l heure Affichage du numéro du pro gramme Affichage Phases de cuisson Phase actuelle Phases occupées Affichage de la température Affichage de la durée Affichage signal sonore Touche d annulation Annuller Touche de démarrage stop Début Fin de la cuisson Touche de programmation du démarrage 24 he...
Page 23: ...enregistré est affiché par exemple Presser P la diode clignote alternant avec l affichage Entrer le programme désiré au moyen du clavier à 10 touches Voir les emplacements de programmes déjà existants dans le registre des programmes Appuyer le programme s affiche Appuyer L appareil démarre Durant le fonctionnement toutes les valeurs peuvent être modifiées Celles ci doivent être confirmées avec ou ...
Page 24: ... après que la température sélectionnée a été atteinte il faut que la différence soit d au moins 3 C 6 13 Réglage de la minuterie de démarrage Entrer le programme désiré P Presser la diode clignote la dernière entrée s affiche Presser la diode clignote dans l affichage entrer le temps au moyen du clavier à 10 touches Presser pour confirmer Presser pour démarrer les affichages s éteindent l appareil...
Page 25: ...u en circuit ouvert Thermocouple sonde niveau court circuit Timeout niveau d eau Timeout pressostat Pressostat sécurité chambre à cuisson Problème contacteur chauffage Démarrage du processus de régénération selon l affichage pas obligatoire Presser P et sélectionner le programme Confirmer avec et presser Démarrage du processus de régénération selon l affichage obligatoire Le programme est déjà aff...
Page 26: ...la plaquette signalétique sur la paroi extérieure à l avant droit de l appareil vu de devant et ou sur le côté intérieur de l appareil à l avant gauche de la tôle intérieure 9 Documentation Selon les dispositions du droit d auteur cette docu mentation est notre propriété intellectuelle et ne peut être copiée que pour un propre usage La copie et même la reproduction d extraits sont soumises à une a...
Page 27: ...d displays 34 6 Operating 35 6 1 Warning notes 35 6 2 Requirements of operating personnel 35 6 3 Filling the appliance 35 6 4 Preparation for standby 35 6 5 Manual cooking 35 6 6 Cooking with a program 35 6 7 Displaying clearing cooking phases 35 6 8 Loading original cooking programs 35 6 9 Editing program 35 6 10 Clearing a program 36 6 11 Write and store new program 36 6 12 Control by core tempe...
Page 28: ...opriate ly trained and instructed persons who are familiar with all aspects of safety relating to this appliance Apart from the safety notes in these instructions the specific requirements for the prevention of accidents as well as the generally applicable rules for workpla ce safety must also be observed These installation and operating instructions must at all times be readily available where th...
Page 29: ...e lid of the water softener compartment during operation of the appliance For filling up regenerant salt refer to the directions in section 6 14 Do not interfere with the door closing mechanism when the appliance is in use as it is under pressure There is an danger if the door is not properly locked For this reason any repairs to this pressure steamer must only be carried out by appropriately trai...
Page 30: ...y essen tial Observe all the building and workplace regulations which apply in your area Heat absorbed latent 3500 kJ h sensible 5000 kJ H 4 5 Electrical connection Before connecting the device check the information provided on the type plate at the front of the right side panel when seen from the front of the appliance and or on the inside of the appliance at the front left on the interior panel ...
Page 31: ...ater connection steam condensation to non treated mains water Can also be connected to soft water Use same connecting set and install tee piece Water consumption max FS 1 1 P approx 30 l h hard and soft water 4 8 1 Water outlet accessoires optional 4 8 2 Water inlet accessoires optional For appliances with integrated water softener device Connection set compl BI 172449 comprising 1 check valve 1 p...
Page 32: ...on diagram 4 9 1 Connections detailed dimensions with or without water softener min clearance from the wall 70 29 5 126 74 150 120 85 50 19 152 107 133 83 278 130 min side clearance Model with water softener device Model without water softener device Legend 1 Water connection 3 4 HW hard water 2 Soft water 3 4 3 HACCP interface connection 4 Signal line overpower protection 2 and 3 5 Connection for...
Page 33: ...of how to set the water credit is provided in the service manual Setting the regeneration interval of the water softener such a description also accompanies every appliance see document below J u g c o n t a i n i n g s a l t S a l t R e s i n Pressure Steamer FS 1 1 P Vitality Adjustment of the regenerating intervals of the water softener There are 3 water softeners possible Integrated in the uni...
Page 34: ...ntry of all values and functions Enter key Confirmation of entry Program memory key Clock key Clock time display Program number display Cooking phase display Current phase Total of phases used Temperature display Time display Buzzer display Clear key delete Start Stop key Start time selection key 24 hours Display Clock time Preselection start time Operating Error Functional Error Core temperature ...
Page 35: ... with a program Press P The program last entered is displayed for example Press P LED blinks alternatingly with display Enter the desired program number on the numeric keyboard Consult the program register for already existing program slots Press to display the program Now press key The appliance starts up You can change any values as desired during operati on Confirm changes by pressing keys or T...
Page 36: ...ature after it is reached a temperature difference of at least 3 C is necessary 6 13 Setting the starting time preselection Enter the desired cooking program P Press LED blinks The last entry is displayed Press LED blinks The display shows Enter on the numeric keyboard Press to save your entry Press start All displays go out The appliance will automatically start at the set time When the cooking p...
Page 37: ...from central control area Early warning and alarm protection Salvis Data manager Precondition Interface RS232 activated in the appliance Connection to PC by means of an converter cable Features Management of all cooking programs for Combi Steamer and Steamer Recording of new pro grams as well as up and download to the appliances Journal printer HACCP The journal printer must be logged into the con...
Page 38: ...put the door seal back into place on the door 8 Service and repairs 8 1 Customer service Should your pressure steamer malfunction please contact your regional SALVIS dealer or SALVIS Customer Service in Aarburg When contacting our service personnel always quote the appliance number and appliance type This information appears on the type plate at the side panel front right when seen from the front ...
Page 39: ... 39 ...
Page 40: ... 40 Art Nr 1W 700 250 ...