background image

Operating Instructions

39 / 92

4

Cookbook

Cookbook

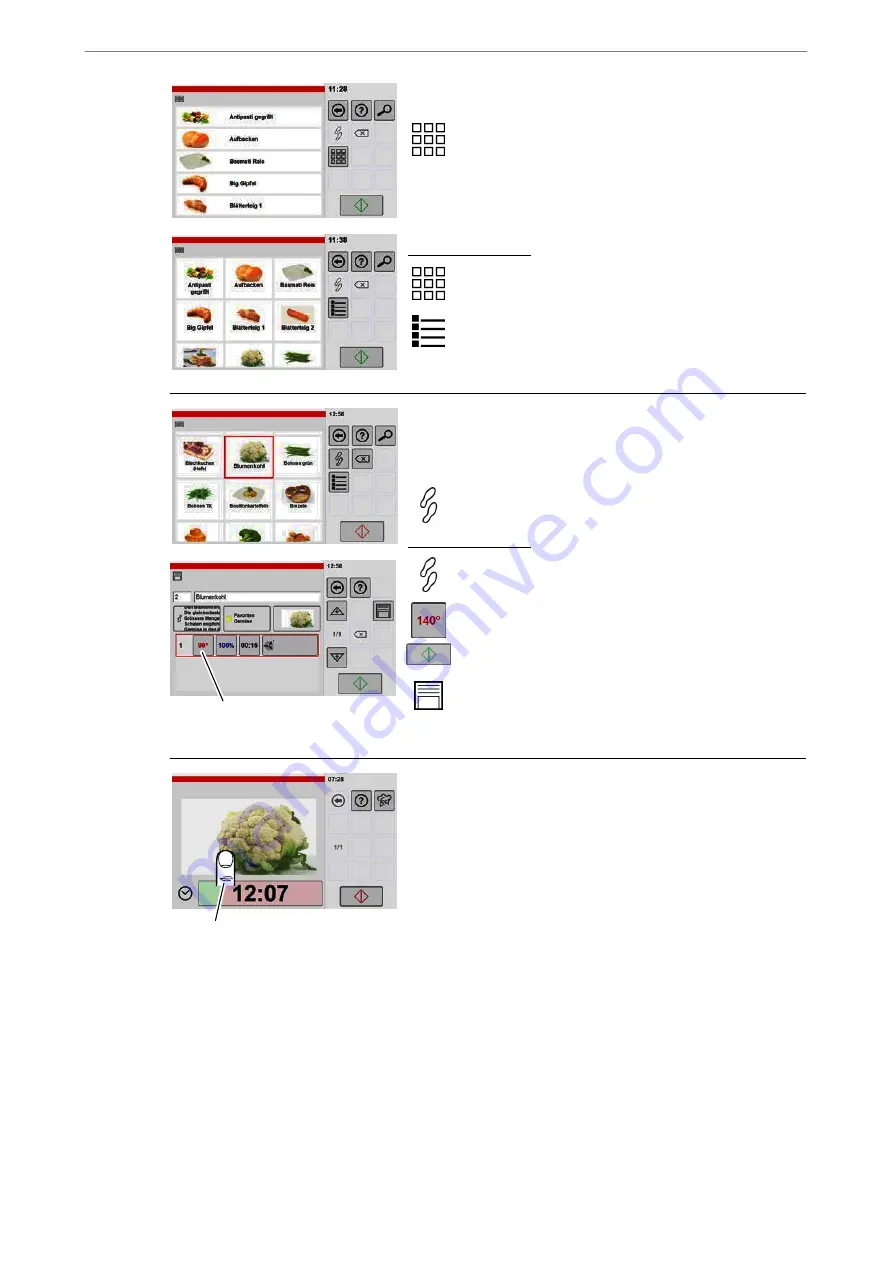
Switching the cookbook view

.

Tap the "Change view" key.

D

The display switches to pictogram view.

Key functions info:

Switching to pictogram view.

Switching to the list view.

5

Cookbook

Tap the value

Display/change of cooking steps in overview window

.

Tape the desired product.

D

The product is framed.

.

Tap the key "Cooking steps overview".

D

The "Cooking steps overview" window is displayed.

Key functions info:

Display of cooking steps overview.

D

Each value displayed can be changed by tapping it.

D

After the change has been made, the settings for the
current cooking process can be started.

D

If the settings are not stored in the cookbook, they
are no longer available after switching the appliance
off and on 

(Saving in cookbook, see page  42 Chap­

ter 7.1).

6

Changing settings during an active
cooking process: tap on the screen
to call up the "Settings" window for
approx. 5 seconds.

Cooking process window - Cooking process started

D

If preheating is enabled, after the preheating process
has expired the cooking process must be started by
loading or by pressing the key "Start/Stop".

D

If AQA is enabled, the quantity/cooking time is
automatically adjusted.

D

The remaining time is displayed.

D

The progress bar indicates the elapsed time graphi­
cally.

D

The cooking process can be interrupted by tapping
the "Start/Stop" key.

For the description of the "Finish cooking process", see
from Page 20, from chapter 5.6.2

Summary of Contents for CucinaEVO 1011QT

Page 1: ...SALVIS Combi Steamer CUCINAEVO Easy CUCINAEVO Pro Operation instructions 623 611 1011 T 611 621 1011 1021 QT 2011 2021 QT ...

Page 2: ... automatic cleaning system 13 5 1 3 Inserting the air baffle 13 5 1 4 Inserting the grease filter optional 14 5 1 5 Inserting the removable racks 15 5 2 Inserting removing removable racks rack trolleys option 16 5 3 Switching on the device 17 5 4 Prevent smoke development with greasy foods 17 5 5 Loading 18 5 5 1 Using the core temperature sensor 18 5 5 2 Using the Sous Vide sensor option 18 5 6 S...

Page 3: ...2 Cleaning the outlet screen in the cooking chamber drain 73 13 3 3 Using the sealing plate Type 2011 2021 73 13 4 Cleaning the cooking chamber without automatic cleaning system 74 13 5 Cleaning the cooking chamber automatically with powdered cleaner optional 76 13 5 1 Dosing quantities for powdered cleaner 76 13 5 2 Starting the automatic cleaning process powdered cleaner 77 13 6 Cleaning the coo...

Page 4: ...tion symbols DANGER Electrical voltage Risk of electric shock that may result in serious injury or death WARNING Caustic substances Risk of chemical burns with possible serious injury Wear protective clothing protective gloves and safety goggles WARNING Risk of injury Warning of possible injuries through escaping hot steam with cau stic cleaning agents Do not open the cooking chamber door during t...

Page 5: ...ol panel must not be co vered D Check before use whether the cooking chamber still contains residues from cleaning agents and rinse aid D An automatic rinse process must be started if the automatic cleaning of the cooking chamber was inter rupted e g power failure This prevents contamination of the food items with cleaning agent residues or damage to chambers D Packaged products may only be cooked...

Page 6: ...ere to find the building s circuit breaker for the appliances to be operated This allows you shutting down the appliance without hazard in the event of fire or damage D Rack trolleys transport carts as well as appliances on wheels may tip over when transported across slanted surfaces or thresholds Danger of chemical burns D Cleaning agents are caustic Wear suitable protective clothing protective g...

Page 7: ...ooking chamber supply air 2 Exhaust air vapour 3 Display and control panel Touch screen 4 Water supply pipe 5 Air baffle 6 4 point core temperature sensor 7 Door catch 8 Outlet screen 9 Drip pan housing 10 Adjustable feet 11 Pull out spray optional 12 Door condensate collecting groove 13 Door handle 14 Cooking chamber door with locking levels 15 Cooking chamber lighting 16 Hook the removable rack ...

Page 8: ...ighting cooking chamber 4 x 17 Sealing plate for cooking chamber with unlocking lever 18 Drip pan housing 19 Cooking chamber door with locking levels 20 Locking the inner door 21 Door handle 22 Door condensate collecting groove 2 3 8 10 8 14 4 5 6 7 1 9 22 19 21 11 10 15 12 13 11 18 16 17 20 20 Caution risk of bruising on the feet Before unlocking or swivelling the sealing plate downwards remove t...

Page 9: ...tions D The pull out shower can be retracted between the locking points D The locking points can be heard and felt D The water supply is activated when the cooking chamber door is open Guide the pull out shower back into the appliance by hand during rewinding Do not allow so snap back D The pull out shower must be completely retracted in the appliance after use Risk of damage of the pull out showe...

Page 10: ...ording to the operational circumstances Changing the views in the Input and display area see page 56 section 10 fig 12 and 13 Control system operating features Easy With four modes of operation Steaming Combi steaming Hot air Vitalising Cooking method Using the operating modes see from Page 22 Chapter 6 1 to Chapter 6 4 Example display The user can adapt the Input and display area according to the...

Page 11: ...actice You can always return to the previous menu with the back key D By briefly tapping and holding the back key the display changes to the home symbol The start screen appears after releasing the key D The help function provides you with additional information in the respective menus An info text is shown when you tap the help key Close the info text with the exit key Differences light grey dark...

Page 12: ...range 30 250 C No moisture can be added This setting influences maintaining the cooked product s own moisture The supply air flap opens or closes depending on the setting Air flap position in increments of 20 0 20 40 60 80 100 0 Supply air flap open cooking chamber is de humidified 100 Supply air flap closed own moisture of the food being cooked remains in the cooking chamber Core temperature rang...

Page 13: ...r on the rear of the appliance 5 1 2 Screwing on the water manifold optional automatic cleaning system D Only for appliances with automatic cleaning sys tem Insert water manifold up in the cooking chamber and fasten with by hand with knurled nut 5 1 3 Inserting the air baffle D The device may not be operated without air baffle D The device must be switched off during installation D The air baffle ...

Page 14: ...e pins 1 Insert at top 2 Lift air baffle 3 Insert at bottom 4 Secure with four screws and U washers 5 1 4 Inserting the grease filter optional D Use the grease filter preferentially with greasy foods Information about Preventing smoke development refer to Page 17 Chapter 5 4 Air baffle at left in cooking chamber Guide pin Seat for guide pin top Air baffle at left in cooking chamber Guide pin Seat ...

Page 15: ...osswise positioning or for bakery standard D Do not mix up the left and right removable racks The holder for the core temperature sensor is mounted in the left removable rack D Careful do not bend the upper guide pins Do not tilt the removable racks whilst inserting them Hook the removable rack on the upper guide pins push upward insert into the lower guide pins and lower it Suspension pin in cook...

Page 16: ... transport cart and slide in frame are not aligned Move the transport cart up to the appliance until the locking mechanism on the cooking chamber engages and the transport cart is thus secured against rolling away Lift the engagement lever and slide the remov able rack into the cooking chamber Secure the removable rack to the slide in frame with the engagement lever Use the pull loop to remove the...

Page 17: ...ll be displayed on the touch screen for approx 1 minute Please note The appliance is computer controlled Therefore do not turn the device on and off in quick succession as this could result in errors The compu ter controller needs a bit of time to load all data or to shut the system down properly Therefore wait about 30 seconds after turning the device off before turning it back on again Select pr...

Page 18: ...od from the cooking cham ber pull the core temperature sensor first from the cooked food and insert it in the holder risk of damage 5 5 2 Using the Sous Vide sensor option D CAUTION Risk of burning risk of injury The Sous Vide sensor and the handle can become hot The Sous Vide sensor has a sharp point Use protective gloves D The The Sous Vide sensor must not protrude beyond the cooking chamber dam...

Page 19: ...perature in the cooking chamber is too high the cooking chamber is cooled down The temperature on the display flashes during the cooling down process Displaying the actual temperature in the cooking chamber Tap the Temperature key D The actual temperature is shown for approx 5 se conds Start Stop key info presentation Green The cooking process can be started Red The cooking process is running The ...

Page 20: ...ening the cooking chamber door D WARNING Scalding hazard Caution Hot surfaces and containers Caution Hot liquids slopping over Wear suitable protective clothing protective gloves Cover containers with liquid foods before removing them to prevent any risk of scalding from liquids slopping over The cooking chamber must be cleaned if no other cooking process follows the removal of the food items Othe...

Page 21: ...ng with cooking chamber door open is now active D The Cooling window is displayed D The Cooling with cooking chamber door open func tion is not activated if the note was not touched within 5 seconds To cancel repeat the process Tap the key Start Stop 6 Cooling Cooling process D The temperature on the display flashes during the cooling process D The fan wheel runs during the cooling process steam g...

Page 22: ... the operating mode For example tap the Steaming key D The Settings window is displayed Operating mode info Steaming Hot air Combi steaming Vitalising Special programs For applications refer to Page 31 Chapter 6 5 3 Making the settings starting the cooking process Tap the key Start Stop D The symbol in the Start Stop key changes from green to red For the cooking process window refer to Page 19 Cha...

Page 23: ... Core temperature D The symbol switches to Core temperature D The display switches from time to temperature 2 Option Change over with numeric keypad C Tap the Core temperature key D The key is shaded dark grey and framed D The display switches from time to temperature Key functions info Symbol next to display Time is activated Symbol next to display Core temperature is activated In the numeric key...

Page 24: ... the food to be cooked Has an effect on the signal activated light signal and external signals Start time end of cooking preselection Pre select start or end of the cooking process Refer to the following figure regarding making the settings 8 Temp Active Preheating Cooling before the cooking process D After a heating or cooling process the controller waits for an entry confirmation Displayed by bl...

Page 25: ...indow Tap the key Start Stop D The start time end of cooking window will be dis played Set the start time or end of cooking with the slider control or the numeric keypad D Depending on the cooking time set the start time or the end of cooking is automatically converted and displayed except when AQA is activated Tap the key Start Stop D The set time runs down D The time remaining until the start of...

Page 26: ...ngs is displayed D The 1 1 display switches to 2 2 D If you require additional cooking steps repeat this step until all desired cooking steps are created Key functions info Switching up or down in the cooking steps only if se veral cooking steps are stored 1 sec Add a new cooking step before the cooking step selec ted Tap and momentarily press the key Arrow D The symbol changes to the symbol New c...

Page 27: ...out option cookbook D The settings of the cooking steps are stored only for the current cooking process The settings are no longer preserved after switching the appliance off and on again Option cookbook D If the settings are not stored in the cookbook they are no longer available after switching the appliance off and on Saving in cookbook refer to Page 42 Chapter 7 1 4 Start cooking steps Start a...

Page 28: ...emaining time is displayed D The progress bar indicates the elapsed time graphi cally D Settings can be made during the cooking process see figure 3 in this Chapter D This cooking step combination can be started again after the cooking process has run down Notes on auxiliary functions after starting the cooking process D If the auxiliary function preheating is enabled a preheating process starts A...

Page 29: ...ods ready to serve specifically for the à la carte or banquet business 1 Start Vitalising Tap the Vitalising key D The Vitalising window will be displayed 2 Select For example tap the Vitalising plate key D The Settings window is displayed Key functions info Vitalising plates Vitalising foods in containers e g GN container Vitalising banquet system 3 Starting the cooking process Make adjustments i...

Page 30: ...uired cooking process D The cooking process window with the preset values is displayed Change the values with the slider control or the nu meric keypad Refer to page 23 figure 4 for the use of the numeric key pad Starting the cooking process see page 19 Figure 1 Cooking process info approximate values Description Temperature Time Core tem perature Humidity Au gratin cooking 250 C 00 15 0 Broiling ...

Page 31: ...ndow is displayed Special programs info Delta T Cooking Suitable for all larger meat joints or roasts Uniform temperature differential between the cooking chamber and core temperature du ring the cooking process Cook and Hold Two stage program with a cooking and temperature maintenance phase NT Cooking over night Tap the NT Overnight cooking key Default setting with several cooking steps is dis pl...

Page 32: ...ettings window is displayed 4 Making the settings for the cooking process Making the settings D The slide in time cooking time set is automatically used as the presetting for all slide in levels D After selecting a slide in level this slide in time can again be changed and thus be adapted Tap the key Start Stop D The Slide in levels window is displayed 5 Loading the cooking chamber and starting th...

Page 33: ...imes continue 7 Changing slide in times interrupting slide in level The slide in times can be changed at any time Tap the enabled symbol Slide in level D The numeric keypad is displayed Enter the required value Confirm the value entered with Enter D The numeric keypad is closed To interrupt the slide in time set 00 00 Tap the Delete key D The slide in level is deleted 8 Warning Several processes a...

Page 34: ...cooking process is started D The Cooking process window will be displayed 3 Cooking process window Tap the key Combi cooking D The Combi cooking window is displayed 4 Making the settings for the cooking process D If no input is made within approx 5 seconds the slide in level function switches off the cooking process window is again displayed Tap the icon Slide in level 1 D The previously selected ...

Page 35: ...chamber door is open the slide in times do not run Remove the food from the corresponding slide in level Close the cooking chamber door D Remaining slide in times continue 8 Changing slide in time interrupting slide in level The slide in times can be changed at any time Tap the enabled symbol Slide in level D The numeric keypad is displayed Enter the required value Confirm the value entered with E...

Page 36: ...t button D The Product Size window for the product category Meat appears Info on products Meat Fish Poultry Vegetables Side Dessert 3 Cube Portion Entire Piece Product size selection For example tap the Entire Piece button D The available Cooking Processes are displayed Info on product sizes The following product sizes can be selected depending on pro duct Meat Entire Piece Portion Cube Fish Whole...

Page 37: ...amber D Caution the core temperature sensor is hot Insert core temperature sensor into the food to be cooked Close cooking chamber door D A reminder notice appears Insert core temperature sensor The notice automatically goes off after ap prox 3 seconds D The colour in the key Start Stop changes from blue to red D AQA The quantity cooking time is automatically ad justed The process period depends o...

Page 38: ...ated than can be shown on the display screen Tap the display screen with the finger and move the products displayed up or down 3 Cookbook Enter the search term Cookbook sch Searching for product names D The search function is possible in the pictogram or list display Tap the Search key Enter the search text e g sch D The search is not case sensitive D Entry of a complete word is not required D The...

Page 39: ...be started D If the settings are not stored in the cookbook they are no longer available after switching the appliance off and on Saving in cookbook see page 42 Chap ter 7 1 6 Changing settings during an active cooking process tap on the screen to call up the Settings window for approx 5 seconds Cooking process window Cooking process started D If preheating is enabled after the preheating process ...

Page 40: ...product Move the display by tapping and moving up or down Tape the desired product D The selected product is framed Tap the Start Stop key D The cooking process is started D The Cooking process window will be displayed D The symbol in the Start Stop key changes from green to red 5 Changing settings during an active cooking process tap on the screen to call up the Settings window for approx 5 secon...

Page 41: ... product D The product is framed Tap the Start Stop key D The cooking process is started D The Cooking process window will be displayed D The symbol in the Start Stop key changes from green to red 4 Changing settings during an active cooking process tap on the screen to call up the Settings window for approx 5 seconds Cooking process window D If preheating is enabled after the preheating process h...

Page 42: ...splayed 2 Selecting the operating mode For example tap the Steaming key D The Steaming operating mode window will be dis played Operating mode info Steaming Hot air Combi steaming Vitalising Special programs For description see page 31 chapter 6 5 3 Making the settings Make the settings e g temperature humidity time core temperature auxiliary functions If additional cooking steps shall be created ...

Page 43: ...the cooking step selec ted Tap and momentarily press the key Arrow D The key symbol New cooking step is displayed D The operating modes window is displayed 1 sec Add a new cooking step after the cooking step selected Tap and momentarily press the key Arrow D The key symbol New cooking step is displayed D The operating modes window is displayed Add a new cooking step before or after the cooking ste...

Page 44: ...rites Category Tap the Categories key Tape the desired category e g vegetables or Fa vourites D The category of Favourites is framed Tap the key Arrow D The selected category or Favourites is moved from the left into the right field D The product is now assigned to the selected cate gory e g vegetables or Favourites D The product can be assigned to several categories To this end repeat the procedu...

Page 45: ... is displayed above the Add key Tap the key Enter D The image has been assigned and the Product entry window is displayed Key functions info Add the selected image Confirm 9 No Name No Name Removing the image Tap the image to be deleted D An overview of all existing images is displayed Move the images displayed to the top until the Camera icon is displayed at the end Tap the Camera key D The camer...

Page 46: ... All settings stored in the cookbook can be adapted or changed e g Temperatures times favourite assi gnments category assignments cooking steps etc 1 Open the cookbook Tap the Cookbook key D The Cookbook window will be displayed 2 Cookbook Selecting the product Tape the desired product D The product is framed Tap the Cooking steps key D The Settings window will be displayed 3 Tap the value Display...

Page 47: ...k D The window for confirming the save process is dis played 5 Note Cookbook has been saved Note Program with same No present Confirm overwriting by pressing OK Confirming the save process Tap the key Confirm D The save process is completed D The product is changed Tap the key Confirm D The save process is completed 7 3 Deleting a product from the cookbook 1 Open the cookbook Tap the Cookbook key ...

Page 48: ...ty request is displayed Tap the key Confirm D The window for confirming the save process is dis played Tap the key Confirm D The save process is completed D The product is deleted 7 4 Creating and deleting a category This function is a part of the cookbook 7 4 1 Creating a category 1 Start categories Tap the Category key D The Categories product groups list is displayed 2 Creating a new category T...

Page 49: ...y by tapping and moving up or down Tap the image D The selected image is framed Tap the key Add D The image is displayed above the Add key Tap the key Enter D The window for confirming the save process is dis played 5 Note Cookbook has been saved Saving Tap the key Confirm D The category is saved in the cookbook Assigning products to a category from Page 42Chap ter 7 1 Figure 7 7 4 2 Delete catego...

Page 50: ...ndow will be displayed 4 Name No Opening the window Categories Favourites Tap the key Category Favourites D The window for allocation is displayed 5 Name Category is removed No Select category and remove Tap the category to which the product is allocated D The selected category is marked Tap the key Arrow D The category is removed from the window and thus no longer allocated to the product Tap the...

Page 51: ...the category Touch Back D Repeating the process see from Figure 3 page 50 7 Delete category D The key Delete is active when all allocations to the category are deleted Tap the category to be deleted D The selected category is framed Tap the Delete key D The window for confirming the save process is dis played 8 Note Cookbook has been saved Note Category is finally deleted Confirm deleting by press...

Page 52: ...set auxiliary function with Enter D The window Baking is displayed D The auxiliary functions set are displayed in the window below Auxiliary functions window Ventilator speeds in five stages and cycled T Select the desired ventilator speed by tapping the key several times until the desired ventilator speed is displayed Supply air flap open Supply air flap closed Stationary times of the fan for exp...

Page 53: ... moisture Adding moisture at the beginning of the baking process e g setting 200 ml during the baking process using key Manual steam injection Blue progress bar display from left to right whilst adding moisture from right to left during the stationary period of the motor Preheating D If preheating is enabled after the preheating process has expired the cooking process must be started by loading or...

Page 54: ...een Tap the display screen with the finger and move the protocols displayed up or down Tap the required date D The selection is framed Key functions info Display of day protocol selected Active for appliances with USB connection Read out of the day data refer to Page 55 Chapter 9 1 Active for appliances with USB connection Read out of the weeks data refer to Page 55 Chap ter 9 1 Active for applian...

Page 55: ...06 02 12 10 05 48 KT every 180s Date 05 02 2012 Time 22 02 Date 05 02 2012 22 02 03 Program Manual 22 02 03 Start 22 02 04 Set 60 HL 0 Duration 10 00 h 22 05 04 Cooking chamber 65 C 22 05 08 Interrupt Overview Select read out date Day Week Month Tap the required date from which the reading should be carried out backwards D The selection is framed Tap the key Day week or month data D The data is wr...

Page 56: ...rial number IP Address HW Version operation SW Version operation SW Version equipment HW Version output 1 SW Version output 1 HW Version motor 1 Information progress indication For example whilst saving exporting importing Progress indicator Displays device data Here you can read the device data such as version number installed options and free memory Flash Tap the display screen with your finger ...

Page 57: ...ent Setting the cookbook sort order Tap desired dis play Alphabetic Numeric Tap the Save key D A note on the save process appears Tap the key Confirm D The note disappears Continue to the next window tap arrow key 4 Calibrate touch Touch auto zero Automatic screen sensitivity adjustment Caution Do not touch the control interface for 10 seconds during the automatic sensitivity adjustment otherwise ...

Page 58: ...only recognized after the appliance is restarted USB connection optional Tap the key Touch calibration D A window with a crosshair in the centre is displayed D Important only tap the crosshairs Do not touch the clear area otherwise malfunctions occur Tap the crosshair D The crosshair switches to the lower right corner Tap the crosshair D The crosshair switches to the next corner Tap the crosshair ...

Page 59: ...fo on settings options Program end signal sounds at the end of the cooking process Step change In cooking programmes with different modes a signal sounds before switching to the next mode Warning signal When notices with red or yellow background appear on screen Combi Cooking slide in time Signal sounds when a slide in time expires Light signal Cooking chamber lighting illuminates when light signa...

Page 60: ... move it until the desired file is visible Tap the desired selection D An acoustic signal is heard Tap the Save key D A note on the save process appears Tap the key Confirm D The note disappears Continue to the next window tap arrow key Info on settings options D Temperature in Celsius or Fahrenheit D Language for the display D Language for the cookbook D Program protection for cookbook None Chang...

Page 61: ...ng increment Automatic increase for the preheating process Preheating hold time min If the target temperature has been reached this is held for the set time PIN refer to Figure 10 and 11 Start screen refer to Figure 12 10 User Delete PIN PIN Start screen Preheating hold time min Preheating increment Temperat Percent Water supply adjust ment Enabling the PIN Restricting modification permissions If ...

Page 62: ...er the device is turned on Tap the box or arrow key D The available screen options are displayed Tap the arrows or the scrollbar and move it until the desired selection is visible Tap the desired selection D The selection is shown in the box Tap the Save key D A note on the save process appears D The selected screen is saved and will be displayed the next time the device is turned back on Tap the ...

Page 63: ... The available screen options are displayed Tap the arrows or the scrollbar and move it until the desired selection is visible Tap the desired selection D The selection is shown in the box Tap the Save key D A note on the save process appears Tap the key Confirm D The note disappears Step forward to the next window tap key Info on selection options blank nothing displayed Manual this symbol is dis...

Page 64: ...ge appears 15 Key Technician popup Other Factory settings Liquid Technician popup Powder Reset Cleaner Water consumption max 0 1000 ltr Refresh Enable function Technician popup The expired appliance activities are displayed in the window Technician popup This display can be used for fault diagnosis In order to make the Technician popup visible and mask it during operation the key Technician popup ...

Page 65: ...ht D The set value is displayed in seconds Tap the required additional type of saving D The selected memory type is highlighted in colour and framed Tap the Save key D A note on the save process appears Tap the key Confirm D The note disappears Step forward to the next window tap button Info about additional selection options Protocol content Nominal temperature Manual changes Error messages 18 Ar...

Page 66: ...entle roasting Cook Hold Slide in times Sous Vide 21 Network activation Setup communication Start remote maintenance Using a static IP address IP address Subnet mask Gateway Input mask for remote maintenance optional This function is only intended for authorised customer service personnel A remote connection to the factory can be initiated if remote maintenance is required The appliance must be co...

Page 67: ...s Notes requirements for files CS_DATA cookbooks COOKBOOK XML Kochbuch_DE xml cookbook_EN xml etc D Number of visible characters in menu 20 characters pictograms 0100_kalbshackse png 0200_gaensebrust png 0200_haehnchen png etc D Image file formats jpg or png D Image size for reading maximum 2 Mbyte D The appliance software converts the imported image files size 480x270 pixels resolution 72 pixels ...

Page 68: ...data with a new file name Sounds 1 Attention All existing sounds in the sounds folder will be deleted 2 The sounds on the USB stick are copied to the sounds folder Sounds with different file names are added to the sounds folder Sounds with identical file names are not changed Images 1 Attention All existing images in the pictograms folder will be deleted 2 The images on the USB stick are copied to...

Page 69: ...rmation on entering or deleting the PIN see Figures 61 and 10 from page 11 Keep tapping the arrow key until the Export window appears 2 Area Export Sounds Export Images Cookbooks User configuration Progress indicator Data export control unit USB stick Export Insert USB stick into the USB port Connecting the USB stick see page 65 Figure 18 D Wait approx 5 seconds for the control unit to estab lish ...

Page 70: ...om page 11 Keep tapping the arrow key until the Import window appears D The Add key is highlighted in colour and framed 2 Area Import Sounds Import options Replace Add Import Images Cookbooks User configuration Progress indicator Data import USB stick control unit Importing example replacing all cookbooks in the control unit Insert USB stick into the USB port Connecting the USB stick see page 65 F...

Page 71: ...g chamber has not been cleaned carefully residues such as limescale proteins or starch remain If these residues are not completely removed it prevents air or oxygen rich water from getting to the stainless steel surface A protective coating cannot be formed and this causes corrosion e g pitting damage even on high quality steel Therefore clean thoroughly to prevent residues from sticking D For exa...

Page 72: ...care products can be obtained from your authorised Customer Service agent D The device manufacturer is not liable for any damage that has been caused as a result of improper cleaning or the use of incorrect cleaning agents D An automatic rinse process must be started if the automatic cleaning of the cooking chamber was inter rupted e g power failure D Stainless steel surfaces are attacked through ...

Page 73: ...1 2021 Caution risk due to bruising on the feet Before unlocking or swivelling the sealing plate downwards remove the sealing plate from the swivel area With the right foot activate the unlocking lever The sealing plate is required in order to completely close the cooking chamber if the appliance is operated without rack trolley e g for preheating for automatic cleaning without rack trolley pushed...

Page 74: ... to gaskets and components D The device manufacturer is not liable for any damage that has been caused as a result of improper cleaning or the use of incorrect cleaning agents Preparing the appliance for cleaning the cooking chamber refer to Page 72 Chapter 13 3 We recommend opening the cooking chamber door for about 5 to 10 minutes to shorten the automatic cool down process at very high temperatu...

Page 75: ...appears Introducing the spray cleaner Put on safety goggles protective gloves and protec tive clothing Spray the cooking chamber with special spray cleaner for cooking chambers Close the cooking chamber door D The information Start cleaning process appears Tap the key Confirm D The cleaning continues After the cleaning is finished the information Rinse coo king chamber is displayed Use the pull ou...

Page 76: ...leaning agent with water D Do not mix the cleaning agent with other cleaners D Do not leave the cleaning agent for extended periods in the cooking chamber Start the automatic cleaning immediately after filling in the cleaner D WARNING Danger of chemical burns Do not open the cooking chamber door during the cleaning process If the cooking chamber door must be opened in exceptional cases the automat...

Page 77: ...process Tap the AutoClean automatic cleaning key D The Cleaning window will be displayed 2 Selecting the cleaning program Tap the desired cleaning level e g level 3 D The Start window will be displayed Key functions info The information for the cleaning time does not include the times for the cooling or heating process Cleaning level 1 With little soiling duration approx 30 minutes Cleaning level ...

Page 78: ...r the soaking process is finished the message Spray cleaner appears Introduce the powdered cleaner Open the cooking chamber door Put on safety goggles protective gloves and protec tive clothing Distribute powder cleaner over the outlet screen do sing see page 76 Chapter 13 5 1 D Do not spread the powdered cleaner in the cooking chamber Close the cooking chamber door D The information Start cleanin...

Page 79: ...ther cleaners D WARNING Danger of chemical burns Do not open the cooking chamber door during the cleaning process If the cooking chamber door must be opened in exceptional cases the automatic cleaning process must first be stopped see page 87 Chapter 13 9 13 6 1 Connecting or replacing the cleaning agent and rinse aid canisters Only for appliances with Liquid cleaning feature Liquid cleaner SALVIS...

Page 80: ...played Tap the Start Stop key D The symbol in the Start Stop key changes from green to red D The suction process runs D The pumping noises during the suction process can be clearly heard D Once the suction process has been completed it is shut off automatically D Once the suction process is completed the symbol in the Start Stop key changes from red to green Important after the suction process a r...

Page 81: ... the cleaning program Tap the desired cleaning level e g level 3 D The Start window will be displayed If cleaning should be immediately started continue with Figure 3 If cleaning should be automatically started at a speci fied time refer to Applying the start time from Figure 4 and 5 Key functions info The information for the cleaning time does not include the times for the cooling or heating proc...

Page 82: ... time progression of the process Once the cleaning process has completed the display Cleaning programme disappears the display Start screen appears carry out manual cleaning tasks refer to Page 83 Chapter 13 7 4 Auto Clean 3 Display window Start time If no start time is required continue with Figure 3 Tap the key Start time D The key is shaded dark grey and framed Tap the key Start Stop D The Star...

Page 83: ...t Air cooking method duration approx 10 minutes humidity 0 tempe rature approx 130 C Switch off the unit Leave the cooking chamber door open to allow it to dry completely Protect cooking chamber and installation parts against corrosion Stainless steel surfaces and installation parts in the cooking chamber are attacked through use Therefore treat stainless steel surfaces and installation parts in t...

Page 84: ...ving cleaning agent Thoroughly dry the door seal Cleaning the drain channel and collecting channel Clean drain channel and collecting channel Remove possible clogging at the drain openings After cleaning Do not close the cooking chamber door keep it a crack open D The residual moisture can escape from the coo king chamber and the door seal is free from pressure 13 7 2 Cleaning the grease filter op...

Page 85: ...ns and remove it Remove any possibly remaining soiling behind the air baffle or on the removable racks with cleaning agent and a cleaning brush Removal of the air baffle Type 611 621QT 1011 1021QT Lift the air baffle and unhook it from the guide pins do not cock risk of bending the guide pins Lower the air baffle and remove Remove any possibly remaining soiling behind the air baffle or on the remo...

Page 86: ... Pull out the air filter toward the front and clean e g in the dish washer D The air filter may only be inserted when dry 13 7 5 Clean stainless steel surfaces Clean stainless steel surfaces with grease dissolving cleaner or a special stainless steel cleaner Dry cleaned parts and surfaces with a soft cloth Restoring operational readiness refer to Page 13 Chapter 5 1 Air baffle at left in cooking c...

Page 87: ...ic cleaning Automatic cleaning should be cancelled only in exceptional situations 1 Tap the Start Stop key D Automatic cleaning is stopped D The cleaning system still contains cleaning agent after stopping the cleaning process A cooking pro cess can therefore only be started after an automatic rinse process was first performed D If there is a power cut during automatic cleaning a rinsing operation...

Page 88: ...of overheating Contact the authorised Customer Service agent in case of overheating The spray hose seal is broken or faulty Leaks lime scale de posits material fatigue In order to continue operation with the appli ance the function pull out shower can be de activated refer to Page 65 Figure 16 Contact your customer service representative The optional condensate cover no longer func tions properly ...

Page 89: ...er tap Fault report No 4003 Overtemperature in wa ter drain Appliance with water connection Open the water tap Appliance without water connection Poor at least 5 litres of water into the outlet screen in the cooking chamber Contact the authorized Customer Service if the fault recurs Fault report Nos 4042 to 4055 Sensor interrupted or short circuited Turn the appliance off and on Contact the author...

Page 90: ... once a year D Use only genuine accessories and spare parts D We recommend entering into a maintenance contract with the authorized Customer Service 16 Disposal of end of life appliances D Before dismantling switch off the appliance at the mains and safeguard it against being switched back on Then disconnect the mains cable from the mains socket and from the appliance D To prevent accident from be...

Page 91: ...the provisions of Directive 2014 35 EC concer ning low voltage electrical equipment and 2014 30 EC concerning electromagnetic compatibility Machine types Circulating hot air steamers combi steamers Harmonized EN standards applied EN 60335 2 42 EN 55014 1 2 EN 61000 3 2 EN 61000 3 11 EN 62233 Authorised representative for documentation SERVATOR ServiceLine GmbH Thomas Schmalz Lindenweg 36 42 97999 ...

Page 92: ...ranslation of the original operating instructions 878970 7 11 V26 5 17 SALVIS AG Nordstrasse 15 CH 4665 Oftringen Tel 41 0 62 788 18 18 Fax 41 0 62 788 18 98 Internet www salvis ch E Mail info salvis ch ...

Reviews: