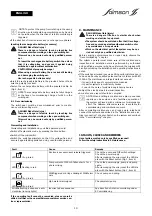
salmson EC-Drain 2x4,0 Installation And Starting Instructions Download Page 15

ENGLISH

15

6.2 Function and operation

After connecting the switchgear to the supply voltage, as well
as after every mains interruption, the switchgear returns to the
operating mode set before the power interruption. 

First, all LEDs are actuated for about 2 s for testing purposes.
Afterwards, the switchgear is ready for operation. 

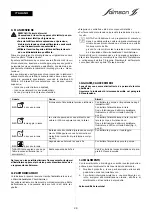
6.2.1 Switchgear operating elements (Fig. 1)

Main switch 4-pole

0


 OFF

I


 ON

Buttons:

Manual mode (item 1)

Stop (item 2)

Automatic mode (item 3)

To optimise the running times, the pumps are cycled each time
after the base-load pump is switched off.

In automatic mode, all pump safety functions, such as elec-
tronic motor protection and monitoring of the WSK, are active.
If a pump fault occurs, the system automatically switches over

to the functional pump, an optical and acoustic signal are
issued and the collective fault signal contact (SSM) is active. 

Once the high water level is reached, an optical and acoustic
alarm signal are output and the collective fault signal contact
(SSM) and high water alarm contact are active. In addition,
there is a forced switch-on of the pumps to increase the system
safety.

Buzzer off/Reset (item 4)

Fault memory

The control contains an error memory.
The last fault that occurred remains in non-volatile storage and
can be called with the following shortcut.

6.2.2 Display elements of the switchgear (Fig. 1)

Ready for operation (item 15)

Automatic mode (item 5, item 9)

Operation (item 6, item 10)

High water (item 14)

Pump 1 or 2 is switched on by pressing the manual 
mode button, regardless of the float switch signal, 
along with all safety functions, such as electronic 
motor protection and the winding protection moni-
toring of the WSK.
The green LED “Pump 1 operation” (item. 6) or “Pump 
2 operation” (item 10) is on as long as the button is 
pressed. This function is intended for commissioning or 
testing purposes. 
Manual mode only runs as long as the button is 
pressed.

If the Stop button is pressed, automatic mode is 
switched off for both pumps and the green LED (item 
5, item 9) flashes. 
The pump is not switched on automatically. 
Once the high water level is reached, an optical and 
acoustic alarm signals are issued and the collective 
fault signal contact (SSM) and high water alarm con-
tact (alarm) are active.

If the automatic mode button is pressed, the auto-
matic mode of both pumps is switched on depend-
ing on the setting of DIP switches 6 and 7 (Fig. 2, item. 
3) and the green LED (item 5, item 9) is permanently 
on.
If a pump was deactivated with the DIP switches, the 
corresponding LED remains off (see Section 6.2.4).
In automatic mode, the pumps are controlled 
depending on the float switch signal. When the first 
activation point is reached, the float switch contact is 
closed and the base-load pump switched on. When 
the second activation point is reached, the peak-
load pump is cut-in.
The green LED (item 6, item 10) is on while the pump is 
in operation. 
If the deactivation point of the base-load float switch 
is reached, the contact opens, the peak-load pump 
switches off and the follow-up time of the base-load 
pump set on the potentiometer (Fig. 2, item 2) takes 
effect.
The green LED (item 6, item 10) flashes until the set 
time has elapsed. After the time has elapsed, the 
base-load pump switches off.

P1

P2

An acoustic signal is issued by the built-in buzzer after 
an error occurs. By briefly pressing the button, the 
buzzer is deactivated and the collective fault signal 
relay is acknowledged. 
To acknowledge the fault and enable the control 
again, the button must be pressed for at least half a 
second. The fault can only be acknowledged once 
the fault and its cause have been remedied.


By pressing both buttons (“stop” + “auto”) simul-
taneously, the last fault saved is displayed by 
the corresponding LEDs (see Chapter 10 
“Faults, causes and remedies”).


The error memory is erased by pressing both 
buttons (“Manual 1” + “stop”) simultaneously 
(approx. 1 sec.)

Green LED

• Goes on permanently lit if the power supply of the 

switchgear is switched on and the control voltage 
applied.

Green LED

• Flashes if the control voltage is applied but auto-

matic mode is deactivated.

• Goes on if automatic mode is activated.
•Does not go on if the pump is deactivated using a 

DIP switch (see Section 6.2.4).

Green LED

• Goes on in green when the pump is switched on 

(switch-on level reached)

• Flashes in green if the pump is switched on by means 

of the set follow-up time

Red LED

• Goes on in red if high water alarm is triggered.

off

P1

Summary of Contents for EC-Drain 2x4,0

Page 1: ...N ET MISE EN SERVICE INSTALLATION AND STARTING INSTRUCTIONS FRAN AIS ENGLISH INSTALLAZIONE E MESSA IN SERVIZIO ITALIANO INSTALACION Y PUESTA EN SERVICIO ESPA OL N M S STOCK N 2 533 857 Ed 02 07 11 EC...

Page 2: ...2...

Page 3: ...3...

Page 4: ...2 3 4 5 6 7 SSM Alarm GL WSK P2 WSK P1 SL 10 16 15 14 13 12 11 9 8 7 6 5 4 3 2 1 HW T1 1 3 5 13 A1 2 4 6 14 A2 T2 T3 L1 L2 L3 NO WSK M 3 WSK M 1 1 2 3 4 5 T1 1 3 5 13 A1 2 4 6 14 A2 T2 T3 L1 L2 L3 NO...

Page 5: ...ent tre imp rativement respect es et maintenues dans un tat bien lisible 2 2 Qualification du personnel Il convient de veiller la qualification du personnel amen r aliser le montage l utilisation et l...

Page 6: ...t en aucun cas tre expos des temp ratures en dehors de la plage comprise entre 20 C 60 C 4 APPLICATIONS Le coffret de commande EC Drain 2x4 0 sert la commande automatique de deux pompes jusqu max P2 4...

Page 7: ...e manuel active la pompe 1 ou la pompe 2 ind pendamment du signal des interrupteurs flotteur avec toutes les fonctions de s curit comme la protection moteur lectro nique et la surveillance de la prote...

Page 8: ...tionnement test est activ ON ou d sactiv OFF par l interm diaire de l interrupteur DIP 6 Un fonctionnement test est activ pendant 2 s apr s une dur e d immobilisation des pompes de 24 h Alarme sonore...

Page 9: ...120 secondes DANGER Danger de mort Lors de travaux sur le coffret de commande ouvert il existe un risque d lectrocution par contact avec des composants sous tension Seul le personnel sp cialis est ha...

Page 10: ...utilis Introduire les extr mit s du c ble de la pompe dans les passe c bles vis et les entr es et les connecter conform ment aux symboles sur les r glettes bornes REMARQUE Apr s le serrage du passe c...

Page 11: ...ffectuer la mise en service par le service apr s vente Salmson Observer les notices de montage et de mise en service Avant de mettre l installation de pompe en service avec le coffret de commande EC D...

Page 12: ...PANNES CAUSES ET REM DES Ne faire effectuer le d pannage que par du personnel qualifi Observer les consignes de s curit au paragraphe 9 Entretien S il s av re impossible de supprimer la panne de fonct...

Page 13: ...installation operating and maintenance personnel must have the appropriate qualifications for this work The area of accountability responsibility and personnel monitoring are to be ensured by the oper...

Page 14: ...switches in potentially explosive areas In the case of usage in potentially explosive areas be sure to comply with all applicable explosion protection regulations The intended use includes complying w...

Page 15: ...ical and acoustic alarm signals are issued and the collective fault signal contact SSM and high water alarm con tact alarm are active If the automatic mode button is pressed the auto matic mode of bot...

Page 16: ...nger of electric shock by touching live components when working on the open switchgear This work may be carried out only by qualified person nel To change the DIP switch settings switch the unit so th...

Page 17: ...of installation from direct exposure to sun light Borehole distances 268 x 188 mm WxH For details see bottom of switchgear For fixation provide screws 4 screws max 4 mm and the corresponding dowels T...

Page 18: ...arm if the voltage drops or if the main switch is switched off Alarm terminals 14 15 16 Connection for external high water alarm potential free changeover contact Min contact load 12 V DC 10 mA Max co...

Page 19: ...ian Before carrying out maintenance or repair work observe the Decommissioning chapter The system operator must make sure all the maintenance inspection and installation work is performed by authorise...

Page 20: ...to the environment and risks to personal health are avoided by the proper disposal and appropriate recycling of this product 1 Draw on public or private waste management companies for the disposal of...

Page 21: ...Qualifica del personale Il personale addetto a montaggio impiego e manutenzione deve disporre dell apposita qualifica richiesta per questo tipo di lavori L utente deve farsi garante delle responsabil...

Page 22: ...dit e danneggiamenti meccanici Esso non deve essere esposto a temperature al di fuori del campo di 20 C 60 C 4 CAMPO D APPLICAZIONE L apparecchio di comando EC Drain 2x4 0 serve al comando automatico...

Page 23: ...seri mento della pompa 1 o della pompa 2 avverr indi pendentemente dal segnale degli interruttori a galleggiante con tutte le funzioni di sicurezza quali salvamotore elettronico e controllo del contat...

Page 24: ...onamento di prova viene atti vato ON o disattivato OFF tramite l interruttore DIP 6 Un funzionamento di prova viene effettuato per la durata di 2 s al termine di un tempo di inattivit delle pompe di 2...

Page 25: ...viene mediante regolazione continua nell arco di 0 120 secondi PERICOLO Pericolo di morte Durante i lavori sull apparecchio di comando aperto sussiste il pericolo di folgorazione da contatto con compo...

Page 26: ...lla designa zione riportata sulle barre morsettiere NOTA Dopo aver serrato il pressacavo accertarsi che il cavo si ben fisso Se il cavo allentato nel pressa cavo sostituire la guarnizione presente con...

Page 27: ...mson Prima di procedere alla messa in servizio dell impianto pompa con l apparecchio di comando EC Drain 2x4 0 verificare tutte le impostazioni tipo della tensione di rete posizioni degli interruttori...

Page 28: ...sere eliminati solo da personale tecnico qualificato Osservare le indicazioni di sicurezza descritte nel paragrafo 9 Manutenzione Nel caso non sia possibile eliminare l inconveniente rivolgersi all in...

Page 29: ...maci n de utilidad para el manejo del producto Tambi n puede indicar la presencia de posibles problemas Las indicaciones situadas directamente en el producto como p ej Flecha de sentido de giro identi...

Page 30: ...ANSPORTE Y ALMACENAMIENTO Inmediatamente despu s de la recepci n del producto Compruebe si el producto ha sufrido da os durante el trans porte Si el producto ha sufrido da os tome las medidas necesari...

Page 31: ...a para inundaciones Adem s se produce una activa ci n forzada de la bomba para aumentar la seguridad de la instalaci n Zumbador desconectado reset pos 4 Cuando se acciona el pulsador Funcionamiento ma...

Page 32: ...prueba c clica Esta marcha de prueba se activa ON o se desactiva OFF con el conmutador DIP 6 La marcha de prueba se activa durante 2 segundos tras un tiempo de parada de las bomba de 24 horas Zumbador...

Page 33: ...ro de electrocuci n por contacto con com ponentes conductores de corriente Las tareas de este tipo deben ser realizadas exclusiva mente por personal cualificado Para ajustar el potenci metro es precis...

Page 34: ...N Tras colocar el prensaestopas com pruebe que el cable queda fijo Si el cable queda suelto en el prensaestopas cambie la junta por la junta reductora suministrada paquete adicional Conecte la bomba l...

Page 35: ...oner en marcha el sistema con el cuadro EC Drain 2x4 0 es preciso comprobar todos los ajustes Tipo de tensi n de red Ajustes de los conmutadores DIP y ajuste de la corriente de la bomba v ase 6 2 3 y...

Page 36: ...icado en el cap tulo Puesta en mar cha 10 AVER AS CAUSAS Y SOLUCI N La subsanaci n de aver as debe correr a cargo exclusiva mente de personal cualificado Se deben respetar las indicaciones de segurida...

Page 37: ...POSTO Questo prodotto stato fabbricato in un sito certificato ISO 14 001 rispettoso dell ambiente Questo prodotto composto da materiali in grandissima parte riciclabile In fine di vita farlo eliminare...

Reviews: