background image

104     

Chapter 05: Securing Your Sahara NetSlate

After creating your password, if you try and log into 
Windows but the on-screen keyboard doesn’t appear, 
tap on the keyboard button located in the lower left 
corner of the login screen.

Getting Started with the UPEK Protector Suite
Now that you have initialized the TPM and created a Windows 
password, you can begin using your security management 
software to more safely manage your passwords, encrypt your 
data and protect your identity. Included on your Sahara NetSlate 
with Windows 7 is the UPEK Protector Suite.

It features an application launcher, a password bank, a strong 
password generator, encrypted archives to protect your data, 
an e-Wallet for safer online purchasing, and a Biomenu for quick 
access to these security features simply by swiping your finger 
across your Sahara NetSlates biometric fingerprint reader.

Enrolling Your Fingerprints

To get started using the security features that the Protector Suite 
offers, you must first enroll your fingerprints.

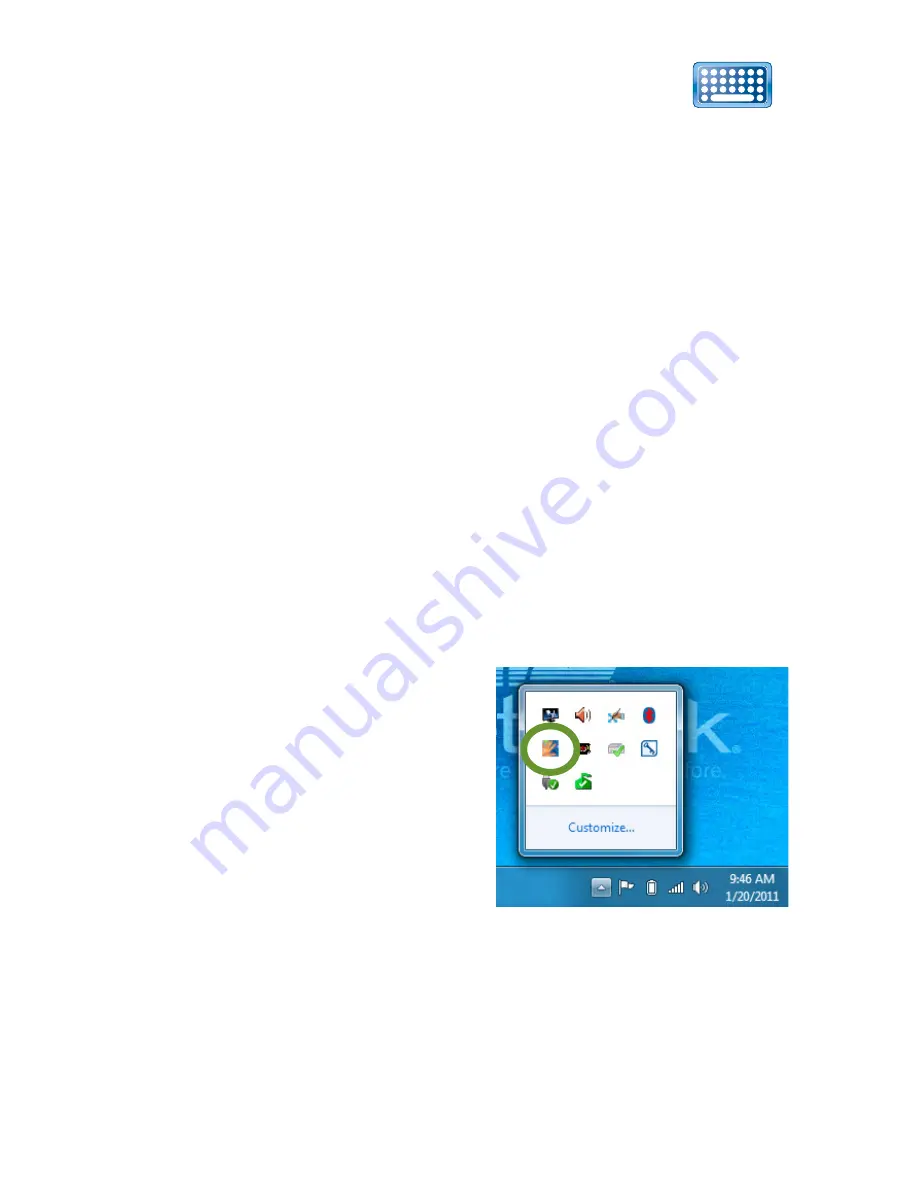
1.  Launch the Protector Suite 

to begin the enrollment 
process. The easiest way to 
do this is by swiping one of 
your fingers over the finger-
print reader. Alternatively, 
you can tap on the Protector 
Suite icon in the System 
Tray, or if you are in the User 
Accounts window, you can 
tap on the link 

Manage your fingerprint data 

in the left pane 

of the window.

2.  The first time you launch the Protector Suite you will be 

presented with the Introduction window. To continue, tap 
on 

Enroll Your Fingers Now

.

This button toggles 
the visibility of the 
on-screen keyboard

Summary of Contents for NetSlate a510

Page 1: ...User s Guide Sahara NetSlate a510 12 1 Tablet PC...

Page 2: ...subject to change without notice Sahara NetSlate TabletKiosk and the TabletKiosk logo are registered trademarks or trademarks of TabletKiosk in the United States and or other countries Microsoft Wind...

Page 3: ...If you have any questions regarding the Sahara NetSlate or the information contained within this manual please contact TabletKiosk at info tabletkiosk com Important Safety Instructions For your own s...

Page 4: ...adapter power cord or plug is damaged 2 Liquid has been spilled into the Sahara NetSlate 3 The Sahara NetSlate has been exposed to excessive moisture 4 The Sahara NetSlate exhibits errors and or does...

Page 5: ...your dealer or the local electrical authorities if you are unsure of the type of power cord to use in your country Voltage changes occur automatically in the power supply Notice of FCC Compliance a Fe...

Page 6: ...ons not expressly approved by TabletKiosk could void your authority to use the equipment b Regulatory information Disclaimers This device must be installed and used in strict accordance with the instr...

Page 7: ...grammed at the factory to match the intended destination The firmware setting is not accessible by the end user d SAR Exposure This device has been tested for compliance with FCC RF Exposure SAR limit...

Page 8: ...n is subject to the following two conditions 1 this device may not cause interference and 2 this device must accept any interference including interference that may cause undesired operation of the de...

Page 9: ......

Page 10: ...Up Your Sahara NetSlate 18 Step 1 Insert the Battery Pack s 18 To Remove the Battery Packs 19 Step 2 Connect the Tablet PC to an External Power Source 20 Step 3 Connecting Applicable Peripherals and...

Page 11: ...Enabling and Disabling Touch Input 47 Touch Action Double Tap Settings 47 Using the Touch Pointer 48 Panning Gesture Settings 49 Disable Single Finger Panning 49 Inertia 49 Resistive Touch Screen Cal...

Page 12: ...ing 74 Rotating 74 Two Finger Tap 75 Flicking 75 Programming the Function Buttons 75 Connecting to the Internet 76 Using a Wired LAN 76 Using Both DHCP and a Static IP Address 78 Using a Wireless LAN...

Page 13: ...ank 108 Strong Password Generator requires full Protector Suite 109 Encrypted Archives 109 E Wallet requires full Protector Suite 109 Biomenu 109 Protecting Your Files Using BitLocker Drive Encryption...

Page 14: ...ate Function Mapping 138 Right Side Button Alternate Function Mapping 138 Main Menu 139 System Time 139 System Date 139 Advanced Menu 140 IDE Configuration 140 AHCI Configuration 140 Trusted Computing...

Page 15: ...dis HX121WX1 101 color active matrix TFT LCD 150 Hydis HX121WX5 114 color active matrix TFT LCD 150 Audio 151 Gigabit Ethernet LAN 151 WiFi Wireless 151 Bluetooth Wireless 152 TPM Security 152 Fingerp...

Page 16: ...Table of Contents xv This page intentionally left blank...

Page 17: ......

Page 18: ...ions after reading this manual please visit our website at www tabletkiosk com for more information or to submit a support request What s in the Box Your Sahara NetSlate a510 should come securely pack...

Page 19: ...Digitizer Pen Step 1 Insert the Battery Pack s Turn the system over and place it optionally screen down on a solid clean flat surface You can also insert the batteries while holding the Tablet PC if...

Page 20: ...supply to minimize the chance of electri cal shock Turn over the Tablet PC and optionally place it on a solid clean flat surface You can also remove the batteries while holding the tablet if you pref...

Page 21: ...an External Power Source Locate the AC adapter and the power cord Plug the power cord securely into the AC adapter Plug the AC adapter s connection cable into the DC Power In port on the top of the Ta...

Page 22: ...ill have a few questions for you to answer in order to localize your installation If you are planning on using the Fingerprint Reader to assist you in securing your system and logging in you should cr...

Page 23: ...s swiping and flicking to aid in navigational operations While not as sensitive as the capacitive panel it has the benefit of being more durable and can be activated by pressure from any type of touch...

Page 24: ...ment while pinching two fingers together will zoom out of or magnify down your page You can learn more about touch gestures and flicks in the chapter Using Your Sahara NetSlate with Windows 7 Active...

Page 25: ...ht mouse button click press and hold down the tip of the stylus lightly on the screen In a moment an animated circle will draw around the pointer similar to when in touch screen mode Lift the stylus f...

Page 26: ...Chapter 01 Getting Started 25 This page intentionally left blank...

Page 27: ......

Page 28: ...yourself with the controls and Input Output I O ports on the faces and sides of the computer Understanding the layout of the system will help you use your Sahara NetSlate more effectively while in the...

Page 29: ...ged orange charging blinking battery low 10 2 LCD with Digitizer Touch Screen Screen may be resistive touch capacitive touch or a dual mode active digitizer capacitive resistive touch On dual mode tab...

Page 30: ...Docking Connector Port For use with both i500 and i400 compatible docking plates and docking cradles 5 Stylus Pen in Garage 6 Hard Drive Solid State Drive 7 System and CPU Intake Vents Do not block to...

Page 31: ...1000 Gigabit Ethernet Port RJ45 4 SuperSpeed USB 3 0 Ports x2 5 Audio Out Headphones 3 5mm 6 Audio In Microphone 3 5mm 7 Stylus Pen in Garage 8 Function Buttons L1 Secure Attention Sequence SAS L2 Sc...

Page 32: ...F10 key in BIOS DOS mode R4 User Programmable Esc key in BIOS DOS mode 3 Battery Bay One 1 with Lithium Ion Battery Pack 4 Anti theft Kensington Lock Port Use with the locking device sold separately...

Page 33: ...the Bluetooth wireless transmitter The switch will glow blue when powered on Slide switch back to turn off Bluetooth NOTE When not actively using a Bluetooth peripheral turn the Bluetooth transmitter...

Page 34: ...e interior of the Tablet PC Do not block to help prevent over heating There are three available wireless modes on the Sahara NetSlate if the optional 3G 3 5G WWAN module is installed The color of this...

Page 35: ......

Page 36: ...to run your Sahara NetSlate for 3 0 3 5 hours before needing to start swapping them out Operations that will significantly reduce battery life include but are not limited to the following 1 Using exte...

Page 37: ...urce When each battery is fully charged its corresponding indicator will turn green Be sure that both indicators have turned green before attempting to run the Sahara NetSlate on battery power for the...

Page 38: ...calibration 1 To enter the BIOS power on or restart your Sahara NetSlate and press the L2 Screen Rotation button as soon as you see the TabletKiosk logo 2 Once in the BIOS use the L3 button to naviga...

Page 39: ...When you connect the computer to an electrical outlet the Smart Battery IC in each battery pack checks its charge level and temperature status If charging is necessary the corresponding battery indica...

Page 40: ...ates approximately how much of a charge is remaining in the battery Low Battery Warnings A battery s indicator light will begin blinking orange to alert you to a Battery Low status Typically this is w...

Page 41: ...m If the computer is left without a power source for long periods of time this battery can be exhausted and system information can be lost This will not affect any of your data stored on the com puter...

Page 42: ...ically charge them in order to keep their electrons mov ing Even charging the batteries for ten to fifteen minutes every 60 90 days should be sufficient to keep the batteries in good condition Since a...

Page 43: ......

Page 44: ...pped the ante with the release of Windows 7 This chapter contains tips and details to help you get the most from your Sahara NetSlate when using Microsoft Windows 7 Navigating in Windows 7 on a Tablet...

Page 45: ...f your resting hand When using a stylus or your finger in touch screen mode instead of sliding the pen or your finger around the screen to move the pointer simply tap on with what you want to interact...

Page 46: ...in the box Hover over another icon and when it appears tap in its check box In touch screen mode tap an icon to highlight it The selection check box should appear Tap in it to add it to the selection...

Page 47: ...calibrate the touch screen you must use either your finger or a stylus meant for use on a capacitive touch screen If you attempt to use the digitizer stylus to calibrate the touch screen you will be...

Page 48: ...nel or you will not be able to control Windows Re check the box and click Apply to re enable touch input Touch Action Double Tap Settings To adjust how fast and how far apart your fingers can be to pe...

Page 49: ...page This feature in Windows 7 essentially removes this limitation When enabled by checking the box Show the touch pointer when I m interacting with item on the screen a graphical representation of a...

Page 50: ...ng Because sliding a single finger around on the screen is also used to select text and objects you might find it less confusing to only allow panning by using two fingers To disable panning with a si...

Page 51: ...continue scrolling longer or faster after removing your finger from the screen adjust the Inertia Settings slider toward More For shorter and slower panning after removing your finger from the screen...

Page 52: ...n button Most of the time a Standard Calibration should be sufficient to perform an accurate calibration NOTE If you find the Standard Calibration to be too imprecise the Advanced Calibration mode off...

Page 53: ...e you don t want the calibra tion data to be stored in the controller Perhaps you are only run ning a test or you want the pre calibrated state to be restored when you restart the system In these case...

Page 54: ...d towards the extreme edges while smaller numbers will pull back the points into linearity If you are having difficulty tapping on objects near the very outer edges of the screen or when you tap near...

Page 55: ...er functions The Tablet PC Settings control panel is where you specify your handedness and where you can go to calibrate the digitizer The Pen and Touch control panel is where you can configure tap se...

Page 56: ...ration screen DUAL MODE SCREEN NOTE To calibrate the touch screen you must use either your finger or a stylus meant for use on a capacitive touch screen If you attempt to use the digitizer stylus to c...

Page 57: ...s similar to the table at the beginning of this chapter Below the table is a Settings button that will allow you to adjust the way the pen performs these actions all except single tap which has no set...

Page 58: ...ity to perform a right click by pressing on the screen and holding You can also adjust how long you must keep your pen pressed to the screen before the circle appears and draws around the tip of the s...

Page 59: ...he Pen and Touch control panel Whether or not your system alerts you each time you tap on the screen with the stylus by making a clicking sound Pen Pop up Menu The pen pop up menu is a handy little fe...

Page 60: ...Tap the OK button to accept the keystroke combination 3 Enter the name as you would like it to appear in the pop up menu into the Name field Tap the OK button to add it to the pop up menu The Add drop...

Page 61: ...navigate to the appli cation you which to add and double tap on it 3 Enter the name as you would like it to appear in the pop up menu into the Name field Tap the OK button to add it to the pop up menu...

Page 62: ...ve Digitizer the panel will be hidden until you bring the tip of the stylus near the screen The edge of the panel will sit just visible at the edge of the screen Hovering your pen over that edge of th...

Page 63: ...olbars and then tap on Tablet PC Input Panel option on the panel that appears This will place a permanent button on the Taskbar next to the System Tray that will easily allow you to call up the panels...

Page 64: ...ptions menu Character by Character Mode This mode accepts input on a character by character basis and is useful for entering information that requires a higher level of precision such as passwords web...

Page 65: ...cuts This panel can be re sized increasing or decreasing the size of the individual keys Windows will always remember how you size the keyboard panel for the next time you open it Input Panel Standar...

Page 66: ...ing how the input panels work Opening This tab contains the option to open the Input Panels by tapping or simply pointing at the panel tab with the digitizer stylus It also has options for where to sh...

Page 67: ...from the text before converting it If you find that the panel waits too long to convert your text or conversely is converting your text while you are still in the middle of writing a word these two sl...

Page 68: ...m the Simplified Chinese PRC standard GB T 18790 2002 If after experimenting with any of the panel s settings you would like to return the Input Panel to its default configuration just tap the Restore...

Page 69: ...a few different characters Teach the recognizer your handwriting style is a total hand writing training session You will be presented with a series of sentences to write that will cover all letters n...

Page 70: ...go to START g Control Panel g Hardware and Sound g Pen and Touch Tap on the Handwrit ing Tab and choose Don t use automatic learning and delete any previously collected data Handedness Lastly telling...

Page 71: ...t of the pen that invokes specific short cut actions normally completed by the press of a key on a keyboard For example you can enter a space you can delete text and you can enter a line return These...

Page 72: ...will need to be turned on if you want to utilize them The do this 1 Tap on START g Control Panels g Hardware and Sound g Pen and Touch to open the Pen and Touch control panel 2 From within the Pen an...

Page 73: ...ck will fade in briefly on your screen where you actually performed the pen flick gesture Customizing Pen Flicks If you would like to assign different actions to any of the eight 8 flick directions yo...

Page 74: ...ther tap on the Tab key in the on screen keyboard or tap on the Keys field to switch focus to it and then enter your desired keyboard key combination for the action you want to create For example tap...

Page 75: ...an up or down but you must use two fingers to pan left and right Simply place your finger tip or stylus on the page and move your finger in the direction you want to page to pan To pan rapidly in a pa...

Page 76: ...the page with one finger To page forward or backward swipe to the left or right Programming the Function Buttons Your Sahara NetSlate has two or three user program mable function buttons located on t...

Page 77: ...e other end into your broadband modem or the appropriate LAN port as instructed by your network administrator 2 If your network or Internet Service Provider ISP uses a Dynamic Host Control Protocol DH...

Page 78: ...s the following items Select Internet Protocol Version 4 TCP IPv4 and tap the Properties button to open the Internet Protocol Version 4 TCP IPv4 Properties window Locate the connection type called Loc...

Page 79: ...ow 9 Repeat steps 5 through 7 selecting Internet Protocol Ver sion 6 TCP IPv6 this time if your network supports it 10 If you need to specify additional DNS servers WINS servers or gateways tap on the...

Page 80: ...802 11a b g n wireless networks and therefore can connect to wireless routers or access points that support any of these standards 1 Turn on the WiFi transmitter using the toggle switch on the top of...

Page 81: ...less technology you can use to transfer data between your Sahara NetSlate and other wireless devices that use Bluetooth such as wireless keyboards and mice cell phones PDAs and even printers Bluetooth...

Page 82: ...e If there is only one device found it will automatically begin the pairing process If there is more than one discoverable device found it will open a window prompting you to choose which device you w...

Page 83: ...our remain ing devices 8 If your additional devices are not found simply place the target Bluetooth device into pairing mode again and start the process over As pairing mode broadcasts an active signa...

Page 84: ...tart the Connection Wizard by tapping on the New Connection button and when the Bluetooth Wizard starts select the Custom Mode option before continuing Intel Graphics and Media Control Panel Using the...

Page 85: ...pport To enable multiple displays be sure to have your external monitor connected and then select your desired operating mode from the drop down on the Display Devices Tab Single Display uses only one...

Page 86: ...on the screen surrounded by a black border Adjusting Power Settings To control how the system balances battery efficiency and display performance tap on the Power Settings button to open a sub panel t...

Page 87: ...ath the two display boxes on the right side of the panel 3D Performance Tapping the 3D Settings button at the bottom of the GMA con trol panel opens a panel where you can adjust the 3D settings for be...

Page 88: ...how video looks when played back on your screen full screen independently of the Windows desktop settings You can use these settings if a movie you are watching looks too dark for example Hot Keys The...

Page 89: ...nch that application the scheme will be automatically invoked Why might you want to create multiple schemes You need better 3D performance at the expense of visual quality for a particular graphics in...

Page 90: ...in more information and program updates Realtek HD Audio Manager The Realtek HD Audio Manager is where you can control how audio is recorded and played back on your Sahara NetSlate To enter this contr...

Page 91: ...ting Audio Playback The Speakers tab is where you can control the way your Sahara NetSlate plays back audio Here you can adjust the system volume level set the default playback device internal speaker...

Page 92: ...volume level is turned up high enough or not muted To encode surround sound audio as stereo sound for transfer out of the analog out headphone jack to a speaker system or receiver capable of surround...

Page 93: ...es Use the Karaoke counter control to cancel out tone down frequencies associated with human voice sounds singing Default Audio Format Use this drop down to set the bit depth sampling rate and frequen...

Page 94: ...system via either the built in digital micro phone array or an externally connected sound source Recording Volume Level The Recording Volume section at the top of the Microphone tab has controls for s...

Page 95: ...p a projector Default Format This sub section is where you can choose the audio recording quality Use this drop down to set the bit depth sampling rate and frequency of the audio recorded The two defa...

Page 96: ...Chapter 04 Using Your Sahara NetSlate with Microsoft Windows 7 95 This page intentionally left blank...

Page 97: ......

Page 98: ...e a specific hardware device for use in platform authentication For example the TPM can be used to verify the authenticity of a specific hardware system for secured access The biometric fingerprint re...

Page 99: ...n the right side 1 Power on or restart your Sahara NetSlate 2 As soon as the TabletKiosk logo appears on the screen press the Screen Rotation L2 button on the left side of the system 3 When the BIOS a...

Page 100: ...ng TCG TPM SUPPORT No Enable Disable TPM TCG TPM 1 1 1 2 supp in BIOS BIOS SETUP UTILITY v02 69 C Copyright 1985 2010 American Megatrends Inc Main Advanced Boot Security Exit Trusted Computing TCG TPM...

Page 101: ...emovable drive such as a USB memory stick and another to Print the password You must choose to do at least one of these options in order to continue VERY IMPORTANT Regardless of which option you choos...

Page 102: ...e and that applications that take advantage of the TPM can now be enabled 9 Tap the Close button to exit the TPM Initialization Wizard You have now successfully initialized and taken ownership of the...

Page 103: ...create a Windows password If your Sahara NetSlate operates within a Windows Domain you likely already have a password assigned to your user account and you are ready to go If you are unsure whether y...

Page 104: ...ecial character _ etc to make it more difficult for someone attempting to access your system to guess it 4 Confirm your password by typing it again and then enter a hint to help you remember it in cas...

Page 105: ...Wallet for safer online purchasing and a Biomenu for quick access to these security features simply by swiping your finger across your Sahara NetSlates biometric fingerprint reader Enrolling Your Fin...

Page 106: ...105 NOTE Place a check in the box labeled Do not show again if you do not want to be presented with this window every time you launch the Protector Suite 3 Enter your Windows password to authenticate...

Page 107: ...selected horizon tally on the front panel to one side of the fingerprint reader and slide it across the scanner bar to begin the enroll ment process The window will inform you if a scan was successfu...

Page 108: ...ta to enroll your fingerprint you will be returned to the previous window and informed that you have success fully enrolled one finger Repeat the process until all of the fingers you wish to use have...

Page 109: ...website log ins and dialog registrations When you are at a website you wish to register simply fill in the login information and before submitting the information swipe an enrolled fingerprint to disp...

Page 110: ...nt verification and the backup password Files and folders stored in the per sonal safe are hidden from view and protected from editing until you unlock the folder E Wallet requires full Protector Suit...

Page 111: ...it checks the computer during start up for any conditions that could represent a security risk for example a change to the BIOS or any start up files If a potential threat is discovered BitLocker will...

Page 112: ...contents of your entire drive could be lost to you forever Turning off BitLocker and Decrypting Your Drive There may be a point in time where you no longer want to use the BitLocker Encryption or per...

Page 113: ......

Page 114: ...al 3G networking module upgrading your computer s memory RAM and storage capacity hard disk drive or solid state drive as well as using the TabletKiosk Modular Expansion System Before you Begin ANY Up...

Page 115: ...Damage resulting from the servicing of your computer that is not authorized by TabletKiosk is not covered by your computer s standard or optional extended warranty Installing a SIM Card for use with...

Page 116: ...Locate the RAM 3G Compartment on the back near the top right side of the system see the chapter Touring the Sahara NetSlate for the location Remove the two screws that secure the access cover use a 1...

Page 117: ...clipped corner of the slot and then close it and slide it back to the right until you feel it click to lock it into place NOTE You will have to lift up slightly on the cover before you will be able t...

Page 118: ...ctions and illustrations for informa tion on how to upgrade your computer s memory modules Be sure to follow the procedures in the previous section Before you Begin ANY Upgrade Procedure 1 Turn off yo...

Page 119: ...ull out the RAM module Try not to touch the module s connector pins to keep them clean in case you d like to use this module again 6 To insert a new RAM module align the connec tor pins on the bottom...

Page 120: ...all the files on your computer If you find you are running out of space you might consider upgrading to a larger drive Typically when a computer s Hard Disk Drive HDD fills up its access time begins t...

Page 121: ...e down on a solid flat surface Be careful not to place it on some thing rough that could damage the LCD display 2 Locate the HDD SSD compartment near the center of the Tablet PC just below the docking...

Page 122: ...e HDD SSD compartment Be careful when aligning the drive so the connec tors match up with the SATA and power ports If you are properly aligned with the compartment it should slide back in very smoothl...

Page 123: ...card data capture capability and optionally a 3G module for sending all the data back remotely Based upon Universal Serial Bus USB technology TabletKiosk expansion system modules are hot swappable Thi...

Page 124: ...wn gently to attach the module 5 Use the two screws that came with the module to secure it to the Tablet PC To swap or remove a module simply remove the two 2 screws holding the module in place remove...

Page 125: ......

Page 126: ...roblems possible causes and sug gested solutions are presented in the following tables Audio Problems Solutions Problem Possible Cause Solution There is no sound The volume is either muted or turned d...

Page 127: ...System Tray is not accurately displaying the remaining charge Battery Packs require calibration Calibrate the battery pack as specified in the chapter entitled Battery Care and Usage The battery packs...

Page 128: ...o connect to and that the network access Password WPA PIN Protected Set up or Key WEP is correct SIM card not inserted with optional TK 3G WWAN Expansion module Make sure that the SIM card provided by...

Page 129: ...nnect but doesn t see any other computers Correct workgroup or domain name is not set in computer s system properties Enter workgroup or domain name in Computer Name tab of the System Properties panel...

Page 130: ...ly even after being calibrated Resistive touch screen Touch screen linear ity is inaccurate Run the Advanced Calibration routine in the PenMount Control Panel Start with 9pt option Touch screen contro...

Page 131: ...is not seated properly Following the instructions in the section entitled Upgrading Your Memory try re moving and reseating the RAM module A RAM module is the wrong specification The RAM module could...

Page 132: ...Disconnect the device and power it off Shut off the Sahara NetSlate normally Power on the device and plug it in Power on the Sahara NetSlate Contacting Your Dealer If you still have a problem the nex...

Page 133: ...ious settings or documents or reinstall your system without saving your docu ments or settings IMPORTANT You will need to have a mouse and or keyboard with standard F1 F12 function keys attached to yo...

Page 134: ...keyboard language You will then be given another chance to cancel by clicking the No button when asked are you sure you want to install Windows If you are sure click the Yes button and the Windows in...

Page 135: ...to access the recovery options you will need to login using your current Windows login NOTE Your current account must have administrator privileges in order to successfully login 4 After successfully...

Page 136: ...lick the Yes button and the restore procedure will begin What To Do After a Successful System Reinstall After you have finished restoring Windows your system will reboot and Set up will configure Wind...

Page 137: ......

Page 138: ...TPM set the SATA mode enable power features and set button functionality BOOT Enables user to set the device order the system will attempt to start up from SECURITY Allows user to set Adminstrator and...

Page 139: ...ion is when entering the Administrator and User passwords as you will still need a keyboard Left Side Button Alternate Function Mapping L1 Ctrl Alt Delete L2 Delete to enter BIOS at POST L3 To navigat...

Page 140: ...c Main Advanced Boot Security Exit System Overview AMIBIOS Version 08 00 16 Build Date 12 19 11 BIOS Rev 1 02 EC FW Rev 3 2 29 Processor Intel R Atom TM CPU D525 1 80GHz Speed 1800MHz System Memory Si...

Page 141: ...anced Boot Security Exit Advanced Settings IDE Configuration AHCI Configuration Trusted Computing BAT Calibration FAN Calibration Wake On LAN From S4 S5 Disable Left Programmable Button 3 4 Volume Up...

Page 142: ...power state by LAN requests Left Programmable Button 3 4 Sets 3rd and 4th function buttons on the left side of the Tablet PC to adjust either the Speaker Volume or Screen Brightness Bootup Num Lock S...

Page 143: ...e you can set the Tablet PC to boot from an external drive such as a DVD drive or USB thumb drive Setting this order will also set the drive in Boot Device Priority screen above BIOS SETUP UTILITY v02...

Page 144: ...w the system to boot If no Supervisor password is set user will be allowed to enter BIOS without being required to enter an additional password BIOS SETUP UTILITY v02 69 C Copyright 1985 2010 American...

Page 145: ...the menu without discarding any changes made to the BIOS Load Optimal Defaults Loads the optimized system defaults as configured from the factory Selecting Yes changes all the BIOS settings back to t...

Page 146: ...Appendix A BIOS Set up 145 This page intentionally left blank...

Page 147: ......

Page 148: ...reaming SIMD Extensions 2 Intel SSE2 Intel Streaming SIMD Extensions 3 Intel SSE3 Intel Streaming SIMD Supplemental Extensions 3 Intel SSSE3 Intel 64 architecture Execution Disable Bit support for enh...

Page 149: ...RAM configuration of 4GB 800MHz PC3 6400 I O Voltage of 1 5 V Single channel 64 bit wide data lines Batteries 3 Series 1 Parallel 3S1P Lithium Ion cells per pack Sanyo prismatic cells Typical capacit...

Page 150: ...er 2 0 Intel Clear Video Technology MPEG2 Hardware Acceleration Dual Display extended desktop or desktop mirroring via optional Docking Cradle or VESA Mounting Plate Input Panels Resistive Touch Scree...

Page 151: ...WXGA 1280x800 AFFS with LED Backlight 262 144 color display 16 7M colors via dithering Typical White Luminance 300 nits Response Time 30 ms black to white to black Viewing angle 180 V H with Contrast...

Page 152: ...mm Stereo Headphone Microphone Plug n Play Jacks Gigabit Ethernet LAN Intel 82577 GbE PHY controller with built in RJ45 port 10 100 1000 Base T IEEE 802 3 specification conformance Supports up to 4KB...

Page 153: ...PS Windows 7 only FISMA Bluetooth Wireless Billionton GUBTCR42M Bluetooth 2 1 EDR built in USB module with Power ON OFF Switch Full speed USB 2 0 interface Bluetooth wireless access up to a radius of...

Page 154: ...epth full 7 bit Array width 144 pixels Array horizontal pitch 50 microns Pixel resolution 508 DPI horizontal Finger swipe speeds up to 25 cm s I O Ports RJ45 Gigabit Ethernet LAN 2x USB 3 0 SuperSpeed...

Page 155: ...working ON blue Bluetooth ON blue Function Buttons Left SAS Ctrl Alt Del Screen Rotation enter BIOS during POST Volume Up or Screen Brightness Increase define in BIOS Volume Down or Screen Brightness...

Page 156: ...maximum SCP Short Circuit Protection plus Auto Recovery Function OVP Over Voltage Protection Latch Mode up to 27 0Vdc maximum OCP Over Current Protection Auto Recovery up to 5 5A maximum OTP Over Temp...

Page 157: ......

Page 158: ...310 782 1201 tel 310 782 1205 fax www tabletkiosk com UG a510 rev 04 25 12...

Reviews: