O p e r a t i o n s a n d I n s t r u c t i o n M a n u a l
19
S A G E M E T E R I N G , I N C .
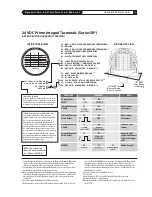
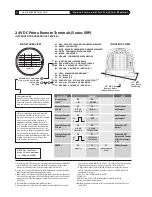
24 VDC Prime Integral Terminals (Series SIP)
(APPROVED FOR HAZARDOUS SERVICE
6
)
1
RED
AC1
COM
1
2
S1
AC2
B +
2
3
RED
SPARE
A –
3
4
WHITE
4-20mA PWR
4
5
S2
4-20mA
5
6
WHITE
VDC GND
6
A
B
C
24 VDC
PULSE
VDC IN
+
VDC GND
–
INTEGRAL
INSIDE COVER VIEW
NOTE: The Sage Prime
draws 2.4 watts maximum
(i.e.
≅
100ma @24VDC)
–
+
C U S TO M E R
R E T U R N
E X T E R N A L LY P O W E R E D
4 – 2 0 m A B Y C U S TO M E R
+
*
DESCRIPTION
TERMINALS
NOTES
DC Input Power:
B5
B6
24 VDC
7,8
+ VDC
– VDC GND
Internally Powered:
C5
C6
Do not remove
4-20 mA
4-20 mA
Return
any Jumpers
SIGNAL DRIVE
Internally Powered:
C4
C6
Do not remove
Pulsed Output
GND
any Jumpers
Externally Powered:
C5
B4
Remove B4 & B5
4-20 mA
4-20 mA
4-20 mA
Jumper
SIGNAL DRIVE
EXTERNAL SOURCE
Externally Powered
9
:
C4
B3
Remove B4 & B5
Pulsed Output
JUNCTION FOR
Jumper and Connect
PULSE RETURN
C4 Resistive Jumper
to B3
MODBUS
C2
C3
C1
Modbus Ground
10
RS485(+)
RS485(–)
MODBUS GROUND
(REQ’D)
*B4 and B5 JUMPER
Remove jumper for Externally Sourced 4-20
mA. In this mode, user supplies 9-27 Volts to
externally power the 4-20 mA loop, and the
4-20 mA loop becomes optically isolated.
1
Specify the Sage Prime PLUS option in order to have the Modbus Ground (Terminal C1, COM) isolated
from the 24 VDC Sage Power Supply Ground (Terminal B6). All other features of Prime PLUS are
identical to the standard Sage Prime, except other voltage available.
(See footnote 8)
2
It is important to connect the Ground when using Modbus communications, or ground loop problems
may develop. Improper wiring can also damage internal circuitry
3
Note,
if customer externally powers the 4-20 mA by removing the jumper, the Pulse voltage output
is also effected: The voltage output of the Pulse will follow the customer power (i.e. 24 VDC external
power will result in a 24 VDC Pulse [maximum of 50 mA]; 12 VDC external power will result in a
12 VDC Pulse)
4
Pulse width 250 msec default (adjustable with Addresser software)
5
Using Sage Addresser, a Low Flow Cutoff (LFC), commonly referred to as Min Cutoff or Zero Cutoff
can be entered into the FLOW MIN Functions. In Versions 1.82 or higher, the Low Flow Cutoff and
the 4-20 mA Scaling are independent of each other. For example: A Low Flow Cutoff (LFC) of
10 SCFM on a Meter with a Full Scale of 100 SCFM will report 0 on the Display and 4 mA on the
output. The output will remain at 4 mA until the LFC is exceeded: (ie: 25 SCFM=8 mA). Thus the
4 mA will always be zero based
6
Class I, Div 2, Groups B,C,D,T4 and ATEX Ex na IIC T4
7
24 VDC ±10%
8
Other DC voltages (5 VDC, 12 VDC, 48 VDC) available on Prime PLUS. Contact Sage
9
Assumes the 4-20 mA is Externally Powered
10
Modbus Ground becomes isolated from the B6 Power Supply Ground only on Prime PLUS version
(specify “PLUS”)
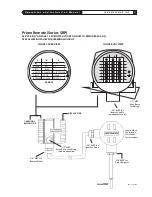
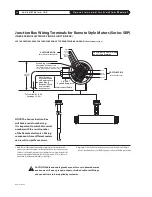
INSIDE BODY VIEW
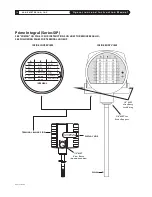
1/2" NPT
User Entry
for Wiring
3/4" NPT for
Remote Cable
(on Remote Style SRP)
* *
**Note, Flow Meter is supplied with a 10K
(1/2 watt) metal film resistor (Resistive
Jumper) connected across Terminals C4 and
C6. For externally powered operation, in
addition to removing B4 & B5 Jumpers, it
is necessary to connect C4 Resistive Jumper
to Terminal B3 instead of C6. Note, B3 must
be connected to the External Sources com-
mon in order to enable the optically isolated
pulse output. In this mode, Pulse Output is
optically isolated. Pulsed Output voltage will
depend on customer source voltage. Use
Sage Resistive Jumper only!
* *
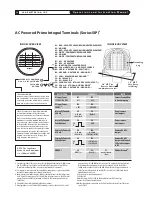
A1 – RED – VELOCITY SENSOR WIRE (HEATED ELEMENT)
A2 – NO WIRE
A3 – RED – VELOCITY SENSOR WIRE (HEATED ELEMENT)
A4 – WHITE – TEMPERATURE SENSOR WIRE
A5 – NO WIRE
A6 – WHITE – TEMPERATURE SENSOR WIRE
B3 – JUNCTION FOR ISOLATED PULSE
B4 – 4-20 mA RETURN (–) AND PULSE SOURCE
B5 – VDC IN – VOLTAGE DC – POSITIVE (+)
B6 – VDC GND – VOLTAGE DC – GROUND (–)
1
C1 – COM – RS485 MODBUS GROUND
1,2
C2 – B(+)–RS485_D1
C3 – A(–)–RS485_D0
C4 – 24 VDC PULSE – 0 TO 24 VDC PULSE OUTPUT
3,4
C5 – 4-20 mA – 4 TO 20 mA SIGNAL DRIVE
5
C6 – VDC GND – VOLTAGE DC – GROUND (–)
24
O
24
O
Summary of Contents for SIP
Page 2: ......
Page 6: ......
Page 7: ...Section GETTING STARTED A...
Page 8: ......
Page 25: ...Section STYLES AND FEATURES B...
Page 26: ......
Page 32: ......
Page 33: ...Section DRAWINGS C...
Page 34: ......
Page 41: ...Section DIAGNOSTICS D...
Page 42: ......
Page 47: ...Section WARRANTIES AND SERVICE WORK E...
Page 48: ......
Page 53: ...Section MODBUS F...
Page 54: ......
Page 63: ...G Section APPENDIX G...
Page 64: ......


