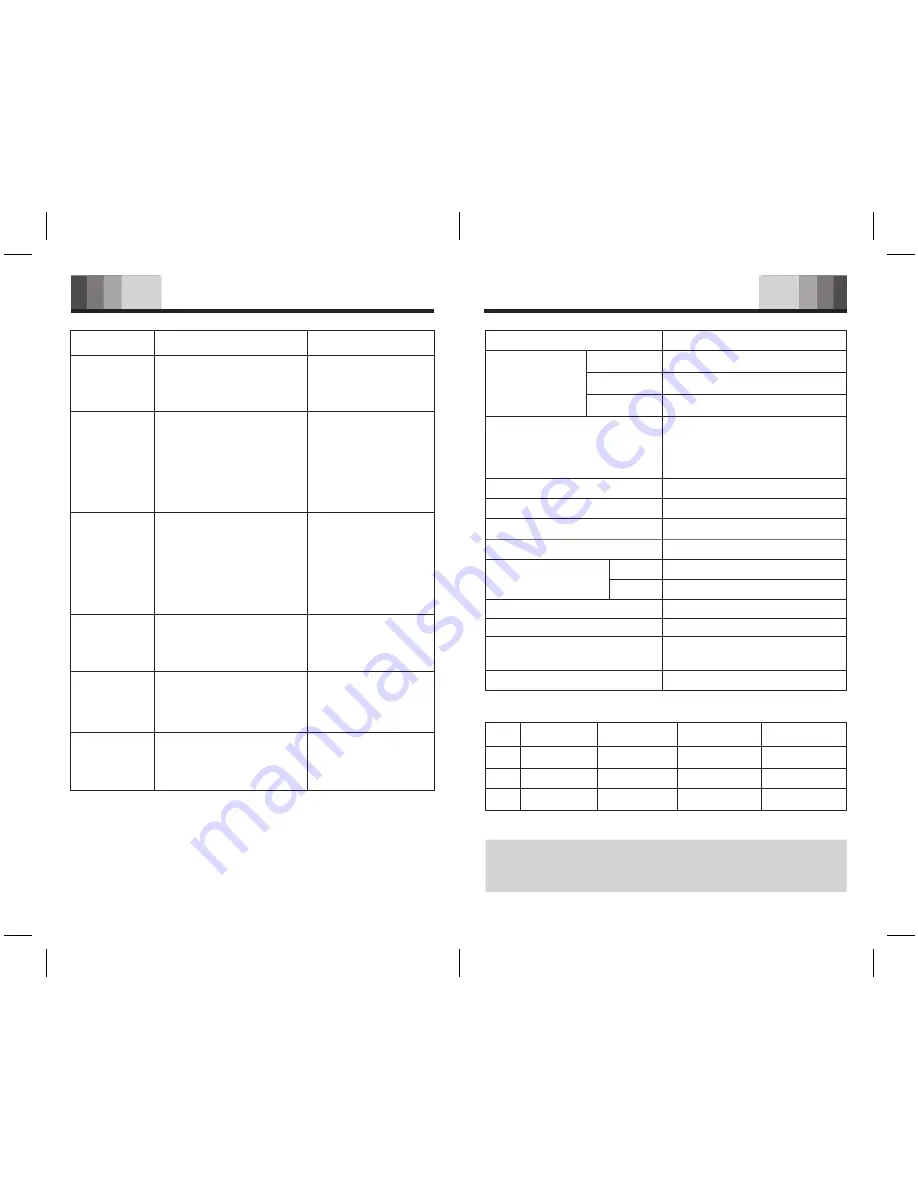
background image

35

36

Troubleshooting

Specifications

Symptom

LCD is Blankt

Can’t record

Can’t playback

Can’t stop, 

pause, play 

or record

No sound from 

the speaker

No sound from 

the earphone

The HOLD switch is engaged.

The battery is exhausted.

Nothing has been recorded

yet.The volume is at the 

lowest setting.

The HOLD switch is engaged.

The earphone is plugged in.

The volume is at the lowest 

setting.

The earphone is not plugged 

in properly.The volume is 

at the lowest setting.

The HOLD switch is engaged.

The battery is exhausted.

The maximum number of 

recordings has been reached 

or the recording capacity is

 full.

Possible cause

The battery is exhausted.

The battery is not inserted 

correctly

Correction

Replace the battery.

Insert the battery 

correctly.

Slide the HOLD switch 

to the Off position.

Replace the battery.

Check the number of 

recordings.Adjust the 

volume.

Slide the HOLD switch 

to the Off position.

Remove the earphone.

Adjust the volume.

Plug in the earphone 

properly.

Adjust the volume.

Slide the HOLD switch 

to the Off position.

Replace the battery.

Delete some recordings 

or move recordings to 

an external device.

Specification
32kbps/ 8kHz/ZVR, Mono
6.4kbps/ 8kHz/ZVR, Mono
4kbps/ 8kHz/ZVR, Mono
Internal microphone (Mono)

external microphone (Mono)

Line (Stereo at HQ mode)

FM  (Stereo at HQ mode)
87.50~108.00 MHz
ON / OFF
YES
Total 396 (99 per folder × 4)
All bit rates
32~192kbps, no DRM supported
USB 1.1
AAA (LR03, UM-4) alkaline battery

106 mm X 31mm X 16 mm

Items
Encoder

HQ
SP
LP

Recording source

FM Radio Reception Band
Alarm function
Timer recording function
Maximum number of recordings
Playback capability

MP3
WMA

USB support
Power supply

Dimensions

Recording time

Important information

HQ
SP
LP

128MB

256MB

512MB

9HR 19 MIN 

46 HR 36MIN 
74 HR 33 MIN

18 HR 34 MIN
92 HR 50 MIN

148 HR 32 MIN

37 HR 12 MIN
186 HR 2 MIN

297 HR 40 MIN

1GB

74 HR 29 MIN

372 HR 27 MIN
595 HR 56 MIN

8 hours

Battery life

(Record/Playback Earphone)

Because its products are subject to continuous improvement,

it is reserved the right to modify product designs and 

specifications without notice and incurring any obligation.

Summary of Contents for SRM520

Page 1: ...Instructions for use Digital Voice Recorder Thank you for purchasing this product Please read this manual carefully before using the product Familiarizing yourself with the instructions and functions ...

Page 2: ... from the manual The screen LCD display shown as an example in this manual may be different from the actual screen LCD display 2 Accessories 3 Hold function 6 USED TO USB POWER 5 1 Normal Playback 10 2 Slow Playback 10 10 Playback 7 Beep Setting 21 3 Search 10 5 Divide Automatically Recording to a new file every 60 minutes 20 6 VOR selection Voice Operating Recording 20 4 Repeat Playback 11 13 FM ...

Page 3: ... menu value FM radio channel indicator Play recording time indicator Menu entries FM radio frequency indicator HQ SP LP REC LOW SENSE MUSIC F M LINE IN VOR MHz ALL REPEAT A B 12 13 14 1 3 4 5 6 7 8 9 10 11 2 12 FOLDER REPEAT Folder change Repeat mode change Repeat A B FM Auto preset 2 Line External Microphone input socket 3 Built in microphone 4 RECORD STOP POWER ON EQ mode change 5 LCD DISPLAY 6 ...

Page 4: ... sound only the Ear Phone Hold function 1 When the HOLD switch on the up side of the Voice Recorder is in the Hold position all buttons on the device are inactive 2 Slide the HOLD switch to the OFF position to enable the buttons on the Voice Recorder Getting Started Getting Started Switching the Voice Record On 1 Press and hold the PLAY STOP button for a few moments to switch on the Voice Recorder...

Page 5: ...acity or the number of files reaches 396 FULL will be displayed and you cannot continue recording Fig 4 5 If this happens delete some recordings or move them to an external device Computer or Audio Do not remove the battery during recording This may cause the Voice Recorder to malfunction If you intend to record for a prolonged period of time replace the battery before beginning recording When the...

Page 6: ...ng with the built in microphone 4 FM Radio Recording 1 Switch the Voice Record on 2 If you are not in FM Radio mode press the MODE MENU button to enter this mode 3 Select the station you want to record For details please read the FM Radio Reception chapter 4 Press the REC STOP button to record the currently selected FM Radio station Fig 11 HQ REC F M MHz Fig 11 2 Press the FOLDER REPEAT button to ...

Page 7: ...will be repeated as long as the repeat indicator is shown on the display Fig 16 Press the PLAY STOP button to stop playback The Voice Recorder will remain in File Repeat mode Fig 16 HQ REPEAT HQ ALL REPEAT Fig 17 2 ALL REPEAT will be shown on the display and the current folder will repeat Fig 17 Press the PLAY STOP button to stop playback The Voice Recorder will remain in Folder Repeat mode Shuffl...

Page 8: ...utton briefly to save the selected station You can use the BACK button to search in the opposite direction 1 Press the FOLDER REPEAT button for a few moments Fig 19 Fig 19 F M MHz Button Function Overview at FM Radio mode FM Radio Reception MUSIC Fig 20 MP3 Player Function 2 Press the MODE MENU button to select the MUSIC folder Fig 20 1 Copy MP3 or WMA files from your computer to the MUSIC folder ...

Page 9: ...mode is available in Stop mode The following description is based on Stop mode in a voice folder The available menu items differ depending on whether you are in a voice folder or a MUSIC folder 1 Erase Deleting a single file or all files in a folder 1 With the Voice Recorder in stop mode select the file you want to delete 2 Press the MODE MENU button for a few moments Fig 26 Deleting a file A Pres...

Page 10: ...30 I Press the PLAY STOP button to delete all files in the selected folder or folders Fig 35 36 37 Fig 35 Fig 36 Fig 37 2 Recording Quality Selection This function is only available in voice folders 1 With the Voice Recorder in Stop mode press the MODE MENU button for a few moments Fig 26 2 Press the NEXT button briefly and then press the PLAY STOP button Fig 38 Fig 38 3 REC is shown and HQ blinks...

Page 11: ...STOP button to save your setting and then the MODE MENU button to exit Menu mode 5 Divide Automatically Recording to a new file every 60 minutes This function is only available in voice folders 1 With the Voice Recorder in Stop mode press the MODE MENU button for a few moments Fig 26 2 Press the NEXT button 4 times DIVIDE is shown on the display Fig 48 3 Press the PLAY STOP button briefly the indi...

Page 12: ...atedly until FRMAT is shown on the display Fig 57 3 Press the PLAY STOP button briefly N blinks on the display Fig 58 4 Press the NEXT button to change the indicator to Y Fig 59 5 Press the PLAY STOP button to format the Voice Recorder and delete all files on it Fig 60 61 Fig 60 Fig 61 9 Clock Set Mode 1 With the Voice Recorder in Stop mode press the MODE MENU button for a few moments Fig 26 2 Pre...

Page 13: ...iefly and then press the NEXT or BACK buttons to enter the desired hours Fig 69 6 Press the PLAY STOP button to set up the recording interval Fig 70 press the NEXT button to set the interval time 7 Press the PLAY STOP button to select the folder you want to record to Fig 71 8 Choose the folder to record to by pressing the NEXT button 6 The month will now blink 01 press the NEXT button to select th...

Page 14: ...AY STOP button briefly N blinks on the display Fig 77 Fig 77 Fig 78 Fig 79 13 Version Displaying the firmware version and release date 1 With the Voice Recorder in Stop mode press the MODE MENU button for a few moments Fig 26 2 Press the NEXT button repeatedly until VER is shown on the display Fig 80 3 Press the PLAY STOP button briefly to display the version number Fig 81 4 Press the NEXT button ...

Page 15: ...irect sunlight or any source of heat for a prolonged period 8 Remove the battery if you will not be using the Voice Recorder for an extended period 9 Do not pull attached earphone microphone or USB cable with excessive force The information in this User Manual is subject to change without notice Recommended PC environment Supported PCs IBM PC AT compatible Supported OS Windows XP Professional Wind...

Page 16: ... of voice recorder 3 Click Install button on the bottom of the menu You can play transferred ZVR file using windows media player on your pc In case of the plug in file for ZVR file play is not preinstalled you need to install program described as following procedure SW installation 1 Connect the voice recorder to PC 30 ...

Page 17: ... Player 31 3 Click and select ZVMPDISK E Playback 1 Select All Programs Windows Media Player from Start menu Windows Media Player starts 2 Select Open from File menu Select 32 2 Select 1 Click 4 Click Files of type and select Any File 2 Select 1 Click ...

Page 18: ...See page 21 Using your PC to do the formatting might stop the unit from recording normally If you accidentally formatted using your PC reformat it using the unit 5 Select the playback file click Open 6 Read the message first Click Don t ask me again for this extension click Yes Playback starts 2 Click 1 Select 34 2 Click 1 Select ...

Page 19: ...e earphone properly Adjust the volume Slide the HOLD switch to the Off position Replace the battery Delete some recordings or move recordings to an external device Specification 32kbps 8kHz ZVR Mono 6 4kbps 8kHz ZVR Mono 4kbps 8kHz ZVR Mono Internal microphone Mono external microphone Mono Line Stereo at HQ mode FM Stereo at HQ mode 87 50 108 00 MHz ON OFF YES Total 396 99 per folder 4 All bit rat...

Reviews: