5
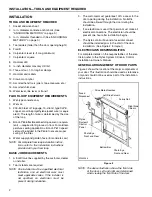
INSTALLATION—SIDE COLUMNS
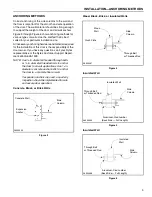
Figure 10
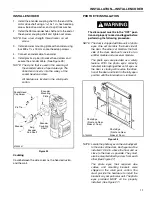
SIDE COLUMNS
NOTE: DO NOT change the location of the drive
motor without first contacting your Rytec
representative or the Rytec Customer
Support Department at 800-628-1909.
1.
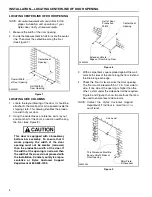
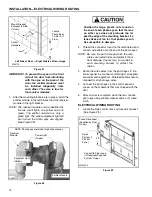
Remove the drive motor side column from the ship-
ping crate. The drive motor side column is identified
by the seal edge that faces inward during installa-
tion for a left-hand-side motor mounting.
(See Figure 11.)
Figure 11
2.
Stand the drive motor side column on the floor and
tight against the wall to determine which side of the
door to place the side column.
3.
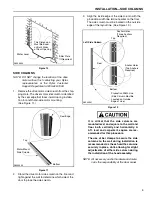
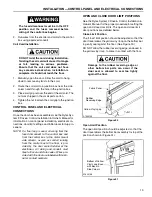
Align the inside edge of the side column with the
production width line laid out earlier on the floor.
The side column must be located on the outside
edge of the layout line. (See Figure 12.)
Figure 12
It is critical that the side columns are
mounted level and square to the wall and
floor, both vertically and horizontally. A
4-ft. level and carpenter’s square are rec-
ommended for this procedure.
The use of bar clamps to secure the side
columns to the wall during installation is
recommended, as these hold the columns
securely in place, while allowing for slight
adjustments of either side column during
the installation of the head assembly.
NOTE: All necessary anchor hardware and mate-
rial is the responsibility of the door owner.
A0500004
This Dimension
Must Be Equal
on Both Sides
of Door Opening
Water Level
Shim Plate
(If Required)
A3000090
Seal Edge
Motor Mount
Side Column
Top
Bottom
A3000091
Anchor Holes
(Two Anchors
Required)
Production Width Line
(Side Column Must Be
Located on Outside
Edge of Line)
Seal
Anchor Holes
(Three Anchors
Required)
Left Side Column
Top
Bottom
Summary of Contents for Pharma-Roll
Page 1: ...Pharma Roll Installation Manual Revision January 15 2009 0715009 Rytec Corporation 2007...
Page 2: ......
Page 23: ...NOTES 19...
Page 24: ......

