background image

11

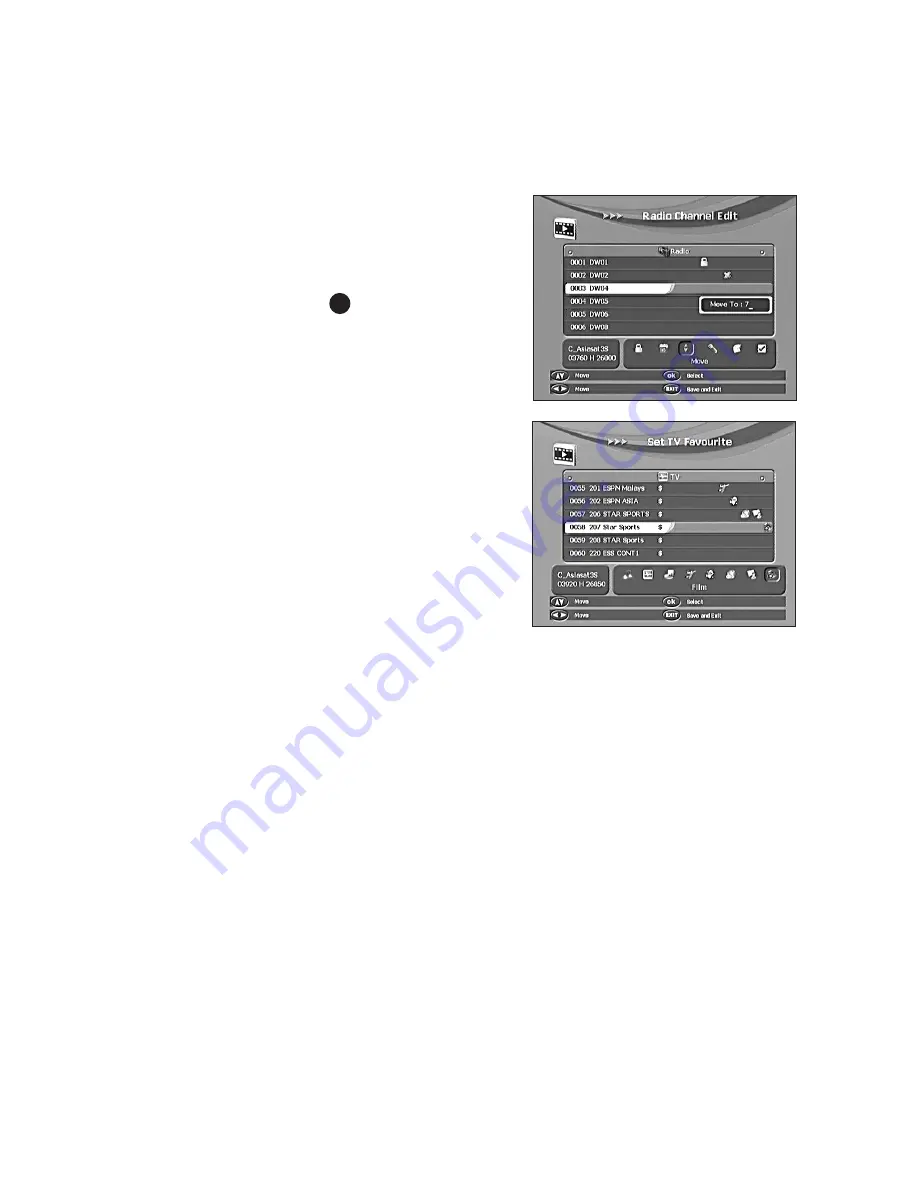
5.2.2 Radio Channel Edit 


Using the “VOL-” and “VOL+” buttons you can select from the options of; LOCK, DELETE, 
MOVE, RENAME, EDIT and SELECT functions to edit your Radio programmes. You can 
press the “CH-” or “CH+” buttons to select the channel, and press “VOL-” or “VOL+” button 
to choose the functions which are displayed towards the bottom of the OSD. Press the 
“OK” button to activate your choice.


The procedure for editing Radio channels is 

  identical to that for TV Channels as described
  in Section 5.2.1.


Press the TV/Radio button      on your remote

  control to enter the radio channels.

5.2.3 Set TV Favourites


This easy to use option makes it simple for you to
find the channels that you want to watch. Personalise
the list in your own way to sort favourite channels and
put them into easy to find groups.


There are a total of 8 favourite sorting groups: 

  Music, HDTV, Finance, Lifestyle, Children, News, 
  Shopping and Film.


Example -

 To include TV Channel 10 in the favourite

  group – Music: Move using the “CH-” or “CH+” 
  buttons to highlight Channel 10, then move using the
  “VOL-” or “VOL+” buttons to select the Music group, press the “OK” button, then you will  
  see a logo displayed at the left beside channel 10, then press the “EXIT” button to save  
  and exit. Now channel 10 is saved in the Music favourite group. When you are watching  
  your TV just press the FAV button to bring up your list of favourites, then scroll  
  through the categories to find the one you want to watch.

5.2.4 Set Radio Favourites  


The procedure for setting Radio Favourites is identical to that for TV Channels as 
described in Section 5.2.3.

5.2.5 Program Back Up  


Select Program Back-Up to create a database of your channel configuration. This can be
found as a .bin file in Users Settings/Multimedia/SATA/Volume 0/PVR. To re-install your 
saved TV Channel database, press the Media Button on your Remote, then select partition/
volume0, select your database .bin file which includes the date it was made, then confirm 
update by clicking on the red button on screen. Your saved database of channels will then 
repopulate the recorder

31

Summary of Contents for HDR-8610USB

Page 1: ...HD Digital Satellite Recorder User Manual MODEL NUMBER HDR 8610USB Please read this Manual thoroughly before using your Recorder and then retain for future reference HD Digital Satellite Recorder ...

Page 2: ......

Page 3: ...10 5 2 2 Radio Channel Edit p11 5 2 3 Set TV Favourites p11 5 2 4 Set Radio Favourites p11 5 2 5 Program Back Up p11 5 3 System Menu p12 5 3 1 System Setting p12 5 3 2 Local Time Setting p12 5 3 3 Timer p13 5 3 4 System Information p13 5 4 User Settings User s Conference p14 5 4 1 Parental Control p14 5 4 2 OSD Control p15 5 4 3 Multimedia p15 5 4 3 1 HDD Management p15 5 4 3 2 Media and Folder Ma...

Page 4: ...he Power Cord If the power cord should become damaged IMMEDIATELY switch the Receiver off at the wall and unplug it You should then contact your Service Centre to carry out a repair DO NOT overload the wall socket this can be dangerous and lead to a fire hazard MAKE SURE you have easy access to the mains plug in case of emergency DO NOT unplug the unit by pulling the Power Cord always grasp the pl...

Page 5: ... contact the retailer where the product was purchased Batteries used in operating this product may contain toxic agents that are hazardous to the environment Therefore as with the unit itself dispose of the batteries according to the prevailing statutory regulations Never put the batteries in normal household waste This receiver conforms to all applicable EU Legislation for this type of product Fu...

Page 6: ...L AUDIO Socket for connecting digital audio cable VCR SCART For the video audio input of a VCR or DVD S PDIF S PDIF format sound through optical output TV SCART For the video audio input of the TV for SD viewing only A V RCA To connect the Audio Video RCA composite output to TV Y Pb Pr To connect component video YUV output to TV HDMI To connect an HDTV using HDMI cable for HD High Definition viewi...

Page 7: ...ARD PREVIOUS NEXT MEDIA PIP 2 4 5 6 7 8 9 10 11 12 13 14 15 16 18 17 19 3 3 Remote Control MUTE AUDIO SUBTL RECALL PAGE UP DOWN TIMESHIFT V FORMAT EXIT TXT TV RADIO PAUSE STOP PLAY PAUSE RECORD SLOW HDD PVR 21 22 23 24 27 26 28 29 30 31 32 33 34 35 36 37 38 TIMER 20 FAVOURITE 25 EPG 3 ...

Page 8: ...hannel list in the viewing mode In theAntenna Setting or the Transponder menu press SAT to initiate a scan Red button to add satellite ZOOM AVAILABLE ON SD CHANNELS ONLY Green button to add satellite Press to rewind select FR 2 FR 4 FR 8 FR 16 for different speeds Press to fast forward select FF 2 FF 4 FF 8 FF 16 for different speeds Press to choose the previous media file Press to choose the next...

Page 9: ...to playback after pausing live TV in Time Shift mode RECORD Press to start recording SLOW Press to slow down video recordings HDD Press to enter and select the hard disc partition when you wish your recordings to be saved PVR To enter the currently selected PVR memory file to playback your recordings Please observe the following when using your Remote Control Change the batteries when operation be...

Page 10: ...he rear of the Remote Control by sliding it downwards and insert two batteries taking care to observe the polarity markings inside the compartment 4 2 3 TV Format Set Up You are now ready to switch on and adjust your dish to complete alignment for this refer to the separate instructions Turn on your TV and your Satellite Recorder both at the wall socket and on the rear of the unit Proceed as follo...

Page 11: ... fine tune reception try to obtain better than 50 for both 4 2 5 Fast Channel Set Up Astra 2A B D Eurobird 1 The HD Satellite Recorder is pre programmed with the most popular English Language chan nels from the Astra2A B D and Eurobird 1 Satellites so there is no need to scan these channels Simply press the Exit button to come out of the Installation menu screen then the Red SAT button to go into ...

Page 12: ...ed into your recorder in the Factory Select the Scanning mode of your chosen satellite FTA only ALL FTA NIT or ALL NIT FTA only To Search for all the Free Channels available with the selected satellite or transponders ALL To Search for all the Free Channels Scrambled Channels available with the selected Satellite or Transponders FTA NIT To Search for all the Free Channels available with the select...

Page 13: ...x Pressing the OK button again will cancel this operation When you exit the menu you will be prompted to confirm the delete and asked to enter your password The channel will then be deleted Move Select the channel you want to move and select the Move function then press the OK button to bring up the pop up Move To menu box Then input the channel number you want to move your selected channel to and...

Page 14: ...l 10 in the favourite group Music Move using the CH or CH buttons to highlight Channel 10 then move using the VOL or VOL buttons to select the Music group press the OK button then you will see a logo displayed at the left beside channel 10 then press the EXIT button to save and exit Now channel 10 is saved in the Music favourite group When you are watching your TV just press the FAV button to brin...

Page 15: ...mode format to Letter Box Combined Pan Scan or Auto format SPDIF Output To set SPDIF audio format output to Dolby or PCM Frame Rate To choose between PAL NTSC or Auto as the output type Low Power Keep switched to ON to save energy Three Hours Shut Down Reminder If set to ON the Recorder will go into STANDBY after three hours of inactivity 5 3 2 Local Time Setting Here you can set the TIME and DATE...

Page 16: ...d Every Day to pre set a regular daily recording Power Off Use the numeric keys to enter time and or time date information Power On Use the numeric keys to enter time and date information One Time To set the timer for one event only Every Day To set the timer to repeat every day Every Week To set the timer to repeat every week Start Date Time Enter the Start Date and Time by pressing the numeric k...

Page 17: ... Parental Control Password to your Recorder The Factory Default Password is 0000 Installation Lock To lock the installation menu to prevent unauthorised adjustment of the Installation Channel Edit Lock To lock the Channel Edit menu to prevent unauthorised adjustment of Channel settings Channel Lock To lock channels from viewing which are not suitable for children Menu Lock To lock the menu to prev...

Page 18: ... can select from USB or SATA Go into SATA to access the internal 320Gb Hard Disk Drive HDD which is a SATA type device Go into USB to access a connected USB device Memory stick of portable HDD All of the following menu functions are applicable to both SATA HDD and USB SATA Serial Advanced Technology Attachment The SATA or Serial ATA is an interface used to connect the 320GB hard drive to your Sate...

Page 19: ...tton on your remote control to enter the Multimedia menu You will see an OSD screen showing the current SATA HDD PARTITIONS or Volumes and if connected lastly any USB device attached to the USB Port Using the CH buttons select the desired partition from the HDD or the USB device and press OK This opens up the folders within the partition in the OSD marked Disk List From here you have the following...

Page 20: ...elect the file you wish to delete Press the DELETE GREEN button You will then be asked to confirm press OK and your file will be deleted Create Path This is used to create a FOLDER within a Volume Partition Using the CH and OK buttons select the location where you wish to create the folder and then press the CREATE PATH YELLOW BUTTON The keypad will be displayed type in the name of the FOLDER you ...

Page 21: ...operate time shift whilst watching the programme press the Time shift button on the remote control The time shift information bar will appear at the bottom of the screen and the TV picture will be paused The information bar displays the increasing time of live TV being recorded and the total recording time available Playback When you wish to commence watching the TV programme being recorded press ...

Page 22: ...nd date corresponding to the channel that you have just recorded To access your recording press the PVR button on your remote control You will see an OSD screen showing the contents of the partition volume that has been allocated to the PVR function The listing labelled DISK LIST will show the folders containing the programmes that have been recorded Disk List Using the CH buttons select the desir...

Page 23: ... LIST Menu To change Partition Volume simply use the CH CH keys to select the partition and press OK The USB Device will be seen normally under Partition Volume 3 Then proceed to record live TV using your remote control as above Your recording will then be stored on your USB Device The receiver allocated file name will have an abbreviated channel name prefix corresponding to the channel that you h...

Page 24: ...ct the programme you wish to appear as a PIP and press OK to confirm The PIP of your choice will now appear in the top right hand area of the screen Press EXIT to remove the CHANNEL LIST window 7 1 Advanced PIP Controls 7 2 1 Active Sub Window Red Button If you press theRED button the box around the PIP window turns red and the following functions are available MOVE Use the CH and VOL buttons to m...

Page 25: ...eric keys if required 22kHz Tone Control If the LNB frequency is not universal the 22 KHz should be set to OFF DiSEqC Control If your satellite recorder has been connected to a DiSEqC switch select the port of DiSEqC or the TONE BURST A or B as appropriate Scan Mode Select the desired Scanning mode for the satellite FTA only ALL FTA NIT or ALL NIT FTA only To Search for all the Free Channels avail...

Page 26: ... Menu allows you to edit the various options for the TP transponder settings and specifications You can also manually search for single transponders programs by selecting SCAN Transponder Number Select the TRANSPONDER you wish to edit e g 5 95 Frequency Check or set the FREQUENCY of the selected Transponder Symbol Rate Check or set the SYMBOL RATE for the selected Transponder Polarisation Set to H...

Page 27: ...ish use the signal strength and quality bars at the bottom of the screen to judge the best position for the dish Move steps Dish moves step by step adjust the dish to East or West for the best position Step Size Adjust the Move Step size in increments from 1 to 10 Limit set Using VOL buttons to fix East or West limits or disable movement limits Reference position Set the original position for the ...

Page 28: ...d Tuner B LNB Power Tuner LNB power OFF if required 9 0 Software Update NOTE This function MUST be used with EXTREME CAUTION ONLY Software provided by your Service Centre can be used Use of other Software may damage your device and invalidate your warranty During the UPDATE process DO NOT press any buttons or switch the unit off Procedure 1 Turn on the set top box insert the USB device enter MENU ...

Page 29: ...stall the dish and calibrate it LNB inputs are not connected correctly Reconnect the cables to the LNB and receiver Bad weather Attempt again later during better weather Incorrect setup of settings Set the proper parameters of received programme in the system settings menu The set top box has power but on TV shows No signal or cannot switch to the input the set top box is connected to Bad connecti...

Page 30: ...t Ratio 4 3 16 9 Output NTSC PAL Video Format 576i 576p 720p 1080i Audio Decoding MPEG Layer I II Audio Mode Stereo Sampling Frequency 32 44 1 48 KHz 3 System CPU 266MHz Flash 8 16MByte Sram 256MByte CAM CI 1 x Common Interface Band Switch 22KHz DiSEqc SCART TV VCR CVBS RGB HDMI HD Video Audio Output USB 2 0 Host S PDIF Coaxial and Optical Component Y Pb Pr output RCAA V Video CVBS Audio L R Ether...

Page 31: ......

Page 32: ...UK Office Stafford Park 1 Telford Shropshire England TF3 3BD Tel 44 0 1952 238 100 Fax 44 0 1952 238 180 Helpline 0845 194 7584 UK For further product information please go to www ross co uk ...

Reviews: