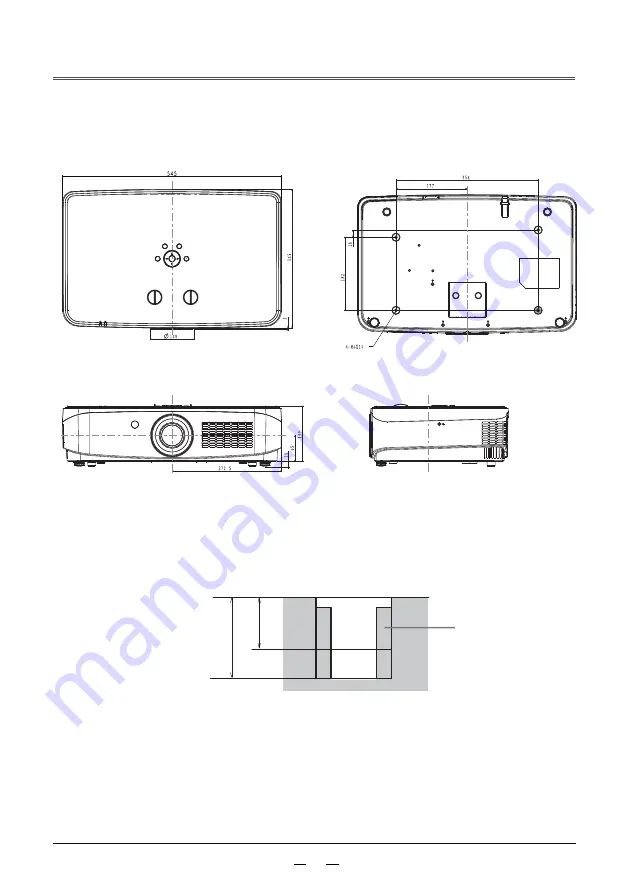
ROLY RL-6000U User Manual Download Page 53

51

Dimensions

Ceiling mounting holes

Use screws with a length of 8mm (minimum) to 10mm (maximum) for ceiling mounting.
Screw locking torque

:(

 M6)4±0.5 N.m

.

Projector

Insert the nut (M6)

Screw holes

Maximum length of the screw

Minimum length of the screw

Unit

mm

Unit

mm

Summary of Contents for RL-6000U

Page 1: ...r purchasing this product Before operating this product please read this manual carefully and keep it properly for future reference User s Manual Laser Projector RL 6500X RL 600X RL 6200W RL 600W RL 6...

Page 2: ...3 33 33 30 8 12 14 15 16 18 18 17 20 19 27 28 29 24 34 1 25 13 Important safety tips Precautions for use Part names and functions Terminal panel Top control panel Indicators Remote control Operating r...

Page 3: ...of the grounding plug WARNING This device complies with the Class A standard of CISPR 32 This is a Class A information technology device which may cause radio frequency disturbance when used in reside...

Page 4: ...recaution This device is equipped with a secondary grounding type power plug Do not remove the grounding terminal of the power plug This plug can only be used with grounding type power outlet This is...

Page 5: ...circuit or fire Do not damage modify excessively bend twist pull wind the power cord or place it close to a hot object or place heavy objects on it Do not use the power cord other than the attached po...

Page 6: ...ified ceiling mount bracket Using a non designated ceiling mount bracket may cause the machine to fall Install the attached safety cable on the ceiling mount bracket to prevent the projector from fall...

Page 7: ...battery properly and refer to the following instructions Otherwise it may cause burns battery leakage overheating explosion or fire Use specified batteries Do not charge dry batteries Do not disassemb...

Page 8: ...ce objects in front of the lens when using the projector Do not block the projection by placing objects in front of the projection lens Doing so may cause fire or damage the objects and may cause malf...

Page 9: ...ojector for a long time remove the batteries from the remote control Failure to do so may cause the batteries to leak overheat catch fire or explode which may lead to fire or contamination of the surr...

Page 10: ...he screen may jitter rarely due to the heated air from the exhaust vent or the cool and hot air from the air conditioner Make sure that the exhaust gas from projector or other equipment or the air fro...

Page 11: ...crews M6 Adjustable feet Positions of screw holes for ceiling mount and adjustable feet Focus Adjustment When turning on the projector the high transparency projection lens is easily affected by the i...

Page 12: ...s Set your password difficult to guess as much as possible Change your password regularly The company and its affiliates do not ask the customer directly for the password Do not give your password whe...

Page 13: ...s When connecting a computer or an external device please read the instructions carefully about the use of power cords and shielded cables in this manual Disposal information in other countries outsid...

Page 14: ...it may result in damage or personal injury CAUTION Part names and functions 1 2 3 4 5 5 6 7 8 Control Panel Lens Shift Dial Intake Vent Speaker Zoom Ring Focus Ring Front Remote Sensor Status Indicato...

Page 15: ...nect an external audio device to this terminal Connect the computer audio signal to this terminal VIDEO IN 2 RGB IN 3 HDMI 4 Connect the HDMI output signal to this terminal 5 RGB OUT 6 7 LAN 8 USB Por...

Page 16: ...14 MENU AUTO SETUP OK INPUT POWER...

Page 17: ...ctor is connected to the power supply and in standby mode Power on mode The projector is ready for projection Sleep mode Get into Sleep mode after no signal input for a period of time Off Red light on...

Page 18: ...aspect ratio mode IMAGE MOGE Button Select the image mode 15 16 TEST PATTERN Button Go into test pattern mode 17 SOUND MODE Button Select sound mode 18 Decrease the volume 19 Increase the volume MUTE...

Page 19: ...ully and install new batteries There is a danger of explosion if using batteries of other types than specified in this manual Dispose of used batteries according to the instructions on batteries or lo...

Page 20: ...two feet counterclockwise Adjustable Feet X inch Y m Y m X inch Y m Y m X inch Y m Y m RL 6500X RL 6200W RL 6500U 30 80 100 150 200 300 0 70 1 87 2 30 3 50 4 70 7 00 1 12 3 00 3 70 5 60 7 50 11 04 30...

Page 21: ...Computer Cables for connection DVI D cable RS232 serial cable HDM I cable This projector is not equipped with this cable USB memory device When connecting the cable unplug the power cord of the proje...

Page 22: ...input Audio output Connecting to an Audio Device Cable for connection Audio cable This projector is not equipped with this cable External audio devices When connecting the cable unplug the power cord...

Page 23: ...1920x1080 30 O DivX Divx 3 11 1920x1080 30 O DivX Divx 4 x 1920x1080 30 O DivX Divx 5 x 1920x1080 30 O VP8 VP8 1920x1080 30 X VC1 VC 1 1920x1080 30 O MPEG 1 2 4 MPEG1 768x576 30 O MPEG 1 2 4 MPEG2 MP...

Page 24: ...AC3 MPEG2 ATSC H 264 O Dolby EAC3 DDCO Dolby Digital Plus H 264 O Generic MTK DVD LPCM O Dolby EAC3 DDCO Dolby Digital Plus Dolby lossless O DTS DTS DTS HD DTS HD LBR O Generic MTK DRA O Dolby AC3 DD...

Page 25: ...g PNG Note 2 O S W static O S W animation O S W JPEG jpg GIF Image Decoder Support List O refer to support X refer to NOT support SW refer to software decoder P refer to planning under development Fil...

Page 26: ...or The projector is in standby mode and consumes a little power when connected to an outlet with an AC power cord CAUTION Use of incorrect cables may affect the product performance and may even lead t...

Page 27: ...ect the AC power cord to the AC outlet The power indicator lights up in red Press button to turn on the projector Turn on the connected devices Select the input source Press the input selection button...

Page 28: ...ut switching method varies according to computer types example Adjust the focus size and position of the projected image Adjust the focus size and position of the projected image Focus Size Zoom Posit...

Page 29: ...to its original position Turn repeatedly to find the ideal position Vertical lens shift dial Horizontal lens shift dial CAUTION Adjusting the tilt of projector by adjusting the adjustable feet By cha...

Page 30: ...efer to the corresponding section of this manual Top control panel MENU MENU button point buttons Remote control MENU 1 2 3 4 5 Press the MENU button on the top control panel or directly press the MEN...

Page 31: ...as standard cinema dynamic DICOM color matching red color matching green color matching yellow user Contrast brightness saturation and color temperature can be adjusted in user mode SOUND menu For so...

Page 32: ...SETUP Function This function can automatically execute the settings of AUTO SETUP in SETUP menu including SOURCE SEARCH AUTO PC ADJUST and AUTO KEYSTONE by pressing the AUTO SETUP button on the remot...

Page 33: ...ly corrected by following steps Press the KEYSTONE button of the remote control and the KEYSTONE box including KEYSTONE UP AND DOWN KEYSTONE LEFT AND RIGHT CORNERSTONE RETURN TO DEFAULT SETTINGS displ...

Page 34: ...orarily Press the MUTE button again to select OFF or press the VOL button to turn the audio effect back on The mute function is also effective for the audio output interface 1 2 VOL VOL Press the MENU...

Page 35: ...calling out the on screen menu FREEZE Button Press the FREEZE button on the remote control to freeze the screen image To cancel the freeze function press the FREEZE button or any other button SOURCE...

Page 36: ...to select the desired image mode ASPECT Button Select 16 9 SCREEN SIZE 4 3 SCREEN SIZE FULL SCREEN WIDE MODE 1 WIDE MODE 2 NORMAL DISPLAY Button Display input channel and resolution information CAUTI...

Page 37: ...URCE menu Press button to select the source icon then press point button or OK button to select VGA source Top control panel INPUT button SOURCE Remote control Direct Operation Press the INPUT button...

Page 38: ...position can be moved horizontally 3 Press button to adjust horizontal image position The adjustment range is 0 255 Vertical Position Under the premise that the relative position of the projector and...

Page 39: ...chieve an optimal image 1 Press button to select PHASE 2 Press OK button 3 Press button to adjust the level The adjustment range is 0 31 Please adjust to the state of minimum interference 1 Press ASPE...

Page 40: ...e control to display the IMAGE DISPLAY MODE menu Then press point button to select the image display mode IMAGE DISPLAY MODE 4 3 Provide a normal video image with an aspect ratio of 4 3 16 9 Provide a...

Page 41: ...the remote control to display the SOURCE menu Press point button to select the source icon then press point button or OK button to select AV input The projector can automatically detect the input vid...

Page 42: ...on screen menu is available in 2 languages 1 2 Press the MENU button on the remote control to display the menu Press button to select select the setting then press point button or OK button to enter...

Page 43: ...s working in 0 second HIGH ALTITUDE 1 HIGH ALTITUDE 2 OFF Normal speed When using the projector set this function to OFF if the altitude of the surrounding environment is not high Faster than OFF mode...

Page 44: ...t to the front projection screen REAR Project to the back projection screen CEILING FRONT Project to the front projection screen after the projector is ceiling mounted CEILING REAR Project to the back...

Page 45: ...0 minutes When no signal is input the projector goes into sleep mode in 10 minutes 15 minutes When no signal is input the projector goes into sleep mode in 15 minutes 20 minutes When no signal is inpu...

Page 46: ...ctor change the network environment and receive emails about the projector status through the network after the projector is turned off LOW POWER Select Economic mode when not using the projector thro...

Page 47: ...control during the source search the source search will stop and return to the input signal used last time The AUTO KEYSTONE function corrects only vertical keystone distortion and does not correct h...

Page 48: ...dicators of the LAN interface and COMPUTER interface blink Using steps 1 Turn on the projector 2 Get the network address set DHCP to ON and get the IP address automatically If you are familiar with th...

Page 49: ...and entering security password settings Enter the password to go into security password settings NK LGIZUX_ JKLG RZ VGYY UXJ OY SECURITY PASSWORD OFF Not to lock CHANGE YOUR PASSWORD Write down the p...

Page 50: ...ction position can be moved to the left at most to the position of 10 width of the projected image The projection position can be moved up at most to a distance equal to 40 of the image range up and d...

Page 51: ...9db RL 600X RL 600W RL 600U Display Technology LCD panel Brightness Resolution Number of pixels Contrast Center to corner uniformity Lens Screen size Throw distance Throw Ratio Light source service li...

Page 52: ...Feature Vertical and horizontal keystone cornerstone feature Supporting HDBaseT long distance network transmission function optional Support horizontal and vertical 360 rotation installation Multiple...

Page 53: ...holes Use screws with a length of 8mm minimum to 10mm maximum for ceiling mounting Screw locking torque M6 4 0 5 N m Projector Insert the nut M6 Screw holes Maximum length of the screw Minimum length...

Page 54: ...52 Compatible Input Signal 1 Video Signal HDMI and DVI...

Page 55: ...may not be displayed correctly when inputting a signal other than those in the table When the screen resolution of the input signal is different from that of the panel the signal will not be displayed...

Page 56: ...topped blinking The projector is in sleep mode The yellow indicator of the projector blinks every 2 seconds indicating that the fan or color wheel is abnormal The yellow indicator of the projector cyc...

Page 57: ...ent is appropriate Check whether the image mode selection is appropriate No image Check the connection of your computer or video device to the projector Check that if the input signal from the compute...

Page 58: ...not work properly Make sure that all functions in AUTO SETUP are not set to OFF Make sure that CEILING function is not set to OFF Image distortion or disapperance Check and adjust the computer adjust...

Reviews: