R&S
®
SMB100A
RF and Microwave Signal GeneratorQuick Start Guide
1407081262Version 20
(>78<Ì)
Page 1: ...R S SMB100A RF and Microwave Signal Generator Quick Start Guide 1407081262 Version 20 78 Ì ...
Page 2: ...info rohde schwarz com Internet www rohde schwarz com Subject to change data without tolerance limits is not binding R S is a registered trademark of Rohde Schwarz GmbH Co KG Trade names are trademarks of the owners 1407 0812 62 Version 20 R S SMB100A The following abbreviations are used throughout this manual R S SMB100A is abbreviated as R S SMB Linux is abbreviated as Linux ...
Page 3: ...ey Features 13 4 Preparing for Use 14 4 1 Lifting and Carrying 14 4 2 Unpacking and Checking 14 4 3 Choosing the Operating Site 14 4 4 Setting Up the R S SMB 15 4 4 1 Placing the R S SMB on a Bench Top 15 4 4 2 Mounting the R S SMB in a Rack 16 4 5 Considerations for Test Setup 17 4 6 Connecting to Power 18 4 7 Connecting to LAN 18 4 8 Connecting to IEC 625 IEEE 488 GPIB 19 4 9 Connecting USB Devi...
Page 4: ... 5 1 3 Display 44 5 1 4 Setup Keys 45 5 1 5 Keypad for data entry 46 5 1 6 Rotary Knob and Navigation Keys 47 5 1 7 Front Panel Connectors 48 5 2 Rear Panel Tour 49 5 2 1 Description of the Connectors 50 6 Trying out the Instrument 53 7 System Overview 58 7 1 Brief Introduction to the Instrument s Concept 58 7 2 Signal Flow at a Glance 58 7 3 Application Field of the Instrument 59 7 4 Description ...
Page 5: ... 5 Quick Start Guide 1407 0812 62 20 8 1 7 How to Use the Help System 81 8 1 8 File Management 83 8 1 9 Legend of Front Panel Controls 86 8 2 Remote Control 88 8 3 Remote Access 89 9 Contacting customer support 90 Index 91 ...
Page 6: ...Contents R S SMB100A 6 Quick Start Guide 1407 0812 62 20 ...
Page 7: ...ducts from the Rohde Schwarz group of companies are manufactured according to the highest technical standards To use the products safely follow the instructions provided here and in the product documentation Keep the product documentation nearby and offer it to other users Use the product only for its intended use and within its performance limits Intended use and limits are described in the produ...
Page 8: ...e injury If you mount products in a rack ensure that the rack has sufficient load capacity and stability Observe the specifications of the rack manufacturer Always install the prod ucts from the bottom shelf to the top shelf so that the rack stands securely Secure the product so that it cannot fall off the rack Connecting to power The product is an overvoltage category II product Connect the produ...
Page 9: ...d cleaning agents Meaning of safety labels Safety labels on the product warn against potential hazards Potential hazard Read the product documentation to avoid personal injury or product damage Electrical hazard Indicates live parts Risk of electric shock fire personal injury or even death Hot surface Do not touch Risk of skin burns Risk of fire Protective conductor terminal Connect this terminal ...
Page 10: ...it will occur if you do not follow the safety precautions WARNING Potentially hazardous situation Could result in death or serious injury if not avoided CAUTION Potentially hazardous situation Could result in minor or moderate injury if not avoided NOTICE Potential risks of damage Could result in damage to the supported product or to other property 1 4 Korea certification class B 이 기기는 가정용 B급 전자파 ...
Page 11: ... the R S SMB The help offers quick context sensitive access to the complete information All user manuals are also available for download or for immediate display on the Inter net 2 2 Data sheets and brochures The data sheet contains the technical specifications of the R S SMB It also lists the options and their order numbers and optional accessories The brochure provides an overview of the instrum...
Page 12: ... 0812 62 20 2 4 Application notes application cards white papers etc These documents deal with special applications or background information on particu lar topics See www rohde schwarz com application smb100a Application notes application cards white papers etc ...
Page 13: ...straightforward and intuitive operation the signal generator makes signal generation fast and easy Outstanding key features of the R S SMB are Frequency range from 100 kHz to up to 40 GHz SSB phase noise of 108 dBc typ at 10 GHz and 20 kHz offset Wideband noise of 138 dBc at 10 GHz and 30 MHz offset High output power of up to 27 dBm meas Analog modulations with AM FM φM and pulse modulation For mo...
Page 14: ... manual 3 Using the delivery notes check the equipment for completeness 4 Check the equipment for damage If the delivery is incomplete or equipment is damaged contact Rohde Schwarz 4 3 Choosing the Operating Site Specific operating conditions ensure proper operation and avoid damage to the prod uct and connected devices For information on environmental conditions such as ambi ent temperature and h...
Page 15: ...t For information on the weight see the data sheet 2 CAUTION Foldable feet can collapse See Setting up the product on page 8 Always fold the feet completely in or out With folded out feet do not place any thing on top or underneath the product 3 WARNING A stack of products can fall over and cause injury Never stack more than three products on top of each other Instead mount them in a rack Stack as...
Page 16: ...instructions in Setting up the product on page 8 2 NOTICE Insufficient airflow can cause overheating and damage the product Design and implement an efficient ventilation concept for the rack To mount the R S SMB in a rack 1 Use an adapter kit that fits the dimensions of the R S SMB to prepare the instru ment for rack mounting a Order the rack adapter kit designed for the R S SMB For the order numb...
Page 17: ...4 9 Connecting USB Devices on page 19 See chapter Troubleshooting and Error Messages Measuring USB Cable Quality in the operating manual LAN At least CAT6 STP cables How to Chapter 4 7 Connecting to LAN on page 18 Always terminate open cable ends Ensure that connected external devices comply with EMC regulations Signal input and output levels Information on signal levels is provided in the data sh...
Page 18: ...all the latest firmware to reduce security risks For internet or remote access use secured connections if applicable Ensure that the network settings comply with the security policies of your company Contact your local system administrator or IT department before connecting your product to your company LAN When connected to the LAN the product may potentially be accessed from the internet which ma...
Page 19: ...ype A connector t the rear panel Refer to the documentation of the USB device to find out which USB connector type you can connect to the USB device To connect USB storage devices USB storage devices such as memory sticks allow easy data transfer from to the R S SMB You can also use them for firmware updates Connect the USB storage device to the USB type A connector at the rear panel To connect US...
Page 20: ...an connections can lead to RF insertion loss and mis match and even premature wear of the connectors Before connecting to the port inspect the RF connector visually to check that it is clean undamaged and mechanically compatible See the application note 1MA99 for information on how to handle and maintain the RF port to minimize measurement deviations and ensure its longevity 2 NOTICE Risk of instr...
Page 21: ...ent return loss as given in the data sheet 4 11 Connecting to Ref In Ref Out The connector is at the rear panel To connect to Ref In Ref Out For connection the R S SMB provides BNC connectors Follow the instructions in To connect to non screwable connectors BNC on page 20 4 12 Switching On or Off The following table provides an overview of power states LEDs and power switch posi tions Table 4 1 Ov...
Page 22: ...ed In addition to auto matic monitoring you can perform maintenance tasks See Chapter Querying Error Messages in the operating manual Chapter Performing Maintenance Tasks in the operating manual To reboot the instrument If it is necessary to restart the instrument e g if the firmware stops unexpectedly Press the STANDBY key for approx 5 s The R S SMB reboots To shut down the product The product is...
Page 23: ...forced to load its default factory settings To access the corresponding dialog box press the SETUP key and select the Factory Preset For more information and an overview of the settings affected by the factory preset function see section Factory Preset in the Operating Manual Overview of the Most Important Preset States The following list gives an overview of the presets for the most important gen...
Page 24: ...wall configuration is adapted accordingly the interface can be used for example To transfer data between a controller and the instrument e g in order to run a remote control program To access or control the measurement from a remote computer using the R S VISA or Ultr VNC programs or similar tools like another VNC client or any Web browser supporting Java To transfer data from a remote computer an...
Page 25: ...dress and enter the IP address for example 192 168 0 1 The IP address consists of four number blocks separated by dots Every block con tains 3 numbers in maximum 4 Select the Subnet Mask and enter the subnet mask for example 255 255 255 0 The subnet mask consists of four number blocks separated by dots Every block contains 3 numbers in maximum Use computer names to identify the instrument In netwo...
Page 26: ... 1 Press the Setup key and select Network Settings The computer name is displayed under Hostname 2 Press the Setup key select Protection and enable the Protection Level 1 The default password is 123456 The parameter Hostname in the Network Settings dialog is now enabled for configuration 3 Change the Hostname 4 16 Remote Access via an External Controller The R S SMB can be remote accessed from a r...
Page 27: ...wser see Chapter 4 17 2 4 Web Control on page 39 required no Web sockets must be supported VNC Client for example Ultr VNC or other dedicated client software for PCs with Linux Unix or Windows operating system see Chapter 4 16 2 Remote Access via a VNC Client Software on page 29 required required VNC Viewer required When the connection is set up with a VNC client software Ultr VNC direct control o...
Page 28: ...ly you can also make use of the LXI browser as described in Chap ter 4 17 2 4 Web Control on page 39 To remote access the instrument via a web browser 1 Connect the instrument and the remote computer to a LAN seeChapter 4 7 Con necting to LAN on page 18 2 Instal the Java Runtime Environment JRE on the remote computer 3 Type the instruments IP address in the address field of the Web browser on your...
Page 29: ...nt unauthorized access Setting up a VNC connection 1 Connect the instrument and the remote computer to a LAN see Chapter 4 7 Con necting to LAN on page 18 2 Install the Ultr VNC application and enable it on the instrument 3 In the ICF firewall enable communication on the network via Ultr VNC program 4 Install the VNC Viewer on the remote computer with Windows operating system see Installing the VN...
Page 30: ... leads through the installation This description focus only on the relevant settings a Select installation of all components b In the Additional Task Panel enable all entries A successful installation is indicated by a message At the same time a warning is displayed stating that a password must be set Remote Access via an External Controller ...
Page 31: ...ated connection is indicated by changed icon color Installing the VNC Viewer on a Windows PC 1 Download the Ultr VNC program form internet and follow the installation instruc tions Only the program component VNC Viewer is required Note The VNC Viewer program is included in the download for the installation of the Ultr VNC program on the signal generator if Full installation was selected in the Sel...
Page 32: ...t can be controlled from the front panel and via the remote computer alternately Setting up the VNC connection on the Windows remote computer 1 Start VNC Viewer program component on the PC select VNC Server and enter IP address of the instrument 2 To initialize the connection select Connect A message requesting the password appears 3 Enter the password as defined in the Default Local System Proper...
Page 33: ...moving the program on the instrument or by deactivating the VNC Server service 1 Remove the VNC program a Press the Windows key to access the operating system and open the Add or Remove Programs by selecting Start Settings Control Panel Add or Remove Programs b Remove the VNC program 2 Deactivate the VNC Server service a Press the Windows key to access the operating system and open the Ser vices b...
Page 34: ...ork settings According to the LXI standard an LCI must set the following parameters to a default state Parameter Value TCP IP Mode DHCP Auto IP Address Dynamic DNS Enabled ICMP Ping Enabled Password for LAN configuration LxiWebIfc The LCI for the R S SMB also resets the following parameters Parameter Value Hostname Instrument specific host name Description Vector Signal Generator Negotiation Auto ...
Page 35: ... indicates that a LAN connection has been established a red symbol indicates that no LAN cable is connected Lan Configuration allows you to configure LAN parameters and to initiate a ping see Chapter 4 17 2 3 Ping Client on page 38 Status displays information about the LXI status of the instrument Utilities provides access to the LXI event log functionality required by the LXI standard Instrument ...
Page 36: ... the Operating Manual 4 17 2 LAN Configuration The LAN Configuration web page provides access to the parameters required for identifying the R S SMB in the network and allows modification Password protection Changing the LAN configuration is password protected The default password is Lxi WebIfc notice upper and lower case characters This password cannot be changed in the current firmware version I...
Page 37: ...red IP address subnet mask and default gateway are used With dynamic configuration DHCP or dynamic link local addressing automatic IP are used to obtain the instrument IP address See Chapter 4 15 1 Assigning the IP Address on page 24 4 17 2 2 Advanced LAN Configuration The Advanced Config page provides LAN settings that are not declared mandatory by the LXI standard LXI Configuration ...
Page 38: ...covery Must be enabled to detect the instrument in the LAN If you disable this setting the instrument cannot be detected by the VXI 11 discov ery protocol mechanism The setting does not affect other detection mechanisms Setting up a VXI 11 connection via the IP address or the host name is independent of this setting 4 17 2 3 Ping Client The Ping Client page provides the ping utility to verify the ...
Page 39: ...it 4 17 2 4 Web Control The web control functionality provides remote operation via VNC using a Web browser with HTML5 This mode does not require additional installation or activation The VNC protocol allows simultaneous operation from several remote devices The instru ment remains locally operable The GUI of the R S SMB is visible To perform the settings you can operate the instrument as with the...
Page 40: ...ed the current screen of the R S SMB is dis played in the browser window 6 Use the mouse cursor and keyboard to access the functionality of the instrument as you would directly perform the settings on the instruments front panel 4 17 2 5 SCPI Remote Trace The remote trace functionality allows you to trace input and output strings at the remote control interface of the R S SMB A recorded trace mess...
Page 41: ...l database If live mode is disabled you can display the recent traces upon request using the refresh button You can also store the log in a file Note The diagnostics functionality is extended in later releases e g to download or upload SCPI command files from to the instrument Toolbars The toolbar at the top of the dialog provides basic settings and functions Live mode logging If logging is switch...
Page 42: ...column filter is applied Rec record number of the message within the message log I number of the subinstrument MT indicates the type of the message Possible values and related message contents are incoming command outgoing response to a query E error message highlighted by red color T execution time i e time required by the instrument to process the com mand internally message indicates the type o...
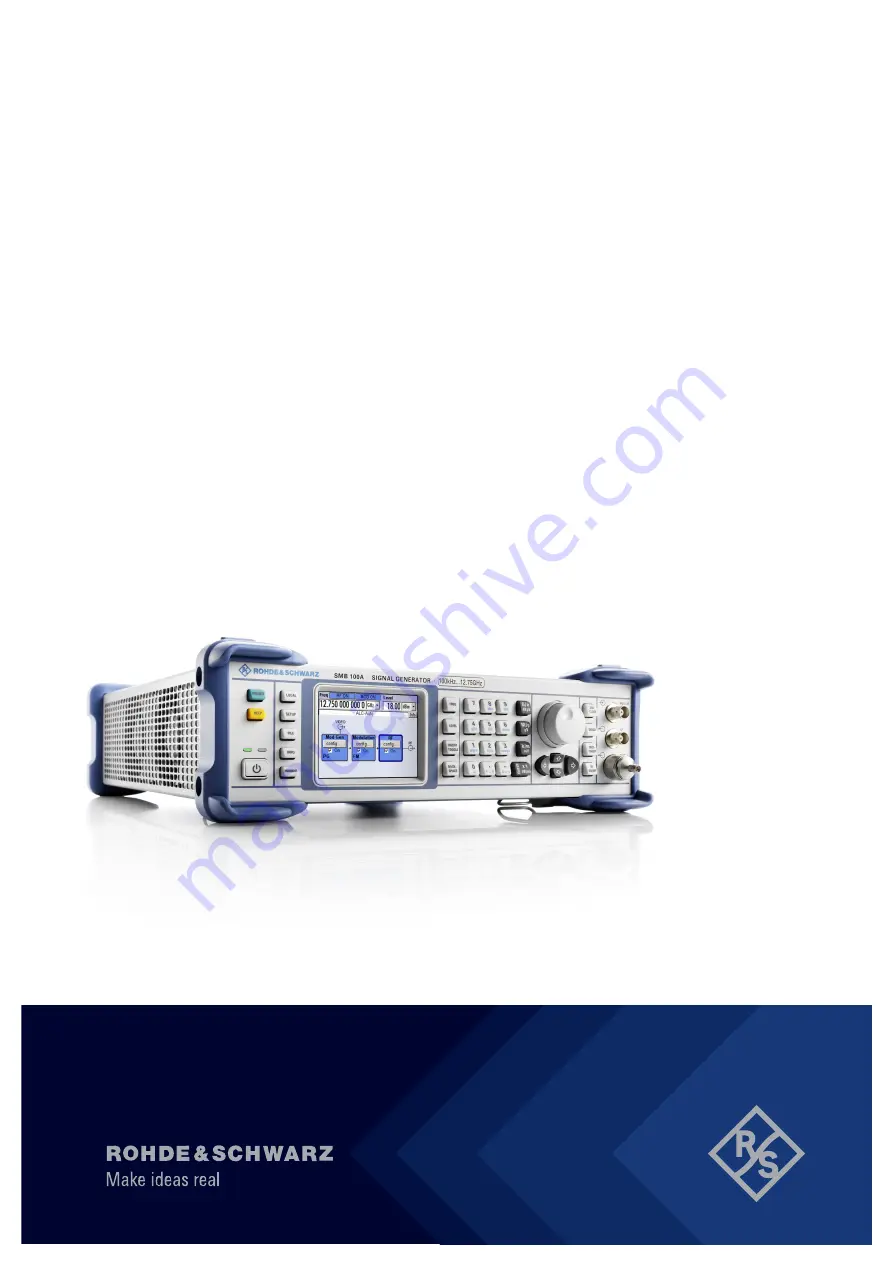
Page 43: ...a and the front panel For more detailed information refer to the corresponding description in the Operating Manual Figure 5 1 Front panel view 5 1 1 Utility Keys The keys to the left of the display cause the R S SMB to return to a definite instrument state and provide information on the instrument and assistance For more information refer to chapter Instrument Settings in the Operating Manual PRES...
Page 44: ...reen LED left is on when the instrument is ready for operation the yellow LED right is on in the standby mode See Table 4 1 5 1 3 Display The display clearly shows all main settings and signal generator states The display is divided into the following sections Frequency and level display with info line Frequency and level settings containing offset Status messages Brief error messages To access an...
Page 45: ...nal For more information refer to chapter Instrument Functions in the Operating Manual FREQ Activates frequency entry LEVEL Activates level entry ON OFF TOGGLE Switches highlighted elements or a function block on and off Switches between two or more settings e g items of selection lists At the end of a list the cursor is set on the first entry again BACKSPACE Deletes the character to the left of t...
Page 46: ...enu or to the previously highlighted block in the block diagram if no menu is active MOD ON OFF Switches the modulations on and off MOD OFF is displayed in the info line of the header next to the Level field RF ON OFF Switches the RF signal on and off RF OFF is displayed in the header next to the Frequency field 5 1 5 Keypad for data entry The keys in the data entry keypad are used to enter alphan...
Page 47: ...es For other entries this key can be used instead of the default unit key The new value is accepted Confirms OK and closes open input windows In a dialog box selects the default or focused button In a dialog box activates the edit mode for the focused area if available In a dialog box activates or deactivates the selected option of the focused area if the edit mode is active Calls the next menu le...
Page 48: ...ally 5 1 7 Front Panel Connectors The RF and LF output connectors and a connector for external modulation signals are located on the front panel MOD EXT Input for external modulation signals LF Output for internal LF modulation generator signal See also data sheet and Operating Manual section LF Generator and LF Output RF 50 Ohm Output for RF signal NOTICE Maximum Input Levels Do not overload the ...
Page 49: ...ways use an appropriate torque wrench suitable for this type of connector and apply the torque specified in the application note 1MA99 The application notes are available on the Internet and provide additional information on care and handling of RF connectors Rohde Schwarz offers appropriate torque wrenches for various connectors For ordering information see the R S SMB data sheet or product broch...
Page 50: ...ange fuses The power switch can be set to two positions 0 The instrument is disconnected from the mains I The instrument is power supplied It is either ready for operation STANDBY or in operating mode depending on the position of the ON STANDBY switch on the instrument front See also data sheet andChapter 4 6 Connecting to Power on page 18 USB IN USB universal serial bus interface of type B device...
Page 51: ...oller Stereo R L Inputs for analog stereo modulation signals External modulation sources or the inter nal LF generator can be used stereo modulation is available with option R S SMB B5 See also chapter Stereo Modulation in the operating manual S P DIF Input for digital stereo signals stereo modulation is available with option R S SMB B5 See also Stereo Modulation in the operating manual SIGNAL VAL...
Page 52: ...nce signal OCXO Oven controlled reference oscillator option R S SMB B1 or high performance oven controlled reference oscillator option R S SMB B1H The OCXO generates a very precise 10 MHz reference signal It needs some minutes of warm up time to reach its nominal frequency Refer also to the data sheet for detailed information Rear Panel Tour ...
Page 53: ...1 Activate default preset state Press the PRESET key to set a defined instrument state 2 Select and activate AM modulation a Turn the rotary knob and select the Modulation block b Press the rotary knob to open the dialog where the modulation can be selected Note Different modulation modes are available depending on the options installed The Amplitude Mod menu is the first menu and is highlighted p...
Page 54: ...isplayed in blue The RF is not yet active which means that no RF signal is output 3 Set frequency and level and activate RF signal a Press the FREQ key to activate the editing mode for frequency entry The Frequency entry field in the header section of the display is highlighted Enter the frequency using the numeric keypad and terminate the entry by pressing a unit key b Press the LEVEL key and ent...
Page 55: ...example an RF frequency sweep is configured Proceed as follow 1 Activate default preset state Press the PRESET key to set a defined instrument state 2 Configure and activate RF frequency sweep a Turn the rotary knob and select the RF block b Press the rotary knob to open the dialog where the RF frequency sweep can be selected ...
Page 56: ...ode press the rotary knob to open the selection list and select Single e Press the rotary knob to apply the selection For triggering the Execute Single Sweep and Reset Sweep buttons are dis played f Finally select State and press the rotary knob to switch on the RF frequency sweep g Press the DIAGRAM key to display the complete block diagram The RF is not yet active which means that no RF signal i...
Page 57: ...ger RF frequency sweep a Press the Winbar key to switch to the RF Frequency Sweep dialog Turn the rotary knob to select the Execute Single Sweep button Press the rotary knob to trigger start the frequency sweep A linear single sweep signal is now present at the RF output starting at 100 MHz The sweep is processed in 1 MHz steps with dwell time of 10 ms per step up to the stop frequency of 500 MHz ...
Page 58: ...is equipped with an intuitive user interface The central element of the display is the block diagram that shows the signal flow and processing from the left on the display to most right i e the generated signal can be seen at a glance Each block represents a functional unit of the instrument Thus you always know the position at which a parameter affects the signal flow The main settings of a block...
Page 59: ...ed when the INFO CTRL I key is pressed Additional information on entries can be requested from the help system The history function permits display of all messages Assistants simplify the completion of tables After data entry in the assistant the table is modified only after the Accept button has been pressed Pressing the Accept but ton also stores the assistant data See Chapter 8 Instrument Contr...
Page 60: ...B homepage on the internet http www rohde schwarz com product smb100a html Mod Gen block The internal modulation sources are configured in this block Also the LF frequency sweep can be activated here An internal LF generator is available as the internal source for the analog modulations AM FM and PHiM Available modulation shapes are sine and rectangle The internal modulation signals are provided a...
Page 61: ...ulation FM Phase modulation PhiM Pulse modulation Pulse Stereo modulation Stereo Note For modulation modes that can be simultaneously used refer to the R S SMB data sheet The status display in the block shows the active modulation s Use the TOGGLE ON OFF key to switch the active modulation of the block on or off RF block In this block the RF parameters and frequency level sweep settings are set Th...
Page 62: ...es and the block diagram and the setting of parameters For an in depth description of the dialog boxes and the instrument functions refer to section Instrument Functions in the Operating Manual 8 1 1 Legend of Manual Controls The following table lists all available key combinations used on the PC keyboard to trig ger functions on the instrument Keyboard labels are described in alphabetical order I...
Page 63: ...Hide Minimizes the active menu Pressing the respective button in the Winbar opens the menu again CTRL I Info Opens closes the info window CTRL L Level Activates the level entry CTRL M Menu Calls the menu selection list CTRL O Modulation on off Switches modulation on off MOD OFF is indicated in the status line CTRL P Preset Restores a defined basic instrument setup CTRL Q Local Switches the instrum...
Page 64: ...s a front panel key emulation to enable execution of the front panel key functions by mouse e g for remote access The emulation is called on the external monitor by a right mouse click The front panel key functions are executed by a mouse click on the associated button 8 1 1 2 On screen Keyboard In addition the Windows XP operating system provides a keyboard emulation that can be used for system s...
Page 65: ...d whenever the DIAGRAM CTRL D key is pressed The main characteristics of the RF signal frequency and level are permanently dis played in the header section of the screen and can be directly set in the display fields after the FREQ CTRL F or LEVEL CTRL L key is pressed Status messages for the output signal are displayed in addition to frequency and level Operation via Graphical User Interface Funct...
Page 66: ...tary knob Turning the rotary knob shifts the entry focus to the target element Pressing the rotary knob activates the selected entry field Depending on the parameter the submenu is called the numeric value varied the list entry selected or the check box activated or deactivated If a value is entered the entry is stored by another click on the rotary knob and the editing mode is exited Settings in ...
Page 67: ...hich can be called by means of an index a content tree or the Previous Next buttons Info line with messages for indication of the current instrument state A great variety of different messages such as status messages error messages warn ings or information are displayed in the header field of the screen With the aid of the INFO CTRL I key help pages can be called for most of the messages They pro ...
Page 68: ...status message UCorr is displayed in the info line The values displayed in the Freq and Level fields include a set offset or multiplier factor See also RF Frequency and Phase and RF Level in the Operating Manual The frequency and level indication can be enlarged so that it covers the complete dis play of the R S SMB by using the DIAGR key This key toggles between block dia gram magnified frequency...
Page 69: ...e types of modulation or on illegal entries that are not accepted by the instrument e g range violations They are displayed in the info line on a yellow background They are displayed on top of status information or permanent messages Volatile messages do not normally demand user actions and disappear automatically after a brief period of time They are stored in the history however These messages c...
Page 70: ...e highlighted message This button is available only if the history of the messages is displayed Delete All Clears all messages This button is available only if the history of the messages is displayed Remote command SYST ERR HIST CLE History Calls the list of all messages that have occurred since instrument switch on The most recent messages are displayed at the top of the list When the button is ...
Page 71: ...or the Config button mouse opens the asso ciated setting menu Example Modulation block In this block the modulation signals are set The status information of the Modulation block indicates the selected modulation Signal Flow and Input Output Symbols in the Block Diagram The input output symbols in the block diagram show the currently used inputs and out puts of the signal generator Unused inputs a...
Page 72: ...s use the mouse or the front key CLOSE ESC Several fields of associated but separately set parameters are organized in menu areas A menu area is framed and labelled with the function common to all parameters Example Pulse Generator Each of the setting fields is assigned a parameter name The kind of setting varies depending on the parameter to be set Some settings can only be made in a specific con...
Page 73: ...ys to activate the Fre quency or Level entry fields in the header area Keyboard Shortcuts Keyboard shortcuts e g Ctrl D for the displaying the block diagram in the fore ground provide direct access to all utility dialogs of the instrument see Chapter 8 1 9 Legend of Front Panel Controls on page 86 8 1 5 Setting Parameters The R S SMB offers several and sometimes alternative possibilities for setti...
Page 74: ...is section provides an information about the parameter handling that comprises of the following main steps Chapter 8 1 5 1 Working with the Cursor on page 74 Chapter 8 1 5 2 Selecting a Control Element on page 75 Chapter 8 1 5 3 Switching Parameters On Off on page 75 Chapter 8 1 5 4 Entering a Value on page 75 Chapter 8 1 5 5 Working with Units on page 77 Chapter 8 1 5 6 Selecting a Value from a L...
Page 75: ... is concerned To activate an element put the cursor on it An active element is highlighted by a blue frame 8 1 5 3 Switching Parameters On Off A parameter can be activated and deactivated using a button or a check box 1 Select the parameter 2 To change the state of a parameter use the Enter function of the different control media Press the rotary knob Press ENTER Press the TOGGLE ON OFF CTRL T key...
Page 76: ... the numeric digit to be changed using the Left Right arrow keys The cursor is displayed in blue and the number to be replaced is highlighted 3 Click on a numeric key to overwrite the highlighted value Varying a value 1 Activate the editing mode 2 Set the cursor to the left of the number to be changed using the Left Right arrow keys The value at the cursor position is varied 3 To vary the selected...
Page 77: ... When the entry is completed the unit can be changed In this case the value remains unchanged but is automatically adapted to the new unit While operating the instrument by means of a mouse assign the unit to the selected parameter before entering its value Assigning a unit To assign a unit to a value use one of the following alternatives 1 Press a UNIT key on the front panel 2 Select a Unit in th...
Page 78: ...7 Terminating Entries with Confirmation The instrument behaves different by the termination of entries deppending on the parameter type and the way this parameter is set Confirming settings To confirm the settings press the rotary knob or one of the Unit keys see also Chapter 8 1 5 5 Working with Units on page 77 Note Variations by means of the rotary knob are immediately set Confirming multiple v...
Page 79: ...cally confirmed when the entry or selection field is exited Restoring values In the case of front panel control or operation from the keyboard previous values can be restored as long as the new value is not confirmed i e the entry is not completed To restore the values press the ESC key Restoring values that require confirmation All settings that are not confirmed with the Accept button but requir...
Page 80: ...ion about file handling and overview of the automatically assigned file pre fixes refer to Chapter 8 1 8 File Management on page 83 8 1 6 1 Working with List Editor The User Correction and List Mode dialogs provide a list editor for defining the fre quency level value pairs Editing list mode data lists 1 To access a list editor and open an existing data list for editing use the cursor keys to sele...
Page 81: ...w list can be created under a new name either by generating a blank file in the File Select menu see section Chapter 8 1 8 File Management on page 83 or by changing an existing list which will then be saved under a new name 1 To create an empty data list select RF List Mode List Mode Data New List or respectively RF User Correction User Cor Data New User Correc tion Data and enter the file name of...
Page 82: ...ing in the help topics 1 To scroll through a page use the Up Down arrow keys 2 To follow a cross reference select the link text 3 To return to the previous page select Back This function scrolls back all steps that you have performed before 4 Use the Scroll Right or Scroll Left buttons to shift the indicated area of the navi gation window to the left or right Using the Index 1 Select Index 2 Enter...
Page 83: ...usb drive In the case of a connected network all network drives that can be accessed are available The files are accessed in a Save Recall dialog in the individual menus The files are differentiated according to their extensions each type of file is assigned a specific file content The extension is usually of no consequence to the user since access to the files occurs in the individual menus where...
Page 84: ... all instrument settings All instrument settings are saved and loaded in the File menu To access the File menu press the FILE CTRL S key For more information see chapter Storing and Loading Instrument Data File Key in the Operating Manual 8 1 8 1 File Select Dialog The Save Recall dialaog displays the available drives and directories In the upper part Recent Data Sets the files last used are liste...
Page 85: ...hen select the Save but ton 5 Create a new file To create a new file use the Save Settings functionality i e specify file name and directory and save the file The created file is empty it must be filled with the necessary values in the individ ual editor 8 1 8 2 File Manager The File Manager allows general file management such as copying shifting renam ing and deleting files as well as generating ...
Page 86: ...ns Confirm with ENTER Extensions for user files The following table lists all available file extensions for user files The currently availa ble files on the instrument depend on the installed options Table 8 2 List of the automatically assigned file extensions in the instrument Function List type Contents File suffix Instrument State Settings Instrument settings savrcltxt User Correction List User...
Page 87: ...ckspace Clears the last entry number sign or decimal point ESC CLOSE ESC CTRL G Selects the next higher menu selection level When the editing mode is exited with ESC the previous value is restored Closes an active menu DIAGR CTRL D Sets the cursor on the block diagram and hides all menus FILE CTRL S Activates the menu for storing instrument settings FREQ CTRL F Activates the frequency entry G n dB...
Page 88: ...xecution of the front panel key functions by mouse e g for remote access The emulation is called by a right mouse click The front panel key functions are executed by a mouse click on the asso ciated button 8 2 Remote Control Remote control is an operation of the instrument by means of remote control com mands or programs that automatize repeating settings The instrument is connected to a computer ...
Page 89: ...ument from a remote computer Both the R S SMB and the computer are connected in a LAN Remote access in contrast to remote control does not use remote control commands but a separate software which is installed on the remote computer After its start the software simulates the user interface of the instrument The instrument can thus be operated from the remote computer as on the unit itself The indi...
Page 90: ...roduct contact our customer sup port center A team of highly qualified engineers provides support and works with you to find a solution to your query on any aspect of the operation programming or applica tions of Rohde Schwarz products Contact information Contact our customer support center at www rohde schwarz com support or follow this QR code Figure 9 1 QR code to the Rohde Schwarz support page...
Page 91: ...8 S P DIF 51 SIGNAL VALID 51 Stereo R L 51 USB type A 50 USB type B 50 Controller external 26 Cursor keys 47 Customer support 90 D Data sheets 11 Default instrument settings 23 DHCP 24 Display 67 Documentation overview 11 E Error messages 69 F Features of R S SMB 59 Frequency display 68 Front panel key emulation 64 88 G GPIB Connecting 19 H Help 11 Host name see Computer name 25 26 Hostname see Co...
Page 92: ...owledgment 11 Operating concept 62 Operating site Choosing 14 Setting up the instrument 15 Operating system 24 OSA 11 Output connector 48 51 P Ping LXI 38 Placing on a bench top 15 Power Connecting the instrument 18 Preparing for use 14 Preset 23 Preset instrument settings 23 R Rack mounting 16 Release notes 11 Remote access 26 Remote trace LXI 40 Reset instrument settings 23 RF block 61 Rotary kn...