Rohde & Schwarz DDF205 Getting Started Download Page 52

Software and Firmware Update

R&S

®

 DDF205

52

Getting Started 4073.0187.02 ─ 03

SFX Installer

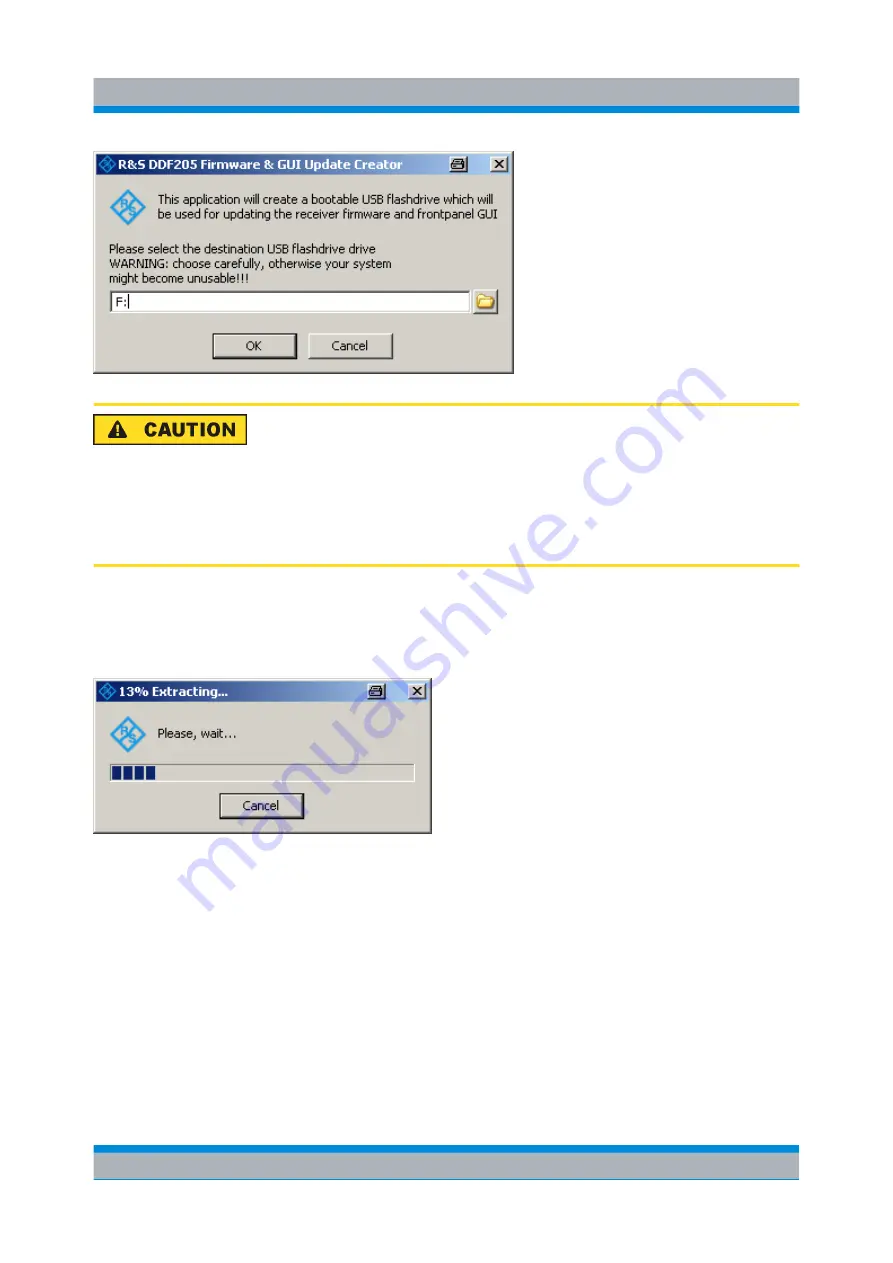
Be careful to use the correct drive letter that is assigned to the flash drive (e.g.
F: or G:). If a wrong drive letter is used (e.g. C:), the boot-loader might get
accidentally installed on the host system, which will result in a unusable host.

After double-checking the drive letter and clicking "OK", the SFX image will self-
extract to the USB flash drive. This process will take less than one minute for a
USB


2.0 drive. In case a USB


1.1 flash drive is used it will take much longer.

The last step for the SFX installer is copying the MBR section to the USB flash drive.
This is shown in a console window.

Receiver Firmware and GUI Update for DDF205 with front control panel

Summary of Contents for DDF205

Page 1: ...R S DDF205 Digital Direction Finder Getting Started Getting Started X 1 2 4073 0187 02 03 Radiomonitoring Radiolocation...

Page 2: ...ckages and the verbatim license texts Rohde Schwarz would like to thank the open source community for their valuable contribution to embedded computing 2012 Rohde Schwarz GmbH Co KG Muehldorfstr 15 81...

Page 3: ...ADY 10 1 2 8 Connecting External Accessories 11 2 Operation 13 2 1 Front Panel Tour 13 2 1 1 DDF205 with front control panel 13 2 1 2 DDF205 without front control panel 15 2 2 Rear Panel Tour 17 2 3 G...

Page 4: ...te 49 4 1 Retrieve Firmware and GUI Versions 49 4 2 Receiver Firmware and GUI Update for DDF205 with front control panel 50 4 2 1 Preparations 51 4 2 2 Update Procedure 53 4 3 Receiver Firmware Update...

Page 5: ...ions for setup and connection to prevent personal injury or damage to the R S DDF205 This is of particular importance when you use the R S DDF205 for the first time The following safety instructions a...

Page 6: ...shows no condensation Non observance may cause damage to the R S DDF205 or other devices in the setup The R S DDF205 is supplied completely assembled except for the handles and mounting brackets which...

Page 7: ...F205 when its feet are folded out The overall load the R S DDF205 s own weight plus that of any devices stacked on top of it on the folded out feet must not exceed 500 N Place the R S DDF205 on a stab...

Page 8: ...nting For use in vehicles the R S DDF205 can be powered directly from the vehicle s battery via the DC input 1 2 4 EMI Protective Measures In order to avoid electromagnetic interference EMI the R S DD...

Page 9: ...ctor counterclockwise and withdraw it Fig 1 1 Speakon NL4FX 1 2 5 2 Connecting to the DC Source The R S DDF205 is connected to an external 10 VDC to 32 VDC source e g battery via connector X1 on the r...

Page 10: ...te and vice versa In STANDBY state the amber LED on the right will turn on and only the power switch circuit is being powered In this state it is safe to remove the DC power and disconnect the R S DDF...

Page 11: ...Connect a LAN cable to the LAN port The R S DDF205 has an internal switch which automatically detects the type of LAN cable connected so you can use any standard type of LAN cable to establish a netw...

Page 12: ...Preparation for Use R S DDF205 12 Getting Started 4073 0187 02 03 Setup...

Page 13: ...information required to access the various con figuration options and settings necessary to get you started operating the R S DDF205 2 1 Front Panel Tour 2 1 1 DDF205 with front control panel An overv...

Page 14: ...The function of each softkey is dependent on the softkey bar on the display 5 Receiver Control Keys BW selects the demodulation bandwidth between 100 Hz and 5 MHz AFC switches automatic frequency con...

Page 15: ...ing knob In certain menus the main rollkey serves as up down key Pressing the rollkey confirms an entry equivalent to the ENT key 9 Data Entry Keys The 0 9 keys allow entry of the corresponding number...

Page 16: ...ereo headphones with a 3 5 mm stereo plug to be connected GUI for remote access A GUI for remote access is available for the Windows XP platform and is particularly useful for the DDF205 without front...

Page 17: ...x numbers refer to the labels in the figure above 1 X1 Power Supply Standard Speakon NL4FX socket for DC power input Socket accepts 10 32 VDC on pin 1 and ground on pin 1 of connector Power requiremen...

Page 18: ...with the output of different audio signals X4 AUX is a 25 pin D Sub female connector for controlling external antenna switching units 6 X2 ANTENNA DF A 25 pin D Sub female connector for controlling di...

Page 19: ...for this Gigabit capable interface 2 3 Graphical User Interface GUI This chapter provides a short description of the graphical user interface of the R S DDF205 2 3 1 GUI Layout Following is an overvi...

Page 20: ...r selected Speaker is off Speaker is on Audio signal is available in stereo at current frequency The R S DDF205 is not locked The R S DDF205 is locked by another client Access is not possible The R S...

Page 21: ...ers e g SPAN and STEP for IF panel and IF Waterfall panel Other softkeys are only related to e g RF panel RF Waterfall panel etc Softkeys can be related to hardkeys they can e g provide selection opti...

Page 22: ...t will not be updated The R S DDF205 time will be set to the new time once the field gets out of edit mode 6 In the same dialog box there are fields to configure the time zone Select Set Time Zone to...

Page 23: ...lect the Tests softkey to open the Tests softkey menu 4 Select the Short Test softkey to run the short test sequence The short test will take about a second to produce a result If the test passed the...

Page 24: ...ttings under the Receiver and Antenna submenu to ensure the default settings are in place 1 Press the SETUP key to open the Setup Menu 2 Select the Receiver softkey 3 The Receiver Configuration dialog...

Page 25: ...se the APPL key to switch the R S DDF205 to receiver mode Operating in the top menu the screen and softkeys are as shown in chapter 2 3 1 GUI Layout on page 19 Ensure the panel focus is on the Spectru...

Page 26: ...M the maximum of the FFT trace over time is displayed c AVERAGE the average of the FFT trace over time is displayed d CLRWRITE the instantaneous FFT is displayed without averaging 3 The Demodulation F...

Page 27: ...th the softkey in 3a highlighted follow procedure 1 to change the demodulation frequency within the IF span c The Mid Frequency will not change 4 The Receiver Control Keys chapter 2 1 Front Panel Tour...

Page 28: ...of the RF amplitude envelope d The DEMOD key changes the demodulation mode CW LSB USB ISB AM FM Pulse PM IQ CW USB and LSB demodulation modes are only available with demodulation bandwidths 4a of 9 kH...

Page 29: ...gain control for amplitude modulated modes Pressing the SELECT rollkey 5g toggles between automatic and manual gain control When in manual gain control mode turning the SELECT rollkey 5h allows the m...

Page 30: ...ion R S DDF205 30 Getting Started 4073 0187 02 03 a Select the More 1 4 followed by More 2 4 and More 3 4 softkeys until page 4 4 of the menu b Select the CONFIG IF PAN softkey Graphical User Interfac...

Page 31: ...ettes for the mapping of the trace level to the color on the waterfall display Highest Lowest Level sets the maximum and minimum of the vertical scale respectively This changes the scale of the displa...

Page 32: ...Press Peripherals softkey to open the Peripherals selectors 3 Open the Antenna Setup dialog 4 The dialog shows the DF antenna ADD197 Check Use Compass and select the built in compass GH150 Take note o...

Page 33: ...ng has been transferred to the antenna s North Correction 8 The fixed system has been configured and the compass will be disabled 9 Press ESC to close the dialog Direction Finding Procedure Direction...

Page 34: ...ime so that the measurement can take place within a short time frame this is in particular important when the observation is done on a moving vehicle In case the measurement takes place on a stationar...

Page 35: ...available for the RF Panel and the Frequency Scan function 4 Use START STOP and STEP or CENTER SPAN and STEP softkeys to define the range and frequency step of the scan In this example start and stop...

Page 36: ...the scan is running To stop the scan press the MODE key and select the Stop softkey 2 3 3 Online Help All the information from the operating manual can be shown on the display of the R S DDF205 after...

Page 37: ...e ENTER key or the main ROLLKEY takes you directly from the activated navi gator to the browser Just like in any other dialog the focus can be on either one of the components Use the PANEL key to move...

Page 38: ...can take place by content by index and by search based on a search term See below for more details Look For The Look For field is provided for entering a search term when navigating in the Search mode...

Page 39: ...Search mode In this mode the help content can be accessed based on keyword search In Search mode the Look For field must be activated and the keyword should be entered there Then by pressing the ENTE...

Page 40: ...ER or ROTARY KNOB you can browse into the hyperlink just like in a normal web browser After browsing through the content by using the Next Link you can always go back to any of the previous pages by p...

Page 41: ...or a detailed explanation 2 4 3 HF Frequency Range Extension R S DDF205 HF This is a hardware option it requires a HF preselector board to be installed With the HF option installed signals from 9 kHz...

Page 42: ...up to a bandwidth of 1 MHz and CW LSB and USB up to a bandwidth of 9 kHz An inde pendent audio volume and balance for each DDC as well as for the basic receiver channel enable flexible audio mixing an...

Page 43: ...Operation R S DDF205 43 Getting Started 4073 0187 02 03 2 4 6 1 Using Digital Down Converters Options for the R S DDF205...

Page 44: ...n press the DEMOD UNCOUPLED COUPLED softkey Take note that not all bandwitdhs and demodulation modes are available for DDC so the coupling might not work 8 If you want to couple frequency of a particu...

Page 45: ...n factors which have their origins outside the R S DDF205 and affect the measurement results The correction data is stored within the flash file system of the R S DDF205 The R S DDF205 COR can process...

Page 46: ...Operation R S DDF205 46 Getting Started 4073 0187 02 03 Options for the R S DDF205...

Page 47: ...When it is stored for a longer period of time the R S DDF205 should be protected against dust The orig inal packing should be used particularly the protective caps at the front and rear when the R S...

Page 48: ...ce R S DDF205 48 Getting Started 4073 0187 02 03 Test points The test points are mainly for diagnostic purposes and their interpretation should be left to qualified Rohde Schwarz service personnel Tes...

Page 49: ...eceiver The GUI Version refers to the GUI software in use If the menu is obtained from the DDF205 with front control panel it refers to the Front Panel GUI If the menu is obtained from Remote Access i...

Page 50: ...e time of shipment The latest versions can be down loaded from GLORIS The CD ROM will autostart and launch the opening menu where the various options are available If the CD ROM does not autostart or...

Page 51: ...USB port of the PC or Notebook Take note of the drive letter assigned to this USB flash drive Execute the installation by clicking on Receiver Firmware and GUI Installation Allow access if there are s...

Page 52: ...ost system which will result in a unusable host After double checking the drive letter and clicking OK the SFX image will self extract to the USB flash drive This process will take less than one minut...

Page 53: ...Update Procedure Power off the R S DDF205 plug in the USB flash drive into the USB port on the R S DDF205 front panel and restart Wait for the R S logo to appear and press ESC to go into the boot menu...

Page 54: ...Ch2 S is the internal drive of the R S DDF205 If this is selected by mistake the R S DDF205 will start up as normal and the GUI Update procedure should be restarted In the next dialog select Update us...

Page 55: ...irmware and the GUI software can start The update process can cater for more than one image If the update was installed on a USB flash drive that was previously used for updates the menu below will sh...

Page 56: ...o two minutes after which the new firmware will be loaded This will usually take about one minute The update progress is visualized by means of notification dialogs and progress bars Then while the re...

Page 57: ...ibed in chapter 4 3 Receiver Firmware Update for DDF205 without front control panel on page 58 Remote GUI on Notebook desktop PC If you want to install the GUI for use on a notebook or desktop PC you...

Page 58: ...date32 tool can be installed by clicking on Setup If your browser does not launch File Explorer you should launch it manually and navigate to the Update32XP directory on the CD ROM where you can run S...

Page 59: ...lso install the version of WinPcap that is com patible with the version of the tool please note the disclaimer and the information in WinPcap s About box Connecting the R S DDF205 Proceed as follows t...

Page 60: ...th Update32 because special network packets required by the process may be discarded by the router Run the Update32 tool by clicking on Firmware Update Program Allow access if there are security warni...

Page 61: ...d Firmware Update R S DDF205 61 Getting Started 4073 0187 02 03 Starting the update Click on the Update button and the following dialog will appear Receiver Firmware Update for DDF205 without front co...

Page 62: ...n in the list of targets as shown in figure below Fig 4 1 List of targets for Ethernet Communication Select the desired target and click the Start button Updating process The following dialog appears...

Page 63: ...er the update is completed close the dialog by clicking on the OK button The R S DDF205 will restart automatically If update procedure fails If the update procedure fails simply switch off the R S DDF...

Page 64: ...ct if another user is running the tool in the same network The R S DDF205 might hang after a reboot because the bootloader gets trapped by this Update32 on the network In such cases the best advise is...

Page 65: ...lier version of the GUI If an earlier version of the GUI exists it must be uninstalled before the installation of a new GUI can proceed A dialog will appear first which requests to uninstall this earl...

Page 66: ...fers to the panel resolution When the emulated front panel buttons are included the resolution of your PC monitor must be higher than the size stated in the settings below oth erwise the buttons might...

Page 67: ...completed The Remote Access GUI requires an additional Redistributable package distrib uted by Microsoft for the deployment of certain software built for the Windows oper ating system It is included i...

Page 68: ...the Windows Firewall Click on Unblock to allow the traffic to from the R S DDF205 As a last step you may have to change the Windows Firewall settings to enable the network traffic of the R S DDF205 GU...

Page 69: ...tion is not loaded previously refer to Selecting the configuration file under Selecting the configuration file on page 60 to select an appropriate configuration file Select Config LAN Settings via Eth...

Page 70: ...change of the IP address a dialog shown below with the option to update the program firmware code appears Selecting No will reset the R S DDF205 such that the new IP address will take effect Selecting...

Page 71: ...ol panel or Remote Access GUI The IP address of the R S DDF205 is needed during the GUI Installation for Remote Access This can be obtained from the front panel of the DDF205 with front control panel...

Page 72: ...Software and Firmware Update R S DDF205 72 Getting Started 4073 0187 02 03 Changing the IP Address...

Reviews: