Riso 7150R User Manual Download Page 88

2-10

2 Copy

ComColor Series User’s Guide 09
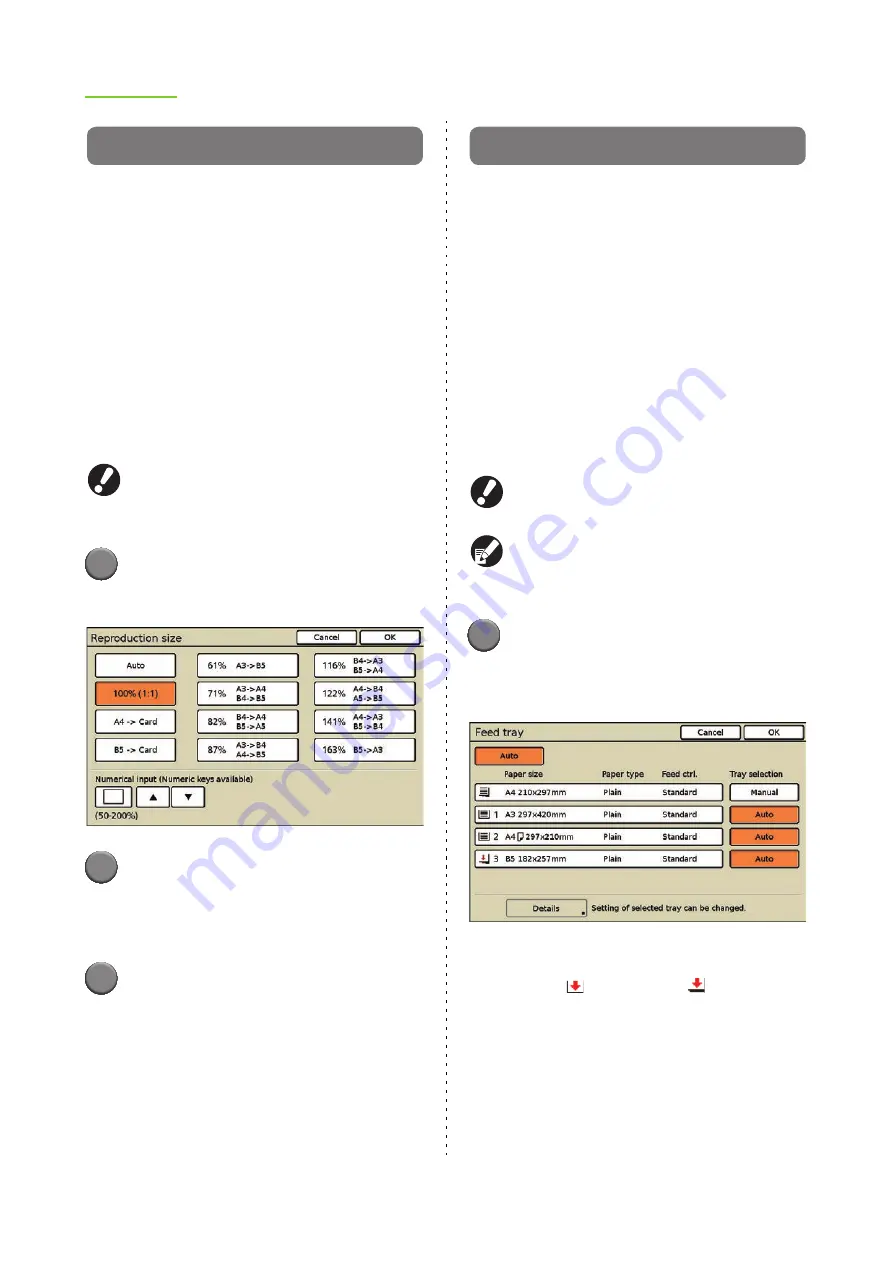
Reproduction size

Copy at the specified reproduction ratio.

[Auto]

The reproduction ratio is set automatically based on 

the original size and paper size.

[100% (1:1)]

Copy at 100%.

Preset Scaling

Copy by enlarging or reducing a standard size 

original to another standard size paper.

[Zoom]

Specify the reproduction ratio to enlarge or reduce the 

original when copying. Specify the reproduction ratio 

from 50% to 200%.

When you have selected "Auto", the reproduction 
size is set automatically to match the paper size. 
(p. 2-10 "Feed tray")

1

Press [Reproduction size].

The [Reproduction size] screen is displayed.

2

Specify the reproduction ratio.

To enter any number, press the empty field at the 
lower left and enter the number using [

S

] and [

T

or the numeric keys.

3

Press [OK]. 

The settings are confirmed and the previous 
screen is displayed.

Feed tray

Select the feed tray.
You can also change the tray settings (paper size, 
paper type, and tray selection).

Selecting the Feed Tray

[Auto]

The feed tray is selected automatically from the tray 

selection.

Feed tray selection

When using a paper size that is different from the 

original size, or to use a tray set [Manual] in [Tray 

selection], select the feed tray.

When [Tray selection] has been set to [Manual] 
for all feed trays, [Auto] cannot be selected.

When [Mixed size original] has been specified, 
only [Auto] can be selected. (p. 2-28 "Mixed size 
original")

1

Press [Feed tray].

The [Feed tray] screen is displayed.

The settings for each tray are displayed.

The icon to the left of the tray button indicates 

the amount of paper remaining in the tray. 

When 

 (standard tray: 

) is displayed, 

this indicates that there is no paper. Load 

paper.

Summary of Contents for 7150R

Page 1: ...This guide describes total operation features and specifications 052 36061 800 Applicable Printer models 9150 9150R 9110 9110R 7150 7150R 7110 7110R 3150 3150R 3110 3110R 2150...

Page 2: ...panel ComColor 9150 9150R 7150 7150R ComColor 9110 9110R 7110 7110R ComColor 3150 3150R ComColor 3110 3110R ComColor 2150 Maximum Print Area Printable Area Margin Connectivity of a Multifunction Fini...

Page 3: ...leshooting Guide This guide describes the action to take when a paper jam or other problem occurs Safety Information This guide describes safety precautions and specifications About This Guide 1 No pa...

Page 4: ...y connected to the right side of the machine Illustrations Used in This Guide The screenshots and illustrations contained in this guide may vary depending on the model of the machine or the usage envi...

Page 5: ...ns 17 Using the Touch Panel 17 Logging In 17 Entering Text 19 List of Settings for Each Mode 20 Print Preparations 26 Turning the Power On Off 26 Loading Paper 27 Preparing the Stacking Tray optional...

Page 6: ...7 Selections entry 2 17 Copying Functions 2 18 Save as default 2 18 Check setting 2 18 Save Call setting 2 19 Select layout 2 22 Copy and pause 2 23 Additional copies 2 24 Save to folder 2 24 Save to...

Page 7: ...Color mode 3 10 Scanning level 3 11 Duplex Simplex 3 11 Scanning Functions 3 12 Save as default 3 12 Check setting 3 12 Save Call setting 3 12 Original 3 12 Book shadow erase 3 13 Image size 3 13 Mixe...

Page 8: ...Console 5 3 Monitoring Menu 5 4 General Screen 5 4 System Screen 5 5 User Screen 5 5 License Info Screen 5 6 Meter display Menu 5 7 Details Screen 5 7 Limit Screen 5 7 Report Screen 5 8 Printer Menu...

Page 9: ...s this cannot be opened When you want to open it turn the Front door release to ON d Standard Tray Load special paper thick paper envelopes etc here Plain paper can also be loaded in the standard tray...

Page 10: ...s Storage Class and USB 1 1 or 2 0 specifications n Scanner Optional Use to copy or scan documents that are read from the platen glass or the ADF o Scanner Lamp green red Lights up in green when the s...

Page 11: ...jamming occurs during paper transfer from the printer to the face down offset stapler open this cover and remove the jammed sheet d Staple Cartridge Pull out the staple cartridge to replace a staple...

Page 12: ...r is left ON f Standard Tray Paper Guide Use to prevent paper in the high capacity feeder from becoming misaligned g Envelope Guide Use to print an envelope Adjust the inclination angle to suit the ty...

Page 13: ...type so that the output paper is neatly aligned b Paper Guides Open Button Use to spread the paper guides apart Operation varies depending on whether paper is present or not When the machine is idle a...

Page 14: ...Press with the right and left covers closed b Right Cover Open this cover to remove printouts to set a carriage or to remove a jammed paper c Paper Guide Use to prevent output printouts from becoming...

Page 15: ...or offset output function is used c Eject Button Use this button to move the printouts in the booklet tray to the position where you can easily retrieve them d Booklet Tray Booklets and 2 fold printo...

Page 16: ...STOP Key Press to stop the job that is in progress i START Key Press to start an operation j Start Lamp Lights up when the START key is ready to be used k Error Lamp Flashes when an error occurs l Cl...

Page 17: ...king correctly The icon is grayed out if accurate color management is not possible d Remaining Ink Indicator These icons indicate how much of each ink color is left The icons flash when less than 10 o...

Page 18: ...you to check the status of the consumables such as paper or ink System Screen Enables you to check the model of the machine MAC and IP addresses and other information User Screen Enables you to check...

Page 19: ...creen to complete the settings If is not displayed the button activates or deactivates the function each time it is pressed Active functions are displayed in orange Buttons that are not available unde...

Page 20: ...our administrator 1 Press Login 2 On the Login screen select your name To find your name press S or T at right to scroll through names or press the index buttons on the bottom of the screen to display...

Page 21: ...r names or passwords enter the required information on the text input screen 1 Select the type of text to enter 2 Press each character you want to enter To move the cursor press or To erase the charac...

Page 22: ...tab Imposition Specify the type of imposition p 1 13 Rotate Specify this when rotating the original p 1 14 Image position Specify this when adjusting the print position p 1 14 Save Call setting Save a...

Page 23: ...fy the output tray When using the optional multifunction finisher or stacking tray p 1 26 Save Call setting Save and call frequently used settings p 1 27 Advanced tab Copies Enter the number of copies...

Page 24: ...and pause To check the printing result when copying a large number of copies the machine stops after printing one set p 2 23 Additional copies 1 Print one or more copies of previously copied original...

Page 25: ...he orientation of the original and paper do not match p 2 44 Staple Punch Specify the position for stapling and punching When using the optional multifunction finisher or face down offset stapler p 2...

Page 26: ...m and register the current settings and print the settings information p 3 12 Save Call setting Up to 10 frequently used settings can be registered p 3 12 Original Select the original type to perform...

Page 27: ...in a USB flash drive p 4 9 Functions Online Set the machine online or offline p 4 15 Feed tray Specify the feed tray paper size feed control and double feed check settings for each feed tray p 4 15 He...

Page 28: ...acity stacker is connected to the machine the power of the optional equipment is turned on and off by the power of the machine If the optional high capacity feeder is connected the main power switch i...

Page 29: ...O Console is not displayed in sleep state If you print on a network where wake on LAN does not work the printer does not wake up automatically Set MAC address in the printer driver s Environment tab C...

Page 30: ...paper Be sure to move the stopper against the edge of the paper The machine determines the size of the paper based on the stopper position To set A3 paper and B4 paper install the A3 B4 paper guide pr...

Page 31: ...rst The Rotate feature is convenient when printing on envelopes from a computer 4 Move the guides against the edges of the paper and push the lever to lock The machine detects the paper size at the po...

Page 32: ...owered when all paper is removed 1 Press the standard tray descent button to lower the standard tray Hold the button down until the tray reaches the desired position 2 Load additional paper or switch...

Page 33: ...load many sheets at a time p 32 To load envelopes leave their flaps open and load them so that they will be fed from the bottom Use the envelope guide angle adjustment lever to adjust the inclination...

Page 34: ...ard tray descent button is pressed The tray lowers automatically if you remove all paper from the standard tray 1 Press the standard tray descent button to lower the standard tray Press and hold the s...

Page 35: ...this time The auto control stacking tray is shown in this illustration When using the wide stacking tray manually adjust the paper guides side and end positions to fit the paper size 1 Open the stacki...

Page 36: ...Corrugators to the High Capacity Stacker Feeding and paper alignment vary depending on the paper size and type that you use therefore adjust the corrugators so that printouts will be aligned Normally...

Page 37: ...ou can remove printouts without pulling out the carriage You can remove printouts without waiting for the standard tray to lower to the bottom If you remove printouts along with the carriage 1 Press t...

Page 38: ...sition of the stacking tray in High capacity stacker of the Admin Settings To change the downward position contact the administrator At some downward positions of the stacking tray specified in High c...

Page 39: ...ot adjust to the paper size of the next job If you print jobs of different sizes setting direction and feed options remove paper from the stacking tray and proceed to the next print Placing the Stacki...

Page 40: ...38 ComColor Series User s Guide 09...

Page 41: ...1 ComColor Series User s Guide 09 Printer Driver...

Page 42: ...etwork Printer Driver Screen Use the printer driver screen to configure the various settings Tab Click a tab to switch the screens Print image Displays a preview image of the document to be printed Th...

Page 43: ...ed first configure Printer configuration If Printer configuration has not been configured correctly the required buttons are not displayed on the printer driver screen p 1 33 Environment Tab Procedure...

Page 44: ...y stacker When outputting printouts to the high capacity stacker make sure that the carriage has been attached and that there is no paper left on the stacking tray Also remove printouts after you fini...

Page 45: ...Print Save to folder or Save to folder this field indicates the directory p 1 10 Save Call setting Save and call frequently used settings p 1 11 Layout tab Imposition Specify the type of imposition p...

Page 46: ...ay When using the optional multifunction finisher or stacking tray p 1 26 Save Call setting Save and call frequently used settings p 1 27 Advanced tab Copies Specify the number of copies to print p 1...

Page 47: ...color cyan regardless of the color of the original Magenta Print in one color magenta regardless of the color of the original Auto and Full color are not displayed when the administrator has restrict...

Page 48: ...0 mm 21 5 8 3 Click OK To cancel the settings click Cancel The size entered here is only valid when configuring the size of the original Registering frequently used original sizes can be useful p 1 34...

Page 49: ...00 When the Zoom check box has not been selected the enlarge reduce ratio is selected automatically according to the Original size and Paper size settings Paper size Specify the size of paper for prin...

Page 50: ...printer Also save the data to a USB flash drive as a PRN file or create a file to use in the barcode area definition application Print Print the data Print Save to folder Print the original data and s...

Page 51: ...USB flash drive 2 Click Details The Output dialog box is displayed 3 In the Destination pull down menu select the directory of the original data The available folders are displayed in the Destination...

Page 52: ...mple you want to share the settings among multiple users or reinstall the printer driver 1 Click Entry Clear for Save Call setting The Entry Clear dialog box is displayed 2 Select the settings to save...

Page 53: ...t the number of pages per sheet 2 pages 4 pages 8 pages Layout order Specify the layout order When specifying 2 pages Left to right T to B Right to left B to T When specifying 4 pages or 8 pages Left...

Page 54: ...ize of the original the size and orientation of the paper loaded in the tray and the settings of an optional multifunction finisher Image position You can adjust the print position 20 mm 13 16 up down...

Page 55: ...tlines smoother You can select either of two different image processing types OFF Select this if you do not want to perform line smoothing Low Select this to make outlines smoother This is appropriate...

Page 56: ...olor The larger the value the stronger the color When printouts are yellowish lower the values of red and green For adjustment of other colors see Color Profile p 1 10 or follow the administrator s ad...

Page 57: ...density Select from the following 2 light 1 0 Standard 1 2 dark Barcode area definition Specify the method of processing barcodes Set the print density of the barcode area so that a printed barcode c...

Page 58: ...er a barcode area definition file to the printer driver Register the CSV format file mentioned in step b to the printer driver Barcode area file entry p 1 37 4 Print an original with a barcode in the...

Page 59: ...printer driver Save Call setting The current settings on the printer driver screen can be saved and retrieved later as needed See Save Call setting p 1 11 in Basic Tab for details Finishing Tab Collat...

Page 60: ...stamped on slip sheets in alphabetical order up to three digits A B C Z AA AB AC Up to ZZZ Slip sheets cannot be inserted when the following settings are configured Paper folding or Fold Staple in the...

Page 61: ...t back cover check boxes and select the trays for the covers Put front cover Insert a cover sheet before the first page Put back cover Insert a cover sheet after the last page Select front cover tray...

Page 62: ...lect the Add center margin check box and specify Width between 0 mm and 50 mm 1 15 16 in 1 mm units When you have selected the Auto reduce check box and the margin width you have specified would cause...

Page 63: ...side and click Details to display the Binding side dialog box Left Right Upper Binding margin Select the Add side margin check box and specify the width between 0 mm and 50 mm 1 15 16 in 1 mm units W...

Page 64: ...inisher Types of paper that can be stapled Size and orientation of paper that can be stapled A3 B4 A4 A4 LEF B5 LEF Ledger Legal Letter Letter LEF Foolscap and custom size The administrator must regis...

Page 65: ...Punch Specify the number of holes to be punched Punch holes at the position specified in Binding side Select from the following OFF 2 holes 3 holes 4 holes The number of holes that can be punched vari...

Page 66: ...on the outside When both sides have been printed the first page is the printed surface 2 fold Output tray Specify the output tray for printouts When you have specified Auto printouts are output to th...

Page 67: ...pages or sheets the first page or first set is printed except for the specified number of sheets printing stops to allow you to check the printout and then printing can be resumed After you check the...

Page 68: ...n you have selected this check box numbers are stamped on the slip sheets When you have selected Between sets the group number and set number are stamped When you have selected Between groups the grou...

Page 69: ...list and enter the character string in the Add dialog box Deleting a character string Select the character string to delete from the list and click Clear You cannot delete the factory preset character...

Page 70: ...page number and date cannot be stamped together in the same position When you have selected Multi up Plural or Multi up Single for Imposition even if multiple pages are stamped onto a single sheet the...

Page 71: ...date based on the date information of the computer Specified date Enter up to 20 numeric characters in the text box Font Select the font and style Size Specify the date text size between 8pt and 32pt...

Page 72: ...all setting The current settings on the printer driver screen can be saved and retrieved later as needed See Save Call setting p 1 11 in Basic tab for details About Tab Check the version and color pro...

Page 73: ...ss Click Get Printer Info and Apply to obtain MAC address and display it in MAC address for this machine To configure this manually select the Wake On LAN check box and configure MAC address for this...

Page 74: ...Paper type is set to Any on the Basic tab of the printer driver screen The machine changes the color profile according to the paper type p 1 10 Paper type Even if a paper type is not specified you mu...

Page 75: ...aper Size to a Computer You can save the registered paper size to a computer It is useful to save settings to a computer when for example you want to share the registered paper size among multiple use...

Page 76: ...10 Output and Destination When the information for register folders cannot be obtained from the printer the shared folders are displayed as Shared folder 1 to Shared folder 30 The Use Personal folder...

Page 77: ...e Using the Barcode Area Definition Application in the Basic Guide 1 Click Barcode area file entry The Barcode area file entry dialog box is displayed 2 Click Add on the Barcode area file entry screen...

Page 78: ...1 38 1 Printer Driver ComColor Series User s Guide 09...

Page 79: ...2 ComColor Series User s Guide 09 Copy...

Page 80: ...ner You can save scanned data in folders for printing as necessary If you connect an optional multifunction finisher you can create a booklet or fold staple or punch the printed paper Procedure The co...

Page 81: ...riginal with the upper left corner of the glass 3 Close the original cover Open and close the original cover gently 2 Selecting Copy Mode 1 Press Copy on the mode screen The copy mode screen is displa...

Page 82: ...ction e Direct access area Displays the frequently used function buttons When using the high capacity stacker When outputting printouts to the high capacity stacker make sure that the carriage has bee...

Page 83: ...eral pages After scanning a sheet of an original the confirmation screen is displayed When there is another page of the original to scan load the next page and press Scan After all originals are scann...

Page 84: ...density p 4 14 Print density in Printer To confirm the settings of the job press Settings Press S and T to scroll the list To configure the following settings press Functions Paper guide control p 2...

Page 85: ...ues p 2 18 Check setting Confirm the current settings and print the settings information p 2 18 Save Call setting Up to 10 frequently used settings can be registered p 2 19 Select layout Set various f...

Page 86: ...p 2 43 Auto Rotate Rotate the image 90 degrees automatically when the orientation of the original and paper do not match p 2 44 Staple Punch Specify the stapling and punching settings When using the...

Page 87: ...and black Black Copy in one color black regardless of the color of the original Cyan Copy in one color cyan regardless of the color of the original Magenta Copy in one color magenta regardless of the...

Page 88: ...r the number using S and T or the numeric keys 3 Press OK The settings are confirmed and the previous screen is displayed Feed tray Select the feed tray You can also change the tray settings paper siz...

Page 89: ...strator has registered print speed and paper alignment improve It is recommended to register an irregular sheet size before using it For details ask your administrator Unregistered irregular sized she...

Page 90: ...g 2 Press Paper type The Paper type screen is displayed 3 Select the paper feed setting When using special paper you can specify the adjustment values U1 to U5 in advance and add settings For more inf...

Page 91: ...displayed Original Select the type of original for the appropriate image processing and then printing Line Photo Select this when the original has both text and photos Line Select this when the origi...

Page 92: ...36 Base color level Duplex Simplex Specify the sides of the original to be read and the sides of the paper to be printed on The current settings the original scanning side and output are displayed on...

Page 93: ...inal are turned Buttons that do not need to be configured are grayed out 3 Select the original orientation 4 In Output press Duplex 5 In Output select the Paging Direction setting 6 Press OK The setti...

Page 94: ...that can be registered to the direct access area in the Basic or Selections screen Save as default p 2 18 Check setting p 2 18 Save Call setting p 2 19 Select layout p 2 22 Copy and pause p 2 23 Addit...

Page 95: ...s entry screen is displayed 5 Repeat Steps 2 to 4 to register additional functions as needed 6 Press Close The previous screen is displayed Selections entry Up to 16 frequently used functions can be r...

Page 96: ...not necessary 1 Press Functions on the copy mode screen 2 Press Save as default The current settings are registered as the login user s default values 3 Press OK The previous screen is displayed On t...

Page 97: ...ettings are registered as the default values of copy mode for the user that is currently logged in 3 Press OK The settings are confirmed and the previous screen is displayed Clearing the Default Value...

Page 98: ...ings 1 Use the copy mode screen to configure the copy functions you want to save or retrieve 2 Press Functions on the copy mode screen 3 Press Save Call setting The Save Call setting screen is display...

Page 99: ...d settings Users without administrative authority cannot rename shared registered settings buttons with the shared mark 1 Display the Save Call setting screen Follow Steps 2 and 3 in Saving Settings 2...

Page 100: ...ll screen is displayed 3 Press Delete The message This setting will be deleted Are you sure appears 4 Press Yes 5 Press Close The previous screen is displayed Select layout Set various finishing setti...

Page 101: ...s been set to Sort you can use Copy and pause to copy only one set p 2 43 Collate slip sheet 1 Press Functions on the copy mode screen 2 Press Copy and pause Copy and pause is set Press again to cance...

Page 102: ...K Printing of additional copies starts Save to folder Save scanned originals and their settings as data to the machine You can retrieve the data and print it when needed When the administrator has set...

Page 103: ...ess Job name and type or edit the job name Enter a name up to 10 characters long on the text input screen p 19 Entering Text 7 Specify the PIN code To add a PIN code when saving the data press Use Use...

Page 104: ...ettings are confirmed and the previous screen is displayed ADF scan pause When copying a quantity of originals that cannot be loaded at one time in the ADF these can be copied as one job Up to 1 000 o...

Page 105: ...ss Functions on the copy mode screen 2 Press Scanning size The Scanning size screen is displayed 3 Select the original size from the original size list 4 Press OK The settings are confirmed and the pr...

Page 106: ...put to the high capacity stacker You can use any combination of the original size copying with the platen glass 1 Load the originals so that the sides of equivalent length are aligned 2 Select Auto fo...

Page 107: ...Mixed size original or Overlay at the same time p 2 28 Mixed size original p 2 53 Overlay Setting Multi up Plural Impose continuous pages onto one sheet Original orientation Top side up Select this w...

Page 108: ...ltiple copies of the same original onto one sheet Original orientation Top side up Select this option when loading originals in an orientation from which they can be read normally Top side left Select...

Page 109: ...ge Number Stamp the page number on the header or footer Stamp position Top L Top C Top R Bottom L Bottom C Bottom R Transparency OFF Remove images in the stamp area to create a white space and stamp t...

Page 110: ...C Top R Bottom L Bottom C Bottom R Transparency OFF Remove images in the stamp area to create a white space and stamp the date in that white space ON Stamp date on top when the stamp area and images o...

Page 111: ...der or footer Stamp position Top L Top C Top R Bottom L Bottom C Bottom R Transparency OFF Remove images in the stamp area to create a white space and stamp the text in that white space ON Stamp the t...

Page 112: ...d 32pt Text Specify the text size between 8pt and 32pt 1 Display the Stamp Page Date screen Follow Steps 1 and 2 in Stamping the Page Number p 2 31 2 Press Text size The Text size screen is displayed...

Page 113: ...R and the weaker the cyan C in the image M 1 to G 7 The lower the setting toward 1 the stronger the magenta M and the weaker the green G in the image The higher the setting toward 7 the stronger the g...

Page 114: ...recognized as text Moire elimination 1 to 7 The higher the setting toward 7 the greater the reduction of moire in portions recognized as photos 1 Press Functions on the copy mode screen 2 Press Image...

Page 115: ...mples of Entering the Number of Copies and Sets Specify the number of copies between 1 and 9 999 and the number of sets between 1 and 99 For example to distribute a document to the parents of all stud...

Page 116: ...een sets Stack each print set shifted apart from one another Between groups Stack each print group shifted apart from one another A multifunction finisher face down offset stapler or high capacity sta...

Page 117: ...er the number using the numeric keys To clear the fields press the Clear key Press the key to enter a number in the next input box Press S and T to scroll the list 3 Press Save Call The Program list s...

Page 118: ...gs are confirmed and the copy mode screen is displayed To return to the Program 1 screen press Back Renaming a Program 1 Display the Program 1 screen Follow Steps 1 and 2 in Configuring the Program 2...

Page 119: ...for details on how to enter the number of copies and sets 6 Press Overwrite The changes are saved To only change the program press Cancel To copy press Close and then press Next on the Program 1 scre...

Page 120: ...ed 3 Select the binding side 4 Configure the cover settings Select Yes or No for Front cover and Back cover 5 Press the select tray button Press Yes to display the Select tray screen Select the feed t...

Page 121: ...slip sheet between sets or jobs Slip sheet OFF Between sets Insert a slip sheet between sets based on the unit specified in Collate Between jobs Insert a slip sheet between print jobs Select tray Whe...

Page 122: ...to use this setting OFF Between sets Stack each collated set shifted apart from one another Between jobs Stack each print job shifted apart from one another Paper that can be offset When using the fac...

Page 123: ...ets that can be stapled When using standard size paper A4 or A4 LEF B5 LEF Letter or Letter LEF 2 to 100 sheets Other standard size paper A3 or B4 Ledger or Legal 2 to 65 sheets When using non standar...

Page 124: ...plays an output image that reflects the Staple Punch settings 3 Select the original orientation 4 Select the binding side 5 Configure the staple setting 6 Configure Staple speed priority in Details as...

Page 125: ...enter the number using S and T or the numeric keys To clear the fields press the Clear key If part of the printing area is missing due to the binding margin setting press Auto reduce 3 Press OK The se...

Page 126: ...and then folding the paper in two The paper can also be bound in the center with staples The optional multifunction finisher is required to use the Fold and Fold Staple settings You cannot use Bookle...

Page 127: ...a book by folding layering and then binding the sheets on the side Center Margin and Auto Reduce You can specify the center margin to the center of folded sections to prevent the folded sections from...

Page 128: ...elect Auto Output tray for optional equipment Select the output tray The buttons displayed on the Output tray screen varies depending on the optional equipment connected 1 Press Functions on the copy...

Page 129: ...tton the paper guides move 1 mm 0 04 toward the outside of the stacking tray Narrower Each time you press the button the paper guides move 1 mm 0 04 toward the inside of the stacking tray You can also...

Page 130: ...vice representative 1 Press Functions on the copy mode screen 2 Press Jump wing control Jump wing control is set Head cleaning Clean the ink head when you notice a change in image quality such as blur...

Page 131: ...link function contact your dealer or authorized service representative 1 Press Functions on the copy mode screen 2 Press View balance The View balance screen is displayed The account name and balance...

Page 132: ...nly the first page of the job as the overlay image 8 Specify Repetition Specify whether to use the target page s set in step 7 repeatedly ON Use the overlay image repeatedly until the last page of the...

Page 133: ...ayed in the message area 3 After the interrupt copy has been completed press the Interrupt key to cancel interrupt copy Printing of the paused job resumes When the machine has not been operated for 60...

Page 134: ...2 56 2 Copy ComColor Series User s Guide 09...

Page 135: ...3 ComColor Series User s Guide 09 Scanner...

Page 136: ...intable in this machine save to folder to save images in a folder on the machine and print them when necessary Select the file format according to how you want to use the scanned image This chapter de...

Page 137: ...this area will be lost In the ADF 1 Load the original in the ADF Align the originals and place them face up 2 Slide the original guides to match the width of the originals On the Platen Glass Open th...

Page 138: ...rnal hard disk Download using RISO Console Save data to a USB flash drive Save data to a computer on the network Attach data to an e mail message 1 Press either PDF TIFF or JPEG 2 Press OK The scanner...

Page 139: ...messages c Screen selection button Displays the Basic or Functions screen Use the Basic screen to configure the basic scan settings Use the Functions screen to configure the scanning functions Press...

Page 140: ...press Directory A list of directories is displayed in Networked computer 2 Select the directory for the saved data Press S and T to scroll the list 3 Press OK The previous screen is displayed To save...

Page 141: ...For information on saving data to a folder see Save to folder p 2 24 in Copy 5 Configuring the Functions Specify the detailed settings for scanning For information on the functions that can be config...

Page 142: ...f the original to be scanned p 3 11 Functions Save as default Register the current settings as the default values p 3 12 Check setting Confirm and register the current settings and print the settings...

Page 143: ...ricting which users can access and then print or edit a document you can prevent it from being improperly used This can be configured when you select PDF as the saving format of scanned data User PIN...

Page 144: ...py When the resolution for File format is set to 400dpi or 600dpi the scanned data cannot be enlarged reduced Scanning size Specify the size of the original to be scanned For operations see Scanning s...

Page 145: ...hen loading the original with the top of the original facing toward the back of the platen glass or the ADF Top side left Select this when loading the original with the top of the original facing towa...

Page 146: ...ner mode Directory p 3 5 File format p 3 9 Reproduction size p 3 10 Scanning size p 3 10 Color mode p 3 10 Scanning level p 3 11 Duplex Simplex p 3 11 Original p 3 12 Book shadow erase p 3 13 Image si...

Page 147: ...OK The settings are confirmed and the previous screen is displayed Entering an Image Size When the original is a non standard size you can specify the original size by entering the numerical value 1...

Page 148: ...ase color lighter so that the text is easier to read when scanning text originals with a background color or colored paper For operations see Base color level p 2 36 in Copy PIN code Assign PIN codes...

Page 149: ...le formats for scan data which are only saved in the internal hard disk You can restrict downloading on a computer on which you are using the RISO Console Scan data are not PIN protected You do not ne...

Page 150: ...3 16 3 Scanner ComColor Series User s Guide 09...

Page 151: ...4 ComColor Series User s Guide 09 Printer...

Page 152: ...rinted Each unit of processing for the print copy and other modes is called a job You cannot use this screen to control the data of Format for PC See Overview of Scan Operations p 3 2 in Scanner for c...

Page 153: ...ays a message and the hard disk usage c Screen selection buttons Switch between the Active Waiting Finished Folder and Functions screens d Job list Displays the job name status owner name number of co...

Page 154: ...of the selected job There are two Details screens The buttons that are available on the Active Waiting Finished and Folder screens vary When a button is grayed out you can confirm the current setting...

Page 155: ...saved in a USB flash drive p 4 9 Functions Online Set the machine online or offline p 4 15 Feed tray Specify the feed tray paper size feed control and double feed check settings for each feed tray p...

Page 156: ...Changing Settings During Printing For information on the operation buttons see Operation Buttons p 4 4 Output order order of job priority of the active job list Print jobs operated from the machine h...

Page 157: ...er limit the first half of the job name is omitted and the job name is displayed as xyz doc In the following cases all job names are displayed When Login setting has been set to Not required When the...

Page 158: ...r jobs for which printing is finished and for jobs that finished due to errors Operation Buttons Some functions may not be available depending on how the administrator has configured the settings Butt...

Page 159: ...of scanner mode The folder function may not be available depending on how the administrator has configured the settings Personal folders are displayed when Login setting has been set to Required Share...

Page 160: ...nt The selected job is moved to the active job list and printed When printing a job with a PIN code on the screen with the message Input the PIN code use the numeric keys to enter the PIN code a numbe...

Page 161: ...10 for information on Save to USB flash drive which is on the Output pull down menu of the printer driver 1 Insert the USB flash drive into the USB port of the machine The Select folder screen is disp...

Page 162: ...flash drive as well as the jobs in the job list For operations see Copying a Job to Another Folder p 4 10 Sorting the Job List p 4 11 and Changing Finished Job and Folder Job Settings p 4 12 Changing...

Page 163: ...d image position is displayed S Move up 0 5 mm 0 02 each time the button is pressed T Move down 0 5 mm 0 02 each time the button is pressed X Move to the right 0 5 mm 0 02 each time the button is pres...

Page 164: ...d in user External system job Press Select folder button to display the shared folder jobs and USB folder jobs on the Select folder screen The job name owner name page amount and saved date saved in t...

Page 165: ...d in the status button If the machine has not been online after printing the machine is set online automatically in the following cases When auto reset is executed The auto reset timing is set by the...

Page 166: ...of the jump wings so that the paper is more evenly aligned Normally the position of the jump wings is adjusted automatically based on the paper type and size however the paper may not be evenly aligne...

Page 167: ...5 ComColor Series User s Guide 09 RISO Console...

Page 168: ...ary depending on the operating system used and the optional equipment connected The actual displayed content may be different from the above screenshot depending on how the administrator has configure...

Page 169: ...ring screen of the RISO Console is displayed You can create a shortcut on the desktop to easily display the RISO Console screen When Login setting has been set to Required Click login to display the l...

Page 170: ...when using Non Riso ink Printer Status Displays a message indicating the current printer status Ready to print Sleeping etc If an error occurs the error code is displayed here Paper Displays the esti...

Page 171: ...field Print system info Click this to print the system information Print sample image Click this to print a sample page so you can check the result of a printed image User Screen The User screen displ...

Page 172: ...gain for confirmation 4 Click OK The message Settings have been sent appears To cancel the settings click Cancel If an error message appears enter the password again License Info Screen The License In...

Page 173: ...SV file Click this to save the latest information to a computer as a CSV file When you click Print this list or Download this list as CSV file the latest information is obtained and may be different f...

Page 174: ...or details on the charge counting contact your dealer or authorized service representative Print this list Click this to print the latest information Download this list as CSV file Click this to save...

Page 175: ...0 in block or 100 in block to change the number of jobs displayed in the list Click or on the right of the screen at above and under the list to scroll one page through the list and or to jump to the...

Page 176: ...s using the printer driver setting p 1 10 Output and Destination in Printer driver Delete Select a job and click Delete to delete that job Waiting Screen The Waiting screen displays waiting jobs Waiti...

Page 177: ...ays the jobs saved to the shared and personal folders These jobs can be printed or copied to another folder The folder function may not be available depending on how the administrator has configured t...

Page 178: ...wn menu Functions Screen Use the Functions screen to configure the user configurable functions of the printer main unit system Head cleaning Clean the ink head to prevent clogging Clean the ink head w...

Page 179: ...g collected The job list displays the scanned job name owner name number of pages and saved date time To select a job click the job name and add a check mark To select all jobs except jobs with PIN co...

Page 180: ...d You can select one job 2 Click Download The Download file dialog box is displayed For a job with a PIN code the Input the PIN code screen is displayed Enter the PIN code and click OK 3 Click Save Th...

Page 181: ...6 ComColor Series User s Guide 09 Appendix...

Page 182: ...direction Number of Gray Levels ComColor 9150 9150R 7150 7150R For each CMYK color 8 gray levels ComColor 2150 For each RK color 8 gray levels Data Processing Resolution Standard 300 dpi 300 dpi Fine...

Page 183: ...314 mm 548 mm 12 3 8 21 9 16 Guaranteed Print Area 3 Standard Margin width of 3 mm 1 8 Maximum Margin width of 1 mm 0 04 Paper Weight Standard Tray 46 g m2 12 lb bond to 210 g m2 56 lb bond plain pap...

Page 184: ...E T 100BASE TX 10BASE T 1ch Memory Capacity 1 GB Hard Disk 5 Capacity 320 GB Available Space 280 GB Operating System Linux Power Source ComColor 9150 9150R 7150 7150R AC 100 240 V 10 0 5 0 A 50 60 Hz...

Page 185: ...LEF orientation using color mode Continuous Print Speed 2 6 A4 LEF 8 ComColor 9110 Simplex 150 ppm Duplex 75 sheets minute 150 ppm ComColor 7110 Simplex 120 ppm Duplex 60 sheets minute 120 ppm Letter...

Page 186: ...3 R2 32 bit 64 bit Microsoft Windows Vista 32 bit 64 bit Microsoft Windows Server 2008 32 bit 64 bit Microsoft Windows Server 2008 R2 64 bit Microsoft Windows 7 32 bit 64 bit Microsoft Windows Server...

Page 187: ...lated as 1 billion bytes 6 The continuous print speed varies depending on the type of optional output equipment connected Multifunction finisher Max 120 sheets minute A4 LEF Simplex Face down offset s...

Page 188: ...ts minute 76 ppm Paper Size Standard Tray Maximum 340 mm 550 mm 13 3 8 21 5 8 Minimum 90 mm 148 mm 3 9 16 5 13 16 Feed Tray 7 Maximum 297 mm 420 mm 11 11 16 17 Minimum 182 mm 182 mm 7 3 16 7 3 16 Prin...

Page 189: ...012 64 bit Microsoft Windows Server 2012 R2 64 bit Microsoft Windows 8 32 bit 64 bit Microsoft Windows 8 1 32 bit 64 bit Network Interface Ethernet 1000BASE T 100BASE TX 10BASE T 1ch Memory Capacity 1...

Page 190: ...duplex scanning by switch back Original Source Size Maximum 297 mm 432 mm 11 11 16 17 equivalent to A3 Minimum 100 mm 148 mm 3 15 16 5 13 16 Paper Quality 52 g m2 14 lb bond to 128 g m2 34 lb bond Or...

Page 191: ...mm 488 mm 13 19 3 16 Minimum 182 mm 182 mm 7 3 16 7 3 16 Stapling Maximum 297 mm 432 mm 11 11 16 17 equivalent to A3 Minimum 203 mm 182 mm 8 7 3 16 Booklet Tray 1 Maximum 330 mm 457 mm 13 18 Minimum 2...

Page 192: ...ture 15 C to 35 C 59 F to 95 F Humidity 40 to 70 RH non condensing Dimensions W D H 1 120 mm 765 mm 1 130 mm 44 3 32 30 1 8 44 1 2 Weight Approx 131 kg 289 lbs Power Source AC 100 240 V 50 60 Hz 2 0 1...

Page 193: ...ion Max 110 W Dimensions when Connected to main unit W D H 1 440 mm 705 mm 1 345 mm 56 11 16 27 3 4 52 31 32 Type External Unit Paper Size Maximum 340 mm 460 mm 13 3 8 18 1 8 Minimum 90 mm 148 mm 3 9...

Page 194: ...tcards Tray Capacity Collating Height up to 440 mm 17 5 16 1 Offset Height up to 405 mm 15 15 16 2 Power Source AC 100 240 V 1 4 0 7 A 50 60 Hz Power Consumption Max 140 W Ready 3 30 W or less Sleep 4...

Page 195: ...nsumable specifications and types are subject to change without notice For pricing information contact your dealer or authorized service representative Ink Cartridges Type Color Quantity Unit ComColor...

Page 196: ...taple ComColor 3150 3110 ComColor 7150 7110 ComColor 9150 9110 2150 N A N A N A N A ComColor 3150 3110 ComColor 7150 7110 ComColor 9150 9110 2150 N A A4 A4 B5 A3 B4 A4 B5 A3 B4 A3 B4 A4 Foolscap A3 B4...

Page 197: ...e appears Follow on screen instructions to load the paper For 1 pos binding the staple angle may be different from the images above and printing images on the printer driver screen depending on the pa...

Page 198: ...1 10 Consumables 6 15 Continuous output 1 29 Contrast 1 16 Copies 1 27 Copy and pause 2 23 Copy mode screen 16 Copy canceling 2 5 Corrugator 12 34 Counter key 14 Custom paper entry 1 34 Cyan 1 7 D Dat...

Page 199: ...oading the next copy job 2 5 Locking lever 27 Login 15 17 5 3 Login password changing 18 5 5 Long edge 1 7 M MAC address 16 1 33 5 5 Magenta 1 7 Main power lamp 14 Main power switch 8 Main unit 7 Main...

Page 200: ...er 1 10 2 24 Save Call setting 2 19 Scan canceling 3 7 Scanner 8 Scanner lamp 8 Scanner mode screen 16 Scanner power switch 8 Scanner socket 8 Scanning level 2 14 3 11 Scanning size 2 27 3 10 Screenin...

Page 201: ...Please contact following for supplies and service Copyright 2014 RISO KAGAKU CORPORATION...

Reviews: