


999-998-086.10_REV. C
19
535 Manual Chuck/535 Auto Chuck Threading Machines
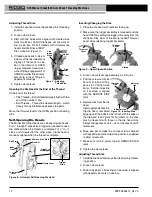
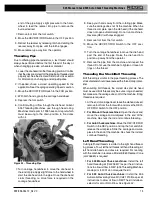
Figure 31 – Priming Model A Pump
To prime the Model A Pump:
1. Remove plug cover located on top cover.
2. Remove plug through opening.
3. Fill pump with oil.
4. Replace plug and plug cover before starting machine
or pump will drain itself immediately.
NOTE! If machine must be primed on a frequent basis, it
is an indication that the pump is in need of repair.
Replacing No. 820 Cutter Wheel
If the cutter wheel becomes dull or broken, push cutter
wheel pin out of frame and check for wear. If needed
replace pin, and install new Cutter Wheel
(see RIDGID
catalog)
. Lubricate pin with light lubricating oil.
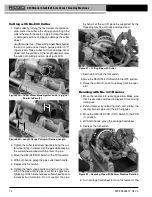
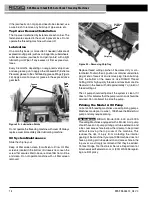
Jaw Replacement (Auto Chuck
Machines)
When teeth on jaw become worn and fail to hold pipe or rod
during operation, flip jaws to unused side or replace entire
set of jaws.
1. Loosen all three front cover mounting screws and
remove the front cover. Mounting screws are retained
to front cover.
2. Remove retaining rings and remove front pivot rod
support.
3. Remove jaws from the drive shaft. Flip over to unused
side or replace with new jaws. Make sure keys are
installed.
Confirm that connection links and jaws are in proper
orientation
(Figure 32 inset).
Figure 32 – Changing Auto Chuck Machine Jaws
4. Reverse process to assemble.
Replacing Jaw Inserts (Manual Chuck
Machines)
If Jaw inserts are worn out and do not grip pipe, they need
to be replaced.
1. Place screwdriver in insert slot and turn 90 degrees in
either direction. Remove insert
(Figure 33)
.
Figure 33 – Replacing Jaw Inserts
To Remove
To Replace
Screw Driver
Insert
Locking
Pin
Teeth
PRESS
DOWN
‘
Top
Cover
Plug
Connecting
Link
Retaining
Ring
Front
Pivot Rod
Support
Key
Jaw


