background image

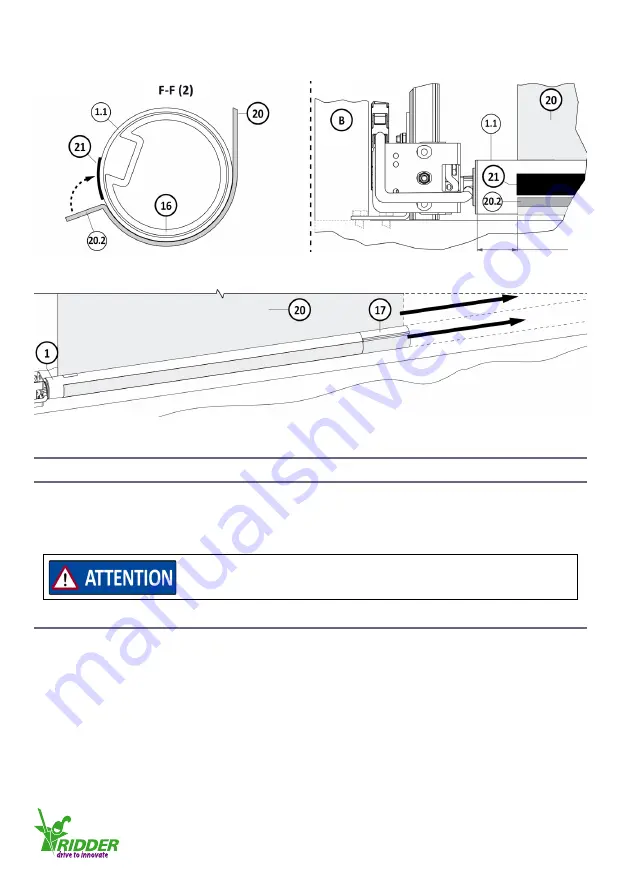
10. Attach the screen cloth (20.2) onto the tube (1.1) with double-sided adhesive tape (21). Refer to 

illustrations 4.7.1/4.7.6/4.7.7.

11. 

Pull the screen cloth (20) tight along the full length. Make sure that it does not fold!

5. CONNECT INSTRUCTIONS

5.1 Electrical material

• 

A minimum conductor diameter of 

1.5 mm²

 is applicable to the cables in the wiring diagrams. For 

the used components, electrical material and cable lengths the necessary conductor diameter can 

be different.

5.2 Protection - Conditions and starting points

The conditions that follow are applicable to the wiring diagrams.

• 

The installer makes sure that a motor-protection circuit-breaker (MPCB) and other necessary 

protections are used.

• 

The installer must include not shown protections in the wiring diagrams.

• 

Do not connect other electrical equipment (lamps, relays and such) directly to the connection 

cables of the motor.

• 

Isolate all poles, with a minimum contact separation of 3 mm per pole (EN 60335), from the 

mains voltage.

40 mm

4.7.6

4.7.7

Use only applicable components and electrical material.

Always refer to the related information and manuals.

Ridder Drive Systems

T

 +31 (0)341 416 854 

F

 +31 (0)341 416 611 

I

 www.ridder.com

22

Summary of Contents for RB50EPLUS

Page 1: ...at 36 38 3846 AX Harderwijk P O Box 360 3840 AJ Harderwijk the Netherlands T 31 0 341 416 854 F 31 0 341 416 611 I www ridder com E info ridder com Product Manual Ridder RB50E Tube motor 265041EN 2017...

Page 2: ...e to the tube motor 19 4 7 Attach the screen cloth and winding tube 20 5 CONNECT INSTRUCTIONS 5 1 Electrical material 22 5 2 Protection Conditions and starting points 22 5 3 Wiring diagram Single 24 5...

Page 3: ...l installers with professional competence must do all work safe and responsible 1 3 Warning about discouraged use The conditions that follow are applicable when the RB50E tube motor is used Do not cha...

Page 4: ...ation Damaged systems must be stopped immediately until they are repaired Do not operate roller screen systems when persons are in the danger zone and can touch the roller screen Monitor the danger zo...

Page 5: ...escriptions Symbol Description Symbol Description ACS Automatic control system N Neutral wire CB Control box with switch components P20 Journal with 2 flat sides at a distance of 20 mm parallel EM M E...

Page 6: ...the burn out of the drive if the electric motor becomes too hot The RB50E tube motor is almost entirely water resistant The protection classification of IP55 makes sure that a damp environment has no...

Page 7: ...ecessary to complete the drive system The illustration and table that follow show an overview of the Ridder components that are applicable to the RB50E tube motor Position Description 1 RB50E tube mot...

Page 8: ...50 x 50 mm approximately 550039 876 x 50 x 50 mm approximately Tube 50 x 1 5 mm Weight 4 2 kg Electrical Supply voltage 230 V AC 1 phase 50 Hz Maximum current 0 56 A 50 Hz Power 126 W Thermal protect...

Page 9: ...B50 Diameter of the tube motor in mm VK10 Journal dimensions in mm 10x10 Alternatives P20 width in mm 50 Mains frequency 50 Hz 230 Mains voltage 230 V 3 5 Number of revolutions drive shaft at 50 Hz E...

Page 10: ...50500 is for the standard VK10 journal The tube of the 550039 tube motor has an extension of 74 mm This makes the RB50E tube motor interchangeable with the RB50 tube motor Installation side of the rol...

Page 11: ...P20 to VK10 tube motor 550032 550039 The replacement VK10 for the P20 guiding unit There is a special guiding unit for the two installation sides of the roller screen Tube motor 550037 Adapter VK10 t...

Page 12: ...guiding profile 3 with guiding unit 2 between The purlins A and D OR The purlin A and the foundation C Use 4 bolts M6 11 and self locking nuts 12 to attach the mounting brackets 4 to the guiding prof...

Page 13: ...l1 4 3 1 6 5mm 4x 25 50 A A 50 25 A A 10 5 6 5 4x 19 5 48 27 5 4 3 2 l1 4 3 3 41 4 3 4 Ridder Drive Systems T 31 0 341 416 854 F 31 0 341 416 611 I www ridder com 13...

Page 14: ...the foundation C Refer to illustrations 4 3 6 4 3 9 2 Drill the holes of 9 mm for the bolts M8 14 2x or 3x in the purlin A Refer to illustrations 4 3 7 4 3 10 Drill the holes at the correct positions...

Page 15: ...h the mounting bracket 4 with bolts M8 14 2x or 3x and self locking nuts 15 to the purlin A Refer to illustration 4 3 10 3 Fully tighten the 4 bolts M6 11 and self locking nuts 12 of the mounting brac...

Page 16: ...e pointed to the guiding unit 2 3 Put the power cable of the tube motor 1 along the long side of the cable carrier bracket 8 4 Move the head 10x10 of the tube motor 1 through the bottom hole 8 1 of th...

Page 17: ...ition of the cable carrier mounting bracket 7 on the post B This position is equal to the length l1 multiplied by 0 5 to 0 6 Drill the holes for the applicable screws 7 1 or bolts 7 1 into the post B...

Page 18: ...at the FCP end female connection of the cable carrier 6 Attach this end 6 to the end connector MCP at the cable carrier bracket 8 7 Attach the other end of the cable carrier 6 to the end connector FC...

Page 19: ...ing piece 16 minimum of 5 2 mm if pop rivets of 5 mm are used 3 Use a pop rivet pliers to attach the pop rivet 18 4 Drill the holes for the other three pop rivets 18 5 Use the pop rivet pliers to atta...

Page 20: ...ler screen system an angle of inclination of less than 20 from the horizontal baseline is not recommended Refer to illustration 4 7 2 The RB50E tube motor is built in to a smooth circular aluminium tu...

Page 21: ...reen cloth 20 Make an estimate of the length of l3 Refer to illustrations 4 7 1 4 7 3 4 Cut and discard the cord 20 1 along the distance of L2 of the screen cloth 20 2 Refer to illustrations 4 7 1 4 7...

Page 22: ...ns and starting points The conditions that follow are applicable to the wiring diagrams The installer makes sure that a motor protection circuit breaker MPCB and other necessary protections are used T...

Page 23: ...rnal sources Too many cables together The warnings that follow must always be obeyed Parallel connection Parallel connection of RB50E tube motors with electronic limit switch systems is possible Alway...

Page 24: ...sure that the load is less than the maximum switch contact load for the switch installation relay controls switches and such To change the direction of rotation of RB50E tube motor Interchange the tw...

Page 25: ...Brown Blue Green Yellow Make sure that the load is less than the maximum switch contact load for the switch installation relay controls switches and such To change the direction of rotation of RB50E t...

Page 26: ...motor Because of this more time is necessary to let the temperature of the tube motor decrease to the ambient temperature If the tube motor is continuously started and stopped for short periods this...

Page 27: ...r possibly operates at a too high temperature and can be thermally stopped The lifespan will decrease if the tube motor continuously operates at high temperatures 6 2 Operation An RB50E tube motor can...

Page 28: ...h Note If the connection is incorrect it is not possible to set the tube motor again 7 3 RB50E limit switch system The RB50E tube motor has an electronic limit switch system with a pulse counter The p...

Page 29: ...st selected direction after step 3 is immediately set Make sure that this direction is correct for the second end position If the selected direction is incorrect erase the first end position refer to...

Page 30: ...p 4 4 Push and hold the Down button also Wait for a minimum of 1 second and then go to step 5 5 Hold the Down button and release the programming button Wait for a minimum of 1 second and then go to st...

Page 31: ...then go to step 4 4 Push and hold the Down button also Wait for a minimum of 1 second and then go to step 5 5 Hold the Down button and release the programming button Wait for a minimum of 1 second and...

Page 32: ...g unit on the guiding profile A dirty guiding profile can cause irregular operation thus uses more power Do a check for a correctly tightened head of the tube motor Do a check for a not damaged power...

Page 33: ...se 4 The mains voltage is not correct Solution 4 Refer to the identification information on the tube motor for the correct mains voltage If the mains voltage does not agree contact your supplier Cause...

Page 34: ...ch installation relay controls switches and such Do a check of the conditions and starting points in 6 1 Is the duty cycle correct Problem 3 The second end position is not set after the programming bu...

Page 35: ...Systems after their lifespan and obey the applicable national and or local regulations 10 2 Decommissioning and removal Decommissioning and removal is only permitted to approved personnel Ridder Driv...

Page 36: ...www ridder com...

Reviews: