background image

123

5

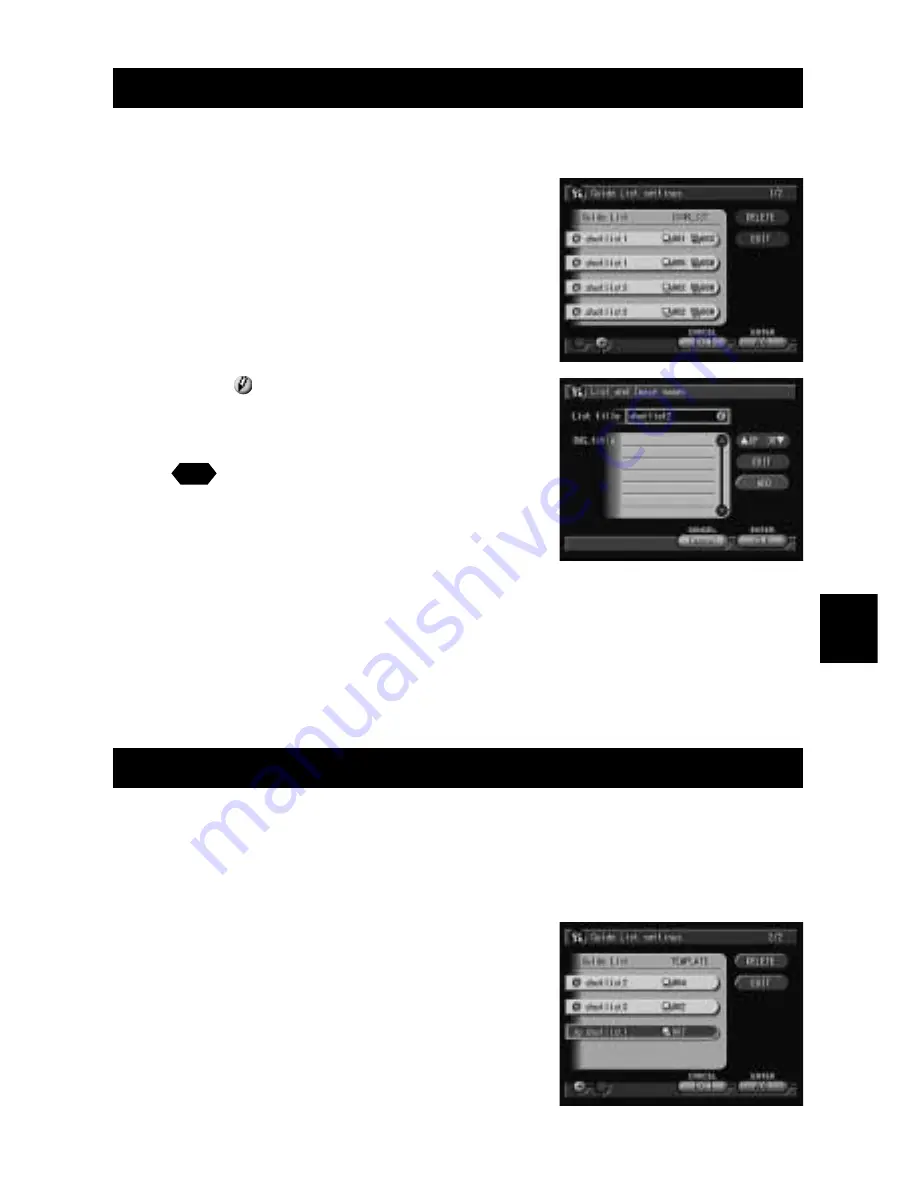
Using JOB Navi. Image Capture Guide List

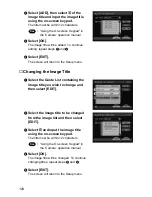
Creating a New Guide List

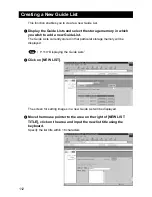
This function enables you to add a new list.

A

Select [ADD].

B

Select   and input the list title using
the on-screen keypad.

The title must be within 16 characters.

See

• “Using the On-screen Keypad” in

the ‘Camera’ operation manual

Add the required images by step 

B

 “Adding

an Image” in “Editing the Guide List” below.

C

Select [OK].

The new list is added.

D

Select [EXIT].

The screen returns to the Setup menu.

Editing the Guide List

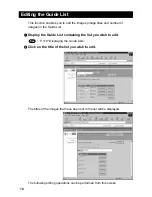
This function enables you to edit the images in an existing list.

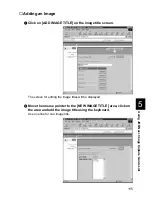
Adding an Image

A

Select the list to which you wish to
add an image and select [EDIT].

Summary of Contents for RDC-I700

Page 1: ...Personal Computer on Manual ect use of your his manual e use Keep the for future use ...

Page 2: ......

Page 3: ...transmitting images from the camera to the PC and operating the camera from the PC Communication Internet Operation Manual This manual explains the procedures for transmitting images and using Internet functions Sending and receiving data using the camera and a PC Using the communication and Internet functions Basic operation Read This Before Proceeding These instructions explain the procedure for...

Page 4: ...g the Camera to a PC 20 Connecting the Camera Directly to a PC 20 Connecting the Camera to a Network 24 Making the Camera Settings 26 COM Port Settings for Windows 26 Chapter 2 Viewing Images on a PC Controlling the Camera from the Browser 28 Preparing the Camera 28 Opening the Camera s Homepage on the Browser 28 Displaying Thumbnail Images 31 Viewing Thumbnail Images 31 Displaying File Properties...

Page 5: ...ddress 64 Deleting an Address 65 Saving the Address Book in the PC 65 Sending the Address Book Stored in the PC to the Camera 66 User Information Settings 68 Modem Settings 70 E Mail Settings 72 Template Settings 74 Displaying the Templates 74 Creating a New Template 75 Editing a Template 76 Deleting a Template 77 Web Settings 78 Dial Up Account Settings 80 Displaying the Dial Up Accounts 80 Enter...

Page 6: ...ing a Guide List 98 Using the Guide List 99 Using the Image Capture Guide List on Excel 100 Creating a Guide List 100 Recording Images Using the Guide List 102 Pasting the Recorded Images to the Table 103 Using the Image Capture Guide List on Word 106 Creating a Guide List 106 Recording Images Using the Guide List 108 Pasting the Recorded Images into a Document 108 Setting the Image Capture Guide ...

Page 7: ...140 Using the TWAIN Function 142 For Windows 142 For Macintosh 144 Chapter 7 Setting the Receiving PC for Direct Upload Setting the Receiving PC for Direct Upload 148 For Windows 148 For Macintosh 153 Appendix Camera Settings When Connected to a PC 158 Setting the PC Connection Environment 158 Setting the Network Environment 160 Switching Between the Modem and LAN 162 Error Messages 163 Error Mess...

Page 8: ......

Page 9: ...thods 12 Installing the USB Driver 14 For Windows 14 For Macintosh 15 Installing the Application Software 16 For Windows 16 For Macintosh 18 Connecting the Camera to a PC 20 Connecting the Camera Directly to a PC 20 Connecting the Camera to a Network 24 Making the Camera Settings 26 COM Port Settings for Windows 26 ...

Page 10: ...ecord still images text files motion pictures and voice memos Setting the Camera from the Large Screen You can make the various camera settings such as Address Book and Dial Up settings using the large screen of the PC You can also make a backup file of all the camera settings as a PC file See To use this function after installing the software and connecting the camera according to the instruction...

Page 11: ... the camera according to the instructions in the latter half of this chapter refer to Chapter 6 Using the Extension Functions Using the TWAIN Function If you install a TWAIN driver for this camera you can call up the images recorded in the camera s storage memory internal memory CF card or PC card directly from the graphic application software compatible with TWAIN onto the screen See To use the T...

Page 12: ...e USB cable you need a computer which is factory equipped with the USB port and is preinstalled with Windows 98 or Windows 2000 Hard disk space 6 MB or more Note To access the camera from the Web browser Internet Explorer Netscape Communicator or other Web browser must be installed To use the TWAIN function application software compatible with TWAIN must be installed To use the Image Capture Guide...

Page 13: ...sed with a MacOS X operating system Hard disk space 6 MB or more Note To access the camera from the Web browser Internet Explorer Netscape Communicator or other Web browser must be installed To use the TWAIN function application software compatible with TWAIN is required If the Mac operating system is earlier than OS9 Apple Remote Access ARA is required to set the PC for Direct Upload The explanat...

Page 14: ...he USB cable supplied with the camera By Serial Cable If the PC has no USB port connect the camera to the PC using the serial cable Important Note If you use the serial cable to connect the camera to the PC the data will take longer to transmit than when connected by the USB cable or LAN If possible you are therefore recommended to use the USB cable or LAN Note The serial cable used for the serial...

Page 15: ...he Camera to a Network You can connect the camera to an existing network LAN by Ethernet etc using the recommended LAN PC card This method is useful when using the camera on several PCs or when using several cameras HUB Ethernet cable ...

Page 16: ...he PC until the software has been installed otherwise installation will not proceed smoothly When you have established a connection click Cancel on a plug play window that appears and remove the USB cable For Windows If you are using Windows install the USB driver as follows A Turn the PC on When Windows is up and running proceed to the next step B Insert the CD ROM provided in the CD ROM drive of...

Page 17: ... a PC Refer to page 169 Troubleshooting for troubleshooting For Macintosh If you are using a Macintosh install the USB driver as follows A Turn the PC on When the Macintosh is up and running proceed to the next step B Insert the CD ROM provided in the CD ROM drive of the PC C Double click on the CD ROM Next double click on the Usb driver folder and then double click on RDC i700 USB Serial Inst Ins...

Page 18: ...lation of the RDC i700 Explorer Plug In software will start Follow the instructions displayed on the screen Important Note When you have finished installation shown above the software RDC i700 USB Serial Process will be launced automatically everytime Windows runs and the corresponding icon will be displayed on the task bar When you have exited this software in case of connecting with a USB cable ...

Page 19: ...ick on My Computer and then double click on the CD ROM Next double click on the QuickTime4 folder D Double click on QuickTime Installer exe Installation of the QuickTime software will start Follow the instructions displayed on the screen Installing the Image Capture Guide List Tool Kit A Check that the PC is turned on B Check that the CD ROM supplied is inserted in the CD ROM of the PC C Double cl...

Page 20: ...PC is turned on B Check that the CD ROM supplied is inserted in the CD ROM drive of the PC C Double click on the CD ROM then double click on RDC 7 i700 Mounter Inst Installation of the RDC 7 i700 Mounter software will start Follow the instructions displayed on the screen Installing the TWAIN Driver A Check that the PC is turned on B Check that the CD ROM supplied is inserted in the CD ROM drive of...

Page 21: ...if QuickTime 4 has already been installed on your Macintosh A Check that the PC is turned on B Check that the CD ROM supplied is inserted in the CD ROM drive of the PC C Double click on the CD ROM then double click on the QuickTime folder D Double click on QuickTime Installer Installation of QuickTime will start Follow the instructions displayed on the screen ...

Page 22: ... camera by the battery Particularly if you are handling no compression files motion pictures or other large files transmission takes a long time If the power fails during transmission the camera or PC may be adversely affected Connecting the camera via the USB hub may result in the camera not functioning properly If possible you are advised not to use the USB hub The camera will not operate on pow...

Page 23: ...sconnect the camera and PC at any time simply by inserting or removing the USB cable The cable can be inserted or removed with the power turned on Connecting the Camera by USB Cable For Macintosh You can connect the camera to a Macintosh using the USB cable supplied with the camera A Open the terminal cover on the right side of the camera B Insert the flat connector on one end of the USB cable sup...

Page 24: ...ble For Windows You can connect the camera to a PC running Windows using a special serial cable Important Note Make sure that both the PC and the camera are turned off before connecting or disconnecting the serial cable A Check that the PC and the camera are turned off B Open the terminal cover on the right side of the camera C Insert the flat connector on one end of the serial cable into the USB ...

Page 25: ...that the PC and the camera are turned off B Open the terminal cover on the right side of the camera C Insert the flat connector on one end of the serial cable into the USB AUX terminal of the camera with the seal facing up D Insert the connector on the other end into the connector of the Macintosh conversion cable E Insert the connector of the Macintosh conversion cable into the serial terminal mo...

Page 26: ... use an AC adapter and avoid powering the camera by the battery Particularly if you are handling no compression files motion pictures or other large files transmission will take a long time If the power fails during transmission the camera or the PC may be adversely affected Do not touch the cable terminal of the LAN connection PC card Do not connect the camera to a LAN and a USB or serial cable s...

Page 27: ...connection PC card D Insert the connector on the other end of the connection cable into the connector of the LAN cable E Insert the connector on the other end of the LAN cable into the free terminal of the LAN hub Connection of the camera to the LAN is now completed ...

Page 28: ...bility of the PC and the camera In this case set a low setting for the CONNECT SPEED in the appendix Camera Settings When Connected to a PC P 158 COM Port Settings for Windows The USB driver for Windows treats the camera as equipment that uses the COM port virtually If the COM port conflicts with other equipment the camera may fail to be detected even if the driver has been correctly installed In ...

Page 29: ...owser 28 Displaying Thumbnail Images 31 Viewing Thumbnail Images 31 Displaying File Properties 33 Checking the Data 34 Saving Data in the PC 36 Displaying Thumbnail Images with Capture Guide Titles 38 Viewing Thumbnail Images with Guide List 38 Displaying File Properties 40 Displaying an Image in its Actual Size 41 Saving Data in the PC 42 ...

Page 30: ...0 Connecting the Camera to a PC B Check that the camera and the PC are turned on C Set the mode dial to PC Opening the Camera s Homepage on the Browser Start up the Internet Explorer or Netscape Communicator browser and open the camera s built in homepage Important Note When you can not connect the camera by controlling the browser check that the proxy server is correctly configured P 170 Checking...

Page 31: ...ress as follows If the IP address is 192 168 181 240 enter the address as follows Note If using Netscape Communicator enter the address in the Location area D Press the Enter key or Return key The following screen will be displayed This is the camera s homepage By selecting functions from this screen you can use the PC to view images stored in the camera and control the various camera functions ...

Page 32: ... connected to the LAN This means that even if the homepage is saved it may not necessarily be displayed using the same number next time Instructions for fixing the camera s IP address are explained in Setting the Network Environment p 158 in the appendix Camera Settings When Connected to a PC Saving the Homepage If you are using Internet Explorer select Add to Favorites from the Favorites menu The...

Page 33: ...umbnail images normal THUMBNAIL and FILE PROPERTY which displays more detailed information A Check that the camera is properly connected to the PC that the camera and the PC are turned on and that the camera s mode dial is set to B Start the browser from the PC input the IP address and display the camera s homepage See P 28 Opening the Camera s Homepage on the Browser C Click on VIEW THUMBNAIL IMA...

Page 34: ...n Picture Voice Memo 20 images can be displayed on one page If there are more than 20 images you can change the display by clicking on NEXT 20 or PRE 20 If the data cannot be displayed as a thumbnail the symbol indicating the type of file will be displayed in the image area You can perform various operations explained in the following pages from this screen Note You can return to the first screen ...

Page 35: ...ata for example the shooting date or photographer A Click on FILE PROPERTY The thumbnail will be displayed in the following form Note If you have registered a plug in that is compatible with the voice memos or recorded memos in the browser you can display and play back files by clicking on the file name of the voice memo or keypad memo on the screen ...

Page 36: ...Perform the following procedure if you wish to view a still image in its actual size 1 pixel of the image corresponds to 1 pixel of the screen A Click on the image you wish to view Click on the image in the same way for FILE PROPERTY The image will be displayed in a new window in its actual size B When you have finished viewing click on the close box The window will be closed ...

Page 37: ...ot been installed in the browser The necessary software should be available if standard installation has been performed A Click on the data icon you wish to check Click on the icon in the same way for FILE PROPERTY The plug in software compatible with the selected data will automatically start up and the data will be displayed or played back Note The screen shown below may be displayed depending o...

Page 38: ...Images P 37 Still Images A In the case of a thumbnail display click on the image you wish to save and display the image in its actual size B For Windows Move the mouse pointer to the image and click the right mouse button For Macintosh Move the mouse pointer to the image and click while pressing the control key The menu will be displayed in the position of the mouse pointer C Click on Save Picture...

Page 39: ...ish to save and click while pressing the control key The menu will be displayed in the position of the mouse pointer B Click on Save Target As If you are using Netscape Communicator click on Save Link As The dialog box for specifying the location and file name will be displayed C Specify the location and file name and then click on Save If you are using Netscape Communicator be sure to select the ...

Page 40: ...the camera in thumbnail form There are two types of thumbnail display normal THUMBNAIL and FILE PROPERTY which displays the information in more detail A Check that the camera is properly connected to the PC that the camera and PC are turned on and that the camera s mode dial is set to B Start the browser from the PC input the IP address and display the camera s home page See P 28 Opening the Camer...

Page 41: ...erent Guide List click on the desired list from the Guide List on the left of the screen 20 images can be displayed on one page If there are more than 20 images you can change the display by clicking on NEXT 20 or PRE 20 You can perform various operations explained in the following pages from this screen Guide Lists Select storage memory ...

Page 42: ...ies If you wish to check detailed information relating to the images such as the shooting date or photographer perform the following procedure A Click on FILE PROPERTY A thumbnail display in the following form will be displayed ...

Page 43: ...xel of the image corresponds to 1 pixel of the screen perform the following procedure A Click on the image you wish to view Click on the image in the same way for FILE PROPERTY The image will be displayed in its actual size in a new window B When you have finished viewing click on the close box The window will be closed ...

Page 44: ... image in its actual size B For Windows Move the mouse pointer to the image and click the right mouse button For Macintosh Move the mouse pointer to the image and click while pressing the control key The menu will be displayed in the position of the mouse pointer C Click on Save Picture As If you are using Netscape Communicator click on Save Image As The dialog box for specifying the location and ...

Page 45: ... Images 44 Shooting 44 Checking the Image 47 Saving the Image 48 Shooting Text Files 49 Shooting 49 Saving the Image 52 Recording Motion Pictures 53 Recording 53 Saving the Motion Picture 56 Recording a Voice Memo 57 Recording 57 Saving the Voice Memo File 60 ...

Page 46: ...mages A Check that the camera is properly connected to the PC that the camera and the PC are turned on and that the camera s mode dial is set to B Start the browser on the PC input the IP address and display the camera s homepage See P 28 Opening the Camera s Homepage on the Browser C Click on RECORDING The screen for making settings relating to shooting will be displayed ...

Page 47: ...ttings to the status prior to shooting click on PRE SETTING Note The procedure for checking or saving a non compressed still image vary Refer to page 49 Shooting Text Files F Click on NEXT The screen for checking the settings will be displayed Important Note If the storage memory selected as the recording destination internal memory CF card or PC card is full an error message will be displayed Del...

Page 48: ...ou wish to check the image in its actual size proceed to the next page To save the image in the PC on the hard disk etc proceed to Saving the Image P 48 At this point the image is only saved in the camera and not in the PC If you do not need to check the image in its actual size or save it in the PC click on EXIT The screen will return to the screen for making settings relating to shooting ...

Page 49: ...tual size 1 pixel of the image corresponds to 1 pixel of the screen A Click on the reduced image The image will be displayed in its actual size in a new window You can save the image in the PC from this screen See next page B When you have finished checking the image click on the close box The window will be closed ...

Page 50: ...e pressing the control key C Click on Save Picture As If you are using Netscape Communicator click on Save Image As The dialog box for specifying the location and file name will be displayed D Specify the location and file name and then click on Save The image is now saved in the PC Note The Save function is a browser function and not a camera function For further details refer to the HELP functio...

Page 51: ...d shoot text files A Check that the camera is properly connected to the PC that the camera and the PC are turned on and that the camera s mode dial is set on B Start the browser on the PC input the IP address and display the camera s homepage See P 28 Opening the Camera s Homepage on the Browser C Click on RECORDING The screen for making the settings relating to shooting will be displayed ...

Page 52: ...the settings to the status prior to shooting click on PRE SETTING F Click on NEXT The screen for checking the settings will be displayed Important Note If the storage memory selected as the recording destination internal memory CF card or PC card is full an error message will be displayed Delete unwanted images recorded on the card or change the recording destination G Aim the camera Aim the camer...

Page 53: ...playing TIFF image files has been installed in your browser you can check the image in its actual size by clicking on the mark To save the image in the PC hard disk etc proceed to the next page At this point the images is only saved in the camera and not in the PC If there is no need to save the image in the PC click on EXIT The screen will return to the screen for making settings relating to shoo...

Page 54: ...e pointer B Click on Save Target As If you are using Netscape Communicator click on Save Link As The dialog box for specifying the location and file name will be displayed C Specify the location and file name and then click on Save If you are using Netscape Communicator be sure to select the source under Save in The image is now saved in the PC Note The Save function is a browser function and not ...

Page 55: ...record motion pictures A Check that the camera is properly connected to the PC that the camera and the PC are turned on and that the camera s mode dial is set on B Start the browser on the PC side input the IP address and display the camera s homepage See P 28 Opening the Camera s Homepage on the Browser C Click on RECORDING The screen returns to the screen for making the settings relating to reco...

Page 56: ...atus when recording was last performed click on PRE SETTING Note Changing the ZOOM setting during recording is not effective for motion pictures F Click on NEXT Important Note If the storage memory selected as the recording destination internal memory CF card or PC card is full an error message will be displayed Delete unwanted images recorded on the card or change the recording destination G Aim ...

Page 57: ...are for playing back AVI format movie files has been installed on your browser you can check the recorded image by clicking on the image To save a motion picture in the PC on the hard disk etc proceed to the next page At this point the motion picture is only saved in the camera and not in the PC If you do not need to save the motion picture in the PC click on EXIT The screen will return to the scr...

Page 58: ...use pointer B Click on Save Target As If you are using Netscape Communicator click on Save Link As The dialog box for specifying the location and file name will be displayed C Specify the location and file name and then click on Save If you are using Netscape Communicator be sure to select the source under Save in The motion picture is now stored in the PC Note The Save function is a browser funct...

Page 59: ...nd record a voice memo A Check that the camera is properly connected to the PC that the camera and the PC are turned on and that the camera s mode dial is set to B Start the browser by the PC input the IP address and display the camera s homepage See P 28 Opening the Camera s Homepage on the Browser C Click on RECORDING The screen for making the settings relating to recording will be displayed ...

Page 60: ...ngs to the status at the last recording click on PRE SETTING F Click on NEXT The screen for checking the settings will be displayed Important Note If the media selected as the recording destination internal memory CF card or PC card is full an error message will be displayed Delete unwanted images recorded on the card or change the recording destination G Aim the camera Aim the camera microphone i...

Page 61: ...ying back WAV format voice memo files has been installed in your browser you can check the recorded sound file by clicking on the microphone mark To save the voice memo file in the PC in the hard disk etc proceed to the next page At this point the sound file has only been saved in the camera and not in the PC If there is no need to save the voice memo file in the PC click on EXIT The screen will r...

Page 62: ...ill be displayed in the position of the mouse pointer B Click on Save Target As If you are using Netscape Communicator click on Save Link As The dialog box for specifying the location and file name will be displayed C Specify the location and file name and then click on Save If you are using Netscape Communicator be sure to select the source under Save in The voice memo file is now saved in the PC...

Page 63: ...ew Dial Up Account 81 Editing a Dial Up Account 82 Deleting a Dial Up Account 83 Direct Upload Settings 84 Displaying the Direct Upload Dial Up Accounts 84 Selecting a Direct Upload Dial Up Account 85 Setting the Send To Folder Name and Server 86 Quick Send Settings 87 Displaying the Quick Send Dial Up Accounts 87 Selecting a Quick Send Dial Up Account 88 Selecting a Quick Send Send To Account 89 ...

Page 64: ...red in the camera internal memory Various editing operations can be performed from this screen A Check that the camera is properly connected to the PC that the camera and the PC are turned on and that the camera s mode dial is set to B Start up the browser by the PC input the IP address and display the camera s homepage See P 28 Opening the Camera s Homepage on the Browser C Click on SET UP D Chec...

Page 65: ...ay the Address Book See P 62 Displaying the Address Book B Click on NEW ADDRESS The screen for setting a new address will be displayed C Move the mouse pointer to the input item and click on the area Input the information using the keyboard D When you have finished entering the information click on SAVE The new address will be added ...

Page 66: ...ddress Book See P 62 Displaying the Address Book B Click on the name of the person whose information you wish to edit The editing screen will be displayed C Move the mouse pointer to the item to be edited and click on the area Edit the information using the keyboard D When you have finished editing click on SAVE Editing is now completed ...

Page 67: ... delete the address Saving the Address Book in the PC This function enables you to save the Address Book all the entries as a file in the PC on the hard disk etc Note This function can be used in the following cases When you want to make a backup file of important addresses When you want joint possession of the Address Book in this case first save the Address Book then connect another camera and s...

Page 68: ...f Windows the file name extension inf will automatically be added to the end of the file name Sending the Address Book Stored in the PC to the Camera This function enables you to download an Address Book file stored on the PC hard disk etc and send it to the camera A Display the Address Book See P 62 Displaying the Address Book B Click on Browse The dialog box for selecting the Address Book file w...

Page 69: ...e Camera Settings C Specify the location of the file to be downloaded select the file and click on Open The selected file name will be displayed D Click on Transfer The selected address book will be sent to the camera ...

Page 70: ...ering Owner Information in the Camera operation manual A Check that the camera is properly connected to the PC that the camera and the PC are turned on and that the camera s mode dial is set to B Start up the browser by the PC input the IP address and display the camera s homepage See P 28 Opening the Camera s Homepage on the Browser C Click on SET UP D Click on USER INFO ...

Page 71: ...d Note If you have not yet clicked on SAVE you can return to the status prior to setting the status immediately after this screen was displayed by clicking on PRE SETTING F When you have finished making the settings click on SAVE Setting of the user information is now completed ...

Page 72: ...he Modem Settings in the Communication Internet operation manual A Check that the camera is properly connected to the PC that the camera and the PC are turned on and that the camera s mode dial is set to B Start up the browser by the PC input the IP address and display the camera s homepage See P 28 Opening the Camera s Homepage on the Browser C Click on SET UP D Click on MODEM SETTING ...

Page 73: ...board Note If you have not yet clicked on UPDATE you can return to the status prior to setting the status immediately after this screen was displayed by clicking on PRE SETTING F When you have finished making the settings click on UPDATE Setting of the modem is now completed ...

Page 74: ...il Function in the Communication Internet operation manual A Check that the camera is properly connected to the PC that the camera and the PC are turned on and that the camera s mode dial is set to B Start up the browser by the PC input the IP address and display the camera s homepage See P 28 Opening the Camera s Homepage on the Browser C Click on SET UP D Click on MAIL ...

Page 75: ...board Note If you have not yet clicked on UPDATE you can return to the status prior to setting the status immediately after this screen was displayed by clicking on PRE SETTING F When you have finished making the settings click on UPDATE The e mail settings are now completed ...

Page 76: ...on enables you to display the list of templates stored in the camera internal memory Operations such as editing deleting and adding a template start from this screen A Check that the camera is properly connected to the PC that the camera and the PC are turned on and that the camera s mode dial is set to B Start up the browser by the PC input the IP address and display the camera s homepage See P 2...

Page 77: ...Creating a New Template This function enables you to create a new template A Display the list of templates See P 74 Displaying the Templates B Click on CREATE NEW TEMPLATE The screen for creating a new template will be displayed C Input the template using the keyboard ...

Page 78: ... SAVE The new template will be added Editing a Template This function enables you to edit a template A Display the list of templates See P 74 Displaying the Templates B Click on the template you wish to edit The screen for editing a template will be displayed ...

Page 79: ...TE The screen will return to the list of templates Deleting a Template This function enables you to delete unwanted templates A Display the list of templates See P 74 Displaying the Templates B Click on DELETE on the template you wish to delete The confirmation screen will be displayed Click on OK to erase the template ...

Page 80: ...Web Page in the Communication Internet operation manual A Check that the camera is properly connected to the PC that the camera and the PC are turned on and that the camera s mode dial is set to B Start up the browser by the PC input the IP address and display the camera s homepage See P 28 Opening the Camera s Homepage on the Browser C Click on SET UP D Click on WEB ...

Page 81: ...Note If you have not yet clicked on UPDATE you can return to the status prior to setting the status immediately after this screen was displayed by clicking on PRE SETTING F When you have finished making the settings click on UPDATE The settings related to the Web are now completed ...

Page 82: ...al Displaying the Dial Up Accounts This function enables you to display the dial up accounts set in the camera Operations such as editing deleting and adding a dial up account start from this screen A Check that the camera is properly connected to the PC that the camera and the PC are turned on and that the camera s mode dial is set to B Start up the browser by the PC input the IP address and disp...

Page 83: ...ount This function enables you to enter a new dial up account A Display the list of dial up accounts See P 80 Displaying the Dial Up Accounts B Click on NEW DIAL UP The screen for setting a new dial up account will be displayed C Make the settings relating to the dial up account using the mouse and keyboard ...

Page 84: ...unt This function enables you to edit the settings related to a dial up account A Display the list of dial up accounts See P 80 Displaying the Dial Up Accounts B Click on the dial up account you wish to edit The setup screen relating to the dial up accounts will be displayed C Edit the settings using the mouse and keyboard ...

Page 85: ...is now completed Deleting a Dial Up Account This function enables you to delete unwanted dial up accounts A Display the list of dial up accounts See P 80 Displaying the Dial Up Accounts B Click on DELETE on the dial up account you wish to delete The confirmation screen will be displayed Click on OK to erase the dial up account ...

Page 86: ...nual For details of how to set the PC to receive direct upload refer to Setting the Computer to Receive Direct Upload P 148 Displaying the Direct Upload Dial Up Accounts This function enables you to display the list of dial up accounts for direct upload set in the camera A Check that the camera has been properly connected that the camera and the PC are turned on and that the camera s mode dial is ...

Page 87: ...ist Settings telephone number IP address etc related to each dial up account are made in Dial Up Account Settings P 80 A Display the list of dial up accounts for direct upload See P 84 Displaying the Direct Upload Dial Up Accounts B Click the radio button for the dial up account to be used Note If you have not yet clicked on UPDATE you can return to the status prior to setting the status immediate...

Page 88: ... Click on DESTI The screen for setting the upload folder name and server will be displayed C Edit the setting using the mouse and keyboard Note If you have not yet clicked on UPDATE you can return to the status prior to setting the status immediately after this screen was displayed by clicking on PRE SETTING D When you have finished making the settings click on UPDATE Setting of the folder name an...

Page 89: ...tting Quick Send in the Communication Internet operation manual Displaying the Quick Send Dial Up Accounts This function enables you to display the list of dial up accounts for Quick Send set in the camera A Check that the camera is properly connected to the PC that the camera and the PC are turned on and that the camera s mode dial is set to B Start up the browser by the PC input the IP address a...

Page 90: ...related to each dial up account telephone number etc are performed in Dial Up Account Settings P 80 A Display the list of send to names for Quick Send See P 87 Displaying the Quick Send Dial Up Accounts B Click the radio button for the dial up account to be used Note If you have not yet clicked on UPDATE you can return to the status prior to setting the status immediately after this screen was dis...

Page 91: ... Book Settings P 62 A Display the list of dial up accounts for Quick Send See P 84 Displaying the Direct Upload Dial Up Accounts B Click on SEND TO The screen for selecting a recipient will be displayed C Click the radio button for the name of the recipient of Quick Send Note If you have not yet clicked on UPDATE you can return to the status prior to setting the status immediately after this scree...

Page 92: ...Upload Dial Up Accounts B Click on IMAGE SIZE The screen for selecting the size of the image will be displayed C Use the mouse to change the setting Note If you have not yet clicked on UPDATE you can return to the status prior to setting the status immediately after this screen was displayed by clicking on PRE SETTING D When you have finished making the setting click on UPDATE Setting of the size ...

Page 93: ...setting refer to Setting FTP Upload in the Communication Internet operation manual Displaying the FTP Upload Dial Up Accounts This function enables you to display the list of dial up accounts for FTP upload stored in the camera A Check that the camera is properly connected to the PC that the camera and the PC are turned on and that the camera s mode dial is set to B Start up the browser by the PC ...

Page 94: ...to each dial up account telephone number etc are performed in Dial Up Account Settings P 80 A Display the list of dial up accounts for FTP upload See P 91 Displaying the FTP Upload Dial Up Accounts B Click the radio button for the dial up account to be used Note If you have not yet clicked on UPDATE you can return to the status prior to setting the status immediately after this screen was displaye...

Page 95: ...playing the FTP Upload Dial Up Accounts B Click on SEND TO The setup screen relating to the FTP server will be displayed C Use the mouse and keyboard to edit the setting Note If you have not yet clicked on UPDATE you can return to the status prior to setting the status immediately after this screen was displayed by clicking on PRE SETTING D When you have finished making the setting click on UPDATE...

Page 96: ...d by several people in this case each person should make their own settings on the camera and save them and then the settings can be changed by the restore function each time the camera is used by a different person Saving the Camera Settings in the PC This function enables you to save all the camera settings such as the Address Book JOB Navi dial up direct upload and Quick Send as files in the PC...

Page 97: ...camera settings file saved on the PC disk to the camera Important Note If you restore the settings all the settings currently in effect will be overwritten A Check that the camera is properly connected to the PC that the camera and the PC are turned on and that the camera s mode dial is set to B Start up the browser by the PC input the IP address and display the camera s homepage See P 28 Opening ...

Page 98: ...le then click on OPEN The selected file will be displayed on the screen E Click on RESTORE The selected backup file will be transferred to the camera F Turn the power off and turn it on again about 5 seconds later The settings transferred to the camera will be effective ...

Page 99: ...06 Creating a Guide List 106 Recording Images Using the Guide List 108 Pasting the Recorded Images into a Document 108 Setting the Image Capture Guide List on the Browser 110 Displaying the Guide Lists 110 Creating a New Guide List 112 Editing the Guide List 114 Deleting a Guide List 118 Saving the Guide List on the PC 119 Sending the Guide List Saved in the PC to the Camera 120 Setting the Image ...

Page 100: ...f memory or forgetfulness such as Did I take this car from the side or Have I already taken this car from the back The Guide List is useful for solving such problems In the case of these examples before leaving for the motor show prepare the following list List Name Motor Show Image Title Diagonally Front Rear Side By this means you only need to proceed with recording according to the Guide List d...

Page 101: ...era connected to a PC or cannot import the images from the camera to Excel or Word application This section therefore gives an explanation as a precondition that you are using the type of PC to which you can connect or insert a CF or PC card When you do not have that type of PC save the Guide List file in a PC hard disk and transfer it to the camera by using the Microsoft Explorer with the RDC i70...

Page 102: ...m Note You can also edit a sample template and create an original Excel document For details refer to Readme in the Excel template folder in the My Document folder If the Guide List Tool Kit was installed with no changes made to the standard settings an Excel template folder containing sample documents can be created in the My Document folder Use the sample template files in the folder by renaming...

Page 103: ...e List C13 C22 in this sample and click on OK The dialog box for specifying the location of the Guide List file Guide List title and Guide List file name will be displayed F Select the location of the Guide List file and specify an appropriate Guide List title and Guide List file name and then click on OK The Guide List file has now been created and stored on the disk G Exit the Microsoft Excel an...

Page 104: ...the Guide List to the camera B Set the mode dial to C Choose the card CF card or PC card having the Guide List with the button D Press the Ô button E Select the desired Guide List title and then select OK F Select the image title to be recorded item 1 and then select OK G Press the shutter release button to record the image After recording the image the screen will return to the image select scree...

Page 105: ...sting the Recorded Images to the Table This function enables you to paste images recorded with the camera to a Microsoft Excel document A Insert the card with which you have finished recording into the camera B Start Microsoft Excel and open Sample1 xlt C Click on Enable Macros D Click on the Paste All Images button The dialog box for selecting the Guide List title will be displayed E Click on on ...

Page 106: ...ted E13 in this sample and click on OK The image has now been pasted in the document Note If several images are recorded for one frame the window for selecting an image will be displayed Follow the instructions and select an image The window for specifying the position for pasting the image will be displayed ...

Page 107: ...era in one go into the Excel table so that the lists match A Click on the Update Iimage Title button B Select the Guide List to be incorporated and click on OK C Select the first cell in which an image is to be pasted and click on OK The image list in the camera is written in order from top to bottom with the specified cell at the head Paste selected images The Paste selected images function paste...

Page 108: ...u can create an original Word document by editing the sample templates For further details refer to the Readme file in the Word Templates folder in My Documents If the Guide List Tool Kit has been installed without any changes to the standard settings a Word Templates folder containing sample documents will be created in the My Documents folder Use the sample template files in the folder by renami...

Page 109: ...List title and Guide List file name will be displayed E Select the location of the Guide List file specify an appropriate Guide List title and file title and click on OK Each LAYOUT FRAME title created in the document has now been incorporated in the Guide List as an image title and the Guide List has been saved on the disk as a Guide List file F Exit the Microsoft Word and remove the card Additio...

Page 110: ...ave finished recording B Start up Microsoft Word and open Sample1 dot C Click on Enable Macros D Click on the Paste All Images At Once button E Click on on the left of RDC i700 The list of folders will be displayed F Click on on the left of the DCIM folder G Select xxxRLIST folder When a Guide List is created and images are recorded an xxxRLIST folder e g 101RLIST 102RLIST is created for each seri...

Page 111: ... Functions The Paste Selected Images function is for pasting only the specified image in the list from the specified folder in the PC A Use the mouse to select the layout frame in which you wish to paste an image B Click on the Paste Selected Images button C Select a Guide List and click OK D Select the image title to be pasted and click on OK The selected image will be pasted into the document ...

Page 112: ... Displaying the Guide Lists This function enables you to display the JOB Navi Image Capture Guide Lists in the camera media All the various Guide List settings start from this screen A Check that the camera is properly connected to the PC that the camera and the PC are turned on and that the camera mode dial is set to B Start up the browser from the PC input the IP address and display the camera s...

Page 113: ...age memory click on IN CF CARD or PC CARD The Guide Lists recorded in the selected storage memory will be displayed The Guide List for images already recorded can also be displayed in addition to the Guide List Setup File in the TEMPLATE folder The various functions which can be started from this screen such as editing the Guide List are explained in order in the following pages Select storage mem...

Page 114: ...e Guide Lists currently stored in that particular storage memory will be displayed See P 110 Displaying the Guide Lists B Click on NEW LIST The screen for setting images in a new Guide List will be displayed C Move the mouse pointer to the area on the right of NEW LIST TITLE click on the area and input the new list title using the keyboard Specify the list title within 16 characters ...

Page 115: ...he first line of IMAGE TITLE that becomes the first image title If you press the Enter key or return key to change the line and input different characters that becomes the title of the second image This operation enables you to add images as necessary The image titles must be within 12 characters E When you have finished setting the image list click on SAVE The new Guide List is now completed and ...

Page 116: ...in the Guide List A Display the Guide List containing the list you wish to edit See P 110 Displaying the Guide Lists B Click on the title of the list you wish to edit The titles of the images that have been set in the list will be displayed The following editing operations can be performed from this screen ...

Page 117: ...ge A Click on ADD IMAGE TITLE on the image title screen The screen for editing the image titles will be displayed B Move the mouse pointer to the NEW IMAGE TITLE area click on the area and add the image title using the keyboard Use one line for one image title ...

Page 118: ...tle screen If you then click on OK the screen will return to the screen showing the Guide Lists Editing an Image Title A Click on the image title that you wish to edit on the image title screen The screen for editing the image titles will be displayed B Edit the image title displayed using the keyboard ...

Page 119: ...then click on CANCEL the screen will return to the screen showing the Guide Lists Deleting an Image Important Note DELETE will automatically delete the image recorded under that title as well A Click on DELETE for the image you wish to delete from the image list The confirmation screen will be displayed The image will be displayed when you click on OK ...

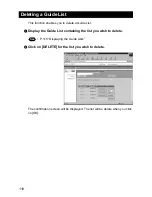
Page 120: ...delete a Guide List A Display the Guide List containing the list you wish to delete See P 110 Displaying the Guide Lists B Click on DELETE for the list you wish to delete The confirmation screen will be displayed The list will be delete when you click on OK ...

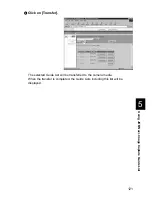
Page 121: ...aved Guide List to this camera A Display the Guide List containing the list you want to save See P 110 Displaying the Guide Lists B Click DOWNLOAD for the list you want to save The dialog box for specifying the location and file name will be displayed C Specify the location and file name and then click on SAVE The image will be saved in the PC Note In the case of Windows the file name extension ls...

Page 122: ...Display the Guide Lists and select the media to which the list is to be sent The Guide Lists currently in the media are displayed See P 110 Displaying the Guide Lists B Click on Browse The dialog box for selecting the Guide List file will be displayed C Specify the location of the file to be downloaded select the file and click OPEN The selected file will be displayed on the screen ...

Page 123: ...Using JOB Navi Image Capture Guide List D Click on Transfer The selected Guide List will be transferred to the camera media When the transfer is completed the Guide Lists including this list will be displayed ...

Page 124: ...the Guide List P 102 Displaying the Guide Lists This function enables you to display the list of Guide Lists stored in the camera media All the various settings for the Guide List editing creating a new list etc start from this screen A Set the mode dial to SETUP B Select JOB Navi C Select the storage memory in which the list has been saved by pressing Proceed to editing the list from this screen ...

Page 125: ... 16 characters See Using the On screen Keypad in the Camera operation manual Add the required images by step B Adding an Image in Editing the Guide List below C Select OK The new list is added D Select EXIT The screen returns to the Setup menu Editing the Guide List This function enables you to edit the images in an existing list Adding an Image A Select the list to which you wish to add an image ...

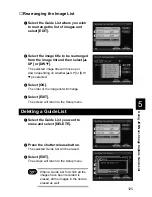
Page 126: ...to the Setup menu Changing the Image Title A Select the Guide List containing the image title you wish to change and then select EDIT B Select the image title to be changed from the image list and then select EDIT C Select and input the image title using the on screen keypad The title must be within 12 characters See Using the On screen Keypad in the Camera operation manual D Select OK The image t...

Page 127: ... depending on whether 왖 UP or DW 왔 is selected C Select OK The order of the image list will change D Select EXIT The screen will return to the Setup menu Deleting a Guide List A Select the Guide List you want to erase and select DELETE B Press the shutter release button The selected Guide List will be erased C Select EXIT The screen will return to the Setup menu Important Note When a Guide List fo...

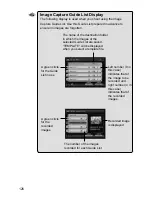
Page 128: ... folder in which the images of the selected Guide List are saved TEMPLATE will be displayed when you select a template file A green circle for the Guide List in use A green circle for the recorded images Left number 0 in this case indicates that of the image to be recorded and right number 4 in this case indicates that of the recorded images Recorded image is displayed The number of the images rec...

Page 129: ...DC 7 i700 Mounter 131 Making a Backup File of the Camera Settings 134 Making a Backup File 134 Restoring the Backup Settings to the Camera 136 Transferring a Signature File 138 Signature File 138 For Windows 139 For Macintosh 140 Using the TWAIN Function 142 For Windows 142 For Macintosh 144 ...

Page 130: ...p However you cannot write in the camera s storage memory from the application First save the files in the PC disk and then copy them by using Explorer The RDC i700 icon is not connected to the camera but is normally mounted in the folder display area If you try to access RDC i700 when the camera is not connected to the PC a connection error will result The non compressed still images are saved in...

Page 131: ... in 100RICOH in the DCIM folder When disconnecting the camera wiith a PC or turning off the camera select Disconnect from the RDC i700 menu Important Note You can change the folder name in the storage memory using RDC i700 Explorer Plug In but unless you change the file name based on the DCF format the folder will be downloaded properly by the camera The folder name will not be recognized by the c...

Page 132: ...e Format If you save the data in this format a new folder will be created and each page of the presentation data will be saved in the folder as a JPEG image file Then copy all files pages in the folder to a certain folder in the camera s DCIM folder by using the RDC i700 Explorer Plug In You cannot copy the folder itself including files If you later select the folder on the camera and play it in a...

Page 133: ...ot write in the camera s memory from the application If you want to play the files you have written in on the camera change the file name format to 8 letters extension The non compressed still images are saved in a specific TIFF file format The generic graphics applications therefore may not open those files when you transfer them from the camera to a PC by using the RDC i700 Explorer Plug In In t...

Page 134: ...ending on the connection method USB Connection Select RICOH RDC i700 as Connect via Serial Connection Select RICOH RDC i700 as Connect via and select Using SLIP under Configure LAN Connection Select Ethernet as Connect via When you have finished making the setting close the TCP IP control panel ...

Page 135: ...rial connection and transmission is unstable try setting a lower Speed on the RDC 7 i700 Mounter control panel You can then open copy and erase the folders and files When you no longer need the connection click on Unmount in the RDC 7 i700 Mounter control panel or drag the camera icon and drop it in the Trash Important Note You can change the folder name in the storage memory using the RDC 7 i700 ...

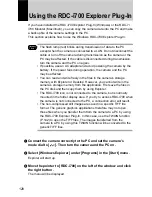
Page 136: ...another camera and restore the backup settings to the other camera When several people are using the same camera each user should make their own settings in advance then a backup file should be made and the settings changed by restoring each time the user changes Making a Backup File For Windows A Connect the camera correctly to the PC and set the camera s mode dial to Then turn the camera and the...

Page 137: ...nter in Control Panels from the Apple menu The RDC 7 i700 Mounter window will be displayed C Click on Set Prefs Note You cannot click on Set Prefs unless one of the storage memories has been mounted If the storage memory has not been mounted mount it first P 131 Depending on the connection method and conditions the screen for inputting the camera s IP address may be displayed In this case input th...

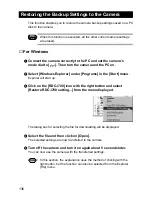
Page 138: ...rams in the Start menu Explorer will start up C Click on the RDC i700 icon with the right button and select Restore RDC i700 setting from the menu displayed The dialog box for selecting the file for downloading will be displayed D Select the file and then click on Open The selected settings are now transferred to the camera E Turn off the camera and turn it on again about 5 seconds later You can n...

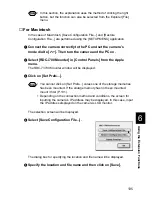
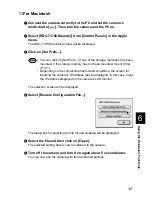
Page 139: ...has not been mounted mount it first P 131 Depending on the connection method and conditions the screen for inputting the camera s IP address may be displayed In this case input the IP address displayed on the camera s LCD monitor The selection screen will be displayed D Select Restore Configuration File The dialog box for selecting the file for downloading will be displayed E Select the file and t...

Page 140: ...bothersome to make image files for 1024 768 and 640 480 At such times only make an image file for 2048 1536 In this case the data for 1024 768 and 640 480 will be made automatically Due to the compression the image quality will be a little coarse Alternately if you only shoot in image quality mode 640 480 then only make an image file for 640 480 In this case the data for 2048 1536 and 1024 768 wil...

Page 141: ...that the RDC i700 icon is displayed on the screen The icon may be displayed in the Explorer window or My Computer window D Select the image file created for the signature file If you have made several image files for each image quality mode select all the image files max 3 while pressing the Ctrl key They may be displayed in the Explorer window or the My Computer window E Select Send To RDC i700 S...

Page 142: ... correctly to the PC and set the camera s mode dial to Then turn the camera and the PC on B Select RDC 7 i700 Mounter in Control Panels from the Apple Menu The RDC 7 i700 Mounter window will be displayed C Click on Set Prefs Note You cannot click on Set Prefs if one of the storage memories has not been mounted If the storage memory has not been mounted mount it first P 131 Depending on the connect...

Page 143: ...age file for the signature will be displayed E Select Select File for each size select the image file for the signature and click on Open Be sure to select the image file for each size F Click on Transfer The selected image file is transferred to the camera as a signature ...

Page 144: ...g In In this case use the TWAIN function to open the TIFF files The images transferred from the camera to a PC by using this TWAIN functon will be converted to the generic TIFF files For Windows This section explains how to use the TWAIN function on a PC running Windows A Check that the camera is properly connected to the PC that the camera is turned on and that the camera s mode dial is set to B ...

Page 145: ...s case input the IP address displayed on the camera s LCD monitor The screen for selecting the storage memory folder and file will be displayed Depending on the application software there may be the additional procedure of specifying the file format D Select the storage memory and folder and then select the image you wish to download from the list of files displayed and click on Download The selec...

Page 146: ... the PC The explanation given here is based on Photoshop application software D Select TWAIN Aquire from the File menu The names of the functions in the menu may differ depending on the application software For further details refer to the operation manual for the application software Note If more than one item of TWAIN compatible equipment has been connected it is necessary to select which TWAIN ...

Page 147: ...ayed on the camera s LCD monitor The following will be displayed E Click on Select Folder The dialog box will be displayed to select a folder F Click on DESKTOP select a camera s storage memory select the target folder and click on Select The image list in the selected folder will be displayed G Double click the target image The selected image will be downloaded and displayed on the screen ...

Page 148: ......

Page 149: ...Chapter 7 Setting the Receiving PC for Direct Upload Setting the Receiving PC for Direct Upload 148 For Windows 148 For Macintosh 153 ...

Page 150: ...lained in Chapter 1 was performed the software should already be installed in the PC On the other hand the Dial Up Server software is not installed by standard Windows installation procedures The installation method for Dial Up Server is explained in this section Check in advance that the modem is correctly connected and that it is possible to access the Internet using the modem Important Note The...

Page 151: ...ams The Add Remove Programs Properties window will be opened C Click on the Windows Setup tab The Windows file screen will be displayed D Select Communications and click on Details The following screen will be displayed E Tick Dial Up Server and click on OK F Click on OK Installation starts Follow the on screen instructions to set the Windows CD ROM and perform installation ...

Page 152: ... Dial Up Networking B Select Dial Up Server from the Connections menu The dial up server setup screen will be displayed C Select Allow caller access D Click on Change Password The password setup screen will be displayed E Select a password If you are selecting a password for the first time leave the Old password area blank Enter your password in the New password and Confirm new password areas The ...

Page 153: ...Internet Windows NT Server Windows 98 from Type of Dial Up Server I Cancel the tick from both Enable software compression and Require encrypted password J Click on OK to close the Server Types window K Click on OK to close the Dial Up Server window L Select Programs RDC i700 Direct Upload from the Start menu The following screen will be displayed ...

Page 154: ...N Click on Start Direct Upload is in standby status To use direct upload from outside the company before leaving the company do not forget to open this screen and click on Open If you click on Conceal the window will be closed and the icon will be added at the right end of the task bar By clicking on the icon you can display the original window Note If you want to change the settings after clickin...

Page 155: ...all it with the MacOS 9 CD ROM installer TCP IP settings When your Macintosh is not connected to a LAN open the TCP IP control panel and set as follows Connect via Ethernet Configure Manually IP Address 1 1 1 1 Subnet mask 255 255 255 0 Router address 1 1 1 2 Name server addr ess 1 1 1 3 You can input any numbers at will including the numbers shown above However do not use 0 0 0 0 having a particu...

Page 156: ... Open the File Sharing control panel B Double click the Start Stop tab C Check Owner Name and Owner Password These settings are used for the PPP account and PPP password in the camera D Click on the Users Group tab E Select the same owner name you checked in step C and click Open F Select Remote Access from Show popup menu and select Remote Access G Check Allow guests to dial in to this computer a...

Page 157: ...you wish to make a direct upload log file a record of connections and transmissions set a folder and file name The images transferred from the camera will be saved in the folder specified as the destination folder If you do not need a log file leave the log file name blank C Click on OK Direct upload is in standby status To use direct upload from outside the company before leaving the company do n...

Page 158: ...156 ...

Page 159: ...nt 160 Switching Between the Modem and LAN 162 Error Messages 163 Error Messages Displayed on the Web Browser 163 Other Error Messages 166 Troubleshooting 169 Restoring the Device Which Could not be Used anymore 169 Checking the Proxy Server 170 Installing the Dial Up Adapter 171 Checking the Dial Up Settings 172 Index 174 ...

Page 160: ...een the camera and the PC when they are directly connected The IP ADDRESS PC and IP ADD RDC i700 settings are only valid when the camera is connected to a Macintosh They are invalid when the camera is connected to a PC running Windows This setting is not required in the case of Windows CONNECT SPEED Speed Setting When the camera is connected to a PC by a serial cable set the transmission speed If ...

Page 161: ...elect PC CONNECTION The screen for setting the PC connection will be displayed C Set each item See Using the On screen Keypad in the Camera operation manual D When you have finished making the settings select OK The settings are completed and the screen returns to the Setup menu ...

Page 162: ...ting is blank You can set the name at will DNS SERVER ADD Domain Name Server Address Set the domain name server DNS address The factory default setting is blank If there is a domain name server on the network set the address GATEWAY ADD Gateway Address Set the gateway address The factory default setting is is blank If there is a gateway on the network set the address of the gateway RDC i700 IP ADD...

Page 163: ...lect NETWORK The screen for setting the network environment will be displayed C Set the various items See Using the On screen Keypad in the Camera operation manual D When you have finished making the settings select OK Setting is completed and the screen returns to the Setup menu ...

Page 164: ...ou do not need to make this setting the card is automatically detected Important Note If you use with a LAN connection and then again with a modem connection select MODEM in the same operation A Set the mode dial to SETUP The Setup menu will be displayed B Select MODEM LAN The screen for setting modem or LAN will be displayed C Select LAN and then select OK Note To change from LAN to modem select ...

Page 165: ...isplayed on Camera Control Screen Error Message Internal Error No PCMCIA Card Cause and Remedy Error occurred in transmission of data between browser and camera Check connection and perform operation again Error occurred in transmission of data between browser and camera Check connection and perform operation again Error occurred in transmission of data between browser and camera Check connection ...

Page 166: ...occurred in recorded image Click on Back button check connection and perform operation again Cause and Remedy Transfer button was clicked without specifying file name for Browse Invalid file selected for Browse Select Guide List or HTML template file Limit has been reached of number of Guide Lists or HTML templates capable of being saved in camera Or no more space in memory for downloading files D...

Page 167: ...ecifying file name for Browse Invalid file selected for Browse Select file from address book Upper limit of number of addresses in address book has been reached Delete unwanted addresses Upper limit of number of templates has been reached Delete unwanted templates Upper limit of number of dial up accounts has been reached Delete unwanted account No entry made in required item Input entry Number ou...

Page 168: ...nd try again Attempted to restore settings without specifying file name Select file Invalid file selected Select correct backup file Failed to restore backup file due to lack of memory etc Close other applications and try again Storage memory internal memory PC card CF card is full and recording process failed Delete unnecessary files or insert another storage memory Cause and Remedy More than one...

Page 169: ...wanted files File name specified when copying moving already exists Specify different file name Cannot create folder as folder layers too deep Make layers more shallow Deletion of specified file prohibited Transfer of specified file folder prohibited Folders in a PC cannot be transferred to RDC i700 Create a folder in RDC i700 first and then transfer files in the folders of the PC Transfer of spec...

Page 170: ...k camera connection and settings Error occurred when creating Windows socket Reinstall WinSock Reset port Failed to initialize software Reinstall signature transfer software from CD ROM supplied Camera not correctly connected or set Check camera connection and settings Camera not correctly connected or set Check camera connection and settings Specified file not in format capable of being used as s...

Page 171: ...ties dialog box For Windows 2000 Select Settings Control Panel from the Start button Double click on the System icon in the window that opens Select the System Properties tab from the Hardware dialog box C Check whether the mark is displayed meaning that the device manager is disabled for RICOH Camera Port or Universal Serial Bus Controller of Ports COM LPT D Specify the marked device and click De...

Page 172: ...lowing procedures to check the proxy server settings For Internet Explorer Version 5 x A Right click on the Internet Explorer icon on the desktop and then click on Properties B Click on the Connections tab C Click on the LAN Settings D Click on the checkbox for Use a proxy server under Proxy Server if it is checked ...

Page 173: ...n on the desktop and then click on Properties B Click on the Confguration tab and then click ADD The Select Network Component Type window will be displayed C Select Adapter and click on Add D Select Microsoft for Manufacturers and click on Dial Up Adapter for Network Adaptesr E Click on OK F Restart the computer The dial up adapter is now added in the Network Component dialog Then install the dial...

Page 174: ...lowing procedure For Internet Explorer Version 5 x A Right click on the Internet Explorer icon on the desktop and then click on Properties B Click on the Connections tab C Click on Never dial a connection for Dial up settings When a PC has received mail with Always dial my default connection checked the dial up dialog dial up request dialog will be displayed preventing from data communication ...

Page 175: ...173 Appendix MEMO ...

Page 176: ...nt 85 Setting the receiving PC 148 Setting the Send to folder name and server 86 E E mail Setting 72 Error messages 163 Explorer Plug In 128 F FTP Upload Displaying the dial up account 91 Selecting a dial up account 92 Setting a server 93 G Guide List Creating 106 112 123 Deleting 118 125 Editing 114 123 Recording images 102 108 Saving on the PC 119 Sending to the camera 120 Guide List Tool Kit 98...

Page 177: ...r Windows 22 Serial port connection For Windows 23 Signature file Transferring 138 Sound Recording 57 Saving 60 Still image Shooting Using the Web browser 44 T Template Deleting 77 Entering 76 Setting 74 Text files Shooting 49 Thumbnail images 31 File property 33 Thumbnail property in Image Capture Guide List 40 TWAIN function 142 U USB cable connection For Macintosh 21 For WIndows 20 USB driver 1...

Page 178: ...OAD Communication Internet P 48 ADDRESS BOOK Communication Internet P 37 JOB Navi Connecting to a Personal Computer P 122 FTP UPLOAD Communication Internet P 53 QUICK SEND Communication Internet P 44 OWNER INFORMATION Camera P 42 FOLDERS Camera P 121 NETWORK Connecting to a Personal Computer P 160 PC CONNECTION Connecting to a Personal Computer P 158 MODEM SETTING Communication Internet P 60 MODEM...

Page 179: ...ITY Camera P 72 AUTO BRACKET Camera P 73 REDEYE REDUCTION Camera P 74 NON COMPRESSED MODE Camera P 75 MONOCHROME MODE Camera P 76 INTERVAL MODE Camera P 77 SOFT MODE Camera P 78 TIME EXPOSURE MODE Camera P 79 SIGNATURE Camera P 80 Recording Mode Ô Button Connecting to a Personal Computer P 102 BRIGHTNESS CONTROL Camera P 81 only in Text mode ...

Page 180: ...SEND Communication Internet P 69 72 77 QUICK SEND Communication Internet P 67 MENU Button FOLDER Camera P 100 PROTECT Camera P 100 DELETE ALL IMAGES Camera P 113 AUTO PLAYBACK Camera P 101 Edit Mode Ô Button HTML FILE CREATION Communication Internet P 114 PRESENTATION Camera P 108 NEW PRESENTATION Camera P 106 Play Mode ...

Page 181: ...ication Mode Connecting to a Personal Computer E MAIL Communication Internet P 85 DIRECT UPLOAD Communication Internet P 95 FAX Communication Internet P 98 WEB Communication Internet P 101 FTP UPLOAD Communication Internet P 116 ...

Page 182: ...180 Declaration of Conformity The Product complies with the requirements of the EMC Directive 89 336 EEC ...

Page 183: ... or an experienced radio TV technician for help FCC 15 105B Changes or modifications not expressly approved by the party responsible for compliance could void the user s authority to operate the equipment FCC 15 21 Properly shielded and grounded cables and connectors must be used for connec tion to a host computer in order to comply with FCC emission limits FCC 15 27 An AC adapter with a ferrite c...

Page 184: ...182 MEMO ...

Page 185: ...e Offices r m Ltd ng hai 6 ...

Page 186: ......

Reviews: