background image

Placing Originals

21

2

CCCC

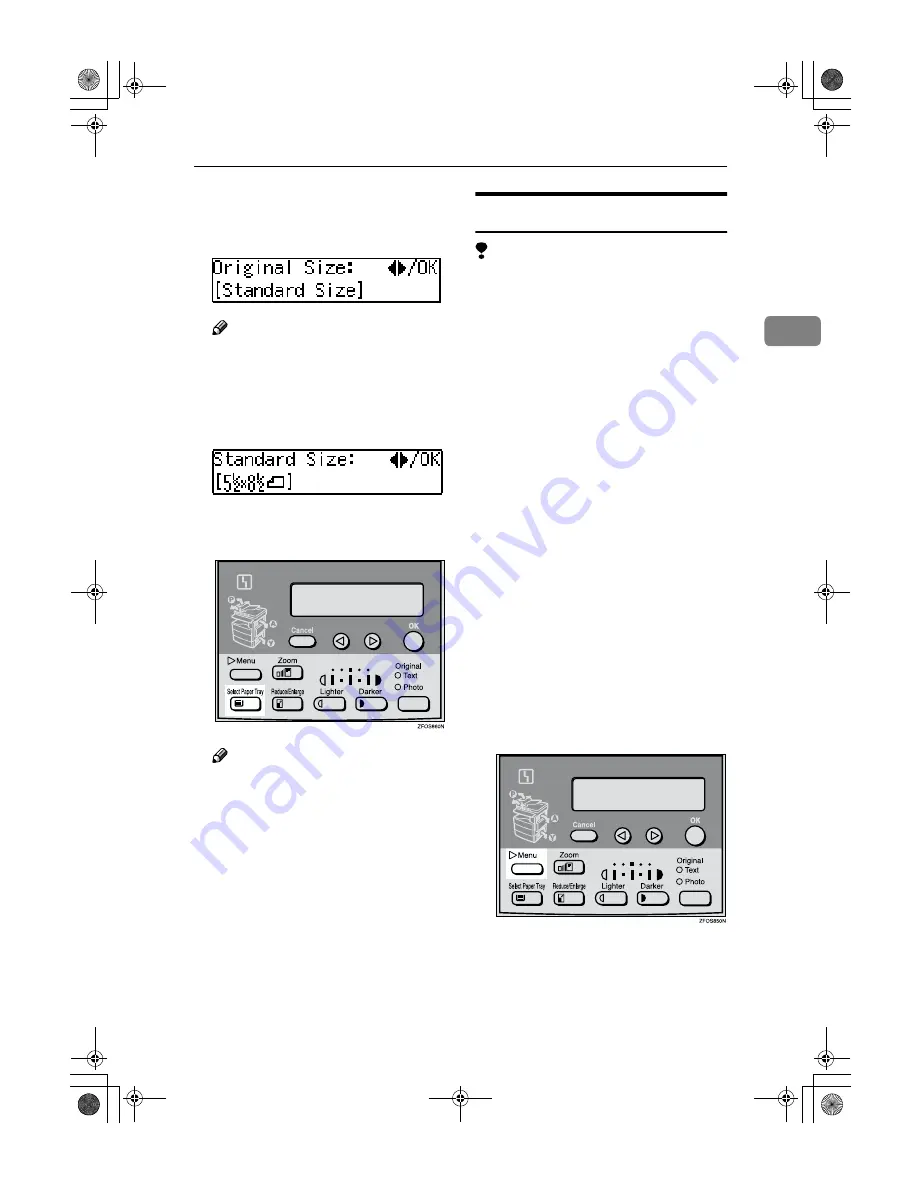
Make sure that "Standard Size" is
selected, and then press the 

{{{{

OK

}}}}

key.

Note

If not, press the 

0

 or 

1

 key to

select it.

DDDD

Press the 

0

0

0

0

 or 

1

1

1

1

 key to select

original size, and then press the

{{{{

OK

}}}}

 key.

EEEE

Press the 

{{{{

Select Paper Tray

}}}}

 key to

select your desired tray.

Note

Select the same size and direc-
tion copy paper as the original.

FFFF

Press the 

{{{{

Start

}}}}

 key.

Placing Custom Size Originals

Limitation

Enter the size of your original if it
is not one of the following: A4

L

,

A5

KL

, 8

1

/

2

×

 14"

L

, 8

1

/

2

×

13"

L

, 8

1

/

2

×

 11"

L

, 5

1

/

2

×

8

1

/

2

"

KL

, 8" 

×

 13"

L

, 8

1

/

4

×

13"

L

, 8

1

/

4

×

 14"

L

For exposure glass, the paper size
that can be set with this function is
vertical 105–216mm, 4.1"–8.5", hor-
izontal 128–297mm, 5"–11"

For document feeder (ADF), the
paper size that can be set with this
function is vertical 140–216mm,
5.5"–8.5", horizontal 140–356mm,
5.5"–14".

For exposure glass, the maximum
copy paper size is 210 

×

 297mm,

8

1

/

2

×

 11".

For document feeder (ADF), the
maximum copy paper size is 216 

×

356mm, 8

1

/

2

×

 14".

AAAA

Place one original face down on
the exposure glass or face up into
the document feeder (ADF).

BBBB

Press the 

{{{{

Menu

}}}}

 key.

StellaC1a-EN-CopyF_V4_FM.book  Page 21  Wednesday, September 12, 2001  4:03 PM

Summary of Contents for I202

Page 1: ...Gap when printed at 81 scale Pages in book Paper thickness 2 3 200000 mm Operating Instructions Copy Reference For safety please read this manual carefully before you use this product and keep it handy for future reference Type for 2512 1202 5612 Aficio 120 Printed in China UE USA B045 7267 ...

Page 2: ... beam might cause serious eye damage Safety precautions and interlock mechanisms have been designed to prevent any possible laser beam exposure to the operator Laser Safety The Center for Devices and Radiological Health CDRH prohibits the repair of laser based optical unit in the field The optical housing unit can only be repaired in a factory or at a location with the requisite equipment The lase...

Page 3: ...y pulling the plug not the cable if the power cable or plug becomes frayed or otherwise damaged To avoid hazardous electric shock or laser radiation exposure do not remove any covers or screws other than those specified in this manu al Turn off the power and disconnect the power plug by pulling the plug not the cable if any of the following occurs You spill something into the machine You suspect t...

Page 4: ...le Do not allow paper clips staples or other small metallic objects to fall inside the machine Keep toner used or unused and toner cartridge out of the reach of children For environmental reasons do not dispose of the machine or expended supply waste at household waste collection points Disposal can take place at an authorized dealer The inside of the machine could be very hot Do not touch the par...

Page 5: ...marks for RWARNING RCAUTION at the positions shown below For safety please follow the instructions and handle the machine as indicated The inside of the machine becomes very hot Do not touch the inside Doing so could result in a burn A StellaC1a EN CopyF_V4_FM book Page iii Wednesday September 12 2001 4 03 PM ...

Page 6: ...ns under this symbol Be sure to read the instructions all of which are described in the Safety Information section The statements above are notes for your safety Important If this instruction is not followed paper might be misfed originals might be damaged or data might be lost Be sure to read this Preparation This symbol indicates the prior knowledge or preparations required before op erating Not...

Page 7: ...v What You Can Do with This Machine Page36 Page33 Page35 GCFM132N StellaC1a EN CopyF_V4_FM book Page v Wednesday September 12 2001 4 03 PM ...

Page 8: ...ling Toner 15 Toner Storage 15 Used Toner 15 2 Copying Basic Procedure 17 Placing Originals 19 Placing Originals on the Exposure Glass 19 Loading Originals in the Document Feeder ADF 20 Placing Standard Size Originals 20 Placing Custom Size Originals 21 Basic Functions 23 Adjusting Copy Image Density 23 Selecting an Original Type 23 Selecting Copy Paper 24 Sort 25 Sort 25 Copying from the Bypass T...

Page 9: ...e in the Paper Tray 47 Selecting the Paper Size with the User Tools 48 4 User Tools Copier Features Accessing the User Tools Copier Features 51 Exiting the User Tools 52 User Tools Menu Copier Features 53 Settings You Can Change with the User Tools 54 Copier Features 54 5 Remarks Do s and Don ts 57 Where to Put Your Machine 58 Machine Environment 58 Power Connection 59 Access to Machine 60 Maintai...

Page 10: ...viii 6 Specifications Mainframe 63 Document Feeder ADF Option 66 32MB Copier Memory Unit Option 67 INDEX 68 StellaC1a EN CopyF_V4_FM book Page viii Wednesday September 12 2001 4 03 PM ...

Page 11: ...ing Do not obstruct the ventilation hole by placing or leaning an object near it If the machine over heats a fault might occur 6 Main power switch If the machine does not operate after turning on the operation switch check if the main power switch is turned on If it is off turn it on However if the machine is installed with the fax function do not turn the main power off 7 Main Power indicator Thi...

Page 12: ...l Panel 11 Front cover Open to access the inside of the machine 12 Paper tray Place paper here See p 42 h Loading Paper 13 Internal tray guide Swing out to support large papers and raise the end fence 1 Bypass tray Use to copy onto OHP transparencies adhesive labels translucent paper post cards envelopes and custom size paper See p 27 Copying from the Bypass Tray 2 Right cover Open this cover to r...

Page 13: ... Options 1 Document feeder ADF Originals will be fed automatically Other options 32MB copier memory unit Increases memory capacity StellaC1a EN CopyF_V4_FM book Page 3 Wednesday September 12 2001 4 03 PM ...

Page 14: ...se printer functions 4 Copy key Press to use copy functions 5 Indicators These indicators show errors or the status of the machine See p 39 Troubleshoot ing 6 Cancel key Press to cancel an operation or return to the previous display 7 Panel display Shows operation status error messages and function menu See p 6 Panel Dis play 8 0 0 0 01 1 1 1 keys Cursor keys Press to select an item on the panel d...

Page 15: ...ions Combine Press to make combined copies See p 36 Combine Sort Optional 32MB copier memory unit is required Automatically sorts copies See p 25 Sort Original Size Select the original size that matches the originals placed See p 20 Placing Standard Size Originals 18 Select Paper Tray key Press to select the paper tray 19 Zoom key Changes the reproduction ratio in 1 steps 20 Reduce Enlarge key Pre...

Page 16: ...rrently selected functions appear here 2 Bottom line Items which can be selected or specified or messages appear here Currently selected items are displayed with brackets 3 Number of copies set and number of copies made Common keys 0 or 1 Press to move between pages or select function Cancel Press to cancel an operation or return to the previous display Clear Stop While entering numbers press to c...

Page 17: ... side of the control panel Press this switch to activate the machine When the machine has warmed up you can make copies Main power switch left side of the machine When the machine is not to be used for an extended period of time turn off the main power switch Turning On the Main Power A A A A Make sure that the power cord is firmly plugged into the wall outlet B B B B Turn on the main power switch...

Page 18: ...ress the Start key while the Select Modes and Press Start message is displayed When Input User Code and Press OK is displayed enter your user code Shutting Down the Machine A A A A Press the operation switch to make the On indicator go off and change to Low Power mode Turning Off the Main Power A A A A Turn off the main power switch The main power indicator of the control panel goes off Important ...

Page 19: ...ey to switch to copy mode For details about how to change the mode the machine starts in when you turn the operation switch on see 1 Function Priority in the System Settings manu al Limitation You cannot switch modes in any of the following cases When scanning in a fax message for transmission During immediate transmission When accessing the user tools During On Hook dialing for fax transmission D...

Page 20: ...mal fax paper art paper alu minum foil carbon paper or conductive paper Originals with indexes tags or other projecting parts Sticky originals such as translucent paper Thin originals that have low stiffness Originals of inappropriate weight other than those specified in p 10 Sizes and Weights of Recommended Originals Bound originals such as books Transparent originals such as OHP transparencies o...

Page 21: ...xposure glass Document feeder ADF Limitation Even if you correctly place originals in the document feeder ADF or on the exposure glass margins about 4mm 0 2 on all four sides might not be cop ied StellaC1a EN CopyF_V4_FM book Page 11 Wednesday September 12 2001 4 03 PM ...

Page 22: ...he User Tools 60 90g m2 16 24 lb 250 sheets 1 By pass tray Stan dard siz es A4L A5KL 81 2 11 L 51 2 81 2 K L 81 2 14 L 8 13 L 81 2 13 L 81 4 13 L 81 4 14 L Note You can specify the paper size See p 27 Copying from the Bypass Tray 60 157g m2 16 42 lb 1 sheet 1 Custom sizes Metric ver sion Vertical 90 216mm Horizontal 140 356mm Inch version Vertical 3 5 8 5 Horizontal 5 5 14 Envelopes Com 10 Env 104...

Page 23: ...UTION Important Do not use any of the following kinds of paper or a fault might occur Thermal fax paper Art paper Aluminum foil Carbon paper Conductive paper Do not use copy paper that has been already copied on Otherwise a paper misfeed might occur Note Do not use any of the following kinds of paper or a misfeed might occur Bent folded or creased paper Damp paper Torn paper Slippery paper Perfora...

Page 24: ...posed adhesive when the flap is in the sealed or closed posi tion Paper Storage Note When storing paper the following precautions should always be followed Do not store paper where it will be exposed to direct sunlight Avoid storing paper in humid areas humidity 70 or less Store on a flat surface Keep open reams of paper in the package and store as you would unopened paper Under high temperature a...

Page 25: ... sunlight Store on a flat surface Used Toner Note Toner cannot be re used Do not incinerate used toner or toner containers Toner dust might ig nite when exposed to an open flame Dispose of used toner containers in accordance with local regulations Keep toner used or unused and toner containers out of reach of children Our products are engineered to meet high standards of quality and function ality...

Page 26: ...Basics 16 1 StellaC1a EN CopyF_V4_FM book Page 16 Wednesday September 12 2001 4 03 PM ...

Page 27: ...u select the by pass tray The maximum copy quantity can be set between 1 and 99 de fault 99 See 1 Max Copy Q ty in p 54 Copier Features To change the number entered press the Clear Stop key and then enter the new number G G G G Press the Start key The machine starts copying Note To stop the machine during the multi copy run press the Clear Stop key To return the machine to the ini tial condition a...

Page 28: ...unction is called Auto Off Note How to exit Auto Off mode Turn on the operation switch Place an original in the docu ment feeder ADF Lift and lower the exposure glass cover You can change the Auto Off time See 6 Auto Off Timer in the Sys tem Settings manual StellaC1a EN CopyF_V4_FM book Page 18 Wednesday September 12 2001 4 03 PM ...

Page 29: ...ding on the direction of the originals For details see explana tions of each function Reference See p 10 Originals Placing Originals on the Exposure Glass A A A A Lift the exposure glass cover or the document feeder ADF B B B B Place the original face down on the exposure glass The original should be aligned to the rear left corner 1 Reference mark 2 Scale C C C C Lower the exposure glass cover or...

Page 30: ... feeder ADF 1 Limit mark 2 Document guide Note Do not stack originals above the limit mark To avoid a multi sheet feed shuffle the originals before set ting them in the document feed er ADF Placing Standard Size Originals Note When the copy paper size and the original size differ follow the steps below A A A A Press the Menu key B B B B Press the 0 0 0 0 or 1 1 1 1 key to select 3 Original Size an...

Page 31: ... the following A4L A5KL 81 2 14 L 81 2 13 L 81 2 11 L 51 2 81 2 KL 8 13 L 81 4 13 L 81 4 14 L For exposure glass the paper size that can be set with this function is vertical 105 216mm 4 1 8 5 hor izontal 128 297mm 5 11 For document feeder ADF the paper size that can be set with this function is vertical 140 216mm 5 5 8 5 horizontal 140 356mm 5 5 14 For exposure glass the maximum copy paper size i...

Page 32: ...ect Custom Size and then press the OK key E E E E Enter the horizontal size of the original with the number keys and then press the OK key F F F F Enter the vertical size of the origi nal with the number keys and then press the OK key G G G G Press the Select Paper Tray key to select your desired paper tray H H H H Press the Start key StellaC1a EN CopyF_V4_FM book Page 22 Wednesday September 12 20...

Page 33: ... Lighter or Darker key to adjust the image density Selecting an Original Type There are two ways to match your originals Text If you do not select either mode your originals will be scanned with the settings suitable for text originals with this mode Photo Delicate tones of photographs and pictures can be reproduced with this mode Note You can change the detailed set tings for Text and Photo each ...

Page 34: ...er You can manually select the paper tray for the paper size you wish to use A A A A Select the paper tray or bypass tray by pressing the Select Paper Tray key StellaC1a EN CopyF_V4_FM book Page 24 Wednesday September 12 2001 4 03 PM ...

Page 35: ...y capacity re move copies from the tray Metric version Inch version The maximum tray capacity might also be reduced when copy paper is considerably curled Sort Copies can be assembled as sets in se quential order Sort A A A A Press the Menu key B B B B Select 2 Sort with the 0 0 0 0 or 1 1 1 1 key and then press the OK key C C C C Select Sort with the 0 0 0 0 or 1 1 1 1 key and then press the OK k...

Page 36: ... originals in the doc ument feeder ADF and then press the Start key Note The last page should be on the bottom If an original is misfed place your originals in the docu ment feeder ADF again ac cording to the instruction on the display When placing an original on the exposure glass A Place the original and then press the Start key B Place the next original and then press the Start key Note Place t...

Page 37: ...en tly insert the copy paper face down 1 Horizontal size 2 Vertical size 3 Paper guides Important If the guides are not flush with the copy paper a skew image or paper misfeeds might occur Note Set the direction of the copy pa per to L If you set A4 81 2 14 or larg er copy paper hold the edge of the paper You can specify the type of pa per used for the bypass tray See 6 Bypass Paper Type in p 54 C...

Page 38: ... key B B B B Press the 0 0 0 0 or 1 1 1 1 key to display 3 Copier Features and then press the OK key C C C C Press the 0 0 0 0 or 1 1 1 1 key to display 6 Bypass Paper Type and then press the OK key D D D D Press the 0 0 0 0 or 1 1 1 1 key to display Special OHP and then press the OK key E E E E Press the User Tools Counter key to exit from the user tools F F F F Gently insert the OHP transpar enc...

Page 39: ... it C C C C Press the 0 0 0 0 or 1 1 1 1 key to select pa per size and then press the OK key When copying onto custom size copy paper Important You should specify the size of pa per to avoid paper misfeeds A A A A Press the R key B B B B Press the 0 0 0 0 or 1 1 1 1 key to select Custom Size and then press the OK key C C C C Enter the horizontal size of the paper with the number keys and then pres...

Page 40: ...nvelopes see p 12 Copy Paper A A A A Press the User Tools Counter key B B B B Press the 0 0 0 0 or 1 1 1 1 key to display 3 Copier Features and then press the OK key C C C C Press the 0 0 0 0 or 1 1 1 1 key to display 6 Bypass Paper Type and then press the OK key D D D D Press the 0 0 0 0 or 1 1 1 1 key to display Special OHP and then press the OK key E E E E Press the User Tools Counter key to ex...

Page 41: ...lear Stop keys simultaneously after copying Reference For details about user codes see p 54 Settings You Can Change with the User Tools Setting the User Code A A A A Press the User Tools Counter key B B B B Press the 0 0 0 0 or 1 1 1 1 key to display 3 Copier Features and then press the OK key C C C C Press the 0 0 0 0 or 1 1 1 1 key until 7 Key Op Tools is displayed and then press the OK key D D ...

Page 42: ... made as soon as warm up finishes A A A A Make any adjustments to copy settings during the warm up peri od B B B B Place your originals C C C C Press the Start key The Start key indicator flashes green Note To cancel Auto Start press the Clear Stop key StellaC1a EN CopyF_V4_FM book Page 32 Wednesday September 12 2001 4 03 PM ...

Page 43: ...Press the Reduce Enlarge key B B B B Press the Reduce Enlarge key or the 0 0 0 0 or 1 1 1 1 key until the desired reduce enlarge size is displayed Note The ratio displayed changes ev ery time you press the Re duce Enlarge key or the 0 or 1 key C C C C Press the OK key Ratio Original Copy paper size 200 enlarge area by 4 A6 A4 141 enlarge area by 2 A5 A4 100 Full Size 93 A little reduced Create Mar...

Page 44: ...originals and then press the Start key Note When the copy paper size and the original size differ set the original size See p 20 Placing Standard Size Originals StellaC1a EN CopyF_V4_FM book Page 34 Wednesday September 12 2001 4 03 PM ...

Page 45: ...roduction ratios with the 0 0 0 0 or 1 1 1 1 key Note To change the ratio in 1 steps just press the 0 or 1 key To change the ratio in 10 steps press and hold down the 0 or 1 key To change the ratio entered press the Clear Stop key and then enter the new ratio When using the number keys A Enter the desired ratio with the number keys Note To change the ratio entered press the Clear Stop key and then...

Page 46: ... the reproduction ratio from 50 200 If the calculated ratio is under the minimum ratio it is corrected within the range of the ratio auto matically However with some ra tios parts of the image might not be copied or blank margins appear on copies When the number of originals placed is less than the number specified for combining the last page s will be copied blank Direction of the originals and a...

Page 47: ... select the copy paper E E E E Place your originals Note Set the direction of the original to L When placing an original on the exposure glass A Place the original and then press the Start key B Place the next original and then press the Start key Note To finish copying press the R key to eject the copy When loading originals in the document feeder ADF A Load your originals and then press the Star...

Page 48: ...ect will be the mode you re working in means that these modes cannot be used together The mode before you select will be the mode you re working in Mode after you select Custom Originals Copying from the Bypass Tray Image Density Text Originals Photo Originals Zoom Preset Reduce Enlarge Combine Sort Mode before you select Custom Originals Copying from the Bypass Tray Image Density Text Originals P...

Page 49: ...number User codes are set Enter the user codes See p 31 User Codes Problem Cause Action The panel display is off The machine is in Energy Sav er mode Turn on the operation switch See p 1 Guide to Compo nents The operation switch is turned off The main power switch is turned off Turn on the main power switch See p 1 Guide to Components The power cord is unplugged Make sure that the power cord is pl...

Page 50: ...lines appear in a copy Your document feeder ADF might be dirty Clean the document feeder ADF with a cloth See p 61 Maintaining Your Machine Copies are too light The image density is too light Adjust the image density See p 23 Adjusting Copy Image Density Damp or rough grain paper is used Use dry paper without rough grain Toner cartridge is almost empty Add toner See p 43 h Changing the Toner Car t...

Page 51: ...of the image are not cop ied The original size and the copy paper size do not match Set the original size and the copy paper size correctly See p 20 Placing Standard Size Originals Your originals are not identi cal in size and direction Use originals that are identical in size and direction Order of copies is not correct You placed originals in an in correct order When loading originals in the doc...

Page 52: ...eing used B B B B Pull out the paper tray until it stops C C C C Push the metal plate down and then square the paper and load it in the tray Important Do not stack paper over the lim it mark If paper is left in the paper tray and then you add paper a mis feed might occur Note Shuffle the paper before setting it in the tray D D D D Push the paper tray in until it stops StellaC1a EN CopyF_V4_FM book...

Page 53: ...e the toner early to prevent poor copy quality Reference Regarding toner storage see p 15 Toner Storage Do not incinerate used toner or toner containers Toner dust might ig nite when exposed to an open flame Dispose of used toner containers in accordance with local regulations Keep toner used or unused and toner containers out of reach of children Our products are engineered to meet high standards...

Page 54: ... horizontally and then shake it 5 or 6 times Remove the seal Insert the new toner cartridge Push the new toner cartridge in until it clicks Close the front cover of the machine StellaC1a EN CopyF_V4_FM book Page 44 Wednesday September 12 2001 4 03 PM ...

Page 55: ...ed areas may be indicated In this case check every appli cable area Refer to the following charts A P You can find a sticker explaining how to remove misfed paper inside of the right cover When the machine instructs you to place originals once again place your originals in the feeding position The display might indicate the number of originals you should return The fusing section of this machine m...

Page 56: ...Troubleshooting 46 3 StellaC1a EN CopyF_V4_FM book Page 46 Wednesday September 12 2001 4 03 PM ...

Page 57: ...e in the Paper Tray A A A A Make sure that the paper tray is not being used B B B B Pull out the paper tray until it stops Note Remove any remaining copy paper C C C C Adjust the back fence Note When you load A4L copy pa per place the back fence in the corner pocket on the left D D D D While pressing the release lever adjust the side fences E E E E Push the metal plate down StellaC1a EN CopyF_V4_F...

Page 58: ...h the User Tools See p 48 Select ing the Paper Size with the User Tools Selecting the Paper Size with the User Tools A A A A Press the User Tools Counter key B B B B Press the 0 0 0 0 or 1 1 1 1 key to display 2 System Settings and then press the OK key C C C C Press the 0 0 0 0 or 1 1 1 1 key until 8 Tray Paper Size is displayed and then press the OK key D D D D Press the 0 0 0 0 or 1 1 1 1 key t...

Page 59: ...paper size When you have selected Custom Size on step E A Enter the horizontal size of the paper with the number keys and then press the OK key B Enter the vertical size of the pa per with the number keys and then press the OK key G G G G Press the User Tools Counter key to exit from the user tools StellaC1a EN CopyF_V4_FM book Page 49 Wednesday September 12 2001 4 03 PM ...

Page 60: ...Troubleshooting 50 3 StellaC1a EN CopyF_V4_FM book Page 50 Wednesday September 12 2001 4 03 PM ...

Page 61: ...unter key B B B B Press the 0 0 0 0 or 1 1 1 1 key to display 3 Copier Features and then press the OK key C C C C Press the 0 0 0 0 or 1 1 1 1 key until de sired User Tools menu is dis played and then press the OK key D D D D Change the settings by following the instructions on the panel dis play and then press the OK key Reference See p 54 Settings You Can Change with the User Tools Note OK key P...

Page 62: ...A A A A Press the User Tools Counter key Note You can exit the User Tools mode by pressing the Cancel key If you want to return to the pre vious mode press the User Tools Counter key StellaC1a EN CopyF_V4_FM book Page 52 Wednesday September 12 2001 4 03 PM ...

Page 63: ...User Tools Menu Copier Features 53 4 User Tools Menu Copier Features StellaC1a EN CopyF_V4_FM book Page 53 Wednesday September 12 2001 4 03 PM ...

Page 64: ...riginal You can choose these mode after selecting 1 Text or 2 Photo Text Mode 1 For normal text originals Text Mode 2 For newspapers originals through which the rear side is mod erately visible with light text Photo Mode 1 For text photo images which contain mainly photo areas Photo Mode 2 For text photo images which contain mainly text areas Special Mode 1 For originals with colored text and line...

Page 65: ... orientation of originals with Combine mode Note Default Off 6 Bypass Paper Type You can select the type of paper for the bypass tray Note Default Thick 7 Key Op Tools If the machine is set to use the User Code function operators must enter their user codes before the machine can operate The machine can keep count of the number of copies made under each user code 1 User Code Access Specify whether...

Page 66: ...an reset each user code s counter to 0 7 Program User Code You can register user codes Note Up to 10 user codes 8 digits or less can be registered 8 Change User Code You can change user codes Note The number of copies made under the old code is added to that made under the new user code 9 Delete User Code You can delete user codes Note The number of copies made under the deleted code is also de le...

Page 67: ...switch while copying or printing When turning off the operation switch copying with memory and printing continue How ever scanning of copy originals is interrupted The machine might fail to produce good copy images if condensation forms inside the machine due to temperature change Do not open the covers of the machine while copying or printing If you do misfeeds might occur Do not move the machine...

Page 68: ...ts to avoid Locations exposed to direct sunlight or strong light more than 1 500 lux Locations directly exposed to cool air from an air conditioner or heated air from a heater Sudden temperature changes might cause condensation with in the machine Locations close to such machines generating ammonia such as diazo copy machines Places where the machine might be subjected to frequent strong vibration...

Page 69: ...y to the power source described on the inside front cover of this manual Connect the power cord directly into a wall outlet and do not use an extension cord Do not damage break or make any modifications to the power cord Do not place heavy objects on it Do not pull it hard nor bend it more than necessary These actions could cause an electric shock or fire Unplug the power cord from the wall outlet...

Page 70: ...shown 1 Rear more than 1cm 0 4 2 Right more than 1cm 0 4 3 Front more than 75cm 29 6 4 Left more than 1cm 0 4 Note For information about required space when options are installed please con tact your service representative StellaC1a EN CopyF_V4_FM book Page 60 Wednesday September 12 2001 4 03 PM ...

Page 71: ... to remove the water Important Do not use chemical cleaner or or ganic solvent such as thinner or benzene If they get into the ma chine or melt plastic parts a failure might occur Do not clean parts other than those specified on this page Such parts should be cleaned by your service representative Cleaning the Exposure Glass Cleaning the Exposure Glass Cover Cleaning the Document Feeder ADF Stella...

Page 72: ...Remarks 62 5 StellaC1a EN CopyF_V4_FM book Page 62 Wednesday September 12 2001 4 03 PM ...

Page 73: ...ionary original exposure type Original reference position Rear left corner Warm up time Less than 20 seconds 20 C 68 F Originals Sheet book objects Maximum original size Exposure glass A4L 81 2 11 L Document feeder ADF A4L 81 2 14 L Copy paper size Paper tray A4L A5K 81 2 11 L 51 2 81 2 K Bypass tray A4L A5KL 81 2 11 L 51 2 81 2 KL 81 2 14 L 8 13 L 81 2 13 L 81 4 13 L 81 4 14 L Bypass tray custom ...

Page 74: ... 81 2 11 L feeding from the paper tray Reproduction ratio Preset reproduction ratios Zoom from 50 to 200 in 1 step Continuous copying count 1 99 copies Copy paper capacity 250 sheets 80g m2 20 lb Power consumption 1 Mainframe with the optional document feeder ADF Metric version Inch version Enlargement 200 155 141 129 Full Size 100 100 Reduction 93 93 71 78 50 65 Mainframe only Full system 1 Warm ...

Page 75: ... at the position of the operator 3 The Complete System consists of mainframe with full options Weight Approx 20kg 44 09 lb Note Specifications are subject to change without notice Mainframe only Complete System 3 Stand by 40 0dB A 40 0dB A During printing 62 0dB A 66 0dB A Mainframe only Complete System 3 Stand by 27 0dB A 27 0dB A During printing 54 0dB A 54 0dB A StellaC1a EN CopyF_V4_FM book Pa...

Page 76: ...g m2 14 28 lb Number of originals to be set 30 sheets 80g m2 20 lb Maximum power consumption less than 50W power is supplied from the main frame Dimensions W D H 110 360 95mm 4 3 14 2 3 8 inch Weight Approx 2kg 4 4 lb Note Specifications are subject to change without notice StellaC1a EN CopyF_V4_FM book Page 66 Wednesday September 12 2001 4 03 PM ...

Page 77: ...B Copier Memory Unit Option Memory capacity 32MB Additional functions Increased memory capacity Number of originals that can be stored about 99 pages ITU T No 4 chart StellaC1a EN CopyF_V4_FM book Page 67 Wednesday September 12 2001 4 03 PM ...

Page 78: ...11 19 61 Exposure glass cover 1 61 F Facsimile key 4 9 Front cover 2 I Internal tray 1 K Key Op Tools 55 L Loading Paper 42 M Machine Environment 58 Mainframe 63 Main Power indicator 1 Main power switch 1 7 Maintaining 61 Maximum copy quantity 54 Message 39 O On indicator 2 Operation switch 2 7 Options 3 Originals 10 19 Original Type 23 Orig Orientation 55 Other Functions 31 P Panel Display 6 Pape...

Page 79: ...69 T Toner 15 U User Codes 31 User Tools 51 V Ventilation hole 1 Z Zoom 35 StellaC1a EN CopyF_V4_FM book Page 69 Wednesday September 12 2001 4 03 PM ...

Page 80: ...70 MEMO StellaC1a EN CopyF_V4_FM book Page 70 Wednesday September 12 2001 4 03 PM ...

Page 81: ...71 MEMO StellaC1a EN CopyF_V4_FM book Page 71 Wednesday September 12 2001 4 03 PM ...

Page 82: ...72 UE USA B045 MEMO StellaC1a EN CopyF_V4_FM book Page 72 Wednesday September 12 2001 4 03 PM ...

Page 83: ...81 Gap when printed at 81 scale Pages in book Paper thickness 2 0 mm Operating Instructions System Settings For safety please read this manual carefully before you use this product and keep it handy for future reference Type for 2512 1202 5612 Aficio 120 Printed in China UE USA B045 8667 ...

Page 84: ...this machine all operators should carefully read and follow the instructions in this manual Please keep this manual in a handy place near the machine Please read the Safety Information in the Copy Reference before using this machine It contains im portant information related to USER SAFETY and PREVENTING EQUIPMENT PROBLEMS Notes Some illustrations may be slightly different from your machine Certai...

Page 85: ...em Set tings Auto Off mode Copier only To conserve energy this product automatically turns off 30 minutes after the last copying or printing job has completed If you wish to make copies when the machine is in Auto Off mode press the operation switch first For details about how to change the default interval that the machine waits before entering Auto Off mode see 6 Auto Off Timer on p 14 System Se...

Page 86: ...er only Fax or printer installed Low Power mode Power consumption 50 Wh 60 Wh Default interval 15 minutes 15 minutes Recovery time 10 seconds 10 seconds Sleep mode Power consumption 20 Wh Default interval 30 minutes Recovery time 20 seconds Auto Off mode Power consumption less than 2 Wh Default interval 30 minutes Recovery time 20 seconds StellaC1a EN SysF_V4_FM book Page ii Wednesday September 12...

Page 87: ...ns under this symbol Be sure to read the instructions all of which are described in the Safety Information section The statements above are notes for your safety Important If this instruction is not followed paper might be misfed originals might be damaged or data might be lost Be sure to read this Preparation This symbol indicates the prior knowledge or preparations required before op erating Not...

Page 88: ...acsimile Mode 7 Sending a Fax 7 Printing a Received Fax 7 Printer Mode 8 Changing to Printer Mode 8 Printing 8 2 User Tools System Settings Keys for User Tools System Settings 9 Accessing the User Tools System Settings 11 Exiting from the User Tools 12 Printing the Counter Value 12 User Tools Menu System Settings 13 Settings You Can Change with the User Tools 14 System Settings 14 INDEX 16 StellaC...

Page 89: ...dvanced facsimile functions and also explains settings for key operations Printer Reference 1 Option Describes the system settings procedures and functions for using this ma chine as a printer Printer Reference 2 Option Describes the procedures and provides necessary information about using this machine as a printer Network Interface Board Quick Configuration Guide Option Describes the procedures ...

Page 90: ...ction enlargement or combining two originals onto one copy You can install an optional memory expansion for storage of document images thereby making the best use of memory with various copy functions Options for Memory Expansion 32MB copier memory unit Increases memory capacity Facsimile Mode Option You can send and receive fax messages in facsimile mode Printer Mode Option You can use this machi...

Page 91: ...y Limitation You cannot switch modes in any of the following cases When scanning in a fax message for transmission During immediate transmission When accessing the user tools During On Hook dialing for fax transmission During Energy Saver mode StellaC1a EN SysF_V4_FM book Page 3 Wednesday September 12 2001 4 16 PM ...

Page 92: ... User Tools Counter User Tools Copy Facsimile or Printer Mode before you select Copy stand by mode Copying Facsimile stand by mode Memory Transmission Memory Reception Automatically printing received data Manually printing received data Manual Reception Operation Automatically printing reports lists Manually printing reports lists Printer stand by mode Receive Data Printing Copy Operating Copying ...

Page 93: ...and operates simultaneously Printer Operating Receive Data Printing While using the external hand set Accessing User Tools Mode after you select Copy Facsimile Printer User Tools Counter User Tools Copy Facsimile or Printer Mode before you select Copy stand by mode Copying Facsimile stand by mode Memory Transmission Memory Reception Automatically printing received data Manually printing received d...

Page 94: ...e a copy when the machine is not printing or scan ning fax data A A A A Press the Copy key The copy display appears on the panel display Reference For details see the Copy Refer ence manual StellaC1a EN SysF_V4_FM book Page 6 Wednesday September 12 2001 4 16 PM ...

Page 95: ...h to the fax display Note When you press the Facsimile key while scanning originals or sorting in Copy mode remove any originals of your copy job B B B B Complete the usual operations for sending a fax and then press the Start key C C C C After the transmission has fin ished press the Copy key D D D D Reset the copy job originals and then press the Start key The machine resumes the inter rupted co...

Page 96: ... from applica tions you do not have to switch to Printer mode Reference For details see the Printer Refer ence manual Printing The machine can receive a print data while another feature is running StellaC1a EN SysF_V4_FM book Page 8 Wednesday September 12 2001 4 16 PM ...

Page 97: ...us error messages and function menu 3 0 0 0 0 or 1 1 1 1 key Cursor keys Press to display the previous next menu or select an item on the panel display 4 OK key Press to make the new settings and re turn to the previous menu 5 User Tools Counter key See p 11 Accessing the User Tools Sys tem Settings 6 Clear Stop key Press to delete a number you have en tered or to stop copying StellaC1a EN SysF_V4...

Page 98: ...ions 10 Printer key Printer installed machine only Press to use printer functions 11 Number keys Use to enter a numeric value 12 Start key Press to start copying or faxing 13 Operation switch Press this switch to turn the power on or return from the Low Power mode the Sleep mode or the Auto Off mode To turn the power off press this switch again StellaC1a EN SysF_V4_FM book Page 10 Wednesday Septem...

Page 99: ...information on Copy Fax and Printer User Tools see the appro priate reference manual A A A A Press the User Tools Counter key The User Tools Main Menu ap pears B B B B Press the 0 0 0 0 or 1 1 1 1 key until 2 Sys tem Settings is displayed and then press the OK key Note To view the total number of prints made by the machine see p 12 Printing the Counter Val ue To switch the display language select ...

Page 100: ...ce p 14 Settings You Can Change with the User Tools Note OK Press to make the new settings and return to the previ ous menu Cancel Press to return to the previous menu without chang ing any data Exiting from the User Tools A A A A After changing the user tools set tings press the User Tools Counter key Printing the Counter Value A A A A Press the User Tools Counter key B B B B Make sure 1 Counter ...

Page 101: ...User Tools Menu System Settings 13 2 User Tools Menu System Settings StellaC1a EN SysF_V4_FM book Page 13 Wednesday September 12 2001 4 16 PM ...

Page 102: ...er your job is finished This function is called System Reset When you set the time select 1 On Off to On and then set 2 Tim er to the desired time The time can be set from 10 to 999 seconds Note Default On 60 seconds You can specify the prioritized mode with the user tools See 1 Function Priority 4 Energy Saver Timer The machine enters Low Power mode automatically after your job is finished after ...

Page 103: ...o 240 minutes Note Default 30 minutes Auto Off might not be effective when an error message is dis played To return to the ready condition from Auto Off the machine re quires the same warm up time as the time for becoming ready after power is turned on When the machine receives a fax or printer data in Auto Off mode it automatically prints the fax or printer data 7 AOF Keep It On Note For details ...

Page 104: ...imer 14 F Facsimile Mode 2 7 Function Priority 14 K Keys for User Tools System Settings 9 M Measurement Unit 15 Modes 3 Multi access 4 N Number keys 10 O OK key 9 Operation switch 10 P Panel display 9 Printer Mode 2 8 S Start key 10 System Reset 14 T Tray Paper Size 15 U User Tools Counter key 9 User Tools System Settings 9 StellaC1a EN SysF_V4_FM book Page 16 Wednesday September 12 2001 4 16 PM ...

Page 105: ...es in book Paper thickness 2 3 360000 mm Operating Instructions Copy Reference Read this manual carefully before you use this product and keep it handy for future reference For safety please follow the instructions in this manual Type for 2513 2513f 1302 1302f 5613 5613F Aficio 1013 1013F Printed in China UE USA B045 7207 ...

Page 106: ... Safety The Center for Devices and Radiological Health CDRH prohibits the repair of laser based optical unit in the field The optical housing unit can only be repaired in a factory or at a location with the requisite equipment The laser subsystem is replaceable in the field by a qualified Customer Engineer The laser chassis is not repairable in the field Customer engineers are therefore directed t...

Page 107: ...plug not the cable if the power cable or plug becomes frayed or otherwise damaged To avoid hazardous electric shock or laser radiation exposure do not remove any covers or screws other than those specified in this manu al Turn off the power and disconnect the power plug by pulling the plug not the cable if any of the following conditions exists You spill something into the equipment You suspect th...

Page 108: ... toner used or unused and toner cartridge out of the reach of children For environmental reasons do not dispose of the equipment or expended supply waste at household waste collection points Disposal can take place at an authorized dealer or at appropriate collection sites The inside of the machine could be very hot Do not touch the parts with a label indicating the hot surface Otherwise it could ...

Page 109: ...o not touch the inside Doing so could result in a burn A B The anti condensation heater in the inner lower part of the machine becomes very hot Do not touch it Doing so could result in a burn C The anti condensation heater in the inner upper part of the machine becomes very hot Do not touch it Doing so could result in a burn Note The anti condensation heater is optional For details contact your se...

Page 110: ...tions under this symbol Be sure to read the instructions all of which are described in the Safety Information section The statements above are notes for your safety Important If this instruction is not followed paper might be misfed originals might be damaged or data might be lost Be sure to read this Preparation This symbol indicates the prior knowledge or preparations required before op erating ...

Page 111: ...his machine has two models Type 2 machine is installed with the fax unit as a standard Type 1 Type 2 Fax unit Option Standard Printer unit Option Option StellaC EN CopyF_V4_FM book Page v Wednesday July 4 2001 11 23 AM ...

Page 112: ...vi What You Can Do with This Machine StellaC EN CopyF_V4_FM book Page vi Wednesday July 4 2001 11 23 AM ...

Page 113: ...Handling Toner 15 Toner Storage 15 Used Toner 15 2 Copying Basic Procedure 17 Placing Originals 19 Placing Originals on the Exposure Glass 19 Loading Originals in the Document Feeder ADF 20 Placing Standard Size Originals 20 Placing Custom Size Originals 21 Basic Functions 23 Adjusting Copy Image Density 23 Selecting an Original Type 23 Selecting Copy Paper 24 Sort 25 Sort 25 Copying from the Bypa...

Page 114: ... in the Paper Tray 48 Changing the Paper Size in the Optional Paper tray unit 49 Selecting the Paper Size with the User Tools 51 4 User Tools Copier Features Accessing the User Tools Copier Features 53 Exiting the User Tools 54 User Tools Menu Copier Features 55 Settings You Can Change with the User Tools 56 Copier Features 56 5 Remarks Do s and Don ts 59 Where to Put Your Machine 60 Machine Envir...

Page 115: ... Specifications Mainframe 65 Document Feeder ADF Option for Type 1 68 Paper Tray Unit Option 69 32MB Copier Memory Unit Option 70 INDEX 71 StellaC EN CopyF_V4_FM book Page ix Wednesday July 4 2001 11 23 AM ...

Page 116: ...x StellaC EN CopyF_V4_FM book Page x Wednesday July 4 2001 11 23 AM ...

Page 117: ... overheating Do not obstruct the ventilation hole by placing or leaning an object near it If the machine over heats a fault might occur 6 Main power switch If the machine does not operate after turning on the operation switch check if the main power switch is turned on If it is off turn it on However if the machine is installed with the fax function do not turn the main power off 7 Main Power indi...

Page 118: ...r tray Place paper here See p 42 h Loading Paper 13 Paper tray unit option Holds 500 sheets of paper 14 Internal tray guide Swing out to support large papers and raise the end fence 1 Bypass tray Use to copy onto OHP transparencies adhesive labels translucent paper post cards envelopes and custom size paper See p 27 Copying from the Bypass Tray 2 Right cover Open this cover to remove jammed paper ...

Page 119: ...DF Option for Type 1 Originals will be fed automatically 2 Paper tray unit Holds 500 sheets of paper Other options 32MB copier memory unit Increases memory capacity StellaC EN CopyF_V4_FM book Page 3 Wednesday July 4 2001 11 23 AM ...

Page 120: ...s These indicators show errors or the status of the machine See p 39 Troubleshoot ing 6 Cancel key Press to cancel an operation or return to the previous display 7 Panel display Shows operation status error messages and function menu See p 6 Panel Dis play 8 0 0 0 01 1 1 1 keys Cursor keys Press to select an item on the panel dis play 9 OK key 10 User Tools Counter key Press to change the default ...

Page 121: ...al 32MB copier memory unit is required Automatically sorts copies See p 25 Sort Original Size Select the original size that matches the originals placed See p 20 Placing Standard Size Originals 18 Select Paper Tray key Press to select the paper tray 19 Zoom key Changes the reproduction ratio in 1 steps 20 Reduce Enlarge key Press to make reduced or enlarged cop ies See p 32 Preset Reduce Enlarge 2...

Page 122: ...r currently selected functions appear here 2 Bottom line Items which can be selected or specified or messages appear here Currently selected items are displayed with brackets 3 Number of copies set and number of copies made Common keys 0 or 1 Press to move between pages or select function Cancel Press to cancel an operation or return to the previous display Clear Stop While entering numbers press ...

Page 123: ...ight side of the control panel Press this switch to activate the machine When the machine has warmed up you can make copies Main power switch left side of the machine When the machine is not to be used for an extended period of time turn off the main power switch Turning On the Main Power A A A A Make sure that the power cord is firmly plugged into the wall outlet B B B B Turn on the main power sw...

Page 124: ...nd press the Start key while the Select Modes and Press Start message is displayed When Input User Code and Press OK is displayed enter your user code Shutting Down the Machine A A A A Press the operation switch to make the On indicator go off and change to Low Power mode Turning Off the Main Power A A A A Turn off the main power switch The main power indicator of the control panel goes off Import...

Page 125: ...ther than copy mode press the Copy key to switch to copy mode For details about how to change the mode the machine starts in when you turn the operation switch on see 1 Function Priority in the System Settings manu al Limitation You cannot switch modes in any of the following cases When scanning in a fax message for transmission During immediate transmission When accessing the user tools During On...

Page 126: ...thermal fax paper art paper alu minum foil carbon paper or conductive paper Originals with indexes tags or other projecting parts Sticky originals such as translucent paper Thin originals that have low stiffness Originals of inappropriate weight other than those specified in p 10 Sizes and Weights of Recommended Originals Bound originals such as books Transparent originals such as OHP transparenci...

Page 127: ...ea Exposure glass Document feeder ADF Limitation Even if you correctly place originals in the document feeder ADF or on the exposure glass margins about 4mm 0 2 on all four sides might not be cop ied StellaC EN CopyF_V4_FM book Page 11 Wednesday July 4 2001 11 23 AM ...

Page 128: ...ecting the Paper Size with the User Tools 60 90g m2 16 24 lb 500 sheets 1 Bypass tray Standard sizes A4L A5KL 81 2 11 L 51 2 81 2 KL 81 2 14 L 8 13 L 81 2 13 L 81 4 13 L 81 4 14 L Note You can specify the paper size See p 27 Copying from the Bypass Tray 60 157g m2 16 42 lb 100 sheets 1 Custom sizes Metric version Vertical 90 216mm Horizontal 140 356mm Inch version Vertical 3 5 8 5 Horizontal 5 5 1...

Page 129: ...o trays the machine automatically switches to another tray when the tray in use runs out of paper This function is called Auto Tray Switch This saves interrupting a copy run to replenish paper even when you make a large number of copies You can cancel this setting The optional paper tray unit is required to use this setting See 10Auto Tray Switch of the System Settings manual Reference If you want...

Page 130: ...g with metal clasps string ties or metal folding bars designed to be interlocked with nicked edges or bent corners with rough wrinkled or laid finishes with any exposed adhesive when the flap is in the sealed or closed posi tion Paper Storage Note When storing paper the following precautions should always be followed Do not store paper where it will be exposed to direct sunlight Avoid storing pape...

Page 131: ...nlight Store on a flat surface Used Toner Note Toner cannot be re used Do not incinerate used toner or toner containers Toner dust might ig nite when exposed to an open flame Dispose of used toner containers in accordance with local regulations for plastics Keep toner used or unused and toner containers out of reach of children Our products are engineered to meet high standards of quality and func...

Page 132: ...Basics 16 1 StellaC EN CopyF_V4_FM book Page 16 Wednesday July 4 2001 11 23 AM ...

Page 133: ...ximum copy quantity can be set between 1 and 99 de fault 99 See 1 Max Copy Q ty in p 56 Copier Features To change the number entered press the Clear Stop key and then enter the new number G G G G Press the Start key The machine starts copying Note To stop the machine during the multi copy run press the Clear Stop key To return the machine to the ini tial condition after copying press the Clear Mod...

Page 134: ...is function is called Auto Off Note How to exit Auto Off mode Turn on the operation switch Place an original in the docu ment feeder ADF Lift and lower the exposure glass cover You can change the Auto Off time See 6 Auto Off Timer in the Sys tem Settings manual StellaC EN CopyF_V4_FM book Page 18 Wednesday July 4 2001 11 23 AM ...

Page 135: ... pending on the direction of the originals For details see explana tions of each function Reference See p 10 Originals Placing Originals on the Exposure Glass A A A A Lift the exposure glass cover or the document feeder ADF B B B B Place the original face down on the exposure glass The original should be aligned to the rear left corner 1 Reference mark 2 Scale C C C C Lower the exposure glass cove...

Page 136: ...ent feeder ADF 1 Limit mark 2 Document guide Note Do not stack originals above the limit mark To avoid a multi sheet feed shuffle the originals before set ting them in the document feed er ADF Placing Standard Size Originals Note When the copy paper size and the original size differ follow the steps below A A A A Press the Menu key B B B B Press the 0 0 0 0 or 1 1 1 1 key to select 3 Original Size...

Page 137: ...e of the following A4L A5KL 81 2 14 L 81 2 13 L 81 2 11 L 51 2 81 2 KL 8 13 L 81 4 13 L 81 4 14 L For exposure glass the paper size that can be set with this function is vertical 105 216mm 4 1 8 5 hor izontal 128 297mm 5 11 For document feeder ADF the paper size that can be set with this function is vertical 140 216mm 5 5 8 5 horizontal 140 356mm 5 5 14 For exposure glass the maximum copy paper si...

Page 138: ... select Custom Size and then press the OK key E E E E Enter the horizontal size of the original with the number keys and then press the OK key F F F F Enter the vertical size of the origi nal with the number keys and then press the OK key G G G G Press the Select Paper Tray key to select your desired paper tray H H H H Press the Start key StellaC EN CopyF_V4_FM book Page 22 Wednesday July 4 2001 1...

Page 139: ... the Lighter or Darker key to adjust the image density Selecting an Original Type There are two ways to match your originals Text If you do not select either mode your originals will be scanned with the settings suitable for text originals with this mode Photo Delicate tones of photographs and pictures can be reproduced with this mode Note You can change the detailed set tings for Text and Photo e...

Page 140: ...Paper You can manually select the paper tray for the paper size you wish to use A A A A Select the paper tray or bypass tray by pressing the Select Paper Tray key StellaC EN CopyF_V4_FM book Page 24 Wednesday July 4 2001 11 23 AM ...

Page 141: ...pies from the tray Metric version Inch version The maximum tray capacity might also be reduced when copy paper is considerably curled Sort Copies can be assembled as sets in se quential order Sort A A A A Press the Menu key B B B B Select 2 Sort with the 0 0 0 0 or 1 1 1 1 key and then press the OK key C C C C Select Sort with the 0 0 0 0 or 1 1 1 1 key and then press the OK key Internal tray A4 o...

Page 142: ...riginals in the doc ument feeder ADF and then press the Start key Note The last page should be on the bottom If an original is misfed place your originals in the docu ment feeder ADF again ac cording to the instruction on the display When placing an original on the exposure glass A A A A Place the original and then press the Start key B B B B Place the next original and then press the Start key No...

Page 143: ...or details about paper capacity in the bypass tray see p 12 Copy Pa per A A A A Open the bypass tray B B B B Push up the paper guide release lever 1 Paper guide release lever C C C C Gently insert the copy paper face down and adjust the paper guides 1 Horizontal size 2 Vertical size 3 Extender 4 Paper guides Important If the guides are not flush with the copy paper a skew image or paper misfeeds m...

Page 144: ...he paper guide release lever If you do not push down the pa per guide release lever a mis feed might occur You can specify the type of pa per used for the bypass tray See 6 Bypass Paper Type in p 56 Copier Features E E E E Place your originals and then press the Start key When copying onto OHP transparencies A A A A Press the User Tools Counter key B B B B Press the 0 0 0 0 or 1 1 1 1 key to displ...

Page 145: ...opy paper size for the paper tray the optional paper tray unit and the bypass tray is A4 81 2 11 L A A A A Press the R key B B B B Make sure that Standard Size is selected and then press the OK key Note If not press the 0 or 1 key to select it C C C C Press the 0 0 0 0 or 1 1 1 1 key to select pa per size and then press the OK key When copying onto custom size copy paper Important You should speci...

Page 146: ...opying onto envelopes Note Set the direction of the envelope to L Reference For details about envelopes see p 12 Copy Paper A A A A Press the User Tools Counter key B B B B Press the 0 0 0 0 or 1 1 1 1 key to display 3 Copier Features and then press the OK key C C C C Press the 0 0 0 0 or 1 1 1 1 key to display 6 Bypass Paper Type and then press the OK key D D D D Press the 0 0 0 0 or 1 1 1 1 key ...

Page 147: ...r Tools Counter key B B B B Press the 0 0 0 0 or 1 1 1 1 key to display 3 Copier Features and then press the OK key C C C C Press the 0 0 0 0 or 1 1 1 1 key until 7 Key Op Tools is displayed and then press the OK key D D D D Press the 0 0 0 0 or 1 1 1 1 key until 7 Program User Code is displayed and then press the OK key E E E E Enter the desired user code with the number keys and then press the O...

Page 148: ...s the Reduce Enlarge key B B B B Press the Reduce Enlarge key or the 0 0 0 0 or 1 1 1 1 key until the desired reduce enlarge size is displayed Note The ratio displayed changes ev ery time you press the Re duce Enlarge key or the 0 or 1 key C C C C Press the OK key Ratio Original Copy paper size 200 enlarge area by 4 A6 A4 141 enlarge area by 2 A5 A4 100 Full Size 93 A little reduced Create Margin ...

Page 149: ...lace your originals and then press the Start key Note When the copy paper size and the original size differ set the original size See p 20 Placing Standard Size Originals StellaC EN CopyF_V4_FM book Page 33 Wednesday July 4 2001 11 23 AM ...

Page 150: ...d reproduction ratios with the 0 0 0 0 or 1 1 1 1 key Note To change the ratio in 1 steps just press the 0 or 1 key To change the ratio in 10 steps press and hold down the 0 or 1 key To change the ratio entered press the Clear Stop key and then enter the new ratio When using the number keys A A A A Enter the desired ratio with the number keys Note To change the ratio entered press the Clear Stop k...

Page 151: ...io from 50 200 If the calculated ratio is under the minimum ratio it is corrected within the range of the ratio auto matically However with some ra tios parts of the image might not be copied or blank margins appear on copies When the number of originals placed is less than the number specified for combining the last page s will be copied blank Direction of the originals and ar rangement of combin...

Page 152: ...t the copy paper E E E E Place your originals Note Set the direction of the original to L When placing an original on the exposure glass A A A A Place the original and then press the Start key B B B B Place the next original and then press the Start key Note To finish copying press the R key to eject the copy When loading originals in the document feeder ADF A A A A Load your originals and then pr...

Page 153: ...r you select will be the mode you re working in means that these modes cannot be used together The mode before you select will be the mode you re working in Mode after you select Custom Originals Copying from the Bypass Tray Image Density Text Originals Photo Originals Zoom Preset Reduce Enlarge Combine Sort Mode before you select Custom Originals Copying from the Bypass Tray Image Density Text Or...

Page 154: ...Copying 38 2 StellaC EN CopyF_V4_FM book Page 38 Wednesday July 4 2001 11 23 AM ...

Page 155: ...it number User codes are set Enter the user codes See p 31 User Codes Problem Cause Action The panel display is off The machine is in Energy Sav er mode Turn on the operation switch See p 1 Guide to Compo nents The operation switch is turned off The main power switch is turned off Turn on the main power switch See p 1 Guide to Components The power cord is unplugged Make sure that the power cord is...

Page 156: ...ack lines appear in a copy Your document feeder ADF might be dirty Clean the document feeder ADF with a cloth See p 63 Maintaining Your Machine Copies are too light The image density is too light Adjust the image density See p 23 Adjusting Copy Image Density Damp or rough grain paper is used Use dry paper without rough grain Toner cartridge is almost empty Add toner See p 44 h Changing the Toner C...

Page 157: ...rts of the image are not cop ied The original size and the copy paper size do not match Set the original size and the copy paper size correctly See p 20 Placing Standard Size Originals Your originals are not identi cal in size and direction Use originals that are identical in size and direction Order of copies is not correct You placed originals in an in correct order When loading originals in the...

Page 158: ...ur Note Shuffle the paper before setting it in the tray D D D D Push the paper tray in until it stops Loading paper in the optional paper tray unit A A A A Make sure that the optional paper tray unit is not being used B B B B Pull out the paper tray until it stops C C C C While pinching the release lever adjust the back fence and side fences D D D D Push the metal plate down and then square the pa...

Page 159: ...up side down E E E E Readjust the back fence and side fences Important When loading small quantities of copy paper be careful not to squeeze in the side fence too much or paper will not be fed properly F F F F Push the paper tray in until it stops StellaC EN CopyF_V4_FM book Page 43 Wednesday July 4 2001 11 23 AM ...

Page 160: ...prevent poor copy quality Reference Regarding toner storage see p 15 Toner Storage Do not incinerate used toner or toner containers Toner dust might ig nite when exposed to an open flame Dispose of used toner containers in accordance with local regulations for plastics Keep toner used or unused and toner containers out of reach of children Our products are engineered to meet high standards of qual...

Page 161: ... then shake it 5 or 6 times Note Do not remove the black cap when shaking Remove the black cap Note Do not remove the inner cap Put the Toner Cartridge on the holder and then press its head forward Push the holder in until it clicks Push down the green holder Close the front cover of the machine StellaC EN CopyF_V4_FM book Page 45 Wednesday July 4 2001 11 23 AM ...

Page 162: ...ated In this case check every appli cable area Refer to the following charts A P Y You can find a sticker explaining how to remove misfed paper inside of the right cover When the machine instructs you to place originals once again place your originals in the feeding position The display might indicate the number of originals you should return The fusing section of this equipment might be very hot ...

Page 163: ...h Clearing Misfeeds 47 3 StellaC EN CopyF_V4_FM book Page 47 Wednesday July 4 2001 11 23 AM ...

Page 164: ...e in the Paper Tray A A A A Make sure that the paper tray is not being used B B B B Pull out the paper tray until it stops Note Remove any remaining copy paper C C C C Adjust the back fence Note When you load A4L copy pa per place the back fence in the corner pocket on the left D D D D While pressing the release lever adjust the side fences E E E E Push the metal plate down StellaC EN CopyF_V4_FM ...

Page 165: ...ush the paper tray in until it stops Note Select the new paper size with the User Tools See p 51 Select ing the Paper Size with the User Tools Changing the Paper Size in the Optional Paper tray unit A A A A Make sure that the paper tray is not being used B B B B Pull out the paper tray until it stops Note Remove any remaining copy paper C C C C Adjust the back fence Note When you load 81 4 14 L or...

Page 166: ...eeds might occur Note Shuffle the paper before loading it in the tray F F F F Adjust the side and back fences to the new paper size Important When loading small quantities of copy paper be careful not to squeeze in the side fence too much or paper will not be fed properly G G G G Push the paper tray in until it stops Note Select the new paper size with the User Tools See p 51 Select ing the Paper ...

Page 167: ...size for and then press the OK key When you select 1 Tray 1 or 2 Tray 2 go to step F F F F E E E E If you have selected 3 Bypass on step D D D D select Standard Size or Custom Size and then press the OK key F F F F Select the desired paper size When you have selected Custom Size on step E A A A A Enter the horizontal size of the paper with the number keys and then press the OK key B B B B Enter th...

Page 168: ...Troubleshooting 52 3 StellaC EN CopyF_V4_FM book Page 52 Wednesday July 4 2001 11 23 AM ...

Page 169: ...s Counter key B B B B Press the 0 0 0 0 or 1 1 1 1 key to display 3 Copier Features and then press the OK key C C C C Press the 0 0 0 0 or 1 1 1 1 key until de sired User Tools menu is dis played and then press the OK key D D D D Change the settings by following the instructions on the panel dis play and then press the OK key Reference See p 56 Settings You Can Change with the User Tools Note OK k...

Page 170: ... A Press the User Tools Counter key Note You can exit the User Tools mode by pressing the Cancel key If you want to return to the pre vious mode copy or facsimile press the User Tools Counter key StellaC EN CopyF_V4_FM book Page 54 Wednesday July 4 2001 11 23 AM ...

Page 171: ...User Tools Menu Copier Features 55 4 User Tools Menu Copier Features StellaC EN CopyF_V4_FM book Page 55 Wednesday July 4 2001 11 23 AM ...

Page 172: ...e original You can choose these mode after selecting 1 Text or 2 Photo Text Mode 1 For normal text originals Text Mode 2 For newspapers originals through which the rear side is mod erately visible with light text Photo Mode 1 For text photo images which contain mainly photo areas Photo Mode 2 For text photo images which contain mainly text areas Special Mode 1 For originals with colored text and l...

Page 173: ...the orientation of originals with Combine mode Note Default Off 6 Bypass Paper Type You can select the type of paper for the bypass tray Note Default Thick 7 Key Op Tools If the machine is set to use the User Code function operators must enter their user codes before the machine can operate The machine can keep count of the number of copies made under each user code 1 User Code Access Specify whet...

Page 174: ...ou can reset each user code s counter to 0 7 Program User Code You can register user codes Note Up to 10 user codes 8 digits or less can be registered 8 Change User Code You can change user codes Note The number of copies made under the old code is added to that made under the new user code 9 Delete User Code You can delete user codes Note The number of copies made under the deleted code is also d...

Page 175: ... switch while copying or printing When turning off the operation switch copying with memory and printing continue How ever scanning of copy originals is interrupted The machine might fail to produce good copy images if condensation forms inside the machine due to temperature change Do not open the covers of the machine while copying or printing If you do misfeeds might occur Do not move the machin...

Page 176: ... might cause condensation within the machine Locations close to such machines generating ammonia such as diazo copy machines Places where the machine might be subjected to frequent strong vibrations Dusty areas Areas with corrosive gases Keep the equipment away from humidity and dust Otherwise a fire or an electric shock might occur Do not place the equipment on an unstable or tilted surface If it...

Page 177: ...ine to the power source described on the inside front cover of this manual Connect the power cord directly into a wall outlet and do not use an extension cord Do not damage break or make any modifications to the power cord Do not place heavy objects on it Do not pull it hard nor bend it more than necessary These actions could cause an electric shock or fire Unplug the power cord from the wall outl...

Page 178: ...as shown 1 Rear more than 1cm 0 4 2 Right more than 1cm 0 4 3 Front more than 75cm 29 6 4 Left more than 1cm 0 4 Note For information about required space when options are installed please con tact your service representative StellaC EN CopyF_V4_FM book Page 62 Wednesday July 4 2001 11 23 AM ...

Page 179: ...loth to remove the water Important Do not use chemical cleaner or or ganic solvent such as thinner or benzene If they get into the ma chine or melt plastic parts a failure might occur Do not clean parts other than those specified on this page Such parts should be cleaned by your service representative Cleaning the Exposure Glass Cleaning the Exposure Glass Cover Cleaning the Document Feeder ADF St...

Page 180: ...Remarks 64 5 StellaC EN CopyF_V4_FM book Page 64 Wednesday July 4 2001 11 23 AM ...

Page 181: ...stem Resolution 600dpi Exposure glass Stationary original exposure type Original reference position Rear left corner Warm up time Less than 20 seconds 20 C 68 F Originals Sheet book objects Maximum original size Exposure glass A4L 81 2 11 L Document feeder ADF A4L 81 2 14 L Copy paper size Paper tray A4L A5K 81 2 11 L 51 2 81 2 K Bypass tray A4L A5KL 81 2 11 L 51 2 81 2 KL 81 2 14 L 8 13 L 81 2 13...

Page 182: ...m 0 08 0 07 Right edge more than 0 5mm 0 02 First copy time 8 seconds or less A4L 81 2 11 L 100 placing an original on the exposure glass feeding from the paper tray Copying speed 13 copies minute A4L 81 2 11 L feeding from the paper tray or the optional paper tray unit Reproduction ratio Preset reproduction ratios Zoom from 50 to 200 in 1 step Continuous copying count 1 99 copies Copy paper capac...

Page 183: ...3 The Complete System consists of mainframe with full options Weight Type 1 Approx 20kg 44 09 lb Type 2 Approx 23kg 50 7 lb Note Specifications are subject to change without notice Mainframe only Full system 1 Warm up About 890W About 890W Stand by About 90Wh About 100Wh During printing About 480Wh About 480Wh Maximum Less than 1 000W Less than 1 000W Mainframe only Complete System 3 Stand by 40 0...

Page 184: ...ls 52 105g m2 14 28 lb Number of originals to be set 30 sheets 80g m2 20 lb Maximum power consumption less than 50W power is supplied from the main frame Dimensions W D H 110 360 95mm 4 3 14 2 3 8 inch Weight Approx 2kg 4 4 lb Note Specifications are subject to change without notice StellaC EN CopyF_V4_FM book Page 68 Wednesday July 4 2001 11 23 AM ...

Page 185: ...nsumption 15W power is supplied from the main frame Paper capacity 500 sheets 80g m2 20 lb Dimensions W D H 430 414 140mm 17 0 16 3 5 6 inch Weight Approx 6kg 13 3 lb Note Specifications are subject to change without notice For details about the optional anti condensation heater contact your service representative StellaC EN CopyF_V4_FM book Page 69 Wednesday July 4 2001 11 23 AM ...

Page 186: ...pier Memory Unit Option Memory capacity 32MB Additional functions Increased memory capacity Number of originals that can be stored about 99 pages ITU T No 4 chart StellaC EN CopyF_V4_FM book Page 70 Wednesday July 4 2001 11 23 AM ...

Page 187: ... Exposure glass cover 1 63 F Facsimile key 4 9 Front cover 2 I Internal tray 1 K Key Op Tools 57 L Loading Paper 42 M Machine Environment 60 Mainframe 65 Main Power indicator 1 Main power switch 1 7 Maintaining 63 Maximum copy quantity 56 Message 39 O On indicator 2 Operation switch 2 7 Options 3 Originals 10 19 Original Type 23 Orig Orientation 57 Other Functions 31 P Panel Display 6 Paper tray 2...

Page 188: ...72 T Toner 15 U User Codes 31 User Tools 53 V Ventilation hole 1 Z Zoom 34 StellaC EN CopyF_V4_FM book Page 72 Wednesday July 4 2001 11 23 AM ...

Page 189: ...73 MEMO StellaC EN CopyF_V4_FM book Page 73 Wednesday July 4 2001 11 23 AM ...

Page 190: ...74 UE USA B045 MEMO StellaC EN CopyF_V4_FM book Page 74 Wednesday July 4 2001 11 23 AM ...

Page 191: ...Pages in book Paper thickness 2 0 mm Operating Instructions System Settings Read this manual carefully before you use this product and keep it handy for future reference For safety please follow the instructions in this manual Type for 2513 2513f 1302 1302f 5613 5613F Aficio 1013 1013F Printed in China UE USA B045 8607 ...

Page 192: ...Safety Information in the Copy Reference before using this machine It contains im portant information related to USER SAFETY and PREVENTING EQUIPMENT PROBLEMS Notes Some illustrations may be slightly different from your machine Certain options may not be available in some countries For details please contact your local dealer Operator Safety This machine is considered a CDRH class I laser device s...

Page 193: ... System Set tings Auto Off mode Copier only To conserve energy this product automatically turns off 30 minutes after the last copying or printing job has completed If you wish to make copies when the machine is in Auto Off mode press the operation switch first For details about how to change the default interval that the machine waits before entering Auto Off mode see 6 Auto Off Timer on p 16 Syst...

Page 194: ...pier only Fax or printer installed Low Power mode Power consumption 50 Wh 60 Wh Default interval 15 minutes 15 minutes Recovery time 10 seconds 10 seconds Sleep mode Power consumption 20 Wh Default interval 30 minutes Recovery time 20 seconds Auto Off mode Power consumption less than 2 Wh Default interval 30 minutes Recovery time 20 seconds Stella EN SysF_V4_FM book Page ii Wednesday July 4 2001 1...

Page 195: ...uctions under this symbol Be sure to read the instructions all of which are described in the Safety Information section The statements above are notes for your safety Important If this instruction is not followed paper might be misfed originals might be damaged or data might be lost Be sure to read this Preparation This symbol indicates the prior knowledge or preparations required before op eratin...

Page 196: ... 9 Changing to Facsimile Mode 9 Sending a Fax 9 Printing a Received Fax 9 Printer Mode 10 Changing to Printer Mode 10 Printing 10 2 User Tools System Settings Keys for User Tools System Settings 11 Accessing the User Tools System Settings 13 Exiting from the User Tools 14 Printing the Counter Value 14 User Tools Menu System Settings 15 Settings You Can Change with the User Tools 16 System Settings...

Page 197: ...Describes more advanced facsimile functions and also explains settings for key operations Printer Reference 1 Option Describes the system settings procedures and functions for using this ma chine as a printer Printer Reference 2 Option Describes the procedures and provides necessary information about using this machine as a printer Network Interface Board Quick Configuration Guide Option Describes...

Page 198: ... This machine has two models Type 2 machine is installed with the fax unit as a standard Type 1 Type 2 Fax unit Option Standard Printer unit Option Option Stella EN SysF_V4_FM book Page 2 Wednesday July 4 2001 1 29 PM ...

Page 199: ...tion enlargement or combining two originals onto one copy You can install an optional memory expansion for storage of document images thereby making the best use of memory with various copy functions Options for Memory Expansion 32MB copier memory unit Increases memory capacity Facsimile Mode Option for Type 1 You can send and receive fax messages in facsimile mode Printer Mode Option You can use ...

Page 200: ...4 Stella EN SysF_V4_FM book Page 4 Wednesday July 4 2001 1 29 PM ...

Page 201: ...tively Limitation You cannot switch modes in any of the following cases When scanning in a fax message for transmission During immediate transmission When accessing the user tools During On Hook dialing for fax transmission During Energy Saver mode Stella EN SysF_V4_FM book Page 5 Wednesday July 4 2001 1 29 PM ...

Page 202: ...sen tative Mode after you select Copy Facsimile Printer User Tools Counter User Tools Copy Facsimile or Printer Mode before you select Copy stand by mode Copying Facsimile stand by mode Memory Transmission Memory Reception Automatically printing received data Manually printing received data Manual Reception Operation Automatically printing reports lists Manually printing reports lists Printer stan...

Page 203: ... printing reports lists Manual printing reports lists While using the external hand set Printer Operating Receive Data Printing While using the external hand set Accessing User Tools Mode after you select Copy Facsimile Printer User Tools Counter User Tools Copy Facsimile or Printer Mode before you select Copy stand by mode Copying Facsimile stand by mode Memory Transmission Memory Reception Autom...

Page 204: ...s make a copy when the machine is not printing or scan ning fax data A A A A Press the Copy key The copy display appears on the panel display Reference For details see the Copy Refer ence manual Stella EN SysF_V4_FM book Page 8 Wednesday July 4 2001 1 29 PM ...

Page 205: ...witch to the fax display Note When you press the Facsimile key while scanning originals or sorting in Copy mode remove any originals of your copy job B B B B Complete the usual operations for sending a fax and then press the Start key C C C C After the transmission has fin ished press the Copy key D D D D Reset the copy job originals and then press the Start key The machine resumes the inter rupte...

Page 206: ...rint from applica tions you do not have to switch to Printer mode Reference For details see the Printer Refer ence manual Printing The machine can receive a print data while another feature is running Stella EN SysF_V4_FM book Page 10 Wednesday July 4 2001 1 29 PM ...

Page 207: ...s Press to display the previous next menu or select an item on the panel display 4 OK key Press to make the new settings and re turn to the previous menu 5 User Tools Counter key See p 13 Accessing the User Tools Sys tem Settings 6 Clear Stop key Press to delete a number you have en tered or to stop copying 7 Clear Modes key Press to clear the previously entered copy job settings 8 Facsimile key F...

Page 208: ... functions 11 Number keys Use to enter a numeric value 12 Start key Press to start copying or faxing 13 Operation switch Press this switch to turn the power on or return from the Low Power mode the Sleep mode or the Auto Off mode To turn the power off press this switch again Stella EN SysF_V4_FM book Page 12 Wednesday July 4 2001 1 29 PM ...

Page 209: ...ee the appro priate reference manual A A A A Press the User Tools Counter key The User Tools Main Menu ap pears B B B B Press the 0 0 0 0 or 1 1 1 1 key until 2 Sys tem Settings is displayed and then press the OK key Note To view the total number of prints made by the machine see p 14 Printing the Counter Value To switch the display language select 6 Language and then press the OK key Press the 0 ...

Page 210: ...ettings You Can Change with the User Tools Note OK Press to make the new settings and return to the previ ous menu Cancel Press to return to the previous menu without chang ing any data Exiting from the User Tools A A A A After changing the user tools set tings press the User Tools Counter key Printing the Counter Value A A A A Press the User Tools Counter key B B B B Make sure 1 Counter is dis pl...

Page 211: ...r Tools Menu System Settings 15 2 User Tools Menu System Settings 1 Displays when the optional paper tray unit is equipped with your machine Stella EN SysF_V4_FM book Page 15 Wednesday July 4 2001 1 29 PM ...

Page 212: ...y after your job is finished This function is called System Reset When you set the time select 1 On Off to On and then set 2 Tim er to the desired time The time can be set from 10 to 999 seconds Note Default On 60 seconds You can specify the prioritized mode with the user tools See 1 Function Priority 4 Energy Saver Timer The machine enters Low Power mode automatically after your job is finished a...

Page 213: ...ected time is up This function is called Auto Off The time can be set from 1 to 240 minutes Note Default 30 minutes Auto Off might not be effective when an error message is dis played To return to the ready condition from Auto Off the machine re quires the same warm up time as the time for becoming ready after power is turned on When the machine receives a fax or printer data in Auto Off mode it a...

Page 214: ...y unit Note Default Tray 1 10Auto Tray Switch for Copy mode only If you load paper of the same size and direction in two trays the machine automatically switches to another tray when the tray in use runs out of paper You can set or cancel this setting The op tional paper tray unit is required to use this setting Note Default On 11Display Contrast You can adjust the brightness of the panel display ...

Page 215: ...16 F Facsimile Mode 3 9 Function Priority 16 K Keys for User Tools System Settings 11 M Measurement Unit 18 Modes 5 Multi access 6 N Number keys 12 O OK key 11 Operation switch 12 P Panel display 11 Paper Tray Priority 18 Printer Mode 3 10 S Start key 12 System Reset 16 T Tray Paper Size 17 U User Tools Counter key 11 User Tools System Settings 11 Stella EN SysF_V4_FM book Page 19 Wednesday July 4...

Page 216: ...20 UE USA B045 MEMO Stella EN SysF_V4_FM book Page 20 Wednesday July 4 2001 1 29 PM ...

Page 217: ...rating Instructions Facsimile Reference Basic Features Read this manual carefully before you use this product and keep it handy for future reference For safety please follow the instructions in this manual ...

Page 218: ... guarantee that interference will not occur in a particular installation If this equipment does cause harmful interference to radio or television reception which can be deter mined by turning the equipment off and on the user is encouraged to try to cor rect the interference by one more of the following measures Reorient or relocate the receiving antenna Increase the separation between the equipme...

Page 219: ...is sent and an identification of the business other entity or other individual sending the message and the telephone number of the sending machine or such business other entity or individual This information is transmitted with your document by the TTI Transmit Terminal Identification feature In order for you to meet the requirement your machine must be programmed by following the instruc tions in...

Page 220: ...uctions Certalnes mesures de sécurité doivent être prises pendant l utilisation de matéri al téléphonique afin de réduire les risques d incendle de choc électrique et de blessures En voici quelquesunes Ne pas utiliser l appareil près de l eau p ex près d une balgnoire d un lava bo d un évier de cuisine d un bac à laver dans un sous sol humide ou près d une piscine Éviter d utiliser le téléphone sa...

Page 221: ...ctions under this symbol Be sure to read the instructions all of which are described in the Safety Information section in the Copy Reference manual The statements above are notes for your safety Important If this instruction is not followed paper might be misfed originals might be damaged or data might be lost Be sure to read this Preparation This symbol indicates the prior knowledge or preparatio...

Page 222: ...tored in memory and checking the con tents of any files in memory Chapter 3 Other Transmission Features Explains about useful features for transmission You can find out about dial ing numbers easily Chapter 4 Reception Features Explains about reception features You can find out about screening out mes sage from anonymous senders Chapter 5 Facsimile User Tools Explains about programming frequently ...

Page 223: ... the Exposure Glass 14 Loading Originals in the Document Feeder 14 Original Sizes Difficult to Detect 15 Memory Transmission 16 Canceling a Memory Transmission 19 Before the Start Key is Pressed 19 While the Original is Being Scanned 19 During Transmission 19 While the Original is Awaiting Transmission 20 Immediate Transmission 21 Canceling an Immediate Transmission 23 Before the Start key is Pres...

Page 224: ... label 42 Speed Dial 44 Registering 44 Editing 46 Deleting 47 Groups 49 Registering 49 Editing 52 Deleting 55 Entering Characters 59 Available Characters 59 Keys 59 How to Enter Characters 60 4 Troubleshooting Adjusting Volume 61 Error Messages 63 When the Facsimile key is Lit in Red 64 When the Receive File Indicator is Lit 65 Solving Problems 66 INDEX 67 StellaCEN basic_V4_FM book Page vii Thurs...

Page 225: ...viii StellaCEN basic_V4_FM book Page viii Thursday July 19 2001 1 39 PM ...

Page 226: ...opies minute A4 81 2 11 13 copies minute A4 81 2 11 13 copies minute A4 81 2 11 Paper Capacity for Bypass Tray 1 sheet 100 sheets 100 sheets Paper Tray Unit Not available Option Option Fax Unit Option Option Standard Document Feeder Option Option Standard StellaCEN basic_V4_FM book Page 1 Thursday July 19 2001 1 39 PM ...

Page 227: ...the expo sure glass 4 Handset Option This permits voice communication 5 main power switch If the machine does not operate after turning on the operation switch check if the main power switch is turned on If it is off turn it on However if the machine is installed with the fax option do not turn the main power switch off Note The main power switch is normally set by your service representative Do n...

Page 228: ...e On indicator goes off See p 6 Turning On the Power 7 Paper Tray Set paper here 8 Paper Tray Unit Option for Mod el B Only You can set more paper here Side View 1 Bypass Tray A fax message can be printed on the pa per placed here Model B only 2 External Telephone Connector 3 G3 Line Connector StellaCEN basic_V4_FM book Page 3 Thursday July 19 2001 1 39 PM ...

Page 229: ...peration or return to the previous display 9 LCD display This guides you through tasks and in forms you of the machine status A mes sage appears here 10 0 0 0 0 1 1 1 1 keys Press to move the cursor or select func tions 11 OK key Press to answer Yes to a question dis played on the display 12 User Tools key Press to enter User Tools mode These tools allow you to customize the default settings 13 Cl...

Page 230: ...r A pause cannot be inserted as the first digit Redial Press to redial one of the last ten num bers 22 On Hook Dial key Use to dial a number from the numeric keypad without having to lift the hand set 23 Image Density keys i i i i and j j j j Use to change the setting of image densi ty 24 Original Type key Press to select original type Text or Pho to When the original type is selected the correspo...

Page 231: ... main power switch is turned on If it is off turn it on Important Fax files stored in memory can be kept for 12 hours after the main power is switched off if the ma chine has been on for at least a week However if the surround ing temperature is low the storage time might be shorter If you leave the main power switch off for more than 12 hours all fax files in memory are deleted See p 7 Turning Of...

Page 232: ...ax documents cannot be received Nor mally only the service representative operates this switch When you have to turn off this switch for some rea son follow the procedure below Important Make sure that 100 is shown on the Fax standby display before you turn the main power switch off or you unplug the power cord Fax files programed in memory will be deleted 12 hours after you turn the main power sw...

Page 233: ...csimile mode immediately after the oper ation switch is turned on See Chapter 2 Settings You Can Change with the User Tools in the System Settings manual Limitation You cannot switch modes under the following circumstances While scanning with fax During Immediate Transmission While editing the System Settings While using On Hook Dial StellaCEN basic_V4_FM book Page 8 Thursday July 19 2001 1 39 PM ...

Page 234: ...t Timer See Chapter 5 Setting the Fax Reset Timer in the Advanced Features manual Reading the Display and Using Keys A Display for the machine status or currently selected function B Display for the messages Items which can be selected or specified C Display for items which can be selected Note Press 0 or 1 to display another function on the LCD display or move the brackets to select another value...

Page 235: ...press the User Tools key or the Cancel key Communication Display While the machine is communicating the status is displayed Display during Memory Transmission or Reception The destination s name or fax number appears on the top of the LCD display Note Even when the machine is sending or receiving a fax message from into memory you can still scanthenextoriginalintomemory Immediate Transmission Disp...

Page 236: ... you would like to send a document immedi ately and would like to check whether you have successfully connected with the other party s fax machine A fax document is not stored in memory Important If there is a power failure the pow er switch is turned off or the plug is pulled out for more than 12 hours all documents stored in memory are deleted As soon as power is restored the Power Fail ure Repo...

Page 237: ...smission is selected Note You can set whether the machine is in Memory Transmission mode or Immediate Transmission mode right after the power is turned on with the User Parameters See Chapter 6 User Parameters in the Advanced Features manual Switch 00 Bit 6 You can set whether the Transmis sion mode returns to the default mode after each transmission with the User Parameters See Chapter 6 User Par...

Page 238: ...e size and direction of paper used in the receiver s terminal If the receiver does not use paper of the same size and direction as that of the original the fax image size may be reduced on output trimmed at the both edges or di vided into two or more sheets When sending an important origi nal we recommend that you ask the receiver about the size and di rection of the paper used in their terminal M...

Page 239: ...der to scan in a stack of originals in one operation The Document Feeder can handle sin gle sided originals Limitation The maximum document length is 1260mm 49 6 with manual assis tance Place all the originals to be sent in a single stack You cannot set originals in the Document Feeder one page at a time or in sheaves Do not open the Document Feeder while it is scanning the originals or your docum...

Page 240: ... such as thermosensitive paper art paper aluminum foil carbon pa per or conductive paper Originals with index tabs tags or other projecting parts Sticky originals such as translu cent paper Thin and soft originals Originals of inappropriate weight Originals in bound form such as books Transparent originals such as OHP transparencies or translucent paper Original Sizes Difficult to Detect The machi...

Page 241: ... the operation switch off files are not deleted Limitation If memory is full 0 appears on the display Memory Transmis sion is disabled Use Immediate Transmission instead Note Maximum number of Memory Transmission files 133 Maximum number of destinations per Memory Transmission 133 Combined total number of desti nations that can be stored 300 The theoretical maximum number of destinations you can e...

Page 242: ...ls C C C C Select any scan settings you re quire See p 24 Scan Settings D D D D Dial If you wish to send the same message to more than one desti nation press the OK key and then dial another destination Re peat this step for all destinations If you make a mistake press the Clear Stop key and then enter the correct number again Note When specifying a destination using a Quick Dial the destina tion ...

Page 243: ... C C C C Press the Start key The machine starts scanning the original D D D D Place the next original on the exposure glass within 60 sec onds after the machine has fin ished scanning the first original Note Repeat steps C to D for all pages E E E E Press the q q q q key to finish StellaCEN basic_V4_FM book Page 18 Thursday July 19 2001 1 39 PM ...

Page 244: ...a trans mission after the original has been scanned Limitation If transmission finishes while you are carrying out this procedure it will not be canceled Note If you cancel a message while it is being sent transmission is halted as soon as you finish this proce dure However some pages of your message may have already been sent and will be received at the other end A A A A Make sure that the machin...

Page 245: ... the transmis sion The transmission may be sent before you can cancel it even if you start canceling the transmis sion before it is fully sent A A A A Press the Job Information key and confirm that 1 Cancel TX RX is displayed B B B B Press the OK key C C C C Display the file you want to de lete Enter the file number with the num ber keys or search using 0 or 1 If you are unable to find the file it...

Page 246: ... on with the User Parameters The machine does not redial with immediate transmission A A A A Check that the Memory Trans mission indicator is not lit If it is lit press the Memory Trans key B B B B Set your original Reference p 13 Setting Originals C C C C Select any scan settings you re quire See p 24 Scan Settings D D D D Dial If you make a mistake press the Clear Stop key and then enter the cor...

Page 247: ...face down on the exposure glass B B B B Dial C C C C Press the Start key The machine starts scanning the original D D D D Place the next original on the exposure glass within 10 sec onds after the machine has fin ished scanning the first original Note Repeat steps C to D for all originals E E E E Press the q q q q key to finish StellaCEN basic_V4_FM book Page 22 Thursday July 19 2001 1 39 PM ...

Page 248: ...ady set the original you can also cancel an Immediate Transmission by re moving the original from the machine After the Start key is Pressed A A A A Press the Clear Stop key and then remove the original Note If the transmission finishes while you are carrying out this procedure it will not be can celed StellaCEN basic_V4_FM book Page 23 Thursday July 19 2001 1 39 PM ...

Page 249: ...als containing nor mal sized characters Detail 8 7 7lines mm 200 200dpi Select for originals containing small characters or when you re quire greater clarity This resolu tion is twice as fine as Standard Fine 8 15 4lines mm 200 400dpi Select for originals with very fine details or when you require the best possible image clarity This resolution is four times as fine as Standard Limitation If the o...

Page 250: ...a fax message with Photo and the background of the received image is dirty reduce the density setting and re send the fax When the machine is turned on or modes are cleared the Original Type is set to Text You can set whether the machine returns to the Original Type de fault setting after every transmis sion with the User Parameters See Chapter 6 User Parameters Switch 01 Bit 7 in the Advanced Fea...

Page 251: ...The digits appear on the display as you enter them Note If you make a mistake press the Clear Stop key and enter again If you wish to send this message to more than one destination press the OK key and then en ter the next destination D D D D Press the Start key Limitations when dialing with the number keys Fax numbers entered with the num ber keys are stored in internal memo ry separate from memo...

Page 252: ...rs stored in Quick Dials and Speed Dials Tone This function allows a machine con nected to a pulse dialing line to send tone signals for example if you want to use a special service on a tone dial ing line When you press the p p p p key the machine dials the number us ing tone signals Limitation You cannot place a tone before the first digit of a fax number Some services may not be available when ...

Page 253: ...destination s fax number in a Speed Dial beforehand Additionally you can store a name for the destination in Speed Dials Note To register edit or delete Speed Dial entries see p 44 Speed Dial To check the contents of all Speed Dials print the Speed Dial list See Chapter 5 Printing Reports Lists in the Advanced Features manual You can use codes 00 49 for Speed Dials If a search letter is registered...

Page 254: ... for specifying Groups differs according to the way they were programmed When programmed in a Quick Di al Press the Quick Dial key When not programmed in a Quick Dial First Program the Group function in a User Function key F1 to F3 When you want to specify a destination press the User Function key in which the Group Function is programmed and then press the Group number with the number keys See Ch...

Page 255: ...Specifying a Group with the Group key Make sure that the Memory Trans mission indicator is lit if not press the Memory Trans key to light it Note You must program the Group function in a User Function key be forehand See Chapter 5 User Function Keys in the Advanced Features manual A A A A Make sure that the machine is in standby mode B B B B Set your original and select any scan settings you requi...

Page 256: ...machine rings a number of times You can answer the call while the machine is ring ing If you do not answer the call the machine automatically chang es to receive fax messages Note You can change the number of rings See Chapter 5 Setting the Auto Ring Time in the Ad vanced Features manual When the other party send a fax message the machine changes to receive the fax message auto matically You can c...

Page 257: ...ve a different ringing pattern This is use ful for distinguishing a fax from a telephone call Please contact your telephone compa ny for details After making a contract with your telephone company turn this func tion on with the User Parameters Switch12 Bit1 Note When Distinctive Ring is set Re ception Mode can not be selected StellaCEN basic_V4_FM book Page 32 Thursday July 19 2001 1 39 PM ...

Page 258: ...2 characters long and is printed on the header of ev ery page you send Own Fax Number Required by inter national law This is your fax machine s phone number which must include coun try and area codes in 20 characters or less During any communica tion your Own Fax Number ap pears on their display Conversely their Own Fax Number appears on your display Note In some areas the Own Fax Number is prepro...

Page 259: ... F F Press 0 0 0 0 or 1 1 1 1 until 6 Fax Infor mation is displayed G G G G Press the OK key Confirm that 1 Own Name is displayed H H H H Press the OK key I I I I Enter your Own Name Note If you want to erase a character in the name press the Clear Stop key Reference See p 59 Entering Charac ters for how to enter characters J J J J Press the OK key Your Own Name is programmed K K K K Press 0 0 0 0...

Page 260: ...Country Code Your Area Code do not insert a pause after your Area Code followed by your tele phone number Check the Inter national Dialing Prefix and the Country Code with your local telecommunications operator Characters you can enter include numerals 0 9 plus signs and spaces R R R R Press the OK key Your Own Fax Number is pro grammed S S S S Press the User Tools key to re turn to standby displa...

Page 261: ...J J Press the Clear Stop key and then reenter the Number or Name K K K K Press the OK key L L L L Press the User Tools key to re turn to standby display Deleting The following procedure describes how to delete initial settings A A A A Press the User Tools key B B B B Press 0 0 0 0 or 1 1 1 1 until 4 Fax Fea tures is displayed C C C C Press the OK key D D D D Press 0 0 0 0 or 1 1 1 1 until 3 Setup ...

Page 262: ... G G G G Press the OK key H H H H Press 0 0 0 0 or 1 1 1 1 to select the item that you want to delete I I I I Press the OK key J J J J Press the Clear Stop key K K K K Press the OK key L L L L Press the User Tools key to re turn to standby display StellaCEN basic_V4_FM book Page 37 Thursday July 19 2001 1 39 PM ...

Page 263: ... Quick Dial list and keep it when you program or change fax num bers See Chapter 5 Printing Re ports Lists in the Advanced Features manual Limitation When a registered Quick Dial key is being used for a standby Memo ry Transmission the message This Dial is in Use Cannot Change is shown and you can not change the destination for this key Note You can confirm fax numbers stored in Quick Dials on the...

Page 264: ...r Function key that contains the Dial Option You can specify SUB or SEP SID and PWD See Chapter 3 SEP Code or SUB Code in the Advanced Features manual H H H H Press the OK key The fax number is programmed I I I I Enter the destination name Note Under rare circumstances gar bled characters may appear during name registration if you use the Pause Redial key to display the fax number of par ties loca...

Page 265: ... want to edit Press a Quick Dial key or search using 0 or 1 G G G G Press the OK key H H H H Press the Clear Stop key and then reenter the fax number with the number keys Note If you make a mistake press the Clear Stop key and try again If you press the Pause Redial key the last 10 fax numbers di aled are displayed Press 0 or 1 to select the fax number you want to specify and then press the OK key...

Page 266: ...printed on the fax when it is received at the other end See Chapter 1 Label Insertion in the Advanced Fea tures manual M M M M Press the OK key If you want to store another Quick Dial go to step E N N N N Press the User Tools key to re turn to standby display Deleting The following procedure describes how to delete fax numbers registered in Quick Dial keys Limitation When a Quick Dial key is being...

Page 267: ...want to delete another Quick Dial key go to step F I I I I Press the User Tools key to re turn to standby display Quick Dial Key Label Dial label You can print a template that can be used to make labels for Quick Dial keys The template will have destina tion or Group names programmed in Quick Dial keys Limitation Set the label paper to landscape in the Bypass Tray Portrait position will print the ...

Page 268: ...Quick Dial 43 3 Label paper 1 Quick Dial key number 2 Destination name StellaCEN basic_V4_FM book Page 43 Thursday July 19 2001 1 39 PM ...

Page 269: ...Speed Dial list and keep it when you register or change a destination Limitation When a registered Speed Dial is be ing used for a standby Memory Transmission the message This Dial is in Use Cannot Change is shown and you cannot change the destination for this Quick Dial Note You can specify codes 00 to 49 You can confirm the contents of Speed Dial numbers in the Speed Dial List See Chapter 5 Prin...

Page 270: ...the OK key I I I I Press the OK key The fax number is programmed J J J J Enter the Destination name Note If a destination name is already registered in the Speed Dial the name is shown on the display If you wish to change the destina tion name press the Clear Stop key and then enter another name K K K K Press the OK key The search letter is registered L L L L Press 0 0 0 0 or 1 1 1 1 to select On ...

Page 271: ...49 Enter the Speed Dial number with the number keys or search using 0 or 1 H H H H Press the OK key I I I I Press the Clear Stop key and then reenter a fax number with the number keys Note If you make a mistake press the Clear Stop key and try again If you press the Pause Redial key the last 10 fax numbers di aled are displayed Press 0 or 1 to select the fax number you want to specify and then pre...

Page 272: ...the User Tools key to re turn to standby display Deleting The following procedure describes how to delete fax numbers in Speed Dials Limitation If a registered Speed Dial is being used for a standby Memory Trans mission the message This Dial is in Use Cannot Delete is shown and you cannot delete the destination for this Speed Dial A A A A Press the User Tools key B B B B Press 0 0 0 0 or 1 1 1 1 u...

Page 273: ...r the Speed Dial number with the number keys or search using 0 or 1 The Speed Dial number and the fax number or name are displayed H H H H Press the OK key The programmed data fax num ber and name is deleted If you want to delete another name go to step F I I I I Press the User Tools key to re turn to standby display StellaCEN basic_V4_FM book Page 48 Thursday July 19 2001 1 39 PM ...

Page 274: ... be stored in a Group key thus leaving the Quick Dial keys to be used more effectively Registering You can register the following items in a Group Destination fax numbers Group name up to 20 characters You can enter destination numbers by Quick Dial keys Speed Dials or the number keys Note You can register up to 5 Groups The maximum number of destina tions you can register in a Group is 133 The co...

Page 275: ...s displayed F F F F Press the OK key G G G G Display the number of the Group you want to register 1 to 5 Enter the group number with the number keys or search using 0 or 1 Note If you make a mistake press the Cancel key and try again If a group has already been stored the contents are dis played Press 0 or 1 to select a group number that is not pro grammed and then press the OK key If a group is p...

Page 276: ...tions you want to register in the Group M M M M Enter the Group name Note If the Group name is already registered it is shown on the display If you wish to change the Group name press the Clear Stop key and then enter another name N N N N Press the OK key to register the Group O O O O Press 0 0 0 0 or 1 1 1 1 to select Yes or No to be programmed in the Quick Dial key Then press the OK key If you s...

Page 277: ...layed C C C C Press the OK key Confirm that 1 Program Delete is displayed D D D D Press the OK key E E E E Press 0 0 0 0 or 1 1 1 1 until 5 Prog Group Dial is displayed F F F F Press the OK key G G G G Display the number of the group you want to edit 1 to 5 Enter the group number with the numberkeys orsearchusing0or1 H H H H Press the OK key I I I I Press 0 0 0 0 or 1 1 1 1 to select No J J J J Pr...

Page 278: ...key O O O O Press the OK key If you want to program another group name go to step F P P P P Press the User Tools key to re turn to standby mode Adding a Fax Number to a Group A A A A Press the User Tools key B B B B Press 0 0 0 0 or 1 1 1 1 until 4 Fax Fea tures is displayed C C C C Press the OK key Confirm that 1 Program Delete is displayed D D D D Press the OK key E E E E Press 0 0 0 0 or 1 1 1 ...

Page 279: ...of the following three methods Enter the fax number with the number keys Press a Quick Dial key Press the Speed Dial key and en ter a Speed Dial number Note If you specify a Quick Dial or Speed Dial that is not pro grammed This key is Not Programmed is displayed Re specify the destination N N N N Press the OK key The destination is added O O O O To add another destination re peat steps K K K K to ...

Page 280: ...step F V V V V Press the User Tools key to re turn to standby mode Deleting The following procedure describes how to delete a destination from a group When you delete a destination from a group programmed in a Quick Dial or a Speed Dial the contents of the Quick Dial or Speed Dial are not deleted To delete a destination from a group A A A A Press the User Tools key B B B B Press 0 0 0 0 or 1 1 1 1...

Page 281: ...M M Press 0 0 0 0 or 1 1 1 1 to display the desti nation you want to delete N N N N Press the OK key To delete another destination re peat steps L to N O O O O If you are finished deleting destina tions press 0 0 0 0 or 1 1 1 1 to select Exit P P P P Press the OK key Q Q Q Q Press the OK key R R R R Press 0 0 0 0 or 1 1 1 1 to select Yes if the group was programmed in a Quick Dial or select No if ...

Page 282: ... is displayed C C C C Press the OK key Confirm that 1 Program Delete is displayed D D D D Press the OK key E E E E Press 0 0 0 0 or 1 1 1 1 until 6 Del Group Dial is displayed F F F F Press the OK key G G G G Display the number of the group you want to delete 1 to 5 Enter the group number with the numberkeys orsearchusing0or1 H H H H Press the OK key The entire Group is deleted I I I I Press the U...

Page 283: ...Dial E Press the OK key F Enter the group number 1 to 5 G Press the OK key H Press 0 or 1 to select No and then press the OK key I Press the OK key J If you want to change the Quick Dial key press Yes and if you want to delete the Quick Dial key press No K Press the OK key If you selected No in step I the Quick Dial key is deleted Go to step M L If you want to change the Quick Dial key press the n...

Page 284: ...press Quick Dial 01 let ters in display are changed A B C A as you press the key Press 1 to move cursor and enter next one 2 Shift key Quick Dial 14 Use to switch between upper and lower case 3 Space key Quick Dial 15 Press to enter a space 4 Symbol key Quick Dial 16 Press to enter symbols 5 0 0 0 0 or 1 1 1 1 Use to move the cursor left or right and select the symbol 6 Number keys Use to enter nu...

Page 285: ... position B B B B Press the OK key Wild Cards When you register other party s Own Name or Own Fax Numbers for mul tiple destinations you can register a sequence of characters common to these identifications as a wild card in stead of registering every identifica tion If a destination has an Own Name or Own Fax Numbers containing a wild card the machine determines that the destination matches the r...

Page 286: ...ds when keys on the Control panel are pressed Alarm The sound to signal something go ing amiss A A A A Press the User Tools key B B B B Press 0 0 0 0 or 1 1 1 1 until 4 Fax Fea tures is displayed C C C C Press the OK key Confirm that 1 Program Delete is displayed D D D D Press 0 0 0 0 or 1 1 1 1 until 3 Setup is displayed E E E E Press the OK key Confirm that 1 Monitor Volume is displayed F F F F ...

Page 287: ...1 to adjust the vol ume I I I I Press the OK key The volume is adjusted If you want to adjust another item repeat steps G to I J J J J Press the User Tools key to re turn to standby display StellaCEN basic_V4_FM book Page 62 Thursday July 19 2001 1 39 PM ...

Page 288: ...resend the original Note There may be a problem with the machine or the telephone line for example noise or cross talk If the error re occurs frequently contact your service representative Reset Original s and press Start Original jammed during Memory Transmis sion Reset originals that have not been scanned Memory is Full Storing Stopped After you press the OK key you can select whether to transmi...

Page 289: ...ge If h is lit refer to the table below and take the appropriate action Problem Solution Paper has run out Add paper See Chapter 3 Loading Paper in the Copy Reference A facsimile error has occurred The facsimile has a problem Contact a service representative The copier function will still work normally StellaCEN basic_V4_FM book Page 64 Thursday July 19 2001 1 39 PM ...

Page 290: ... out h is lit red Add paper See Chapter 3 Loading Paper in the Copy Reference Toner is empty h is lit red Replace the toner cartridge See Chapter 3 Changing the Toner Cartridge in the Copy Reference Note Even if there is no toner left you can still send fax messages Paper is jammed h is lit red Remove the jammed paper See Chapter 3 Clearing Misfeeds in the Copy Reference Cover is open h is lit red...

Page 291: ...eginning to run out Replace the toner cartridge soon Reference See Chapter 3 Changing the Toner Cartridge in the Copy Reference Message appears blank at the other end The original was set upside down Set it properly Reference See p 13 Setting Originals You want to cancel a Memory Trans mission If the original is being stored press the Clear Stop key Reference See p 19 Canceling a Memory Transmissi...

Page 292: ...ng Quick Dials 27 Using Speed Dials 28 Dial label 42 Display 9 Document Feeder ADF 2 14 E Editing Fax Header 35 Groups 52 Own Fax Number 35 Own Name 35 Quick Dial 40 Speed Dial 46 Entering Characters 59 Error Messages 63 Exposure Glass 2 14 Exposure Glass Cover 2 External Telephone Connector 3 F Facsimile key 4 8 64 Fax Header 33 Editing 35 Registering 34 Faxing 11 Fine 24 Front View 2 G G3 Line C...

Page 293: ...g 40 Registering 38 Quick Dial keys 4 R Receive File Indicator 4 65 Reception Mode Selecting 31 Reception Modes Auto Receive 31 Auto Select 31 Manual Receive 31 Registering Fax Header 33 Groups 49 Own Fax Number 33 Own Name 33 Quick Dial 38 Speed Dial 44 Resolution 24 Resolution key 5 RTI Own Name 33 S Scan Settings 24 Setting Originals 13 Side View 3 Solving Problems 66 Speed Dial 44 46 47 Deleti...

Page 294: ...69 V Volume 61 W Wild Cards 60 StellaCEN basic_V4_FM book Page 69 Thursday July 19 2001 1 39 PM ...

Page 295: ...70 MEMO StellaCEN basic_V4_FM book Page 70 Thursday July 19 2001 1 39 PM ...

Page 296: ...71 MEMO StellaCEN basic_V4_FM book Page 71 Thursday July 19 2001 1 39 PM ...

Page 297: ...72 UE USA B465 MEMO StellaCEN basic_V4_FM book Page 72 Thursday July 19 2001 1 39 PM ...

Page 298: ...aper thickness 2 3 680000 mm Operating Instructions Facsimile Reference Advanced Features Operating Instructions Facsimile Reference Advanced Features Read this manual carefully before you use this product and keep it handy for future reference For safety please follow the instructions in this manual Printed in China UE USA B465 8657 ...

Page 299: ...tions under this symbol Be sure to read the instructions all of which are described in the Safety Information section in the Copy Reference manual The statements above are notes for your safety Important If this instruction is not followed paper might be misfed originals might be damaged or data might be lost Be sure to read this Preparation This symbol indicates the prior knowledge or preparation...

Page 300: ...and machine Chapter 2 Faxing Explains basic transmission You can also learn about other types of transmis sions Chapter 3 Registering Explains how to make initial settings such as the Own Name and Own Fax Number settings Also explains the Quick Dial Speed Dial and Group keys These keys allow you to store numbers and save time when dialing This chapter also explains how to enter letters and symbols...

Page 301: ...age 12 Printing the Journal 13 Report Formats 14 3 Other Transmission Features Handy Dialing Functions 15 Chain Dial 15 Telephone Directory 16 Redial 16 On Hook Dial 17 Manual Dial 18 Transmission Features 19 SEP Code 19 SUB Code 20 More Transmission Functions 22 If Memory Runs Out While Storing an Original 22 Checking the Transmission Result 22 Broadcasting Sequence 23 Sending a Fax Message Immed...

Page 302: ...ax Reception Power up 29 Printing Options 30 Center Mark 30 Checkered Mark 30 TSI Print 30 Reception Time 31 Page Separation and Length Reduction 31 When There is No Paper of the Correct Size 32 5 Facsimile User Tools User Function Keys 35 Functions You Can Assign to User Function Keys 35 Making a User Function Key Assignment 36 Using a User Function Key 37 Deleting a User Function Key 37 Printing...

Page 303: ...Troubleshooting Reading Reports 71 Error Report 71 Power Failure Report 71 8 Appendix Connecting to a Telephone Line and a Telephone 73 Connecting the Optional Handset and an External Telephone 74 Specifications 75 Base Machine 75 Available Options 76 Originals 76 Maximum Values 78 Advanced Transmission Features 79 Job Information 80 User Tools 81 Key Operator Tools 83 INDEX 84 StellaCEN advanced_...

Page 304: ...vi StellaCEN advanced_V4_FM book Page vi Tuesday July 17 2001 1 01 PM ...

Page 305: ...he Transmission Option key D D D D Confirm that 1 Send Later is displayed E E E E Press the OK key F F F F Press 0 0 0 0 or 1 1 1 1 to select On G G G G Press the OK key H H H H Press 0 0 0 0 or 1 1 1 1 to select AM or PM I I I I Press the OK key J J J J Enter the time that you want to send the fax message with the number key Enter the hour setting 1 to 12 Then press 0 or 1 Then enter a 2 digit nu...

Page 306: ...he destination If you want to specify another des tination press the OK key and repeat step L M M M M Press the Start key Note You can cancel a message trans mission set for Send Later See p 9 Canceling Transmission or Reception StellaCEN advanced_V4_FM book Page 2 Tuesday July 17 2001 1 01 PM ...

Page 307: ... number and switch on Fax Header Print with the User Parameters See p 58 User Parameters Switch06 Bit0 A A A A Make sure that the machine is in Facsimile mode and the standby display is shown B B B B Place your original and then se lect any scan settings you require C C C C Press the Transmission Option key The Transmission Option menu appears D D D D Press 0 0 0 0 or 1 1 1 1 until 2 Fax Header Pr...

Page 308: ...r on the page From is automatically inserted before your personal code This function is available when per sonal code is registered and the Re stricted Access is turned on 1 Name that is registered in the Quick Dial or Speed Dial key 2 Name that is assigned to the Per sonal Code Reference To program the Label Insertion function in the Quick Dial see Chapter 3 Quick Dial in the Ba sic Features manu...

Page 309: ...with matching ID s If no ID s match any messages that does not require an ID are received Free Polling Limitation Polling Reception requires that the other machine can perform Polling Transmission To receive a message sent by any Secured Polling Transmission or Stored ID Override Polling Trans mission it is necessary to specify the same Polling ID as the sender s To receive a message sent by Se cu...

Page 310: ...he Quick Dial keys You can enter 0 to 9 by the number keys 0000 and FFFF can not be en tered If you make a mistake press the Clear Stop key and try again H H H H Press the OK key I I I I Specify the other party s fax num ber J J J J Press the Start key Polling Documents from Other Manufacturer s Fax Machines Standard Polling Reception only works with machines of the same manufacturer that have the...

Page 311: ...arameters See p 58 User Parameters Switch03 Bit3 Communication Result Report Polling RX This report is printed after a Polling Reception has been completed and shows the result of the Polling Recep tion You can check the date and time Oth er party s name and result with this report Note You can also check the result of a Polling Reception with the Journal You can turn this function on or off with ...

Page 312: ...Transmission Options 8 1 StellaCEN advanced_V4_FM book Page 8 Tuesday July 17 2001 1 01 PM ...

Page 313: ...ored in memory Reference For details about Memory Trans mission and Polling Reception see Chapter 2 Memory Transmis sion in the Basic Features manual and p 5 Calling to Request a Mes sage Polling Reception A A A A Make sure that the machine is in Facsimile mode and the standby display is shown B B B B Press the Job Information key Confirm that 1 Cancel TX RX is displayed C C C C Press the OK key D...

Page 314: ...l stored in memory can also be printed See p 11 Printing a Stored Message Print TX File A A A A Make sure that the machine is in Facsimile mode and the standby display is shown B B B B Press the Job Information key C C C C Press 0 0 0 0 or 1 1 1 1 until 2 Print File List is displayed D D D D Press the OK key E E E E Press the Start key The File List is printed out and the machine returns to the st...

Page 315: ...he Information menu is shown C C C C Press 0 0 0 0 or 1 1 1 1 until 3 Print TX File is displayed and then press the OK key D D D D Display the file you want to print The registered name or fax number appears on the lower line Note Enter the file number with the number keys or search using 0 or 1 If you make a mistake press the Cancel key and try again E E E E Press the OK key F F F F Press the Sta...

Page 316: ...f this function is switched on If the main power switch is turned off for more than 12 hours all mes sages protected by Memory Lock are deleted If this happens use the Power Failure Report to identify which messages have been lost See p 71 Power Failure Report A A A A Make sure that the machine is in Facsimile mode and the standby display is shown B B B B Press the Job Information key C C C C Pres...

Page 317: ...d to register a Specified Sender If you do not want the Journal to be printed automatically you can turn au tomatic printing off See p 58 User Parameters switch 03 bit 7 A A A A Make sure that the machine is in Facsimile mode and the standby display is shown B B B B Press the Job Information key C C C C Press 0 0 0 0 or 1 1 1 1 until 5 Print Journal is displayed D D D D Press the OK key E E E E Pr...

Page 318: ...des are explained on the bottom of the report 2 The Result Column OK Successful communication E An error occurred D Power Failure 3 The Footnote on the Journal Transmission counter Total number of transmitted pages Reception counter Total number of re ceived pages StellaCEN advanced_V4_FM book Page 14 Tuesday July 17 2001 1 01 PM ...

Page 319: ...on Maximum length of telephone or fax number 254 digits Note For Memory Transmission and Im mediate Transmission insert a pause between numbers For On Hook Dial and Manual Dial no pause is needed Reference For registering fax numbers to Speed Dials or Quick Dial keys See Chapter 3 Speed Dial or Quick Dial in the Basic Features manual A A A A Set your original and select any scan settings you requi...

Page 320: ...ey Note If you make a mistake press the Cancel key and try again If you wish to dial another des tination press the OK key and dial another fax number E E E E Press the Start key Redial The machine can recall the last 10 des tinations that have been dialed If you wish to send a message to a destina tion which you faxed recently the Re dial function saves you from finding and entering the number ag...

Page 321: ... make a mistake press the On Hook Dial key and re turn to step B Note You can change the volume of sound with 0 or 1 D D D D When the line is connected and you hear a high pitched tone press the Start key When the originals are placed on Document Feeder ADF the ma chine starts transmitting the origi nals The display will be that shown for step F Note If you hear a voice pick up the external teleph...

Page 322: ...ire B B B B Pick up the external telephone You will hear a tone C C C C Dial If you make a mistake replace the external telephone and try again from step B D D D D When the line is connected and you hear a high pitched tone press the Start key to send your fax message Note If the other party answers the phone inform them that you are sending a fax E E E E Replace the handset of the exter nal telep...

Page 323: ...s function are marked SEP on all reports When you send a fax message with SEP Code to other makers ma chines sometimes a password PWD is necessary Use PWD when it is necessary A A A A Dial the destination fax number using the number keys B B B B Press the User Function key as signed with the Dial Option func tion C C C C Press 0 0 0 0 or 1 1 1 1 until 2 SEP is displayed D D D D Press the OK key E ...

Page 324: ...be forehand See p 35 User Function Keys Note The ID can be up to 20 digits long and consist of numbers spaces q q q q and p p p p Make sure the ID matches the specification of the fax you are sending to You can store IDs in Quick Dials Speed Dials and Groups Messages you send using this function are marked SUB on all reports When you send fax message with SUB Code to other makers ma chines sometim...

Page 325: ...B B B Press 0 0 0 0 or 1 1 1 1 until 3 SID is displayed C C C C Press the OK key D D D D Enter the SID code with the number keys E E E E Press the OK key H H H H Press the Start key Note If you use Immediate Transmis sion and the destination fax ma chine does not support the Dial Option function a message will appear on the display to inform you of this In this case press the OK key to cancel the ...

Page 326: ...Transmission Result Turn on the printing of the Com munication Result Report if you want a report to be printed after every successful transmission See p 25 Printed Reports If you leave off the printing of the Communication Result Report the report will not be printed after ev ery transmission However should a transmission fail a Com munication Failure Report will be printed instead If you turn of...

Page 327: ... been sent to so far print the TX file list Automatic Redial If a fax message could not be trans mitted because the line was busy or an error occurred during transmis sion redialing is done 4 times at 5 minutes intervals these figures vary according to which country you are in If redialing fails after four redials the machine cancels the transmission and prints the Communication Result Re port or ...

Page 328: ...the orig inal faster than Immediate Transmis sion and is useful when you are in a hurry and need to use the original for another purpose Note You can switch this function on or off with the User Parameters See p 58 User Parameters Switch07 Bit2 Limitation Standard Memory Transmission is used instead of Parallel Memory Transmission in the following cas es When the line is busy and could not be conn...

Page 329: ...red Note File Reserve Report will not be printed with Parallel Memory Transmission Communication Result Report Switch 03 Bit 0 This report is printed when a Memo ry Transmission is completed so you can check the result of the transmis sion If two or more destinations are specified this report is printed after the fax message has been sent to all the destinations If the machine is set up not to pri...

Page 330: ...ans mission was successful or not If the machine is set up not to print this re port and the fax message could not be successfully transmitted the error re port is printed instead Note If the page was sent successfully the Page column gives the total number of pages that were sent successfully The Not Sent col umn gives the number of pages that could not be sent successfully StellaCEN advanced_V4_...

Page 331: ...inated Memory Reception The machine waits until all pages of the message have been received into memory before printing the message This method is used with Substitute Reception See p 28 Printing Docu ments that have been Received into Memory Substitute Reception Important All the messages stored in memory are deleted if the power is switched off for more than 12 hours The machine may not be able ...

Page 332: ...is ter minated Screening Out Messages from Anonymous Senders To help you screen out unwanted messages that may fill up your mem ory the machine can be programmed to only use Substitute Reception for messages that arrive with name or fax number identification Two settings are available When a name or fax number is re ceived Free Note When When a name or fax num ber is received is selected the ma ch...

Page 333: ...ction of Manual Recep tion is registered to the User Function Key press the User Function key and receive the message then go to H D D D D Make sure that the machine is in Facsimile mode and the standby display is shown E E E E Press the Start key F F F F Press 0 0 0 0 or 1 1 1 1 to select Receive G G G G Press the OK key H H H H Replace the handset Auto Fax Reception Power up This machine can be ...

Page 334: ...rs Checkered Mark When this function is turned on a checkered mark is printed on the first page of fax messages to help you sep arate them Note You can turn this function on or off with the User Parameters Switch 02 Bit 4 See p 58 User Parame ters TSI Print Usually the sender s Fax Header is printed on received messages If the sender has not programmed their Fax Header you will not be able to iden...

Page 335: ...lit and printed on several sheets or reduced and printed on a single sheet For example When the paper size is A4 L this function splits the message if the message length is 92mm 3 7 or longer than the paper used The message is re duced if it is less than 92mm 3 7 When the paper size is 81 2 11 L this function splits the message if the message length is 85mm 3 4 or longer than the paper used The me...

Page 336: ...re ceive a A5K size message check the A5K column of the table below The paper size at the top has the highest priority In this case since 81 2 11 L is a higher priority than A4L the message is printed on 81 2 11 L Priority Table KK and LL indicate that the message is split over two pages of paper with the orientation and size shown Page Reduction Disabled Reduction in Sub scan Direction Enabled Wi...

Page 337: ...itation The paper size used to print a received message may be different from the size of the sent original Reference p 31 Page Separation and Length Reduction StellaCEN advanced_V4_FM book Page 33 Tuesday July 17 2001 1 01 PM ...

Page 338: ...Reception Features 34 4 StellaCEN advanced_V4_FM book Page 34 Tuesday July 17 2001 1 01 PM ...

Page 339: ...sh to answer all calls yourself and decide whether they are fax messages or telephone calls See Chapter2 Reception Modes in the Basic Fea tures manual Reception Mode Use this mode to switch Reception modes See Chapter 2 Reception Modes in the Basic Fea tures manual Print Journal Use when you want to print out a Journal See p 13 Printing the Journal TX Result Report Use this to have a result report...

Page 340: ...F3 you want to assign H H H H Press 0 0 0 0 or 1 1 1 1 to display the func tion name you want to assign Dial Option Use this function to attach various information to a fax message See p 19 SEP Code p 20 SUB Code Batch Trans You can turn this function on or off b See p 23 Batch Trans mission Forwarding You can turn this function on or off b See p 52 Forwarding Prog Quick Dial Use when you want to ...

Page 341: ...nges for each as signed function Deleting a User Function Key To delete a User Function key per form the following procedure A A A A Press the User Tools key B B B B Press 0 0 0 0 or 1 1 1 1 until 4 Fax Fea tures is displayed C C C C Press the OK key D D D D Confirm that 1 Program Delete is displayed E E E E Press the OK key F F F F Press 0 0 0 0 or 1 1 1 1 until 7 User Func tions is displayed G G...

Page 342: ... to display None J J J J Press the OK key If you want to delete another User Function key repeat the above steps from step G K K K K Press the User Tools key The machine returns to standby mode StellaCEN advanced_V4_FM book Page 38 Tuesday July 17 2001 1 01 PM ...

Page 343: ...Group Dial List Quick Dial Label See Chapter 3 Quick Dial in the Basic Features manual User Function List See p 35 User Function Keys A A A A Press the User Tools key B B B B Press 0 0 0 0 or 1 1 1 1 until 4 Fax Fea tures is displayed C C C C Press the OK key D D D D Press 0 0 0 0 or 1 1 1 1 until 2 Reports Lists is displayed E E E E Press the OK key Printing the Journal A A A A Confirm that 1 Jou...

Page 344: ...l key and try again Printing the Group Dial List A A A A Press 0 0 0 0 or 1 1 1 1 until 3 Dial List is displayed B B B B Press the OK key C C C C Press 0 0 0 0 or 1 1 1 1 until 3 Group Dial List is displayed D D D D Press the OK key Note If you make a mistake press the Cancel key and try again Printing the All Lists You can print all Dial Lists Quick Dial List Speed Dial List and Group Dial List b...

Page 345: ...he Cancel key and try again Printing the User Function List A A A A Press 0 0 0 0 or 1 1 1 1 until 5 U Func tion List is displayed B B B B Press the OK key Note If you make a mistake press the Cancel key and try again F F F F Press the Start key G G G G Press the User Tools key The machine returns to the stand by display StellaCEN advanced_V4_FM book Page 41 Tuesday July 17 2001 1 01 PM ...

Page 346: ...ess the OK key D D D D Press 0 0 0 0 or 1 1 1 1 until 3 Setup is displayed E E E E Press the OK key F F F F Press 0 0 0 0 or 1 1 1 1 until 2 Display Contrast is displayed G G G G Press the OK key H H H H Press 0 0 0 0 or 1 1 1 1 to adjust the bright ness of the display I I I I Press the OK key J J J J Press the User Tools key to re turn to the standby display StellaCEN advanced_V4_FM book Page 42 ...

Page 347: ... D D D Press 0 0 0 0 or 1 1 1 1 until 3 Setup is displayed E E E E Press the OK key F F F F Press 0 0 0 0 or 1 1 1 1 until 3 Date Time is displayed G G G G Press the OK key H H H H Use the number keys to enter the year I I I I Press the OK key J J J J Press 0 0 0 0 or 1 1 1 1 to select the correct month K K K K Press the OK key L L L L Use the number keys to enter the correct number for the date 1...

Page 348: ...Q Press the OK key After Function Accepted flashes briefly in the display the next set ting is displayed R R R R Press the User Tools key to re turn to standby display StellaCEN advanced_V4_FM book Page 44 Tuesday July 17 2001 1 01 PM ...

Page 349: ... 1 1 1 until 4 Fax Fea tures is displayed C C C C Press the OK key D D D D Press 0 0 0 0 or 1 1 1 1 until 3 Setup is displayed E E E E Press the OK key F F F F Press 0 0 0 0 or 1 1 1 1 until 5 No of Rings is displayed G G G G Press the OK key H H H H Enter the new number using the number keys Note If you make a mistake press the Clear Stop key and try again I I I I Press the OK key J J J J Press t...

Page 350: ... 1 until 4 Fax Fea tures is displayed C C C C Press the OK key D D D D Press 0 0 0 0 or 1 1 1 1 until 3 Setup is displayed E E E E Press the OK key F F F F Press 0 0 0 0 or 1 1 1 1 until 7 Fax Reset Timer is displayed G G G G Press the OK key H H H H Press 0 0 0 0 or 1 1 1 1 to select a period of time I I I I Press the OK key J J J J Press the User tools key to return to the standby display Stella...

Page 351: ...B Press 0 0 0 0 or 1 1 1 1 until 4 Fax Fea tures is displayed C C C C Press the OK key D D D D Press 0 0 0 0 or 1 1 1 1 until 3 Setup is displayed E E E E Press the OK key F F F F Press 0 0 0 0 or 1 1 1 1 until 8 On Hook Timeout is displayed G G G G Press the OK key H H H H Press 0 0 0 0 or 1 1 1 1 to select a period of time I I I I Press the OK key J J J J Press the User tools key to return to st...

Page 352: ...Facsimile User Tools 48 5 StellaCEN advanced_V4_FM book Page 48 Tuesday July 17 2001 1 01 PM ...

Page 353: ...ers must enter the Personal Code This allows you to limit transmission to specified users p 63 Personal Codes 5 ID Code Allows you to register IDs required for various types of transmissions p 66 ID Code 6 Line Type Allows you to select tone or pulse dial ing to match the telephone line connect ed to your fax machine p 67 Line Type 7 PSTN Ac cess No Allows you to specify the code used to access an...

Page 354: ...n select to lock only messag es from Specified Users or you can select to lock messages from send ers other than from Specified Us ers See p 58 User Parameters switch 09 bits 1 and 0 A A A A Press the User Tools key B B B B Press 0 0 0 0 or 1 1 1 1 until 4 Fax Fea tures is displayed C C C C Press the OK key D D D D Press 0 0 0 0 or 1 1 1 1 until 4 Key Op Tools is displayed E E E E Press the OK key...

Page 355: ...eleting a Specified Sender for Memory Lock You can delete Specified Senders for this function A A A A Press 0 0 0 0 or 1 1 1 1 to select 3 De lete Sender B B B B Press the OK key C C C C Press 0 0 0 0 or 1 1 1 1 to select the name of the Specified Sender that you want to delete D D D D Press the OK key The Specified Sender is deleted If you want to delete more Spec ified Senders repeat from step B...

Page 356: ...nder Limitation This function only works if the in coming message is from another party that has been programmed as a Specified Sender The Forwarding function does not forward messages received with Polling Reception mode You cannot register a sender who does not have an Own Name or Own Fax Number You can register up to 30 senders for the Forwarding function You some times cannot register 30 sende...

Page 357: ...the OK key and then register a forwarding station by follow ing steps J to P on p 53 Regis tering Forwarding Stations K K K K Press the User Tools key to re turn to the standby display Registering Forwarding Stations You can register a Forwarding Station as follows A A A A Press the User Tools key B B B B Press 0 0 0 0 or 1 1 1 1 until 4 Fax Fea tures is displayed C C C C Press the OK key D D D D ...

Page 358: ...the OK key To register another Specified Send er repeat the above steps from step N To register a different Forwarding Station press the Cancel key and repeat the above steps from step I Limitation Names for Specified Senders can be up to 24 characters long Note You can confirm the names and fax numbers of Specified Send ers on the Journal You can confirm registered Specified Senders using the Spe...

Page 359: ...ation press the Can cel key and repeat the above steps from step I N N N N Press the User Tools key to re turn to the standby display Editing a Specified Sender To edit a Specified Sender delete the Specified Sender you want to edit Seep 56 Deleting a Specified Send er and then register it as a new Specified Sender See p 53 Register ing Forwarding Stations Deleting a Forwarding Station To delete a...

Page 360: ...s the User Tools key B B B B Press 0 0 0 0 or 1 1 1 1 until 4 Fax Fea tures is displayed C C C C Press the OK key D D D D Press 0 0 0 0 or 1 1 1 1 until 4 Key Op Tools is displayed E E E E Press the OK key F F F F Press 0 0 0 0 or 1 1 1 1 until 2 Forward ing is displayed G G G G Press the OK key H H H H Press 0 0 0 0 or 1 1 1 1 until 2 Prog Sta tion is displayed I I I I Press the OK key J J J J Pr...

Page 361: ...ess Follow the steps below to print this list A A A A Press the User Tools key B B B B Press 0 0 0 0 or 1 1 1 1 until 4 Fax Fea tures is displayed C C C C Press the OK key D D D D Press 0 0 0 0 or 1 1 1 1 until 4 Key Op Tools is displayed E E E E Press the OK key F F F F Press 0 0 0 0 or 1 1 1 1 until 2 Forward ing is displayed G G G G Press the OK key H H H H Press 0 0 0 0 or 1 1 1 1 until 4 Prin...

Page 362: ...r Parameter switches are outlined below Bit Number 7 6 5 4 3 2 1 0 Bit Value 0 1 0 0 0 0 0 0 Switch Bit Item 1 0 00 3 2 1 Image density adjustment level home position the higher level the greater image density 000 Standard 001 lighter 010 darker 101 somewhat lighter 110 somewhat darker 5 4 5 4 Default resolution when you send a message RESOLUTION 00 Standard 01 Detail 10 Fine 6 Default setting for...

Page 363: ...unication Result Re port Memory TX On Off 2 Automatic printing of the File Reserve Report Mem ory TX On Off 3 Automatic printing of the File Reserve Report Poll ing RX On Off 4 Automatic printing of the Communication Result Re port Polling RX On Off 5 Automatic printing of the Transmission Result Re port Immediate TX On Off 7 Automatic printing of the Journal On Off 04 7 Include a portion of the i...

Page 364: ...RANSMISSION On Off 07 2 Parallel Memory Trans mission On Off 4 Assign the Tone key as the key on the operation panel TONE SWITCH BY AS TERISK KEY On Off 08 6 Forwarding On Off 7 Forwarding 0 Forward messages from Specified Senders only 1 Forward messages from non Specified Senders only 09 0 Memory Lock On Off 1 Memory Lock 0 Messages from Specified Senders are not printed unless you en ter the Mem...

Page 365: ...splayed C C C C Press the OK key D D D D Press 0 0 0 0 or 1 1 1 1 until 4 Key Op Tools is displayed E E E E Press the OK key F F F F Press 0 0 0 0 or 1 1 1 1 until 3 User Pa rameters is displayed G G G G Press the OK key 10 7 Use dithering halftone SPD or standard halftone STD HALFTONE METHOD SPD STD 11 6 Print the received message when acting as a Forward ing Station PRINT MEMORY TRANSFER FILES O...

Page 366: ... to the standby display Printing the User Parameter List Print this list to see the current User Parameter settings A A A A Press the User Tools key B B B B Press 0 0 0 0 or 1 1 1 1 until 4 Fax Fea tures is displayed C C C C Press the OK key D D D D Press 0 0 0 0 or 1 1 1 1 until 4 Key Op Tools is displayed E E E E Press the OK key F F F F Press 0 0 0 0 or 1 1 1 1 until 3 User Pa rameters is displ...

Page 367: ... Each Personal Code name can be up to 20 characters long Registering and Editing A A A A Press the User Tools key B B B B Press 0 0 0 0 or 1 1 1 1 until 4 Fax Fea tures is displayed C C C C Press the OK key D D D D Press 0 0 0 0 or 1 1 1 1 until 4 Key Op Tools is displayed E E E E Press the OK key F F F F Press 0 0 0 0 or 1 1 1 1 until 4 Personal Code is displayed G G G G Press the OK key Confirm ...

Page 368: ...s displayed I I I I Press the OK key J J J J Press 0 0 0 0 or 1 1 1 1 to display the Per sonal Code you want to delete K K K K Press the OK key The Personal Code is deleted If you want to delete another Per sonal Code repeat the above steps from step I L L L L Press the User Tools key to re turn to the standby display Printing the Personal Code List Print this list to find out the registered Perso...

Page 369: ... usage by user or department Preparation In order to use this function you need to register the Personal Code and turn this function on with the User Parameters beforehand See p 63 Registering and Editing and p 58 User Parameters Switch 05 Bit 4 Note The machine returns to the state where a Personal Code must be en tered to use the machine in the fol lowing situations The machine is not used for a...

Page 370: ... 9 by the num ber keys 0000 and FFFF can not be en tered Memory Lock ID This ID is required for printing a message received using the Memo ry Lock function See p 12 Print ing a Memory locked Message Note You can enter 0 to 9 by the num ber keys 0000 can not be entered Registering To register ID Codes perform the fol lowing procedure The following example is for Memory Lock ID A A A A Press the Use...

Page 371: ...t set the Line Type to Pulse and dial a trial number If the connection was suc cessful your Line Type is Pulse Limitation If you do not correctly set the Line Type you will be able to receive messages but you may not be able to send them To register the Line Type perform the following procedure A A A A Press the User Tools key B B B B Press 0 0 0 0 or 1 1 1 1 until 4 Fax Fea tures is displayed C C...

Page 372: ...ber select the line to PABX on User Parameters Switch 13 Bit 0 To register an PSTN access number perform the following procedure A A A A Press the User Tools key B B B B Press 0 0 0 0 or 1 1 1 1 until 4 Fax Fea tures is displayed C C C C Press the OK key D D D D Press 0 0 0 0 or 1 1 1 1 until 4 Key Op Tools is displayed E E E E Press the OK key F F F F Press 0 0 0 0 or 1 1 1 1 until 7 PSTN Ac cess...

Page 373: ...ding was successful or not Details of the forwarding opera tion are not printed in the Journal To transfer all of the messages cur rently stored in memory perform the following procedure A A A A Press the User Tools key B B B B Press 0 0 0 0 or 1 1 1 1 until 4 Fax Fea tures is displayed C C C C Press the OK key D D D D Press 0 0 0 0 or 1 1 1 1 until 4 Key Op Tools is displayed E E E E Press the OK...

Page 374: ... if you request it A A A A Press the User Tools key B B B B Press 0 0 0 0 or 1 1 1 1 until 4 Fax Fea tures is displayed C C C C Press the OK key D D D D Press 0 0 0 0 or 1 1 1 1 until 4 Key Op Tools is displayed E E E E Press the OK key F F F F Press 0 0 0 0 or 1 1 1 1 until 9 RDS On Off is displayed G G G G Press the OK key H H H H Press 0 0 0 0 or 1 1 1 1 and select On or Off I I I I Press the O...

Page 375: ...er switch being turned off a power cut or the power cable being removed contents of the Fax memory will be lost Lost items will include any fax messages stored in memory using Memory Transmission or Reception If a file has been deleted from memo ry a Power Failure Report is auto matically printed as soon as power is restored This report can be used to identify lost files If a memory stored for Mem...

Page 376: ...Troubleshooting 72 7 StellaCEN advanced_V4_FM book Page 72 Tuesday July 17 2001 1 01 PM ...

Page 377: ...ct type before you start By law in the United States you must program your phone number identifi cation your OWN FAX NUMBER into your machine before you can connect the public phone system See chapter3 Own Name Fax Header Own Fax Number in the Basic Features manual Where to connect the machine 1 External Telephone 2 Line StellaCEN advanced_V4_FM book Page 73 Tuesday July 17 2001 1 01 PM ...

Page 378: ... or an optional external telephone with the On Hook Dial key for tele phone calls you can not talk with the other party without pressing the On Hook Dial or Clear Stop key after taking off the receiver Specifying the handset line type The switch on the handset should be in the appropriate position TT Tone Dialing or DP Pulse Dialing Adjusting the handset bell volume Adjust the handset ringer volum...

Page 379: ...mm 8 5 23 7 Fine Maximum Scanning Size 216 1260mm 8 5 49 6 Standard and Detail 216 600mm 8 5 23 7 Fine Print Process Printing on standard paper using a laser Transmission Speed 33 600 31 200 28 800 26 400 24 000 21 600 19 200 16 800 14 400 12 000 9 600 7 200 4 800 2 400bps auto shift down system Standby mode 100W Immediate Transmission 130W Immediate Reception 290W Printing 480W Night Timer Off mo...

Page 380: ...achine Originals containing wet ink or correcting fluid will mark the exposure glass and affect the resulting image Sizes and weights of Recommended Originals Paper Size and Scanned Area Exposure Glass Where Original is Placed Acceptable Original Size Maximum Number of Sheets Paper Thickness Exposure glass Maximum A4 210 297mm L 81 2 11 216 279mm L 1 Document Feeder ADF Fax transmission A5LK to A4...

Page 381: ...inal may not be sent There may be a difference in the size of the image when it is printed at the des tination Note The maximum scanning area on ADF is 1260mm 49 6 when the Resolution is Detail or Standard 600mm 23 7 when it is Fine If the receiver uses paper narrower than the original the image will be re duced to fit the paper width StellaCEN advanced_V4_FM book Page 77 Tuesday July 17 2001 1 01...

Page 382: ...mber of destinations you can specify for one file 133 The number of destinations you can specify for all files 300 The number of Quick Dials you can register 16 The number of Speed Dials you can register 50 The number of Group Dials you can register 5 The number of destinations you can specify by the number keys 67 The number of destinations you can register in a group 133 The number of destinatio...

Page 383: ...ption at an ap pointed time p 1 Sending at a Specific Time Send Later Fax Header Print You can add a Fax Header e g registered name to the message you send so it ap pears on the message printed by the receiving machine p 3 Fax Header Print Polling Reception Use this function if you want to poll a message from anoth er terminal p 5 Calling to Request a Mes sage Polling Reception StellaCEN advanced_...

Page 384: ...ry and the file numbers p 10 Printing a List of Files in Memory Print File List Printing a Stored Message Prints the contents of a fax that is stored in memory and has not been sent yet p 11 Printing a Stored Message Print TX File Printing a Memory locked Message The Memory locked mes sages can be manually printed To print the mes sages you have to enter the Memory Lock ID p 12 Printing a Memory l...

Page 385: ...ently used func tion in a User Function Key F1 to F3 p 35 User Function Keys Reports Lists This function allows you to print various reports and lists manually You can print the following reports and lists Journal Transmission File List Quick Dial list Speed Dial list Group Dial list Quick Dial Label User Function List p 39 Printing Reports Lists Monitor Volume Adjusts the volume of moni toring an...

Page 386: ...wn Name Fax Header Own Fax Number in the Basic Features manual Fax Reset Timer You can select a period of time before this machine automati cally returns to the standby mode p 46 Setting the Fax Reset Timer On Hook Timeout You can select a period before the machine cancels the On Hook Dial mode p 47 On Hook Timeout Function name Description Reference StellaCEN advanced_V4_FM book Page 82 Tuesday J...

Page 387: ...onal Code in order to transmit documents p 63 Personal Codes ID Code Registers the ID required for using Polling Recep tion and Memory Lock p 66 ID Code Line Type Registers the type of line Tone or Pulse you are connected to p 67 Line Type PSTN Access Number Allows you to specify the code used to access an outside line when dialing p 68 PSTN Access Number Memory File Transfer You can send all mess...

Page 388: ...ender 56 Specified Sender for Memory Lock 51 Display Contrast 42 81 Dual Access 24 E ECM Error Correction Mode 24 Editing Forwarding Station 54 Specified Sender 55 Error Report 71 External Telephone 74 F Fax Header Print 3 79 Fax Information 82 Fax Reset Timer 46 82 File Reserve Report 25 File Reserve Report Polling RX 7 Forwarding 52 83 Forwarding Station 53 54 55 Function List Advanced Transmiss...

Page 389: ...st 39 Reports Lists 39 Specified Sender list 57 Speed Dial List 39 Stored Message 11 80 TX File List 39 User Function List 39 User Parameter List 83 Printing Options 30 Print TX File 11 PSTN Access Number 68 83 PWD 19 Q Quick Dial 81 Quick Dial Label 39 Quick Dial List 40 R RDS 70 RDS On Off 83 Reception Auto Fax Reception Power up 29 Immediate Reception 27 Memory Reception 27 Receiving Messages i...

Page 390: ...ephone Directory 16 Telephone Line 73 Telephone Mode 29 Transmission Features 15 19 Transmission Options 1 Transmission Result Report Immediate Transmission 26 Troubleshooting 71 TSI Print 30 TTI Print Fax Header Print 3 TX File List 39 U User Function key Deleting 37 Using 37 User Function Keys 35 81 User Function keys Making key assignment 36 User Function List 39 User Parameter List 58 83 User ...

Page 391: ...lated to USER SAFETY and PREVENTING EQUIPMENT PROBLEMS Notes Some illustrations might be slightly different from your machine Certain options might not be available in some countries For details please contact your local dealer Two kinds of size notation are employed in this manual With this machine refer to the inch version Machine Types The model names of the machines do not appear in the follow...

Page 392: ...ller Type 1013 Operating Instructions Printer Reference 2 option Read this manual carefully before you use this product and keep it handy for future reference For safety please follow the instructions in this manual ...

Page 393: ...quential damages as a result of handling or operating the machine Trademarks Microsoft and Windows are registered trademarks of Microsoft Corporation in the United States and or other countries Ethernet is a registered trademark of Xerox Corporation Adobe PostScript Acrobat and PageMaker are registered trademarks of Adobe System Incorporated PCL is a registered trademark of Hewlett Packard Company...

Page 394: ...t using this machine as a printer This manual is provided as a PDF file on the CD ROM labeled Operating Instructions for Printer this manual Network Interface Board Quick Configuration Guide Describes the procedures and provides necessary information about setting up and using the printer under the network environment This manual is provided as a PDF file on the CD ROM labeled Operating Instructio...

Page 395: ... is not followed paper might be misfed originals might be damaged or data might be lost Be sure to read this Preparation This symbol indicates the prior knowledge or preparations required before op erating Note This symbol indicates precautions for operation or actions to take after misop eration Limitation This symbol indicates numerical limits functions that cannot be used together or conditions...

Page 396: ...2000 Windows NT 4 0 Canceling a Print Job 12 Macintosh Canceling a Print Job 13 2 Uninstalling the Printer Driver and Software Uninstalling the PCL 6 5e Printer Driver 15 Windows 95 98 Me Uninstalling the PCL 6 5e Printer Driver 15 Windows 2000 Uninstalling the PCL 6 5e Printer Driver 15 Windows NT 4 0 Uninstalling the PCL 6 5e Printer Driver 16 Uninstalling the PostScript Printer Driver 17 Window...

Page 397: ...Features Menu 24 Printer Features Parameters 27 Job Control Menu 27 Network Setup Menu 34 Maintenance Menu 35 List Print Menu 37 Adjusting System Settings 40 Accessing the System Settings 40 System Settings Parameters 41 5 Appendix Specifications 43 Options 44 INDEX 45 ...

Page 398: ...r s settings are not used and the application s own default settings are applied E Click OK Making printer settings from an application To make the printer settings for a specific application open the Printer Proper ties dialog box from that application The following example describes how to make settings for the WordPad application that comes with Windows 95 98 Me Note The actual procedure you sh...

Page 399: ... Click Start on the taskbar point to Settings and then click Printers The Printers window appears B Click to select the icon of the printer whose default settings you want to change C On the File menu click Properties The Printer Properties appear D Make any settings you require and click Apply Note Settings you make here are used as the default settings for all applications E Click OK Changing th...

Page 400: ...on open the Print dialog box from that application The following example describes how to make settings for the WordPad application that comes with Windows 2000 Note The actual procedures you should follow to open the Print dialog box may differ depending on the application For more information see the documen tation that comes with the application you are using Any settings you make in the follow...

Page 401: ...erties appear D Make any settings you require and click OK Note Settings you make here are used as the default settings for all applications Changing the default printer settings Default Document Properties Limitation Changing the setting of the printer requires Full Control access permission Members of the Administrators Server Operators Print Operators and Pow er Users groups have Full Control p...

Page 402: ...rocedure you should follow to open the Printer Properties dialog box may differ depending on the application For more information see the documentation that comes with the application you are using Any settings you make in the following procedure are valid for the current application only A On the File menu click Print The Print dialog box appears B Select the printer you want to use in the Name l...

Page 403: ...ter Properties appear D Make any settings you require and click Apply E Click OK Making printer settings from an application To make the printer settings for a specific application open the Printer Proper ties dialog box from that application The following example describes how to make settings for the WordPad application that comes with Windows 95 98 Me Note The actual procedure you should follow...

Page 404: ...rt on the taskbar point to Settings and then click Printers The Printers window appears B Click to select the icon of the printer whose default settings you want to change C On the File menu click Properties The Printer Properties appear D Make any settings you require and click Apply Note Settings you make here are used as the default settings for all applications E Click OK Changing the default ...

Page 405: ...pplication open the Print dialog box from that application The following example describes how to make settings for the WordPad application that comes with Windows 2000 Note The actual procedures you should follow to open the Print dialog box may differ depending on the application For more information see the documen tation that comes with the application you are using Any settings you make in th...

Page 406: ...operties appear D Make any settings you require and click OK Note Settings you make here are used as the default settings for all applications Changing the default printer settings Default Document Properties Limitation Changing the setting of the printer requires Full Control access permission Members of the Administrators Server Operators Print Operators and Pow er Users groups have Full Control...

Page 407: ...t The Print dialog box appears B Select the printer you want to use in the Name list box and then click Prop erties The Printer Properties appear C Make any settings you require and click OK D Click OK to start printing Macintosh Setting Up for Printing Making paper settings from an application A Open the file you want to print B On the File menu click Page Setup The LaserWriter 8 Page Setup dialo...

Page 408: ...rinting from an application A Open the file you want to print B On the File menu click Print The Printer dialog box appears C Confirm that the printer is selected in the Printer box and make the print er settings D After configuring the settings click Print ...

Page 409: ...he control panel The message appears on the panel display indicating that the print job is be ing canceled Important This procedure cancels the print job that is being processed by the printer In some cases the printer may already be processing data for the next print job following the one currently being output In this case the next print job is also canceled when you press Job Reset When the pri...

Page 410: ...ing canceled Important This procedure cancels the print job that is being processed by the printer In some case the printer may already be processing data for the next print job following the one currently being output In this case the next print job is also canceled when you press Job Reset When the printer is being shared by multiple computers be careful not to accidentally cancel someone else s...

Page 411: ...Setting Up the Printer Driver and Canceling a Print Job 14 1 ...

Page 412: ...ile menu click Delete A confirmation dialog box appears E Click Yes to uninstall the printer driver Windows 2000 Uninstalling the PCL 6 5e Printer Driver Limitation Uninstalling a printer driver requires Manage Printers permission Members of the Administrators and Power Users groups have Manage Printers permis sion by default When you uninstall a printer driver log on using an account that has Man...

Page 413: ... ers groups have Full Control Permission by default When you install a printer driver log on using an account that has Full Control permission A Close all applications that are currently running B Click Start on the taskbar point to Settings and then click Printers The Printers window appears C Click to select the icon of the printer you want to remove D On the File menu click Delete A confirmatio...

Page 414: ...the File menu click Delete A confirmation dialog box appears E Click Yes to uninstall the printer driver Windows 2000 Uninstalling the PostScript Printer Driver Limitation Uninstalling a printer driver requires Manage Printers permission Members of the Administrators and Power Users groups have Manage Printers permis sion by default When you uninstall a printer driver log on using an account that ...

Page 415: ...ter driver log on using an account that has Full Control permission A Close all applications that are currently running B Click Start on the taskbar point to Settings and then click Printers The Printers window appears C Click to select the icon of the printer you want to remove D On the File menu click Delete A confirmation dialog box appears E Click Yes to uninstall the printer driver Macintosh ...

Page 416: ...l not automatically resume if the paper size and orienta tion settings are incorrect Load Tray Paper Size There is no paper left in this tray Load paper into the tray indi cated Memory Overflow Job Incomplete A memory overflow has oc curred Add memory to the printer Memory Full Job Incomplete A memory full has occurred Add memory to the printer Printing The printer is printing Wait for a while Pri...

Page 417: ...setting Job The print job is being reset Wait for a while Toner is Almost Empty Toner is almost running out Replace the toner early to pre vent poor print quality Waiting The printer is waiting for the next print job Wait for a while Warming Up The printer is warming up or toner is being supplied Wait until the panel display changes to Ready Messages Second messages Description Solution ...

Page 418: ...ne by touching the Online key Is the specified paper set Set the specified paper in any of the input trays Are there any error messages on the panel dis play Check the error message and take the required action Does the indicator above the Printer Mode key stay red Check the error message and take the required action Is the Data in Indicator blinking or lit If not the data does not reach the machi...

Page 419: ...inter to start printing The machine might be in Energy Saver mode or Low Power mode which requires more time for warming up and resuming the print job It takes too much time to complete the print job The data is so large or complex that it takes time to process it If the Data In indicator is blinking the data processing is being done Just wait until it is finished Windows 95 98 Me 2000 NT 4 0 The ...

Page 420: ...ations Printer Features settings you make are retained even when you turn off the printer Reference For more information about the copy features and their system settings see the Copy Reference and the System Settings manuals Note Some of the settings accessed by the printer driver can be accessed by the Printer Features Settings made by the printer driver take priority over set tings by the Print...

Page 421: ...ct functions in the following table Category Function menu Job Control p 27 Paper Input Tray Priority Tray Locking Bypass Paper Size Standard Size Custom Size Print Quality Edge Smoothing Resolution PCL PS Toner Saving System Print PS Errors I O Timeout I O Buffer Page Protect Auto Continue Sub Paper Size PCL Menu Orientation Form Lines Font Source Font Number Point Size Font Pitch Symbol Set ...

Page 422: ...5 Printer Features then press OK The following screen appears on the panel display Press the 0 or 1key to display the following four items one by one Job Control Network Setup Maintenance List Print Network Setup 1 p 34 IP Address Subnet Mask Gateway Address Maintenance p 35 Restart Printer Menu Reset Hex Dump List Print p 37 Configuration Page Menu List PCL Font List PS Font List 2 Category Funct...

Page 423: ...he previous menu After making the printer settings be sure to return to the previous menu by pressing Cancel After making the printer settings press User Tools Counter to return to the initial display The revised settings are not canceled even if the power switch is turned off ABC DEF JKL MNO GHI ...

Page 424: ...oad paper having the size and di rection you frequently use in the tray selected with Tray Pri ority Tray Locking If you use different kinds of paper you can lock a tray to prevent printing on wrong paper such as letterhead or colored paper When Auto Select is selected in the Paper Source selections from the printer driver the locked tray will not be used Tray 1 Tray 2 None Note Default None This ...

Page 425: ... paper of either the short edge feed size or the long edge feed size use the short edge feed size Note Specifications of bypass tray depends on the machine Con firm which type of machine you have See the Copy Reference Menu Description Edge Smoothing You can set whether to enable Edge Smoothing On Off Note Default On If Toner Saving is On EdgeSmoothing is ignored even if it is On The setting in th...

Page 426: ...ds 30 seconds 60 seconds 180 seconds 300 seconds Note Default 30 seconds I O Buffer You can set the size of the I O Buffer Normally it is not necessary to change this setting 16 KB 32 KB 64 KB 128 KB 256 KB 512 KB Note Default 32 KB Print PS Errors You can set whether the PS error sheet should be printed out Off On Note Default Off Page Protect When the Print Overrun Job Incomplete message appears...

Page 427: ...efault Off Sub Paper Size You can enable the Auto Substitute Paper Size feature between A4 and letter size When you select On the printer substitutes A4 letter size if the paper currently specified is not loaded Off On Note Default Off Menu Description Orientation You can set the page orientation Portrait Landscape Note Default Portrait Form Lines You can set the number of lines per page 5 128 Not...

Page 428: ...font Font Pitch You can set the number of characters per inch you want to use for the default font 0 44 to 99 99 by 0 01 Note Default 10 00 This setting is effective only for a fixed space font Symbol Set You can specify the set of print characters for the default font The available options are as follows Roman 8 ISO L1 ISO L2 ISO L5 PC 8 PC 8 D N PC 850 PC 852 PC8 TK Win L1 Win L2 Win L5 Desktop ...

Page 429: ... in the Paper Input menu A Press User Tools Counter B Press the 0 or 1key until the following message appears on the panel dis play C Press OK The following screen appears on the panel display D Press OK The following screen appears on the panel display E Press OK The following screen appears on the panel display ABC DEF JKL MNO GHI ...

Page 430: ...ears on the panel display G Press the 0 or 1key to select the tray type you want to use H Press OK Programmed is displayed for two seconds I The following screen appears on the panel display J Press User Tools Counter to return to the initial display ABC DEF JKL MNO GHI ...

Page 431: ...You can set the IP Address Note Default All zero Reference See Configuring the Printer for the Network with the Control Pan el in Printer Reference 1 Subnet Mask You can set the Subnet Mask Note Default 255 000 000 000 Reference See Configuring the Printer for the Network with the Control Pan el in Printer Reference 1 Gateway Address You can set the Gateway Address Note Default All zero Reference ...

Page 432: ...e Maintenance menu A Press User Tools Counter Menu Description Restart Printer You can restart the printer p 35 Restarting a Printer Menu Reset You can reset the menu settings to the factory defaults except the optional Network Interface Board settings Hex Dump You can set to isolate the source of a print job problem With this function On all data sent to the printer is printed in hexadeci mal cha...

Page 433: ... C Press OK The following screen appears on the panel display D Press the 0 or 1key until the following message appears on the panel dis play E Press OK The following screen appears on the panel display F Press OK The following screen appears on the panel display G Press OK Ready appeares on the panel display ...

Page 434: ...List Print menu Reference For more information see p 39 Interpreting the Configuration Page A Press User Tools Counter B Press the 0 or 1key until the following message appears on the panel dis play Menu Description Configuration Page You can print a Configuration Page p 37 Printing a Configu ration Page Menu List You can print the Menu List which shows the function menus of this machine PCL Font ...

Page 435: ...el display F Press OK The following screen appears on the panel display G Press OK The following screen appears on the panel display In a short time the printing of the configuration page will start Important If you cannot complete printing a configuration page correctly make sure an error message appears on the panel display For more information about error messages see p 19 Error Status Messages...

Page 436: ... Show the options that you installed Job Control Shows the settings made under the Job Control menu Reference For more information see p 27 Job Control Menu Network Setup Shows the settings you made under the Network Setup menu When DHCP is active on the network the actual IP Address Subnet Mask and Gateway Address appear in parentheses on the configuration page Reference For more information see ...

Page 437: ...C Press OK The following screen appears on the panel display Select the desired menu you want to change D Change the settings by following the instructions on the panel display then press OK p 41 System Settings Parameters Note Press the Language key to switch the display language Exiting from the User Tools Counter A Press User Tools Counter ABC DEF JKL MNO GHI ...

Page 438: ...m Reset The time can be set from 10 to 999 seconds or no system reset Note Default On 60 seconds You can specify the prioritized mode with the user tools See 1 Function Priority 6 Auto Off Timer The machine turns itself off automatically to conserve energy after your job is finished after the selected time This function is called Auto Off The time can be set from 1 to 240 minutes Note Default 60 m...

Page 439: ...Using the Control Panel 42 4 ...

Page 440: ...ith Mac OS X the machine operates in only Classic mode Component Specification Resolution 300 300 dpi PCL5e 1 PS2 2 600 600 dpi PCL5e 1 PCL6 PS2 Printing Speed Printing Speed depends on the machine Confirm which type of machine you have Parallel Interface Standard 36 pin printer cable and a parallel port on the host com puter IEEE1284 Note Do not use a parallel cable that is longer than 3 meters 1...

Page 441: ...tor RJ45 Required Cable Interface cable with ferrite core Interface cable is not provided with this option Memory Unit Module Type SO DIMM Small Outline Dual in line Memory Module Memory Type SDRAM Synchronous Dynamic RAM Number of Pins 144 pins Compatible PC100 compatible Type 1018 PostScript level2 Compatible Kit PostScript level2 compatible ...

Page 442: ... PCL 5e 1 Windows 2000 uninstalling 15 Windows 95 98 Me uninstalling 15 Windows NT 4 0 uninstalling 16 PCL 6 1 Windows 2000 uninstalling 15 Windows 95 98 Me uninstalling 15 Windows NT 4 0 uninstalling 16 PCL Font List 37 PCL Menu 27 PostScript Windows 2000 uninstalling 17 Windows 95 98 Me uninstalling 17 Windows NT 4 0 uninstalling 18 PostScript Printer Driver Macintosh uninstalling 18 Printer Fea...

Page 443: ...e uninstalling 15 PCL 6 uninstalling 15 PostScript uninstalling 17 printer properties PCL 1 printer properties PostScript 6 Windows 95 98 Me Windows 2000 Windows NT canceling a job 12 Windows NT 4 0 document defaults PCL 4 document defaults PostScript 9 PCL 5e uninstalling 16 PCL 6 uninstalling 16 PostScript uninstalling 18 printer properties PCL 4 printer properties PostScript 9 ...

Page 444: ...Consult the dealer or an experienced radio TV technician for help Warning Changes or modifications not expressly approved by the party responsible for compliance could void the user s authority to operate the equipment Caution in case of IEEE1284 environment Properly shielded and grounded cables and connectors must be used for connections to host computer and or peripheral in order to meet FCC emi...

Page 445: ...PRINTER Controller Type 1013 Operating Instructions Printer Reference 2 option UE USA B441 8627 ...

Reviews: