background image

Operation

22

1

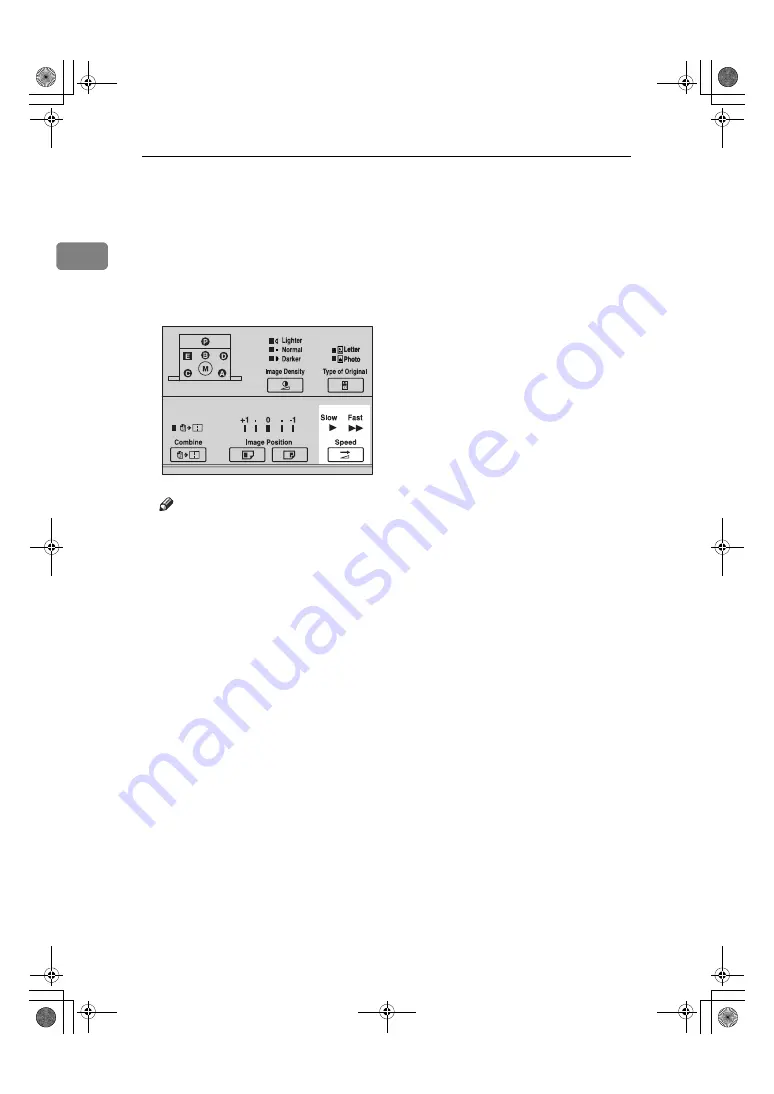
Changing the Printing Speed

Use the 

{

Speed

}

 key to adjust the

speed of the machine to suit the im-
age density and paper type.

A

Press the 

{

Speed

}

 key to select the

printing speed.

Note

The following speeds are avail-
able:
• Fast:

90 sheets/minute

• Slow:

60 sheets/minute

The default is 90 sheets/minute.

The faster the printing speed be-
comes, the lighter the printing
density is, and vice versa.

Select the slower speed when
you are printing on very thick
or very thin paper.

BQA034S

C2748608_Titanium3-EN.book  Page 22  Wednesday, November 19, 2008  10:25 AM

Summary of Contents for DX 2330

Page 1: ... Operating Instructions Operating Instructions Read this manual carefully before you use this machine and keep it handy for future reference For safe and correct use be sure to read Safety Information before using the machine Operation Optional Functions Replenishing Supplies Troubleshooting Remarks Specifications 1 2 3 4 5 6 Type for DX 2330 LDD745 Printed in China EN USA C274 8608 ...

Page 2: ...anual in a handy place for quick reference Important Contents of this manual are subject to change without prior notice In no event will the company be li able for direct indirect special incidental or consequential damages as a result of handling or oper ating the machine Do not copy or print any item for which reproduction is prohibited by law Copying or printing the following items is generally...

Page 3: ...anual in a handy place for quick reference Important Contents of this manual are subject to change without prior notice In no event will the company be li able for direct indirect special incidental or consequential damages as a result of handling or oper ating the machine Do not copy or print any item for which reproduction is prohibited by law Copying or printing the following items is generally...

Page 4: ...king a Master 21 Changing the Printing Speed 22 Stopping the Machine during the Multi print Run 23 When You Want to Stop the Machine during the Multi print Run and Print the Next Original 23 When You Want to Change the Number of Prints Entered or Check the Completed Prints 23 Preset Reduce Enlarge Reducing and Enlarging Using Preset Ratios 24 Printing on Different Types of Paper Thickness 26 Feed ...

Page 5: ...the Open Cover Unit Indicator M Lights 58 When the Master Eject Indicator k Lights 60 Poor Printing 61 Dirt on the Back Side of Paper 61 Dirt on the Front Side of Paper Black Line Stain 63 White Prints or Incomplete Prints 64 5 Remarks Operation Notes 67 General Cautions 67 Print Paper 69 Originals 69 Where to Put Your Machine 70 Environmental Conditions 70 Power Connection 71 Access to Machine 71...

Page 6: ...the power plug by pulling the plug not the cable if the power cable or plug becomes frayed or otherwise damaged To avoid hazardous electric shock do not remove any covers or screws other than those specified in this manual Turn off the power and disconnect the power plug by pulling the plug not the cable if any of the following occurs You spill something into the machine You suspect that your mach...

Page 7: ...ehold waste collection points Disposal can take place at an authorized dealer When disposing of a used ink container reattach the cap to prevent ink from splattering Be careful not to get ink on your clothes when replacing an ink container Ink stains on clothes are hard to remove Be careful not to cut yourself on any sharp edges when you reach inside the machine to remove misfed sheets of paper or...

Page 8: ... energy con servation by promoting energy efficient computers and other office equipment The program backs the development and dissemination of products that feature energy saving functions It is an open program in which manufacturers participate voluntarily Targeted products are computers monitors printers facsimiles copiers scanners and digital duplicator Energy Star standards and logos are inte...

Page 9: ... to read the instructions all of which are described in the Safety Information section The statements above are notes for your safety Important If this instruction is not followed paper might be misfed originals might be damaged or data might be lost Be sure to read this Preparation This symbol indicates the prior knowledge or preparations required before op erating the machine Note This symbol in...

Page 10: ...ge Density Changing the Print Speed See p 22 Changing the Printing Speed Reducing and Enlarging Using Preset Ratios See p 24 Preset Reduce Enlarge Reducing and Enlarging Using Preset Ra tios Printing on Thick or Thin Paper See p 26 Printing on Different Types of Paper Thickness Selecting Original Type See p 28 Selecting Original Type Printing from Several Originals at Once See p 29 Auto Cycle Proc...

Page 11: ...p 30 Combine Combining Two Originals onto One Print Making Color Prints See p 33 Making Color Prints Printing in Two Colors See p 35 Printing in Two Colors ZCTX040E B A A B C2748608_Titanium3 EN book Page 6 Wednesday November 19 2008 10 25 AM ...

Page 12: ...or to clear a master misfeed 6 Feed roller pressure lever Use to adjust the contact pressure of the paper feed roller according to the paper thickness 7 Paper feed tray Set paper on this tray for printing 8 Paper feed side plates Use to prevent paper skew 9 Paper feed side plate lock levers Use to lock or unlock the paper feed side plates 10 Separation pressure lever Use to prevent double feed 11 ...

Page 13: ...eliv ery tray 5 Paper delivery end plate Use to align the leading edge of prints 6 Paper delivery tray Completed prints are delivered here 7 Drum unit The master is wrapped around this unit 8 Ink holder lock lever Release this lever in order to pull out the ink holder 9 Drum unit lock lever Lift to unlock and pull out the drum unit 10 Ink holder Set the ink cartridge in this holder BQA011S C274860...

Page 14: ...key Press to enlarge or reduce the image See p 24 Preset Reduce Enlarge Reducing and Enlarging Using Preset Ratios 7 Combine key Press to combine originals onto one print See p 30 Combine Combining Two Originals onto One Print 8 Image Position keys Press to shift the image forwards or back wards See p 19 Adjusting the Print Im age Position 9 Speed key Press to select Fast or Slow for your print in...

Page 15: ... indicator See p 39 When the Add Ink Indicator j Lights C Master End indicator See p 42 Master Roll Replacement k Master Eject indicator See p 60 When the Master Eject Indica tor k Lights M Open Cover Unit indicator See p 58 When the Open Cover Unit In dicator M Lights x Misfeed indicator See p 47 x Clearing Misfeeds B Load Paper indicator See p 37 Loading Paper into the Paper Feed Tray 4 Counter ...

Page 16: ...me stack Buckled or curled paper Low stiffness paper Correct curls in the paper before setting it in the machine When you cannot cor rect the paper curl stack the paper with the curl face down Otherwise the paper might wrap around the drum or stains might appear Store paper where it will not curl or absorb moisture Use paper soon after it is unpacked Only use paper where the leading edge has two r...

Page 17: ... 55 mm 2 2 Paper with a length of 90 275 mm 3 6 10 8 and width of 140 395 mm 5 5 15 6 can be set in the paper feed tray The following types of paper are not recommended for this machine Roughly cut paper Paper of different thickness and types in the same stack Curled or waved paper Use paper with less than 5 mm 0 2 curl and 3 mm 0 1 wave Grained paper loaded with the direction of the grain perpend...

Page 18: ...0 8 lb If you are printing from originals that have bold letters or solid images at the leading edges you may get prints with dirty edges In this case insert the widest margin first or raise the printing speed The first 5 mm 0 2 of the leading edge cannot be printed Make sure the lead ing edge margin is at least 5 mm 0 2 a 5 mm 0 2 Original Print a C2748608_Titanium3 EN book Page 13 Wednesday Nove...

Page 19: ...aper curl before setting the paper If you cannot do so stack the paper with the curl face down as shown D Make sure that the paper feed side plates touch the paper light ly Shift the lock levers back to their original positions E Shift the tray adjustment lever to the paper feeding position Note Before you start printing the paper feed tray must be aligned with the feeding position If not a paper ...

Page 20: ...Paper Delivery Tray A Adjust the paper delivery side plates to match the paper size B Adjust the paper delivery end plate to match the paper size C Turn on the main switch C2748608_Titanium3 EN book Page 15 Wednesday November 19 2008 10 25 AM ...

Page 21: ... A Place the original face down in the document feeder Adjust the original side guides to match the size of the original Note You can only place one original at a time B Press the Master Making key A trial print is delivered to the pa per delivery tray C Press the Proof key and check the image density and image po sition on the proof print Note If the image position is not cor rect adjust it using...

Page 22: ...d enter the new number E Press the Print Start key Note After printing is completed the same number of prints is auto matically set for the next job To stop the machine during the multi print run press the Clear Stop key To return the machine to the ini tial condition after printing press the Clear Modes Recovery key C2748608_Titanium3 EN book Page 17 Wednesday November 19 2008 10 25 AM ...

Page 23: ...ower the paper feed tray adjust ment lever and remove the paper from the paper feed tray B Remove the prints from the paper delivery tray C Turn off the main switch C2748608_Titanium3 EN book Page 18 Wednesday November 19 2008 10 25 AM ...

Page 24: ...ards or Backwards Paper feed direction A Press the left Image Position key to move the image forwards and the right key to move it back wards Note When you shift the image for wards leave a margin more than 5 mm 0 2 at the leading edge If there is no margin pa per might wrap around the drum and cause a misfeed The right or left Image Position keys shift the image about 1 mm 0 04 each time they are...

Page 25: ...r towards the front of the machine Shifting the image to the left Shift the paper towards the back of the machine Note The image position can be shift ed up to about 10 mm 0 4 each way B Lock the paper delivery side plates and shift the tray adjustment lever back to the paper feeding position C Press the Proof key to check the image position GRLEFT0E C2748608_Titanium3 EN book Page 20 Wednesday No...

Page 26: ...fore pressing the Master Making key Note In addition to Normal Darker and Lighter modes you can also select Tint mode to make half tone prints When the Lighter mode indicator is blinking Tint mode is selected After Making a Master A Press the Speed key to decrease the printing speed Press it again to bring the printing speed back to Fast Note The faster the printing speed be comes the lighter the ...

Page 27: ...inting speed Note The following speeds are avail able Fast 90 sheets minute Slow 60 sheets minute The default is 90 sheets minute The faster the printing speed be comes the lighter the printing density is and vice versa Select the slower speed when you are printing on very thick or very thin paper BQA034S C2748608_Titanium3 EN book Page 22 Wednesday November 19 2008 10 25 AM ...

Page 28: ...feeder C Enter the number of prints and press the Master Making key When You Want to Change the Number of Prints Entered or Check the Completed Prints A Press the Clear Stop key B Change the number of prints or check the completed prints Note When you change the number of prints you can re enter the number with the number keys after pressing the Clear Stop key C Press the Print Start key C2748608_...

Page 29: ...can select a ratio regardless of the size of an original or printing paper With some ratios parts of the image might not be printed or margins will appear on prints Prints can be reduced or enlarged as follows Reduction Metric version 1 Select this ratio when you make prints with a lot of edge margins GRREDU0E GRENLA0E Indica tor Original Size Print Size Reduc tion Ratio 93 1 93 A4VB5 A4 B5 JIS Ja...

Page 30: ...sing the Image Position key see p 19 Shifting the Print Image Position For wards or Backwards or by moving the position of the pa per see p 20 Shifting the Print Image Position to the Right or Left F Press the Print Start key Indicator Origi nal Size Print Size Reduc tion Ratio Create Margin 1 93 81 2 14 V 81 2 11 81 2 14 81 2 11 77 11 15 V 81 2 11 11 15 81 2 11 74 11 17 V 81 2 11 11 17 81 2 11 65...

Page 31: ...ng table If the feed roller pressure lever is at the Standard paper posi tion and paper misfeeds occur even though you are using pa per within the specified range move the lever to the Thick pa per position B Make sure that the paper feed side plates touch the paper light ly C When you have finished printing shift the feed roller pressure lever back to the Standard paper posi tion Metric version I...

Page 32: ...ding edge of the paper is curled or when the paper does not feed properly Posi tion Metric version Inch version 1 Use this position if the lead ing edge of the paper is curled or when the paper does not feed properly at Po sition 2 2 1 35 47 0 g m2 81 6 127 9 g m2 9 3 12 5 lb 21 7 34 0 lb 3 47 1 81 5 g m2 12 6 21 6 lb 4 Use this position when a double feed occurs 5 Use this position if double feed...

Page 33: ... ap pear lighter A Press the Type of Original key to select either Letter or Photo mode Note When both the Photo mode and Letter mode indicators light up Letter Photo mode is selected B Press the Image Density key to ad just the image density C Place the original in the docu ment feeder D Press the Master Making key E Check the image position on the trial or proof print Note If the image position ...

Page 34: ... in One Step Use the Auto Cycle key to process masters and make prints in one step A Place the original in the docu ment feeder B Press the Auto Cycle key C Enter the number of prints re quired with the number keys D Press the Master Making key C2748608_Titanium3 EN book Page 29 Wednesday November 19 2008 10 25 AM ...

Page 35: ...B4 Inch version 1 For a reduction ratio of 65 use the Reduce Enlarge key to select 11 17 V81 2 11 If the master length of the first origi nal is longer than 243 mm 9 5 or shorter than 70 mm 2 8 Combine mode is disabled Any image closer than 5 mm 0 2 to the leading edge of an original will not be printed When the im age is too close to the leading edge use copies of the originals with the image shi...

Page 36: ...original face down in the document feeder Note If you wish to select a different reproduction ratio for the sec ond original you need to enter the new settings before the beeping stops F Press the Master Making key G Check the image position on the trial or proof print Note If the image position is not cor rect adjust it using the Image Position key see p 19 Shifting the Print Image Position For w...

Page 37: ...Operation 32 1 H Enter the number of prints with the number keys I Press the Print Start key to make your prints C2748608_Titanium3 EN book Page 32 Wednesday November 19 2008 10 25 AM ...

Page 38: ...ange the color drum unit see p 33 Changing the Color Drum Unit B Place the original in the docu ment feeder and press the Master Making key C Check the image position on the trial or proof print Note If the image position is not cor rect adjust it using the Image Position key see p 19 Shifting the Print Image Position For wards or Backwards or by moving the position of the pa per see p 20 Shifting...

Page 39: ...e rail on the drum and slide out the drum while pulling the release towards you E Remove the drum unit from the machine while holding the upper drum stay Note Be careful not to let the drum unit fall F Set the color drum unit on the guide rail G Slide in the drum unit until it locks in position BQA015S BQA016S BQA019S C2748608_Titanium3 EN book Page 34 Wednesday November 19 2008 10 25 AM ...

Page 40: ...irty In this case wipe off the roller with a cloth Note You cannot print in two colors at a time A Preparetwo originals Placethe first original in the document feeder B Press the Master Making key C Check the image position on the trial or proof print Note If the image position is not cor rect adjust it using the Image Position key see p 19 Shifting the Print Image Position For wards or Backwards ...

Page 41: ...load them into the paper feed tray as shown in the illustration G Change the drum unit See p 33 Changing the Color Drum Unit H Place the second original and press the Master Making key I Check the image position J Press the Print Start key C2748608_Titanium3 EN book Page 36 Wednesday November 19 2008 10 25 AM ...

Page 42: ...ed tray adjust ment lever Note The top sheet of paper might re main between the feed rollers In this case remove the top sheet C Load paper into the paper feed tray Note Correct paper curl before set ting the paper D Shift the tray adjustment lever to the paper feeding position Note Before you start printing the paper feed tray must be aligned with the feeding position If not a paper misfeed might...

Page 43: ... plates to match the new pa per size 1 Paper Feed Side Plate Lock Le vers C Load paper into the paper feed tray Note Correct any paper curl before setting the paper Make sure that the side plates touch the paper lightly Shift the lock levers back to their original positions D Adjust the side plates and the end plate of the paper delivery tray C2748608_Titanium3 EN book Page 38 Wednesday November 1...

Page 44: ...he front door Keep the ink or ink container out of reach of children Be careful not to get ink on your clothes when replacing an ink container Ink stains on clothes are hard to remove When disposing of a used ink container reattach the cap to prevent ink from splattering If your skin comes into contact with ink wash the affected area thoroughly with soap and water If ink comes into contact with yo...

Page 45: ... lock lever and pull out the ink holder Remove the used ink cartridge C Remove the cap of the new ink cartridge D Insert the new cartridge into the ink holder BQA020S BQA022S BQA021S C2748608_Titanium3 EN book Page 40 Wednesday November 19 2008 10 25 AM ...

Page 46: ...rrow mark is firmly inserted into the guide E Slide the ink holder back in until it clicks into place F Close the front door The machine will start idling to supply ink to the drum Note It will stop when the correct amount of ink reaches the drum TSLT011E C2748608_Titanium3 EN book Page 41 Wednesday November 19 2008 10 25 AM ...

Page 47: ...ols into a new master roll Note When the Master End indicator lights up it is necessary to re place the master roll even if some master remains on the old roll D Make sure that the new master roll is positioned as shown in the illustration E Set the paper edge of the master roll as shown Note Rotate the spools backward to take up any slack in the master TSLH02EE TSLT010E TSLH01XE TSLH01UE C2748608...

Page 48: ...ter Roll Replacement 43 3 F Close the plotter cover using both hands until it clicks into place G Close the right side cover TSLH023E C2748608_Titanium3 EN book Page 43 Wednesday November 19 2008 10 25 AM ...

Page 49: ...Replenishing Supplies 44 3 C2748608_Titanium3 EN book Page 44 Wednesday November 19 2008 10 25 AM ...

Page 50: ...e main switch If you do so your copy settings are cleared If misfeeds occur repeatedly contact your service representative Indicator Page x and P p 48 When x and P light up x B and A p 50 When x B and A light up x and B p 50 When x and B light up x and C p 52 When x and C light up x and D p 55 When x and D light up x and E p 56 When x and E light up Be careful not to cut yourself on any sharp edge...

Page 51: ...usly using the orig inals that have solid images In the case turn off the main switch and wait for a while Indicator Meaning Page M Close the front door or the right side cover p 58 When the Open Cover Unit Indica tor M Lights M and M Set the drum M and D Close the plotter cover M and E Close the master eject box Indicator Meaning Page B and A Load more paper p 37 Loading Paper into the Paper Feed...

Page 52: ...where jams occur Important When clearing misfeeds do not turn off the main switch If you do your print settings are cleared After clearing misfeeds Press the Clear Modes Recovery key to reset the error indicators C2748608_Titanium3 EN book Page 47 Wednesday November 19 2008 10 25 AM ...

Page 53: ...ht up An original misfeed occurs in the document feeder A Open the cover of the document feeder B Pull out the original gently C Close the cover of the document feeder C2748608_Titanium3 EN book Page 48 Wednesday November 19 2008 10 25 AM ...

Page 54: ... Originals smaller than 90 mm 140 mm 3 6 5 6 Originals larger than 275 mm 395 mm 10 8 15 6 Folded curled creased originals Bound stapled or clipped originals OHP transparencies Translucent paper Pasted originals Note The first 5 mm 0 2 of the leading edge cannot be printed Make sure the lead ing edge margin is at least 5 mm 0 2 a 5 mm 0 2 Remove staples or clips of originals Fan originals that hav...

Page 55: ...ut the paper When x and B light up The master or paper is wrapped around the drum or a paper misfeed occurs in side the machine A Pull out the drum unit B Remove the misfed paper Be careful not to cut yourself on any sharp edges when you reach inside the machine to remove misfed sheets of paper or masters C2748608_Titanium3 EN book Page 50 Wednesday November 19 2008 10 25 AM ...

Page 56: ... prevent paper misfeeds If the paper is curled or the originals leading edge margin is too narrow the fol lowing action is necessary When you use curled paper correct the curl as shown If you cannot correct the paper curl stack the paper with the curl face down as shown BQA023S C2748608_Titanium3 EN book Page 51 Wednesday November 19 2008 10 25 AM ...

Page 57: ...gin first or make a leading edge margin by making a copy When x and C light up A paper misfeed occurs in the paper delivery section R CAUTION A Remove the misfed paper Be careful not to cut yourself on any sharp edges when you reach inside the machine to remove misfed sheets of paper or masters GRLEAD0E C2748608_Titanium3 EN book Page 52 Wednesday November 19 2008 10 25 AM ...

Page 58: ...s in position and put the lever back in place Note If you followed step B or C close the front door To prevent paper misfeeds If the paper is curled or the original s leading edge margin is too narrow the fol lowing action is necessary When you use curled paper correct the curl as shown TSLH02BE BQA023S C2748608_Titanium3 EN book Page 53 Wednesday November 19 2008 10 25 AM ...

Page 59: ... as shown When the leading edge margin of the original is less than 5 mm 0 2 or there is a solid image on the leading edge insert the original with the widest mar gin first or make a leading edge margin by making a copy GRLEAD0E C2748608_Titanium3 EN book Page 54 Wednesday November 19 2008 10 25 AM ...

Page 60: ...the plotter cover and then remove the misfed master C If you could not remove the misfed master in steps B and C take out the drum and remove the misfed master from the inside D Close the right side cover TSLH02EE C2748608_Titanium3 EN book Page 55 Wednesday November 19 2008 10 25 AM ...

Page 61: ...rs in the master eject section A Pull out the master eject box B Remove the misfed master Note Be careful not to stain your hands with ink when you touch used mas ters C Return the master eject box to its original position Note Set the drum unit and close the front door C2748608_Titanium3 EN book Page 56 Wednesday November 19 2008 10 25 AM ...

Page 62: ...pull out the unit Reference For how to remove the drum unit see p 33 Changing the Color Drum Unit B Remove the master from the drum C Re insert the drum unit until the drum unit locks in position and put the lever back in place 1 2 2 TSLH031E C2748608_Titanium3 EN book Page 57 Wednesday November 19 2008 10 25 AM ...

Page 63: ...door units are closed The machine indicator shows the place where the door units are not closed Right Side Cover Close the right side cover firmly until it locks into position Front Door Close the front door completely BQA014S C2748608_Titanium3 EN book Page 58 Wednesday November 19 2008 10 25 AM ...

Page 64: ...When the Open Cover Unit Indicator M Lights 59 4 Drum Unit Set the drum unit completely until it locks in position C2748608_Titanium3 EN book Page 59 Wednesday November 19 2008 10 25 AM ...

Page 65: ... to set the master eject box A Take out the master eject box and remove the used masters Note Spread an old newspaper then turn the master eject box upside down on it to remove the used masters Then throw away the masters B Push the master eject box back in until it clicks into position C2748608_Titanium3 EN book Page 60 Wednesday November 19 2008 10 25 AM ...

Page 66: ...rwise you might get dirty background prints When you use postcards and the like the background might be dirty because postcards do not absorb ink well You might get prints with dirty background when printing at low speed and under high temperature A Turn off the main switch GRDIRT0E C2748608_Titanium3 EN book Page 61 Wednesday November 19 2008 10 25 AM ...

Page 67: ...Changing the Color Drum Unit for the details C Clean the pressure roller with a clean cloth D With a clean cloth remove any ink that has accumulated on the trailing edge of the drum unit TSLH02CE C2748608_Titanium3 EN book Page 62 Wednesday November 19 2008 10 25 AM ...

Page 68: ...rints even if you clean the above contact your service representative If there is no margin or if there is a solid image area near the leading edge of the original make a margin of at least 5 mm 0 2 at the leading edge Other wise the paper exit pawl might become dirty and cause black lines on prints Check the document feeder and clean it if dirty See p 72 Document Feeder GRBLAC1E C2748608_Titanium...

Page 69: ...r lightly Put back the lock levers When you get white or incomplete prints even when you have checked the above perform the following procedure A Pull out the drum unit Reference See p 33 Changing the Color Drum Unit for the details GRWHIT0E C2748608_Titanium3 EN book Page 64 Wednesday November 19 2008 10 25 AM ...

Page 70: ...er from the drum C Remove paper that is stuck to the drum D Insert the drum unit until it locks in position then lower the drum unit lock lever 1 2 2 TSLH031E TSLH02BE C2748608_Titanium3 EN book Page 65 Wednesday November 19 2008 10 25 AM ...

Page 71: ...Troubleshooting 66 4 E Close the front door BQA014S C2748608_Titanium3 EN book Page 66 Wednesday November 19 2008 10 25 AM ...

Page 72: ...er parts with alcohol wipe them with a dry cloth afterwards Always turn the machine off when you have finished printing for the day If the machine must be transported by vehicle please contact your service representative Always make trial prints to check the image position because the image posi tion of the trial print might not correspond with that of the original If image registration is not con...

Page 73: ...n with waterless hand cleaners followed by washing with soap and water Also be careful not to get any ink on your clothing while emptying the master eject box or while loading a new ink cartridge The image density varies according to the printing speed and the room tem perature To achieve the desired image density adjust the printing speed or increase the room temperature When you make a lot of pr...

Page 74: ...ginals If there is no margin or if there is a solid image area near the leading edge of the original make at least a 5 mm 0 2 margin at the leading edge otherwise the paper might wrap around the drum or the paper exit pawl might become dirty and cause black lines on prints If you use originals that have bold letters or solid images at the leading edges you might get prints with dirty edges In this...

Page 75: ...x Locations directly exposed to cool air from an air conditioner or heated air from a heater Sudden temperature changes might cause condensation with in the machine Places where the machine might be subjected to frequent strong vibration Dusty areas Areas with corrosive gases Keep the machine away from humidity and dust Otherwise a fire or an elec tric shock might occur Do not place the machine on...

Page 76: ...ever use an ex tension cord Only connect the machine to the power source describe in the manual Do not damage break or make any modifications to the power cord Do not place heavy objects on it Do not pull it hard nor bend it more than necessary These actions could cause an electric shock or fire Unplug the power cord from the wall outlet before you move the machine While moving the machine you sho...

Page 77: ...ng a damp cloth and then wipe with a dry cloth Note If you do not clean the document feeder marks on the feeder will be printed Paper Feed Roller paper feed tray A Wipe off the paper dust on the pa per feed roller with a damp cloth then wipe it with a dry cloth Note If you do not clean the paper feed roller paper misfeeds tend to oc cur C2748608_Titanium3 EN book Page 72 Wednesday November 19 2008...

Page 78: ...s can be used together means that these modes can be used together means that these modes cannot be used together 1 2 3 4 5 6 1 Reduce Enlarge 2 Auto Cycle 3 Combine 4 Type of Original 5 Image Density 6 On Line C2748608_Titanium3 EN book Page 73 Wednesday November 19 2008 10 25 AM ...

Page 79: ...Remarks 74 5 C2748608_Titanium3 EN book Page 74 Wednesday November 19 2008 10 25 AM ...

Page 80: ...300 300 dpi Image Mode Photo mode Letter mode Letter Photo mode Image Density Lighter Normal Darker Tint Reduction Ratios Inch version 93 77 74 65 Metric version 93 87 82 71 Enlargement Ratios Inch version 155 129 121 Metric version 141 122 115 Printing Area LG drum 210 mm 355 mm 8 2 14 0 B4 drum 250 mm 355 mm 9 8 14 0 C2748608_Titanium3 EN book Page 75 Wednesday November 19 2008 10 25 AM ...

Page 81: ... system black red blue green brown yellow pur ple navy maroon orange and teal Image Position Adjustment Vertical More than 10 mm 0 39 Side 10 mm 0 39 for either side Paper Feed Tray Capacity 500 sheets 80 g m2 20 lb Paper Delivery Tray Capacity 500 sheets 80 g m2 20 lb Master Eject Box Capacity 30 masters Dimensions W D H 1 With both the paper feed tray and the paper delivery tray detached Weight ...

Page 82: ...he inside front cover of this manual Power Consumption Optional Equipment Color Drum B4 drum LG drum Printing Speed Noise Emission Stand by 32 dB A During printing 60 cpm 77 dB A 90 cpm 80 dB A Printing Speed Noise Emission Stand by 23 dB A During printing 60 cpm 64 dB A 90 cpm 68 dB A Master Making Less than 0 175 kW Printing Less than 0 175 kW C2748608_Titanium3 EN book Page 77 Wednesday Novembe...

Page 83: ...made per roll Ink Black 500ml pack 5 packs case Environmental conditions 5 to 40 C 10 to 95 RH Ink Red 600ml pack 5 packs case Ink Blue 600ml pack 5 packs case Ink Green 600ml pack 5 packs case Ink Brown 600ml pack 5 packs case Ink Yellow 600ml pack 5 packs case Ink Purple 600ml pack 5 packs case Ink Navy 600ml pack 5 packs case Ink Maroon 600ml pack 5 packs case Ink Orange 600ml pack 5 packs case...

Page 84: ...nt 24 Enter key 9 Environments to avoid 70 Error indicators 10 E XX 46 F Feed roller pressure lever 7 Front door 7 I Image Density key 9 21 Image Position key 19 Image Position keys 9 Indicators 10 Ink Add ink indicator j 39 Ink holder 8 Ink holder lock lever 8 K Keys 9 L Loading Paper 14 Loading Paper into the Paper Feed Tray 37 M Machine Exterior 7 Machine indicator Misfeed 47 Machine indicators...

Page 85: ...ing Preparations 14 Print Start key 9 Proof key 9 R Reduce Enlarge key 9 25 Reduction 24 Replenishing Paper 37 Right side cover 7 S Safety Information 1 Separation pressure lever 7 Shifting the Image Position Forward or Backward 19 Shifting the print image to the left 20 Shifting the print image to the right 20 Speed indicators 10 Speed key 9 22 Standard Printing 16 Stop the Machine 23 supply exch...

Page 86: ...81 MEMO C2748608_Titanium3 EN book Page 81 Wednesday November 19 2008 10 25 AM ...

Page 87: ...82 EN USA C274 8608 MEMO C2748608_Titanium3 EN book Page 82 Wednesday November 19 2008 10 25 AM ...

Page 88: ... Operating Instructions Operating Instructions Read this manual carefully before you use this machine and keep it handy for future reference For safe and correct use be sure to read Safety Information before using the machine Operation Optional Functions Replenishing Supplies Troubleshooting Remarks Specifications 1 2 3 4 5 6 Type for DX 2330 LDD745 Printed in China EN USA C274 8608 ...

Reviews: