background image

b) Check for and tighten any loose parts;
c) Have any damaged parts replaced or repaired with parts having equivalent specifications.

7- Do not allow processed material to build up in the discharge zone; this may prevent proper
discharge and can result in kickback of material through the feed intake opening.
8- If the machine becomes clogged, shut off the motor and unplug the connection cable (to
disconnect the electric unit from the mains power supply) before clearing any debris. 
Keep the motor (ventilation slots) clear of debris and other accumulations to prevent damage to the
motor or possible fire.
9- Keep all guards and deflectors in place and in good working condition.
10- Do not transport this machine while the motor is running. Do not tilt the machine while the
motor is running
11- Shut off the motor and unplug the connection cable (to disconnect the electric unit from the
mains power supply) whenever you leave the work area.
12- Only operate the machine in an open space (e.g. not close to a wall or to any other fixed object)
and on a firm, level surface.
13- Do not operate the machine on a paved or gravel surface where ejected material could cause
injuries.
14- Replace damaged or unreadable labels.

5.3- Operation
5.3.1- Positioning and moving 

- The shredder must be placed on solid, smooth and even ground during operation.
- Caution! Do not move the machine before you have disconnected it from the mains supply.

5.3.2- Feeding

Wear protective gloves.
Feed the material to be chopped into the right side of the feeding tunnel 
The material is automatically pulled in by the chopping knife.
Caution! Longer material standing out from the machine could lash out when being pulled in by the
chopping knife! Keep a safety distance!
Warning! Always use the pusher if you try to push the material into the feeding tunnel. 
Do not use your hands directly! Keep the pusher well after use.
Only insert as much material as will not block up the feeding tunnel.
Chop garden waste that has been stored for some days and is wilted and damp alternately with
branches. This will prevent the chopping knife from getting blocked up.
Do not fill into the shredder any soft material such as kitchen waste instead of compositing it.
Widely branched material with leaves must be completely chopped before any new material is fed
in.
Take care that the chopped material can freely fall from the discharge chute – danger of backing up!
The ventilation slots must not be covered by the waste bag (not included) or the chopped material.

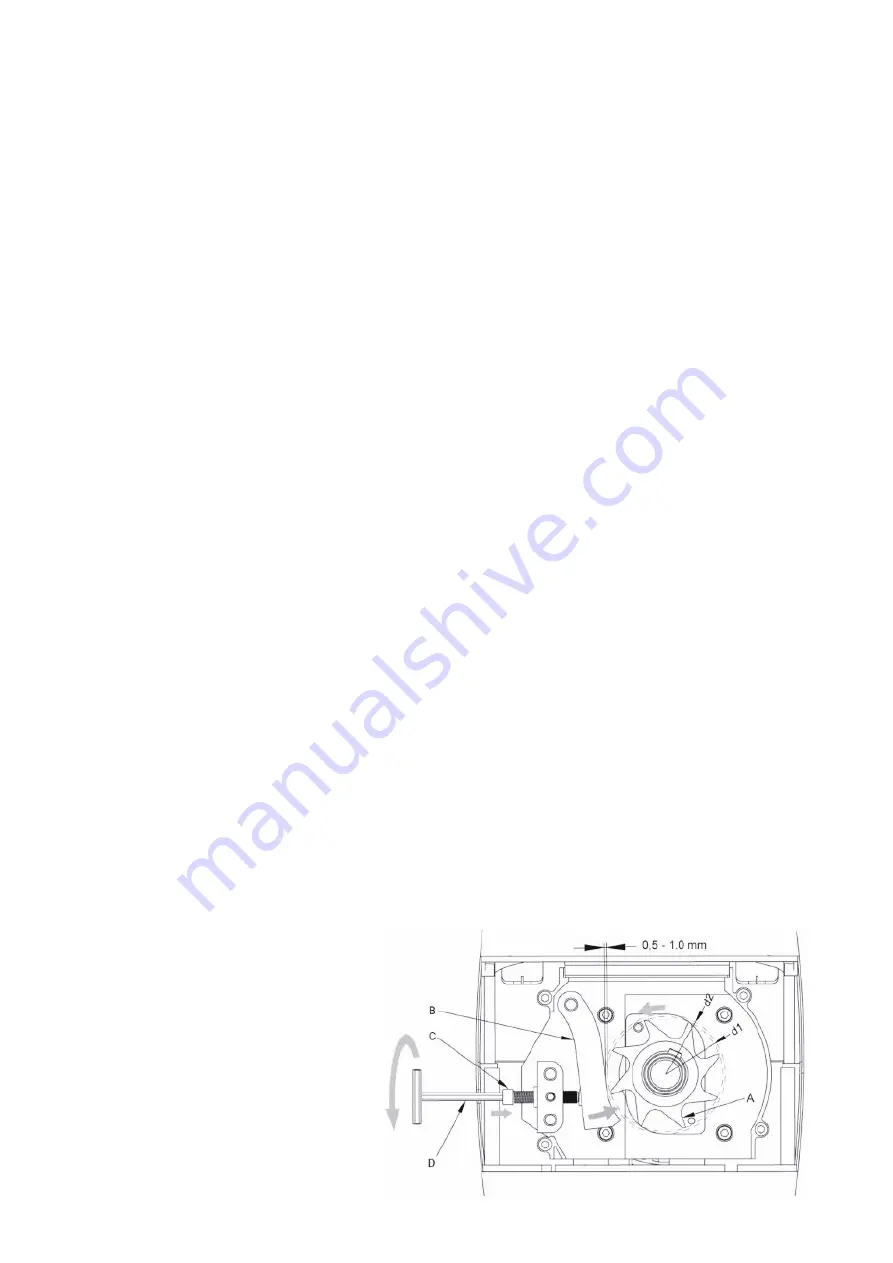
5.3.3- Adjusting the counter knife (Fig.4)

Counter knife B can be set from 0 to
0.50 mm away from chopping knife
A. 
This distance should be kept to
achieve effective operation.
Soft materials or wet woody branches
may be wrapped around the chopping
knife or not cut off clean, while a
worn counter knife may cause the
same problem after several operations.
There is an adjusting device (6) on the
side of the lower shell. 
To adjust the distance, turn the screw
C (in Fig.4) clockwise.

Fig.4

Summary of Contents for ESS2504

Page 1: ...Lire et assimiler ce manuel avant d assembler ou d utiliser ce produit Une utilisation incorrecte du produit pourrait causer de graves blessures et des dommages Conserver ce manuel pour pouvoir le con...

Page 2: ...TENZA Leggere attentamente questo manuale di istruzioni prima di utilizzare l attrezzo Il funzionamento non corretto pu causare lesioni e o danni Conservare il presente manuale per ulteriori consultaz...

Page 3: ...n Utilisation Ce broyeur n est pas destin un usage professionnel et ou industriel Ne pas utiliser pour des applications non mentionn es dans ce manuel d instructions Ne pas utiliser d autres lames et...

Page 4: ...re corps et tout sp cialement les mains et les pieds loign es des pi ces en mouvements Ne pas tenter de nettoyer des d bris lorsque la lame tourne Tenir les personnes sp cialement les enfants et anima...

Page 5: ...anger l outil en tat de repos Lorsqu il n est pas utilis il est recommand de ranger l outil dans des locaux secs de le placer hors de port e des enfants soit en hauteur soit sous clef 4 Utiliser l out...

Page 6: ...ges 13 Attention Cet appareil doit tre reli la terre Avant d ins rer la fiche dans la prise de courant assurez vous que les caract ristiques de votre alimentation lectrique correspondent celles indiqu...

Page 7: ...tes ayant re u des instructions ad quates doivent utiliser ce produit Cet appareil n est pas pr vu pour tre utilis par des personnes y compris les enfants dont les capacit s physiques sensorielles ou...

Page 8: ...n plein jour ou sous une lumi re artificielle suffisante 11 Assurez vous que la lame de coupe soit totalement arr t e avant de pencher le broyeur pour le d placer de transporter le broyeur 12 Ne mette...

Page 9: ...e bloque de sorte que le moteur ne peut pas continuer tourner appuyez d abord sur le bouton rouge 3 de l interrupteur Marche Arr t pour arr ter le moteur Positionner l interrupteur d inversion 4 sur l...

Page 10: ...arr tez le moteur et laissez s arr ter la lame de coupe D branchez le c ble d alimentation et prendre les mesures suivantes a V rifier s il y a d ventuels dommages b Contr ler et serrer les pi ces d t...

Page 11: ...doit tre maintenue pour assurer un fonctionnement efficace Les mat riaux mous ou les branches humides peuvent s enroul s autour de la lame ou risque de ne pas tre coup s net tandis qu un contre coutea...

Page 12: ...ces en mouvement ex lame de coupe sont compl tement arr ter Laissez refroidir l outil avant de proc der toute inspection r glages etc e Lors de l entretien de la lame de coupe restez vigilant car m m...

Page 13: ...e le ranger Veiller ce que la lame de coupe et le contre couteau soient prot g s contre la corrosion par ex traiter avec une huile cologique la fin de la saison ou si l appareil ne va pas tre utilis p...

Page 14: ...ose of composting i e household use in outdoors or covered area within the characteristic limits of the tool 1 3 Not Intended Use The shredder is not intended for professional and or industrial use Do...

Page 15: ...e is sharp Keep all parts of your body and especially the hands and feet away from the moving parts Do not attempt to clean debris when the blade rotates Keep persons esp children and animals away fro...

Page 16: ...place out of reach of children 4 Use the right tool Do not force small tools to do the job of a heavy duty tool Do not use tool for purposes not intended or for unsuitable purposes Only use the machin...

Page 17: ...ive liquids etc Warning Do not use an extension cable that shows any signs of damage Have a complete new cable fit do not undertake yourself any permanent or temporary repairs Have the cable replaced...

Page 18: ...ing protection is not worn Risk of injury if you touch the blade while in use Exposure to electricity by using damaged or non compliant power cable Risk of body injury or property damage from flying d...

Page 19: ...Fig 2 4 4 Power supply Always use the correct supply voltage The power supply voltage must match the information quoted on your shredder s identification plate Shredders with a rating of 230V can only...

Page 20: ...dder again 4 8 Disassembling For certain purposes e g storage after use etc you can disassemble the shredder in the reverse order as described under Assembly V OPERATION WARNING Ensure that other pers...

Page 21: ...t from the mains supply 5 3 2 Feeding Wear protective gloves Feed the material to be chopped into the right side of the feeding tunnel The material is automatically pulled in by the chopping knife Cau...

Page 22: ...signs of vibration Heavy vibration is caused by damaged or worn out knives Change the knives if necessary VI MAINTENANCE AND STORAGE Before any intervention on the product make sure that the shredder...

Page 23: ...lean tool before storage Inspect tool for any damage worn out part or ageing replace or repair part as necessary Do not place or store any object on top of the product Do not store any object above th...

Page 24: ...sile 1 3 Non Uso Questa macchina non concepita per un uso professionale e o industriale Non usarla per le applicazioni che non sono inserite in questo manuale Non usare lame e o accessori che non sono...

Page 25: ...nte il lavoro Tenere tutte le parti del vostro corpo e soprattutto le mani e piedi al di fuori della zona di taglio Non tentare di pulire i detriti quando la lama in rotazione Tenere le persone es bam...

Page 26: ...i per garantire che non giochino con l apparecchio 3 Riporre gli utensili in un luogo sicuro Gli utensili non utilizzati devono essere conservati in una stanza asciutta e chiusa a chiave non accessibi...

Page 27: ...icati nelle istruzioni sul funzionamento o consigliati dal produttore dell utensile 13 Attenzione Questo apparecchio deve essere collegato a terra Prima di inserire la scheda nella presa di corrente a...

Page 28: ...l uso appropriato dell apparecchio 2 L utilizzo di questo prodotto vietato ai bambini ed adolescenti 3 L apparecchio pu essere utilizzato esclusivamente da persone adulte ben addestrate Questo prodot...

Page 29: ...artificiale sufficiente 11 Assicurarsi che la lama non giri pi quando Bisogna inclinare il biotrituratore per spostarlo Bisogna trasportare il biotrituratore 12 Non mettete le mani i piedi od ogni par...

Page 30: ...su questa posizione la lama di taglio va a trascinare il materiale e A stritolarlo 2 posizione 0 Fig 3 Quando la lama di taglio si blocca cos che il motore non pu continuare a girare premete il sul b...

Page 31: ...Controllare e stringere i pezzi di ricambio c Gli elementi danneggiati devono essere sostituiti o riparati con pezzi di ricambio che presentano le stesse specificazioni 7 Non lasciare i detriti accum...

Page 32: ...care lo stesso problema dopo alcune operazioni C una molla di regolazione 6 sul lato della struttura Per regolare la distanza girate la vite C Fig 4 nel senso degli aghi di un orologio Fig 4 Un mezzo...

Page 33: ...he l acqua non penetri all interno Non bagnare mai l attrezzo b Attenzione Questa operazione richiede la vicinanza alla lama Per la vostra sicurezza si raccomanda di indossare guanti protettivi c Atte...

Page 34: ...odotto ad un centro per il trattamento dei rifiuti o ad un centro di colletta degli scarti delle attrezzature elettriche ed elettroniche o informatevi presso il vostro comune Effettuare lo smaltimento...

Reviews: