


a) Choosing the mounting position
Once configured, the product should now be placed in a suitable mounting position.
When configured in AP mode, the product can be placed almost anywhere as it is connected to
the router by cable. However, make sure you keep a certain distance between the product and
your Wi-Fi router to preclude overlapping Wi-Fi signals.
In Repeater mode the product should be positioned so that the Wi-Fi signal is at least 2 bars.
Try out different locations and choose the one that ensures the best connection to the Wi-Fi
router.
In Router mode make sure the mounting position provides the best possible Wi-Fi coverage.
b) Mounting the bracket
• Choose a suitable installation location. The bracket can
be mounted either on the wall or on a post.
• When mounting the product on a post, always use the in-
cluded cable ties to secure the bracket. The small round-
ing on the bracket must fit on the mast. The four slots are
intended for the cable ties as shown in the figure.
• When mounting the product on the wall, choose a stable
surface. Depending on the surface, suitable screws and
dowels must be used.
• If it is a wooden wall, you can drive screws in directly
without using dowels. It is recommended that you pre-
drill the holes anyway, if necessary.
• When mounting, align the bracket so that the small re-
cesses in the outer mounting holes face upwards. The
bracket can also be suspended on the screws.
When drilling mounting holes or fastening into place, ensure that no existing electri-
cal cables, gas or water pipes are damaged.
c) Connecting and mounting the device
•
Before you fit the device onto the mounting bracket, make sure you have connected all the
cables, closed the housing and screwed the antennas.
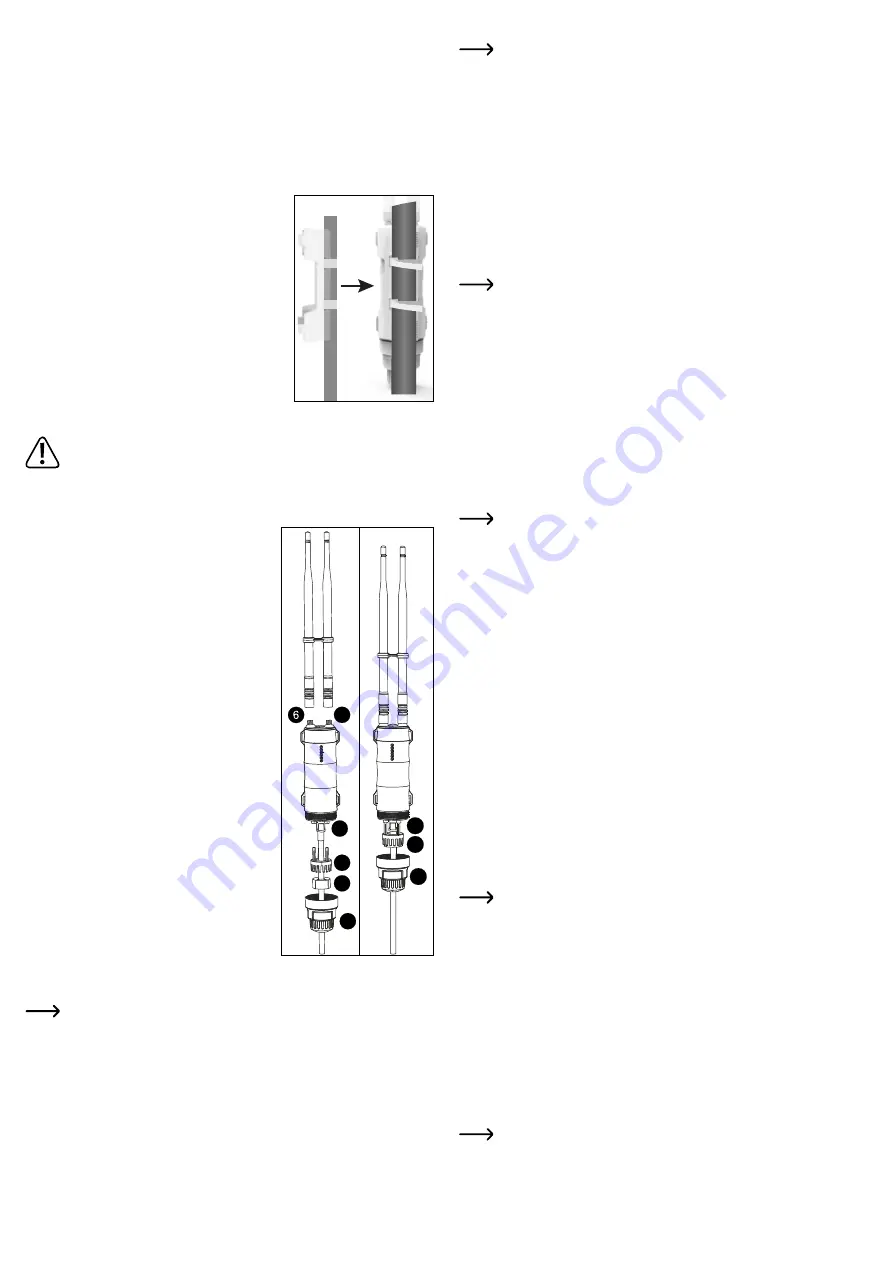
1
Guide the cables through the large screw cap.
2
Guide the cables through the rubber seal (it can
be opened to the side). If two or more cables are
used, first remove the rubber plug from the second
or third hole.
3
Guide the cables through the rubber seal holder.
4
Connect the RJ45 cable (min. CAT5e) to the “
WAN/
LAN/POE
” RJ45 port (
H
).
The device can be grounded by connecting the
grounding cable to the “
GND
” connection (
G
).
5
Attach the 2.4 GHz antenna to the respective
connection (
B
). Before you screw on the antenna,
be sure to put a small white rubber seal onto the
connection.
6
The 5 GHz antennas (
A
) should be attached in the
same way as the 2.4 GHz antennas.
7
Insert the rubber seal holder into the dedicated 3
holes.
8
Insert the rubber seal into the holder.
9
Screw the cover onto the housing.
• Once all the necessary connections are done, you
can place the AP on the bracket and press it in until
it clicks into place.
• Connect the other end of RJ45 cable connected to
the “
WAN/LAN/POE
” connection (
H
) to the “
POE
”
connection of the PoE adapter.
• Connect the output plug of the power adapter to the
“
DC24V
” socket of the PoE adapter. Plug the power adapter into a mains socket.
• Use the push switch to turn on the product.
As a rule, only the network cable can be found in the place of installation of an ac-
cess point. The PoE adapter is usually connected near the router or network switch.
1
5
4
3
2
7
8
9
Preparing for configuration
The AP can be configured wirelessly via Wi-Fi using a PC (computer, laptop, MAC)
or tablet/smartphone.
a) General Information
• Wi-Fi name 2.4 GHz: “
Wireless-N
” (no password, unencrypted)
• IP address:
192.168.10.1
• Web interface:
http://ap.setup/
Login password: “
admin
” (without quotation marks)
b) Establishing connection to AP
•
Before configuring wirelessly via Wi-Fi, make sure you connect your PC or tablet to Wi-Fi
of the AP.
c) Registering with the web interface
• Once connected, open your web browser.
• Type “
http://ap.setup/
” (without quotation marks) in the address bar and confirm.
In some cases your PC can recognise the network connection of the AP as “Public”.
There can also be no access to the web interface. If there is no access, open the
network settings of the respective network adapter and change the network profile
from “Public” to “Private”. The same can also apply after configuration during recon
-
nection.
• Enter the login password (“
admin
” by default).
•
If necessary, select your language and confirm the login.
• You should now see the main page of the web interface.
Basic configuration (all modes)
When calling up the web interface for the first time, change the basic settings first.
• Click the Wi-Fi icon below to open Wi-Fi settings.
• Click on the middle button to open advanced settings.
• Select your country or region from the list and click on it. Click on the blue button to save.
For Germany or Europe, select “
CE/ETSI (EU)
”. France is listed separately.
• Next click on the gear icon below and then on the second menu item from the top.
• Select the correct time zone. Make sure you select “
(GMT+01:00)...
” for Europe.
• Click on the blue button to save.
• Click on the arrow at the top left to go back and then click on the third menu item.
• First enter the old login password for the web interface (“
admin
” by default) and then enter
a new login password twice.
Make sure your password is at least 8 characters long, consisting of numbers and upper and
lower case letters.
• When you are done, save the settings by clicking on the blue button.
The next time you call up the web interface, you need to enter the new saved password
instead of the default one.
Configuring modes
To start the mode configuration wizard, tap the second button from the left in the blue bar at the
bottom. Basically, the “
AP
” mode is selected by default.
To select a different mode and proceed with the configuration, simply click on the desired mode.
a)
Configuring as access point “AP”
• Click on “
AP
”.
• Choose a name for the 2.4 GHz Wi-Fi network. The name of this Wi-Fi network name can be
the name of your Wi-Fi router.
•
Then select the encryption “WPA2-PSK” and enter a Wi-Fi password in the field below.
The password must be at least 8 characters long. We recommend that you use a
password with more characters, consisting of numbers and upper and lower case
letters.
The Wi-Fi connection should not be left unencrypted (open).
• Click on the blue button to save the setting. The AP will restart. The process can take up to
2 minutes.
•
Reconnect your device to the AP‘s Wi-Fi network and enter the previously set password.
• Once connected, click on the blue button to refresh the display.
•
For further configurations, log in to the web interface.
• Or disconnect the AP from the mains supply.
• Connect the RJ45 connection “
LAN DATA IN
” on the PoE adapter with a 1 to 1 connected
network cable to a free RJ45 connection on your router or network switch.
•
Switch on the voltage supply again. When the AP has started, the configuration is almost
complete.
As soon as the AP is connected to your router, the integrated DHCP server is deac-
tivated. The devices connected via the AP‘s Wi-Fi receive their IP address from your
Wi-Fi router.
The AP also receives an IP address from your Wi-Fi router. The AP can also be
configured via the IP address. To find the IP address, check the device list on your
router.