10
Chapter 6
Once increased headway is gathered in reverse gear, the
force of the lower hull moving through the water is enough
to track straight. When backing, the stern will lead as it
heads to port or starboard, before the vessel actually starts
to turn. When the control is put in forward gear position,
the stern is pushed to starboard; the amount of push
depends on the hull design and the amount of throttle
advance.
STOPPING
Remember that your boat
does not have any brakes. It
uses reverse thrust from the
propeller to stop. If the vessel
has headway, with the helm
and propellers in reverse the
propeller thrust is directed
backwards, past the lower
gearcase of the stern drive.
Depending on how far the
throttle is advanced, the discharged thrust may not be
strong enough to reverse the water flowing by the gearcase.
As the power is increased, the propeller thrust becomes
strong enough to stop the flow of water past the lower
unit, and, as the throttle is advanced it reverses its flow
more completely.
When water is flowing past the gearcase, steering torque
is increased, but when the thrust stops the water flow, the
boat will not respond to the helm. This is a short lived
event and is overcome quickly when the water again flows
past the gearcase. Furthermore, added to the energy of
the water hitting the lower gearcase, the propeller thrust
is directed by turning the stern drive, which can add to the
steering torque.
The props tend to throw the stern to port. This is why
experienced skippers undertake a portside landing when
wind and current conditions permit. They allow the prop
to move the stern to port toward the dock.
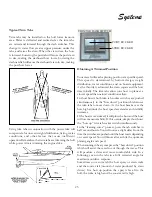
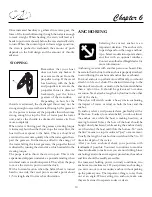
With a forward motion when the helm wheel is turned
hard to one side, the vessel pivots around a point about
1/3 its length abaft to stern. See illustration.
Selecting the correct anchor is an
important decision. The anchor style
in part depends on the usage and boat
type. Select models incorporate chain,
and line with an optional windlass.
Contact an authorized Regal dealer for
more information.
Anchoring is easier with another person on board. First
be certain that the line for the anchor is properly attached,
to avoid losing the anchor and anchor line overboard.
For most anchors to perform more efficiently, you should
attach 3 to 6 feet of chain. The chain will stand up to the
abrasion of sand, rock, or mud on the bottom much better
than a nylon line. It should be galvanized to reduce
corrosion. Next, attach a length of nylon line to the other
end of the chain.
The nylon will stretch under a heavy strain cushioning
the impact of waves or wind on both the boat and the
anchor.
To anchor, select a well protected area, preferably with a
flat bottom. Contrary to modern belief, you do not throw
the anchor over while the boat is making headway, or
moving forward. In fact, the bow of the boat should be
bought slowly backward, while easing the anchor slowly
over the side of the boat until it hits the bottom. To “snub
the line” means to stop its outward “pay” or movement.
Usually the length of anchor line used should be 5 to 10
times the depth of the water.
After you have anchored, check your position with
landmarks if possible. You need to continue to monitor
these landmarks to make sure you are not drifting. Since
anchoring can also be an emergency procedure, the anchor
and line should be readily accessible.
For increased holding power in windy conditions, two
anchors are sometimes set. If your primary anchor drags,
you can run out your secondary anchor without picking
up the primary one. The important thing is to lay them
out at an angle. When setting two anchors, make sure
they are fastened to separate rodes or cleats.
ANCHORING
Summary of Contents for 30 EXPRESS
Page 1: ...30 EXPRESS OWNER S MANUAL...
Page 2: ...784022 OWNER S MANUAL 30 EXPRESS 12 2012...
Page 30: ...11 Safety On Board NAVIGATION LIGHT RULES...
Page 41: ...Chapter 2 22 Notes...
Page 44: ...3 Rules Of The Road NAVIGATION RULES...
Page 85: ...28 Chapter 5 Notes...
Page 105: ...4 Chapter 7...
Page 106: ...5 Equipment Operation...
Page 107: ...6 Chapter 7...
Page 108: ...7 Equipment Operation...
Page 109: ...8 Chapter 7...
Page 110: ...9 Equipment Operation...
Page 111: ...10 Chapter 7...
Page 117: ...16 Chapter 7...
Page 126: ...25 Equipment Operation ROTARY ENCODER AND MENU KEY...
Page 127: ...26 Chapter 7 USING THE ROTARY ENCODER AND MENU KEY...
Page 158: ...57 Equipment Operation BACKING A TRAILER 1 2 3 4 LAUNCHING RAMP...
Page 161: ...60 Chapter 7 Notes...
Page 195: ...34 Chapter 8 Notes...
Page 204: ...9 Troubleshooting TOILET SYSTEM DIAGNOSTIC CHART...
Page 209: ...14 Chapter 9...
Page 219: ...6 Chapter 11 Notes...
Page 221: ...2 Chapter 12...
Page 224: ...5 Technical Information 30 Express Deck Overview 30 Express Cabin Overview...
Page 225: ...Technical Information 12 6 30 EXPRESS...
Page 226: ...12 7 Technical Information 30 EXPRESS...
Page 227: ...Technical Information 12 8 30 EXPRESS...
Page 228: ...12 9 Technical Information 30 EXPRESS...
Page 229: ...Technical Information 12 10 30 EXPRESS 30 EXPRESS...
Page 230: ...12 11 Technical Information TYPICAL NEGATIVE GROUND SYSTEM...
Page 231: ...Technical Information 12 12 30 EXPRESS...
Page 232: ...12 13 Technical Information 30 EXPRESS...

